As a Clinical Research Coordinator (CRC), you will move between the Participant Matrix and the Participant Details screen to complete your data-entry tasks. This workflow guides you through the full process—from locating a participant to entering, editing, reviewing, and managing form data.
OpenClinica supports efficient data entry through:
- Auto-Save — your work is saved as you type
- Conditional Field Display — only relevant fields appear
- Automatic Checks and Calculations — ensures accuracy
- Queries — document questions or discrepancies
Before You Begin
Before entering data, ensure the following steps are complete:
1. Add a Participant
A participant must be created before any scheduling or data entry can begin.
For instructions, refer to Add Participants.
2. Schedule an Event
Data entry occurs within scheduled events.
For instructions, refer to Scheduling and Editing Events.
Your ability to schedule events depends on your access permissions.
Step 1: Locate and Select a Participant
Begin in the Participant Matrix, your primary workspace for monitoring participant progress.
Use the Participant Matrix to:
- View participant status at a glance
- Identify forms that need attention
- Navigate to participant records
- Review icons that indicate form statuses and attributes
- ℹ️ Note: For more information, refer to Status Icons.
To open a participant:
- In the Participant Matrix, find the Participant ID.
- Click the Participant ID or a form/event icon to open the Participant Details screen.
- Your available actions depend on your access permissions.
For more information, refer to The Participant Matrix.
Step 2: Navigate to the Participant Details Screen
Once a participant is selected, the Participant Details screen becomes your workspace for all form-related actions.
Use this screen to:
- Access all visit-based and common events
- Open forms for data entry
- Edit or review form data
- View form statuses and attributes
- ℹ️ Note: For more information, refer to Status Icons.
- Download uploaded files or media
For more information, refer to The Participant Details Screen.
Step 3: Open a Form and Enter Data
To begin entering data:
- Locate the form card on the Participant Details screen.
- Click the Edit (✎) icon to open the form.
- Enter data in each required field.
- If the form contains multiple pages, click Next to continue.
- Your work is automatically saved as you enter data.
When finished:
- Click Complete to finalize the form, or
- Click Close to save your progress and return later.
Step 4: Handling Item Constraints
If a field violates a constraint (for example, a date falls outside the allowed range), you can choose how to proceed.
Option 1: Correct the Data or Add a Manual Query
- Click Cancel to return to the field.
- Update the value or create a manual query with an explanatory message.
Option 2: Allow the System to Create a Query
Click Proceed to allow OpenClinica to generate a system query using the default message defined in the form.
For more information, refer to Queries (CRC).
Step 5: Edit Existing Data (If Permitted)
If you need to update a form:
- Open the three-dot menu on the form card.
- Select Edit.
- Make the necessary updates.
- Enter a Reason for Change when prompted.
- Save and close the form.
ℹ️ Note: If you cannot open or edit the form, your user role may restrict access or the status may prevent editing.
Step 6: Manage Supporting Actions
While working with forms, you may need to perform additional actions.
Download Files or Media
- Forms may include uploaded files, images, or signatures.
- Click Download within the field to retrieve supporting files.
- Downloads are available in Edit, Review, and Read-Only modes.
Address Queries
Depending on the form and your permissions, you can:
- Review system-generated queries
- Create manual queries
- Respond to outstanding queries
For details, refer to Queries (CRC).
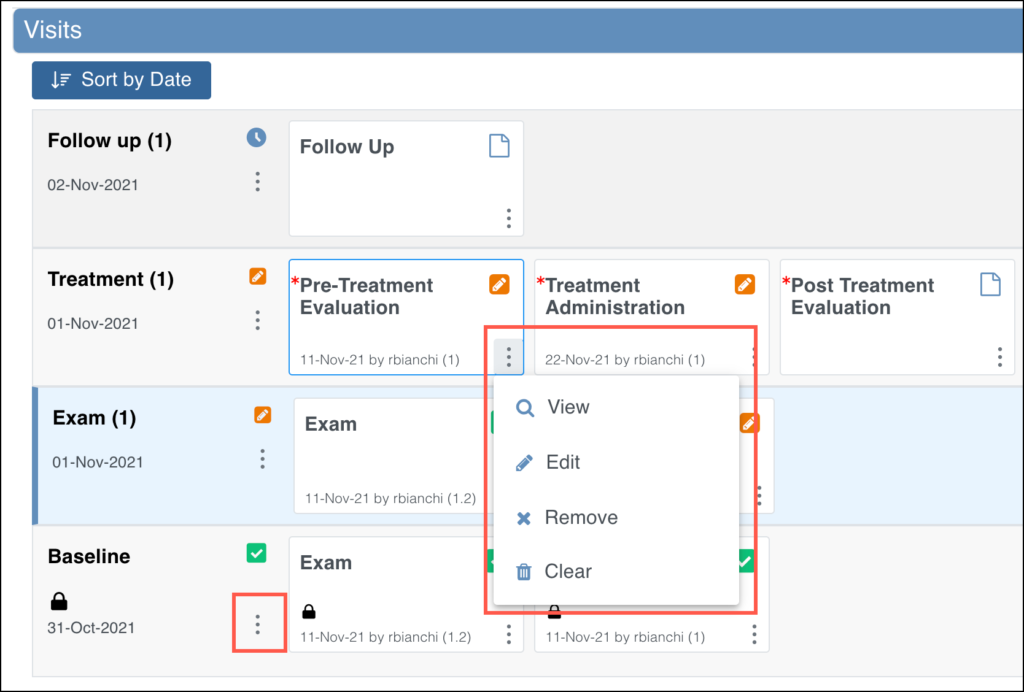
Step 7: Perform Form-Level Actions
From the form card’s three-dot menu, you may be able to perform the following (based on access permissions and form status):
View a Form
- Review the form in Read-Only mode by selecting View
- Alternatively, hover over the form card to view the default action for the form and click the form card to take the default action. The default action is based off of your role and the status of the form.
Remove a Form
Removes form data from the participant’s record. Use this action when a form was entered in error—for example, if data were entered for the wrong participant, or if a repeating or non-repeating common event form was created that is not needed for this participant.
To remove a form:
Select Remove from the three-dot menu.
Enter a Reason for Change.
Click Remove Event CRF to confirm.
ℹ️ Note: Removing a signed form invalidates the signature. If restored, the form must be signed again.
Restore a Form
Restores previously removed form data to the participant record.
- Select Restore.
- Enter a Reason for Change.
- Click Restore Event CRF.
ℹ️ Note: Restoring a signed form requires re-signing.
Clear a Form
Users with Edit access can clear form data. Use this action when data was entered in error but the same form instance still needs to be used for the participant (for example, in a non-repeating common event form or a visit form that must be completed correctly).
To clear a form:
- On the Participant Details screen, open the three dots menu and click Clear Form.
- The system performs the following actions:
- Clears all data from the form
- Closes all queries associated with the form
- Removes a signature, if present
- Sets the form status to Not Started
- Records this action in the Participant Audit Log
Print a Form
- Click Print at the top of the form.
- Select printing options.
- (Optional) Check the checkbox next to Show to include Query and Edit History on the printed Form.
- Select a Paper Size.
- Select a Paper Orientation.
ℹ️ Note: The Paper Size and Paper Orientation fields appear only for Forms with the Style of theme-grid and printing options must be set correctly in your browser for these settings to take effect.
- Click the Prepare button to show a preview.
- Click the Print button.
ℹ️ Note: If your form includes a visual analog scale item, the Background graphics browser setting must be selected in the print screen so that the scale will display properly on the printed form.