Clinical Data Managers and Programmers can leverage OpenClinica 4’s Insight module to automatically receive alerts based on data entered into OpenClinica. Insight provides powerful reporting and alerting capabilities.
Overview
In Insight, you will create a report, referred to in Insight as a Question, that identifies specific item data to be polled on a schedule. If the query returns any results, the system will automatically send an email notification. The report can be configured so that it returns no results under normal conditions, ensuring that alerts are triggered only when an issue or exception occurs.
This guide will walk you through configuring an example Serious Adverse Event (SAE) Alert in Insight with step-by-step instructions.
Configuring an Insight Question
The first step is to create an Insight report that will capture the relevant data. In this example, we want a report that lists new Serious Adverse Events in the study. You can create this using the Insight Question Builder (point-and-click interface) or by writing an SQL query (if you need more advanced logic). If you want to create a report using SQL, refer to SQL Guide for more information. If you want more information about other Question building use cases, refer to the Insight Reporting Guide.
Below are the general steps to create an Insight report using the Insight Question Builder.
Create a New Question
In the Insight interface, click on Ask a Question (or New Question).

Select Your Study’s Data Source
Select Raw Data to select the dataset (study name) and table (form) that includes the Adverse Event data. The exact name of the dataset or table will vary based on the study and form definition.

Select Fields to Include
Configure the question to retrieve any key fields needed for an SAE alert by clicking on the arrow next to the selected table. Note that many columns in this table will correspond to items in the form definition (e.g. Seriousness), and their names in Insight will be specific to your study build. For instance, include columns such as:
- Site (if applicable)
- Participant ID (subject identifier for the event)
- AE Number (if multiple AEs per participant)
ℹ️ If this value is not pulled into the form as an item, you can select Study Event Repeat Key
- Adverse Event Term (description of the event)
- Seriousness – this is the critical flag indicating an SAE
Any other AE related fields that you want to see in the report, such as start / end dates, outcome, severity, etc.

Add Timestamp Data
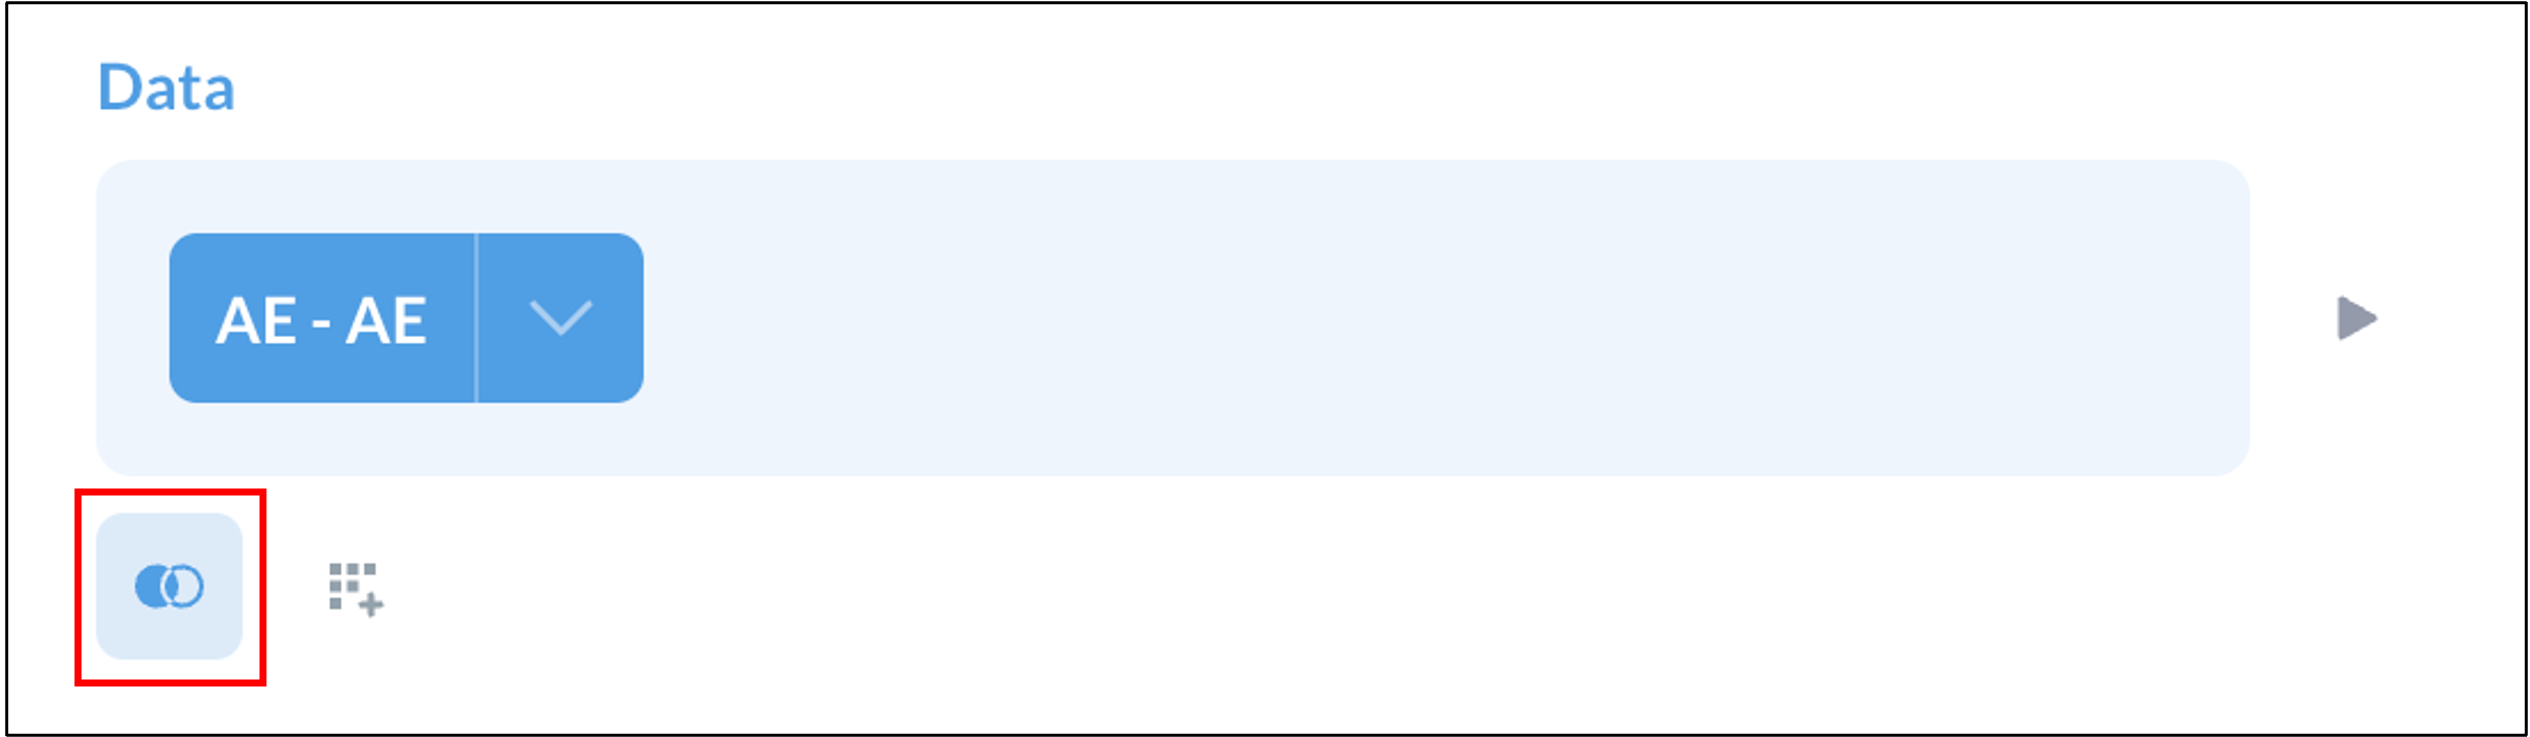
In the case of SAEs, you will want to include only events in the report that have occurred within a certain period of time. Use the Join feature to add data from the Audit Log to your report so that you can pull in the timestamp for data entry in order to identify which events are new. This will allow you to create an Alert on new SAEs rather than all historical SAEs.
- Click the Join icon
- Select Audit Log Events
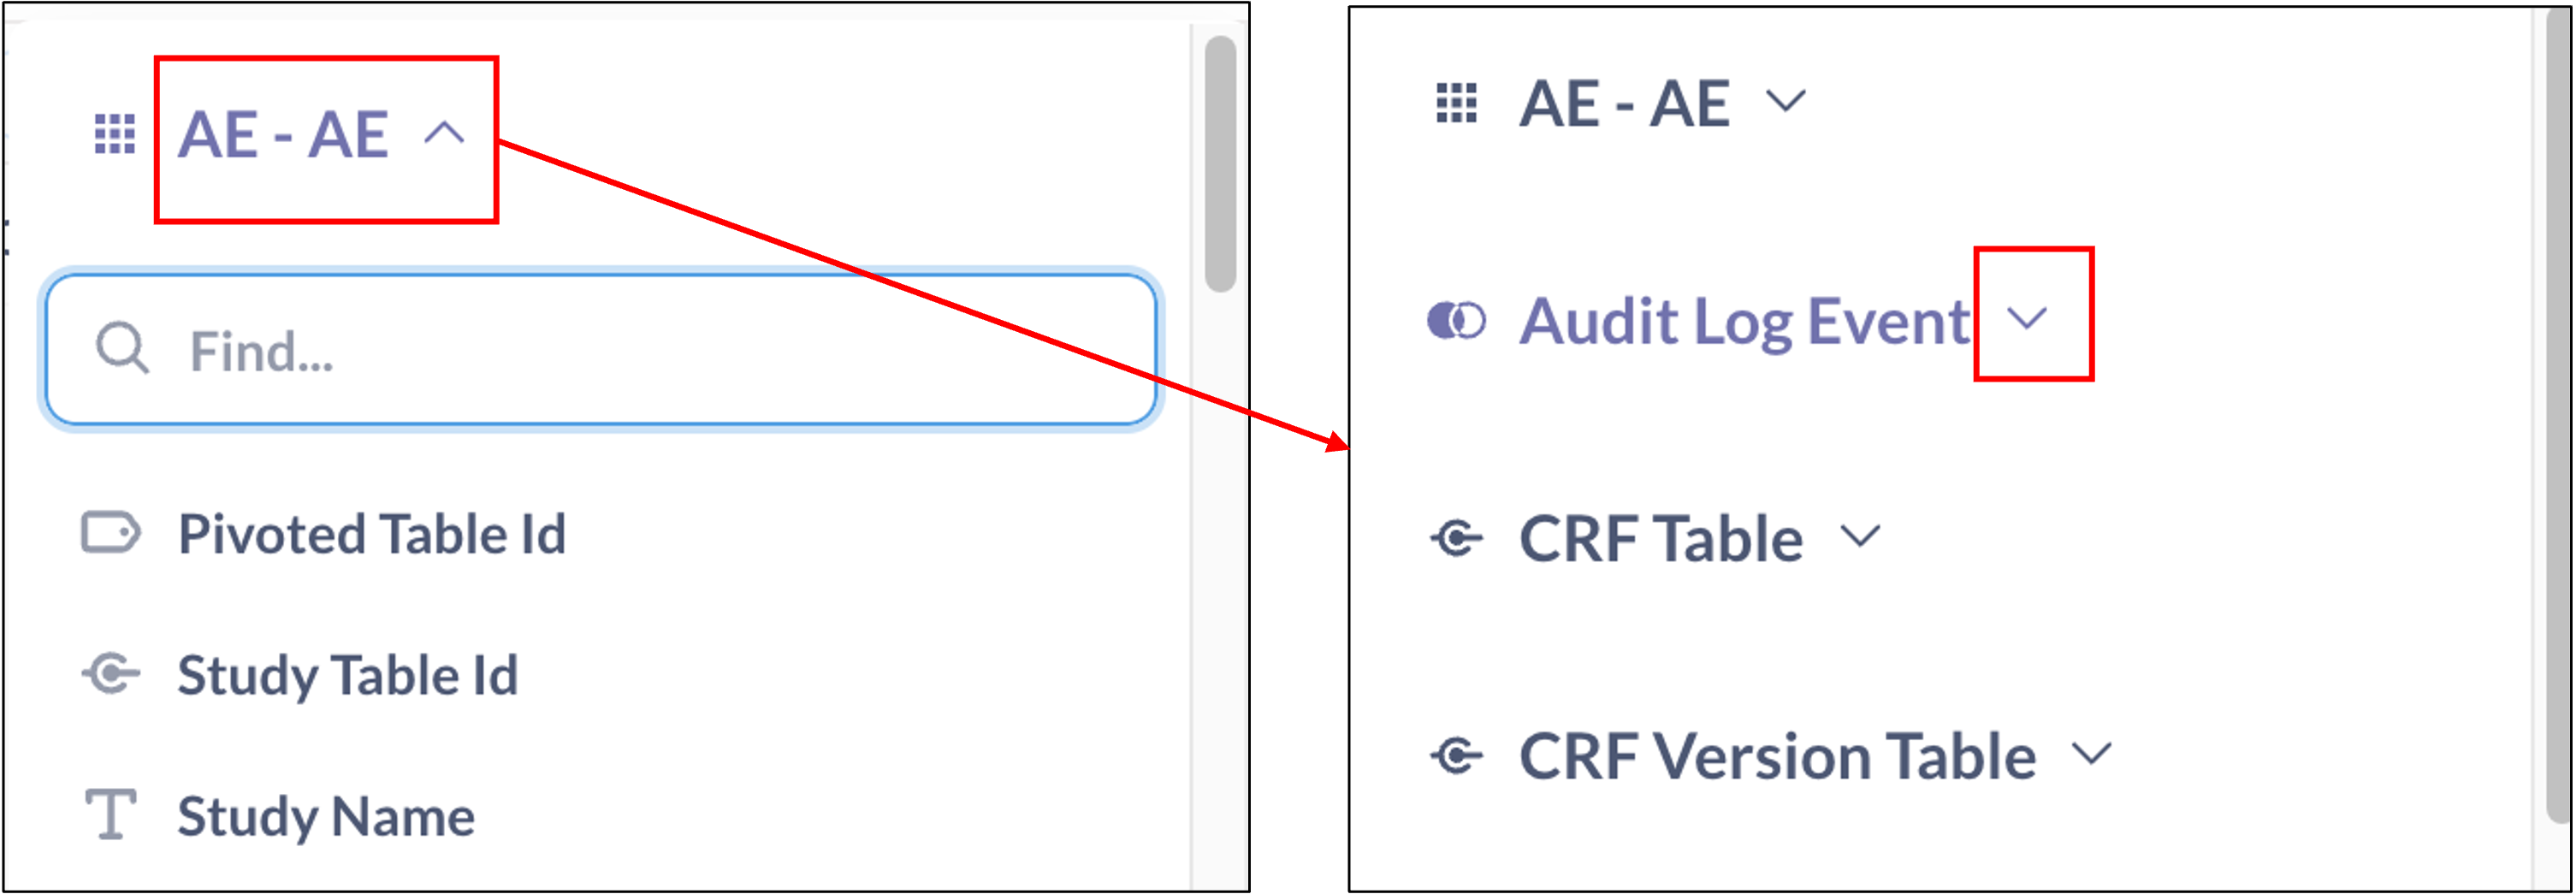
- Select Fields to include. Select any fields you need (such as the timestamp for data entry in order to identify which events are new), as well as the fields that will allow you to join the Form table and the Audit Log Events table. For instance, include fields such as:
- Audit Log Timestamp – The field you need in order to report on only AEs marked serious within the specified period of time.
- Study Event Repeat Key and Participant ID – The fields you will need in order to join the data from the two tables.

- Select the fields from the AE and Audit Log Events Tables that will be matched in order to join the two tables. Select the field from the first table in the first box, and the field from the second table in the second box. Repeat the process for any other fields that need to be matched up. In this example, the best option will be to select both Participant ID = Participant ID, and Event CRF ID = Event CRF ID.

Apply Filters
In order to avoid extraneous information being included in the report, apply filters as needed. One or more filters can be applied at the same time to achieve the specificity you require. In this section, we will walk through a typical set of filters used for SAE reports.
Report Only SAEs
In the filter section, select the item on the form that indicates whether the adverse event is serious. In the “Enter some text” box, add the applicable choice name. This ensures only SAEs will appear in the report. For example, add “yes” if the choice name is “yes” to denote that the adverse event was serious.
Report Only One Row Per SAE
Because the Audit Log Event table contains entries for every item on the form, you will need to choose one specific item to reference so that the report will have one row per adverse event record, and not a row for every field that was entered.
- Collapse the adverse event table, and expand the Audit Log Event table.
- Select Audit Entity Key for the AE Seriousness item. This filter will limit the reported results to just one line entry per SAE, based on when the adverse event was indicated to be serious.
- Select Audit Entity Key in Audit Log Events is

- Type in Audit Entity Key in the text box.
Include a Time Filter
To ensure complete peace of mind and timely awareness of any serious adverse events (SAEs), we recommend setting up both hourly and daily Insight reports. While Insight and its notification system are designed to be reliable, configuring reports at multiple intervals provides an added layer of assurance. This approach allows your team to stay closely informed and confidently monitor for SAEs as part of your ongoing oversight.
- Hourly Report
- Report on only SAEs that have been added or updated in the last hour. To set up this filter:
- Select the Audit Log Events table
- Select the Audit Timestamp field.
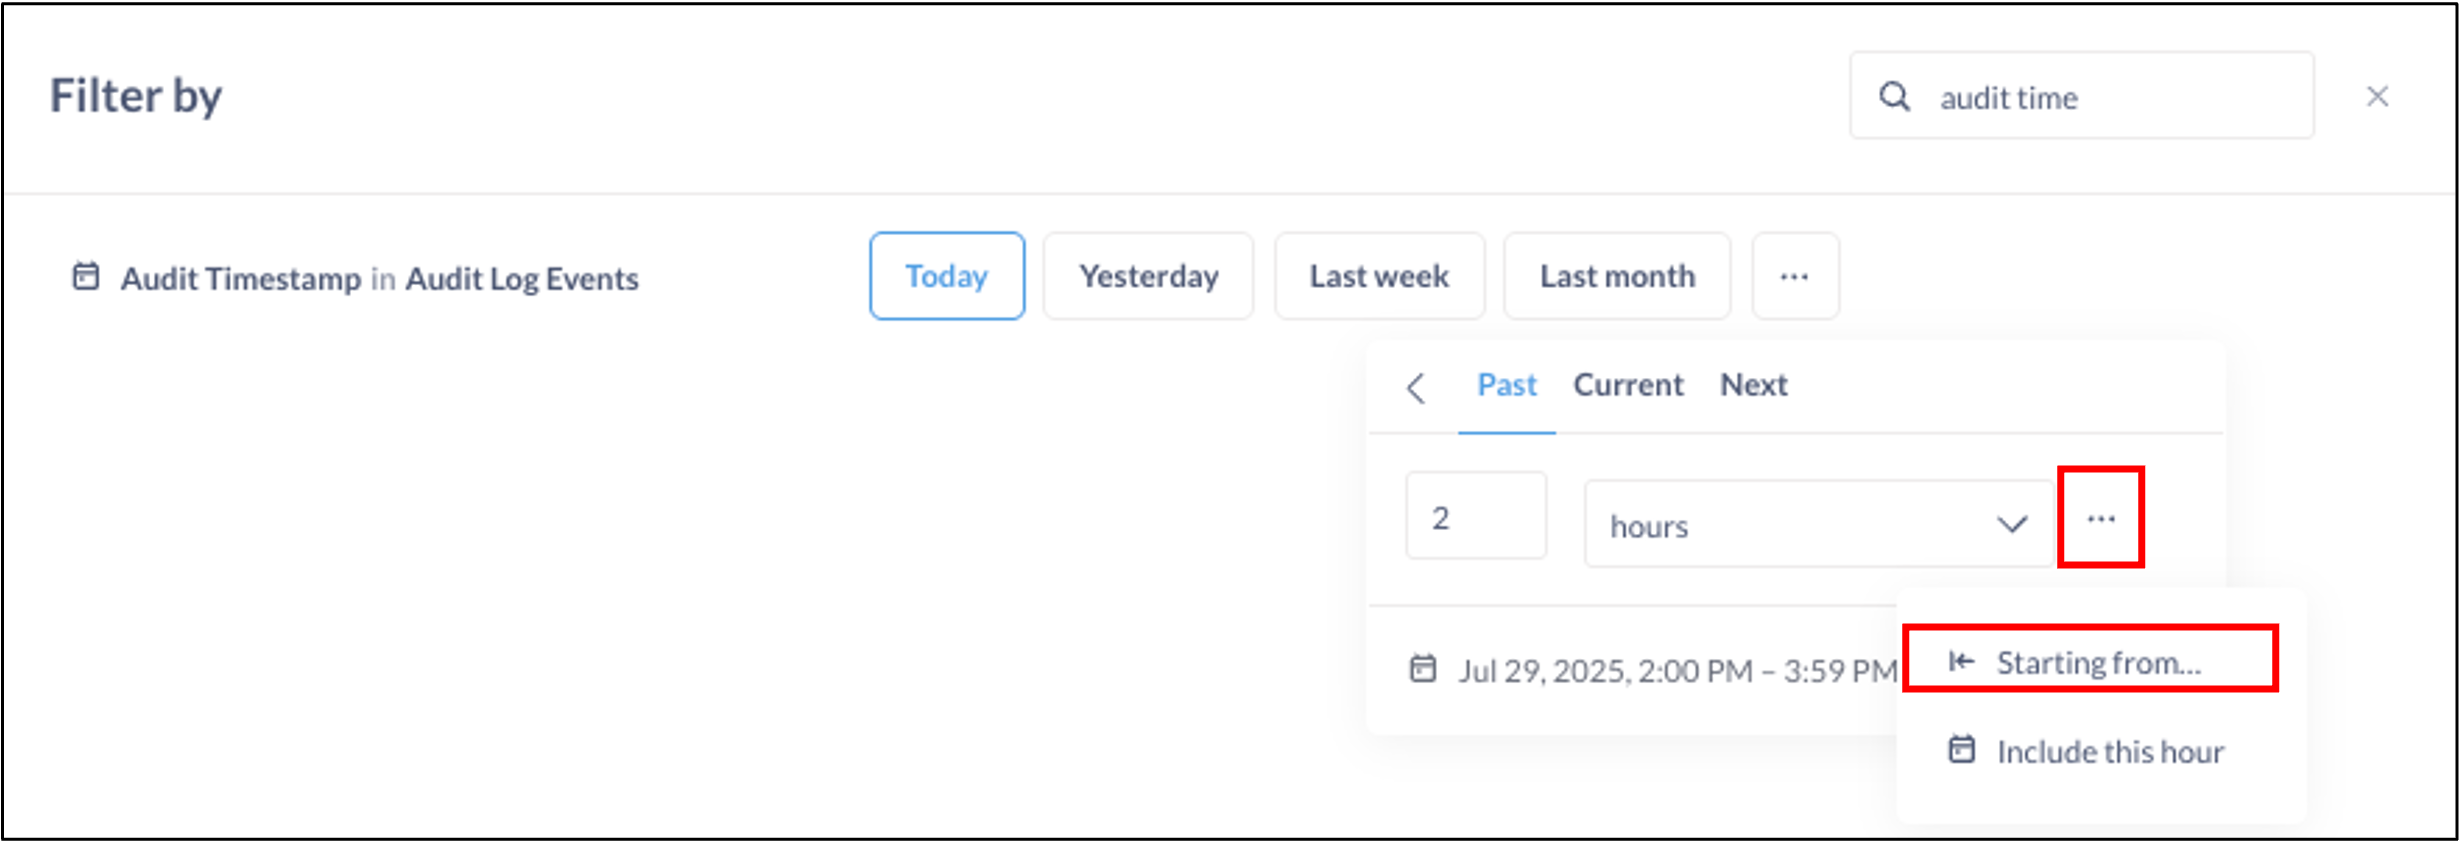
- Select Today.
- Click the More Options button or click on the filter again to make available additional options to narrow down the timeframe during which the SAEs must be reported.
- Select the Past tab
- To get the latest data, with minimal risk of missed data due to time lag between OpenClinica EDC and Insight:
- Select the past 2 hours.
- Click the More Options button and select Starting from…
- Input that the filter should be starting From 1 hour ago
- Report on only SAEs that have been added or updated in the last hour. To set up this filter:
- Daily Report
- Set up a second Question designed to provide a daily synopsis of added or updated SAEs. Other than the time filter, it should be identical to the hourly report. To set up the daily report filter:
- Select the Audit Log Events table
- Select the Audit Timestamp field.
- Select Yesterday to return results from the preceding calendar day.
- Note: For results from the preceding day-long period, use a filter of Past 24 Hours.
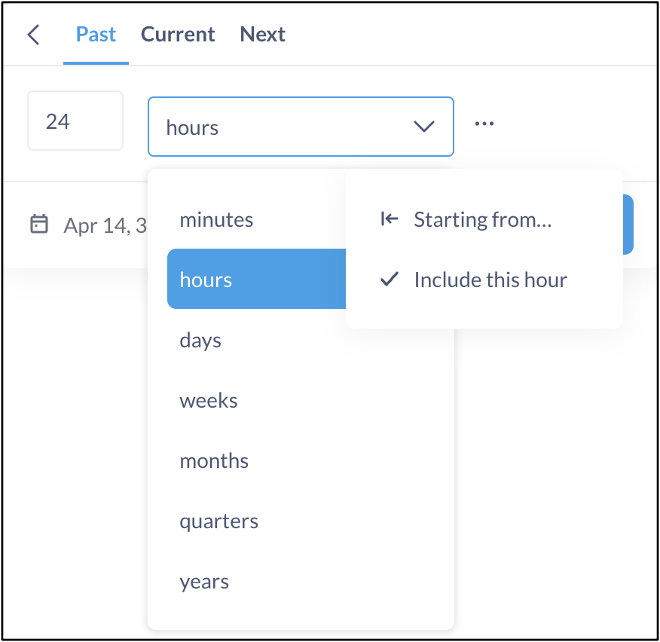
- Click the More Options button or click Yesterday again to make available additional options to narrow down the timeframe during which the SAEs must be reported.
- Select the Past tab
- Select the number of minutes, hours, days, weeks, months, quarters, or years, as well as whether there is a certain starting time, or if the results set should include the current hour.
- Set up a second Question designed to provide a daily synopsis of added or updated SAEs. Other than the time filter, it should be identical to the hourly report. To set up the daily report filter:
Preview the Question Results and Save the Report
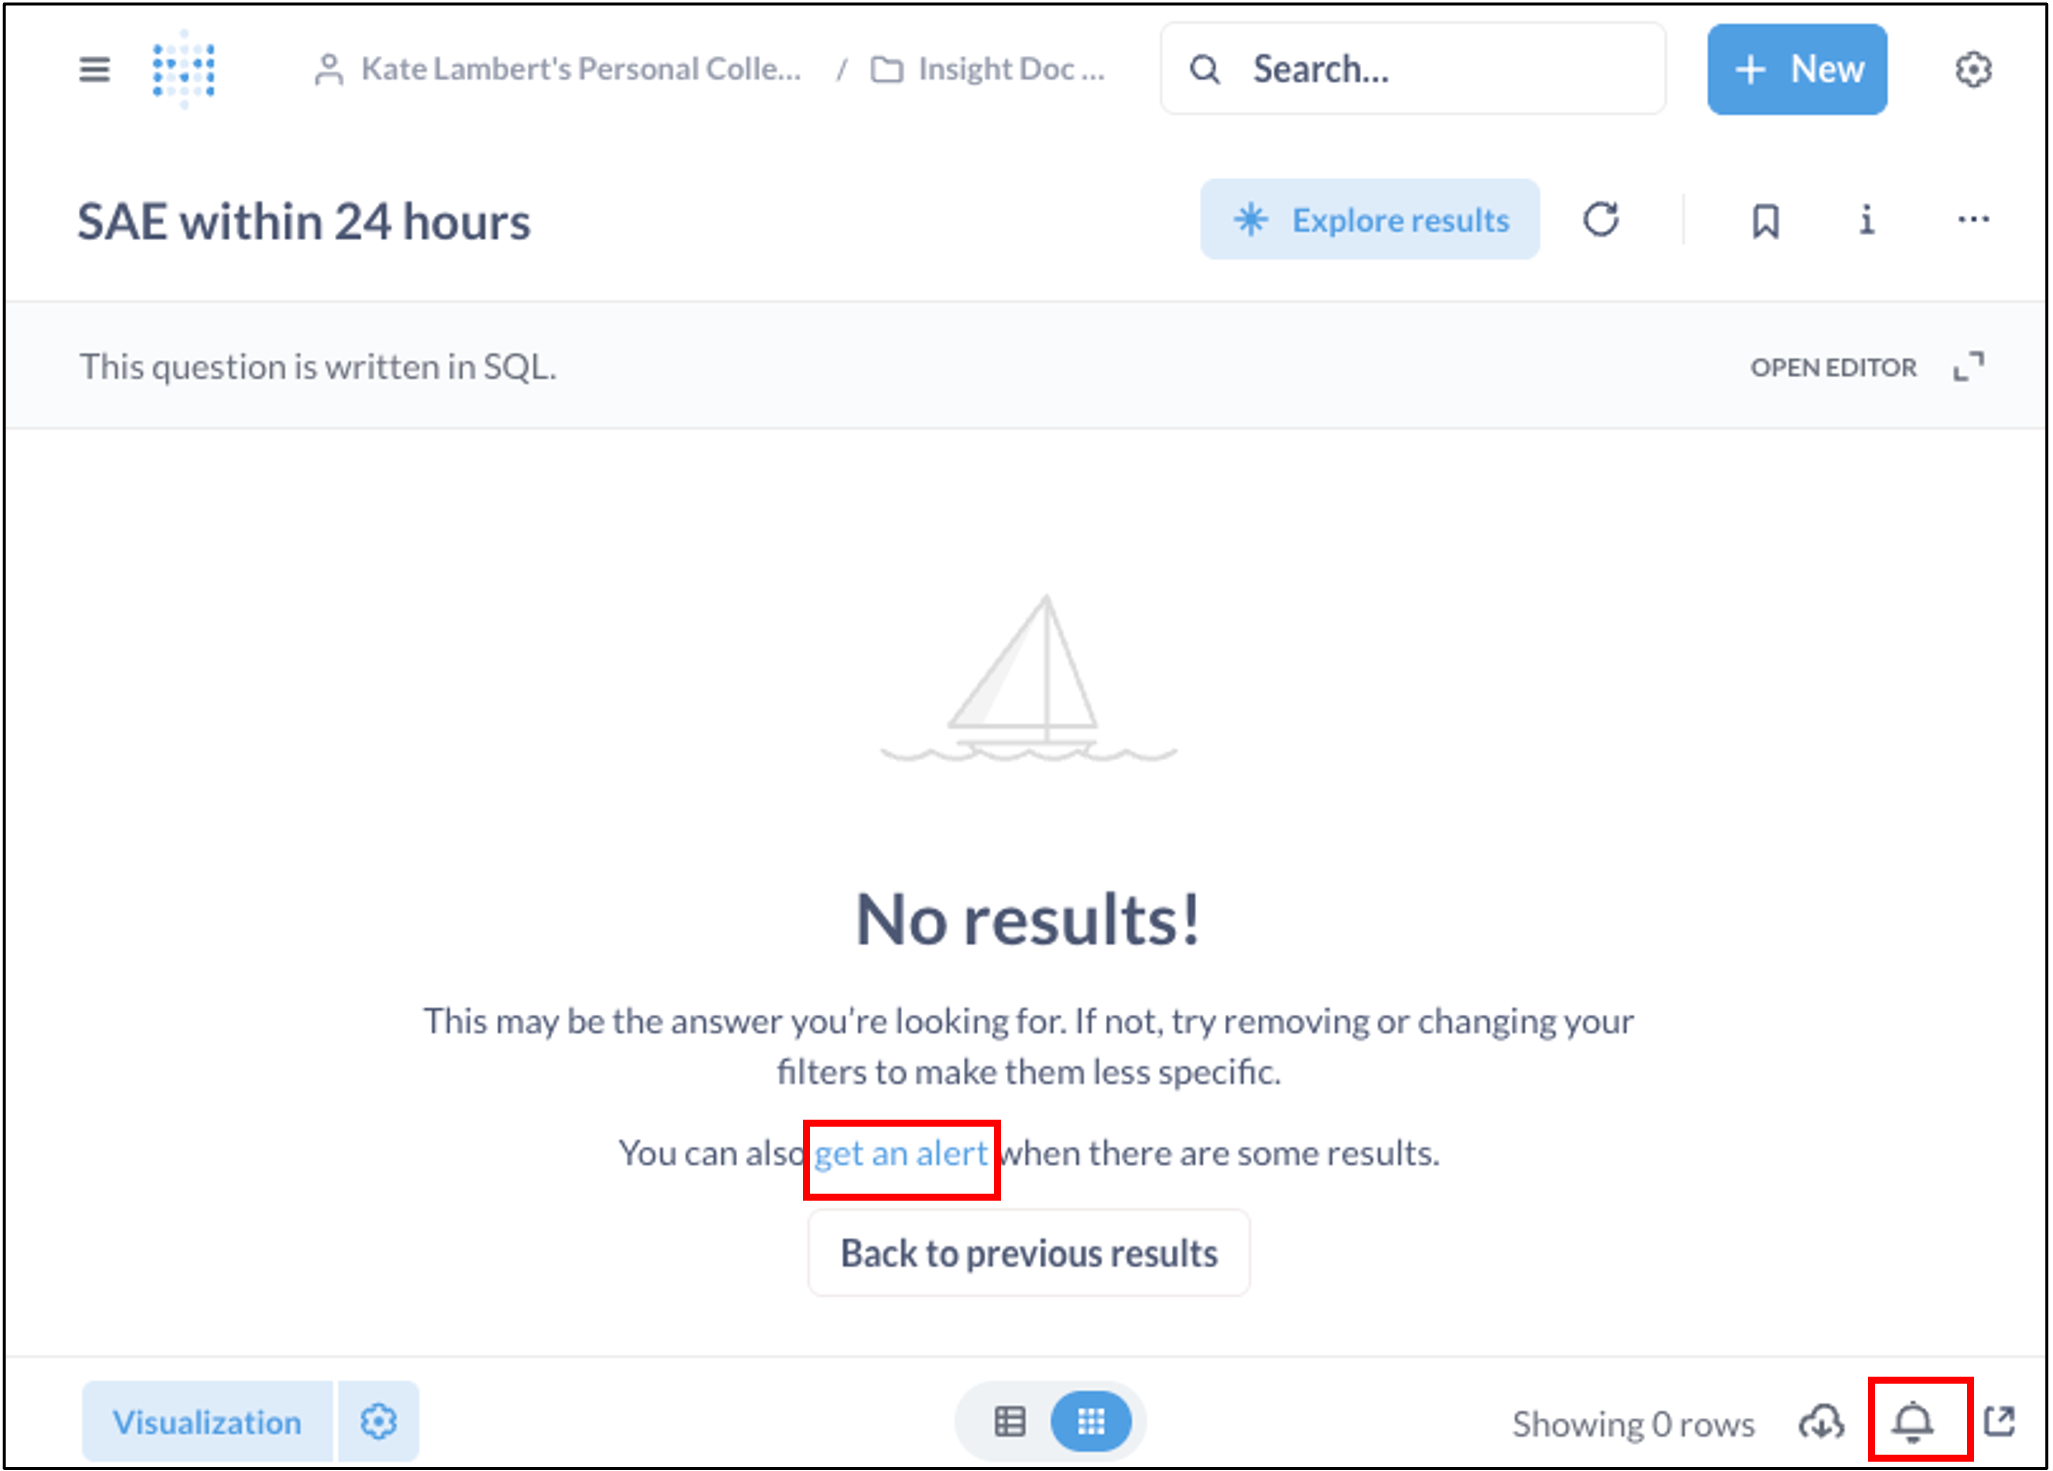
Run the query to make sure it’s returning the expected columns and filtering correctly. Initially, if no recent SAEs meet the criteria, you may see “No results!” – this is expected (and even desired) if you’ve filtered for only new occurrences, or no SAEs have been entered.
Give the Insight question a clear name and save it in an appropriate Insight collection for your study. For example, you may want to name your two reports SAE – Hourly and SAE – Daily.
Configuring an Alert on a Single Question
Now that you have created a Question / report, you can create alerts (email notifications) based on the Question results.
- When you are within either the Results or Edit screen of your Question, you can click “get an alert” or the bell icon in the bottom right to set up alerts.
- Next, you will configure how often the alert should be sent: hourly, daily, or weekly. In all cases, the alert will send the report you have configured, as long as there are results at the time the alert is triggered. If no results exist, no alert will be sent.
- Hourly: In our example, this alert option should be selected for the SAE – Hourly Question so that applicable personnel will receive the results as quickly as possible.
- Daily: A report sent once a day that can be configured to be sent at a particular time. In our example, this alert option should be selected for the SAE – Daily Question.
- Weekly: A report sent once a week that can be configured to be sent on a specific day of the week at a particular time. In our example, we have not created a report that will be sent weekly.
- Specify who should receive the SAE notification emails. You can add any Insight user or any email addresses. For example, add safety team members, data managers, or other stakeholders.
⚠️ Warnings and Limitations ⚠️
- All recipients will receive the same content regardless of their permissions in OpenClinica. Ensure that the recipients list is appropriate and does not include anyone who shouldn’t see SAE data.
- It is important to match the frequency of alerts with any time filters applied to the Question so that you receive all appropriate results while minimizing or eliminating duplicates.
Configuring an Alert on Multiple Questions
If you have multiple Question results that need to be sent out at the same time, you can create a Dashboard and subscribe to it. In our example, we can create a dashboard (e.g., “SAE Alerts Dashboard”), add the SAE report Question and any other applicable Questions to it, and then use the Email this dashboard option to configure the notification.
- Create a Dashboard: From the Insight question, create a new dashboard with a clear name. Save the dashboard.

- Add More Questions to the Dashboard: Click the plus sign and select any additional Questions that you would like to add to the dashboard.
- Open Subscription Settings: On the dashboard screen, find the email/alert icon or menu. Click “Email this dashboard”. This opens the notification configuration panel on the right side of the screen.

- Configure Your Notifications in the Email this Dashboard Panel:
- Specify who should receive the SAE notification emails. You can add any Insight user or any email addresses to the To: field. For example, add safety team members, data managers, or other stakeholders.
- Note: All recipients will receive the same content regardless of their permissions in OpenClinica. Ensure that the recipients list is appropriate and does not include anyone who shouldn’t see SAE data.
- Set how often Insight should check for new SAEs in the Sent field. For instance, choose Hourly if you want to be notified within an hour of an SAE being entered, or Daily if a daily summary is sufficient.
- Select “Don’t send if there aren’t results” if you only want a notification when there are new SAEs reported. This setting makes the notification conditional on the presence of data so you aren’t spammed with empty reports.
- If desired, toggle Attach results to include the data as an attachment. You can choose a file format (CSV or XLSX). Attaching the results can be convenient so that the email contains the SAE details in a spreadsheet. In our example, we enable attachments and choose CSV or XLSX as needed.
- Double-check the configuration and then click Done. The subscription/notification is now active. Insight will now automatically run the SAE report on the set schedule and email the specified recipients whenever the condition is met (i.e., the report has any rows).
- Specify who should receive the SAE notification emails. You can add any Insight user or any email addresses to the To: field. For example, add safety team members, data managers, or other stakeholders.
- Test Your Notification (Optional): You can do this by creating a dummy SAE in a test environment or using the “Send email now” button in the subscription panel to trigger an immediate email. Verify that the email is received and that the content (or attachment) matches the report. This confirms everything is working. If no email comes through, double-check spam folders and ensure that the email integration for Insight is configured properly (SMTP settings in OpenClinica).
Using and Managing the Alerts After Initial Setup
Once the alert is configured, it will run automatically. Here’s how to use and maintain it:
- Email Notifications: When a new SAE is entered into the database (for example, a site user marks an adverse event as serious), the next scheduled check will find this in the SAE report. An email will be sent to all recipients you listed. The email will typically include the dashboard name in the subject and the results either in the email body or as an attachment. This allows real-time awareness of critical events.
- Example – Viewing the Report Data: The SAE Insight report we created will show the details of any serious adverse events that triggered the notification. You can always go into Insight and view this report or dashboard directly to see the list of SAEs.
- Editing or Disabling Alerts: You can modify the alerts at any time.
- If you go back to the Question and click the Bell icon or “get an alert” again, you will see options to edit timing of the existing alert or add/remove email recipients.
- If you go back to the Insight dashboard and click the email/alert menu again, you’ll see options to Edit the subscription or Unsubscribe. For instance, you can change the frequency, add/remove recipients, or turn off the notification. Administrators have oversight of all notifications and can also add additional recipients or disable notifications study-wide if needed. Regular users who receive the notification can individually unsubscribe if they no longer wish to receive emails.
By following these steps, you have an automated notification in place for SAEs. Your Insight module will continuously monitor the incoming data and notify the clinical safety team within the specified timeframe whenever a new serious adverse event is recorded. This helps in timely assessment and follow-up on critical safety events without manual monitoring.
With OpenClinica 4 Insight, you can similarly set up notifications for other critical data points (protocol deviations, critical lab values, etc.) using this same process, ensuring proactive trial monitoring and quick actions when needed.