2.4.1 Enter Data Into a CRF
When a CRF is created as part of Study Setup, many aspects of the CRF and data entry for it are configurable. These instructions provide general guidelines; when you enter data for a CRF, the process might differ.
- Open the CRF. There are different ways to open the CRF to enter data, including the following:
- In the Subject Matrix, find the Subject and Event you want to complete the CRF for, then click the icon in the cell for that Event, and click View/Enter Data.
- When you Schedule an Event, after completing the Schedule Study Event page, click Proceed to Enter Data.
The Enter or Validate Data for CRFs page opens. The page reports the Event information followed by a table of all CRFs in that Study Event, with one CRF per row.
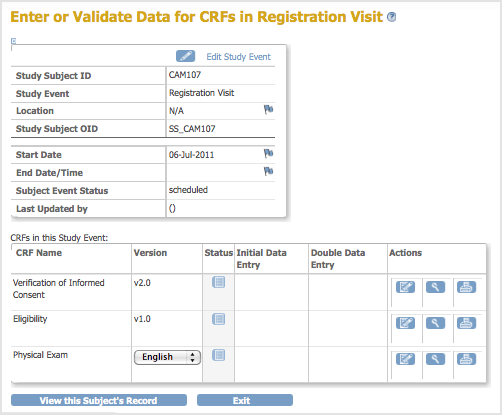
- If there is more than one version of the CRF available for the current Site or Study, select the one you want from the drop-down list in the Version column.
- If you want to print the CRF, click the Print icon for that CRF. The printout will include any data already entered in the CRF. To view a read-only version of the CRF, click the View icon. Note that when the CRF is viewed or printed in this manner all hidden fields in the CRF are displayed.
- To enter data for a CRF, click the Enter Data icon in the Actions column for that CRF.
The CRF opens, showing the first Section. Details about the CRF and entering the data depend on how the Study was configured during Study Setup.Example CRF — Eligibiity for Study Subject CAM107: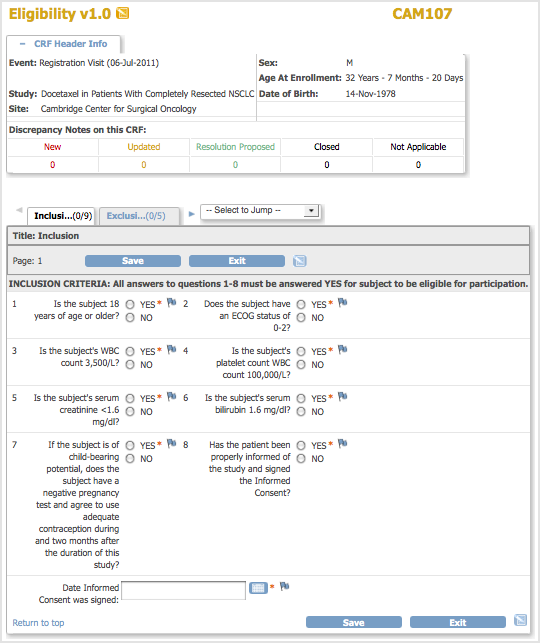
- To view information about the Subject, Event, and Discrepancy Notes, click the plus sign (+) next to CRF Header Info, which is at the top of the page. To hide the Header Info, click the minus sign (-).
- Select the Section you want to enter data for. The title of the current Section is listed in a tab below the CRF Header Info. To select a different Section, click the tab for that Section (tabs are below the CRF Header Info) or select the Section from the drop-down list next to the tabs.
- Enter the information for the current Section. The icon changes from
 to
to  , indicating the page now contains unsaved data. Items are numbered if the CRF was defined that way, with the total number of Items completed for that Section and total number of Items in the Section shown in the tab. For example, (0/5) indicates 5 Items in the Section, with no data entered in any of the Items. Instructions for completing Items in the Section are be shown at the top of the page or with each Item, if the CRF was defined that way. If you enter a value that differs from what is required for the CRF, have a question, or want to make a note, add a Discrepancy Note by clicking the Add Discrepancy Note icon
  for the Item and then completing the Note. For details, see Notes and Discrepancies.
 - After completing a Section (page):
- If you don’t want to save the information you entered for a Section, click Exit to end data entry.
- If you want to keep the information you entered for that Section, click Save.
If there are any problems with the data you entered, OpenClinica does not save the data, but displays messages about the information that is incorrect. Specifically, it checks that all required values are provided and that values entered comply with validation checks and Rules that are defined for the CRF. Correct any mistakes in the data or provide a Discrepancy Note for them, then click Save.
Upon saving the Section, OpenClinica performs any calculations that were set up for the Section of the CRF. After saving the Section, OpenClinica displays the next Section of the CRF.
- Complete all Sections in the CRF, saving each Section as you complete it.
- In the last Section:
- If all information has been entered for the CRF, select the Mark CRF Complete checkbox, then click OK in the confirmation dialog box. If a password is required, supply your password in the dialog box that opens. You can later edit the data in the CRF, even after marking it complete.
- If all information has not been completed, do not select Mark CRF complete. you can edit the CRF later to complete the information and mark the CRF complete at that time.
- If double data entry is required for the CRF, select the Mark CRF Complete checkbox. You or another user will need to enter the data for the CRF again before it can be verified as complete.
- Click Save in the last Section.
If the CRF has been marked complete, the Enter or Validate Data for CRFs page opens, and the status for the CRF shows Data Entry Complete, or Data Entry Started if you did not mark it complete. The Study Events sidebar panel also shows the updated status for the Event. - If you want to print the completed CRF, click the Print icon for the CRF in the Enter or Validate Data for CRFs page.
2.4.2 CRF Unavailable
OpenClinica prevents two users from entering data for or editing a CRF at the same time. If you try to enter data for or edit a CRF that another user is already entering data for, OpenClinica does not show you the CRF but instead displays a message that the CRF is unavailable for data entry. The message also indicates who is currently editing the CRF. Click OK in the message. When the other user exits the CRF, you can edit it.
Note: When double data entry is specified, OpenClinica allows two users to enter data for the same CRF at the same time.
2.4.3 Double Data Entry
Double data entry is when the data for a CRF is entered twice to ensure the integrity of the captured data. It is typically used when CRF data is first captured on paper forms, then entered into the OpenClinica system. Double data entry can be optional or required, as specified for each CRF in the Study Event Definition.
During double data entry, OpenClinica flags any differences between the values in the initial data entry and the second data entry, and provides options for resolving the differences.
There are options for who performs the double data entry and when:
- After a user completes entering the initial CRF data, a different user can perform the double entry.
- The user who initially enters the data can also perform the double entry but must wait at least twelve hours after the initial data entry to perform the double entry.
- Certain user roles have permission to complete initial data entry and move directly to double data entry without waiting.
This is the process for completing data entry when double data entry is configured for a CRF:
- Perform initial data entry for the CRF, mark it complete, and click Save.
- Perform double data entry for the CRF, mark it complete, and click Save. If the value for any Items in the double data entry are different than for the initial data entry, an error message displays. Address the difference in one of these ways:
- If the value in the double data entry is correct, keep that value by clicking Save again. The Audit Log stores the user name, date, time, and value for both the value entered in initial data entry and in double data entry.
- If the value in the initial data entry is correct, change the value to the correct one in the CRF field for the double data entry, and click Save. The Audit Log stores only the initial value.
- If you want to maintain the value from initial data entry and from double data entry for later followup, add a Discrepancy Note, then click Save.
2.4.4 CRF Status
This is how the CRF status progresses through the data entry process:
| CRF Status | Icon | Description |
| Not Started | The CRF has not been opened for data entry. | |
| Initial Data Entry | The CRF has been opened for data entry. The user might have entered some or all data into the CRF. | |
| Data Entry Complete
or
Initial Data Entry Complete |
| The CRF has been marked complete. All required data has been entered and saved, and the OpenClinica edit checks have been performed. The completed icon is displayed when the CRF is not configured for double data entry; in the CRFs table, the Double Data Entry column in the Enter or Validate Data page, shows n/a (not applicable). If you make changes to a CRF when the status is complete, the status remains complete; if the system is set up to create a Reason for Change Discrepancy Note, you will be required to fill it out.
If the CRF is configured for double data entry, indicates the CRF has been marked complete after the initial data entry and is ready for double data entry. |
| Double Data Entry Started | A user has opened the CRF for double entry. The status of double data entry for a CRF is shown in the Enter or Validate Data page, in the CRFs table. | |
| Data Entry Complete | When the CRF has been marked complete after the double data entry. | |
| Locked | The OpenClinica system automatically sets the status of all CRFs for an Event to “locked,” when you set the status of the Event to “stopped,”, “skipped,” or “locked.” When the CRF status is “locked,” you cannot enter or make changes to data in it. To enter data or change data in the CRF, you must change the CRF status by changing the Event Status. |
2.4.5 Editing and Adding Data to Previously Saved CRF Sections
When you return to edit a section of an event CRF that you (or somebody else) has previously saved, you will notice some differences in the display and behavior of the form versus entering data on a new event CRF.
Deletion of Previously Saved Repeating Group Rows Not Allowed
If your form uses repeating groups, the most noticeable difference is that you will no longer be able to delete previously saved rows from the grid using the ‘X’ icon at the end of the row. OpenClinica 3.1 has eliminated the ability to delete repeating group rows for records that have already been saved to the database. If a row needs to be removed, you must change all the item values to blank for that row. Newly added rows can still be deleted, provided they have not yet been saved.
This behavior, introduced for repeating groups in version 3.1, helps OpenClinica maintain an audit trail that allows users to trace back all changes that have occured in the data. While it has some usability drawbacks, it provides a much needed improvement in the integrity and traceability of data values. The purpose of the audit trail is to be able to reconstruct the data as it looked at any point in time. The audit trail is one of the cornerstones of compliance to 21 CFR Part 11, and ensuring a complete and robust audit trail is necessary to make it possible the adoption of OpenClinica for regulated applications. The row will always display, and the audit records and discrepancy notes associated with the items in that row will be traceable in manner that is compliant with regulations and good clinical data management practices.
Consider the case of an Investigator that reviews and signs a CRF after confirming the CRF’s values in a repeating group. After a certain time he goes back to the same CRF and finds that the CRF has been further edited, which may require review and re-signing. In OpenClinica 3.0, the method of deleting rows from the CRF so they are no longer viewable or traceable to entries in the audit log means he will have no means to understand what changes later occurred to the data, when they occurred and under whose responsibility. Addition of records to the repeating group have no trace (and thus they are not attributable to someone), removals were traced as change of state from Available to Removed, but no evidence of the formerly existing values was provided. This is critical because he has signed the CRF as a “whole record” and the addition or removal of sets of data in this whole record really is a change of that record. Providing detailed information on what has changed since the signing event is now possible based on the audit trail, and provides the investigator with a means to identify what has changed since the signing as part of his review.
User Required to Provide a Reason for Change
The other major difference in behavior applies only after the CRF has been marked complete and only if the study is set up to require ‘Reason for Change’.
In this scenario, if you make any changes to CRF data (including adding new rows to a repeating group) after it has been marked complete, you will be required to enter a discrepancy note indicating the reason for change.
As of OpenClinica 3.1.3, changes in the values of calculated fields do not require a reason for change. Note that if the calculation cannot be computed (such as division by zero) the reason for change message will be displayed, however the form can be safely submitted without a discrepancy note.