5.8.1 About Sites
In OpenClinica, a Site is typically a location to which Subjects are assigned, although it can be a different organization to which Subjects are assigned. A Study can have more than one Site, where each Site might be in a different city or at a different institution. Event Definitions for the Study are assigned to Sites in the Study. Subjects are added to a Site and scheduled for Events at the Site. OpenClinica users are assigned permission to access information at one or more Sites, and can also be assigned to access data at the overall Study level.
Even if there is only one location for a Study when you create it, it is strongly recommended that you create a Site for it, and add Subjects to the Site rather than only add them at the Study level. By doing this, there are more options available for user permissions, and you will be able to easily add Sites in the future, should the Study expand.
5.8.2 Create Site
A user whose Role has appropriate permission can create a new Site. When you create a new Site, it inherits some information from its parent Study, but you can make changes to it.
You can create Sites for a Study at any time after you have completed the first five steps in the Build Study process.
To create a Site:
- Change the current Study to the Study you want to create a Site for.
- Select Tasks > Build Study.
The Build Study page for the current Study opens. - In the table, for Create Sites (Task 6), click the Add icon
 .
.
The Create a New Site page opens.
- Complete at least the required fields in the Create Site Properties section, referring to these guidelines as needed:
- The Protocol ID for the Site must be unique.
- The Expected total enrollment is for reporting statistics only; it does not limit the number of Subjects you can add to the Site, nor is it used to enforce any minimum required enrollment.
- You can view but cannot change the Site Status at this point; its Status is “available” when you first create it. You can also complete the other fields and can make changes to the Site Event Definitions.
- You can update Site Event Definitions. The Events for all Sites in a Study must be the same, but you can use different CRF versions and different CRF parameters at different Sites. For example, you might use an English version of a CRF at one Site, and a French version of the same CRF at a different Site, or you might require double data entry for a CRF for one Site but not for another Site. The default values are specified for the Study as part of the Event Defiinition; for more information, see Create and Modify Event Definitions.
- Click Confirm Site.
The Confirm Site page opens. - Verify that the information is correct, then click Submit Site.
The Build Study page opens. The Count for the Create Sites task increased by one to reflect the Site you just added. - Continue adding Sites by repeating steps 3 through 6 now, or at another time. When you have completed adding Sites, select the Mark Complete checkbox for the Create Sites task, then click Save. Note that even though the task Status is Complete, you can add more Sites later.
5.8.3 View Site Information
To view information about the current Site, click the Site name link in the Other Info sidebar panel or at the top of the page. The view Study Metadata page opens, showing information for the current Site.
To view all Sites assigned to the current Study and access information for each Site:
- Change the current Study to the Study whose Site information you want to access.
- Select Tasks > Build Study.
The Build Study page for the current Study opens. - In the table, for Create Sites (Task 6), click the View icon.
The Manage All Sites page for the current Study opens, listing a summary of information for each Site in the Study.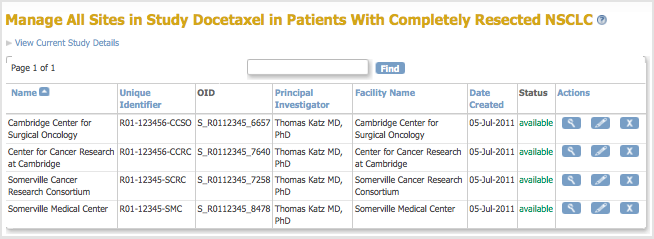
- To view information about a Site, click the View icon in the Actions column for that Site.
The View Site Details page opens for that Site. - The View Site Details page displays information for the site. From the page, you can print all CRFs for each Event by clicking the Print icon in the Event section.
- Click Exit to return to the Manage All Sites page, from which you can make changes to Site details or the Site status.
5.8.4 Edit Site Information
After creating a Site, you can edit the information for it, including its status:
- Change the current Study to the Study whose Site information you want to access.
- Select Tasks > Build Study.
The Build Study page for the current Study opens. - In the table, for Create Sites (Task 6), click the View icon.
The Manage All Sites page for the current Study opens, listing a summary of information for each Site in the Study. - Click the Edit icon in the Actions column for the Site whose information you want to edit.
The Update Site Details page opens, showing current values for the Site details. - Make changes to values in the Update Site Properties section, including changing the Status for the Site. The Status values you can select for a Site are: available, pending, locked, and frozen. For more about the meaning of each Status value, see Status of a Study; the meanings described in that topic apply, but they are for the Site, not the Study.
- Make changes to information for any of the Event Definitions for the Site. For example, you might use an English version of a CRF at one Site, and a French version of the same CRF at a different Site, or you might require double data entry for a CRF for one Site but not for another Site.
- Click Submit Site.
The Manage All Sites page opens.
5.8.5 Remove or Restore Site
Remove a Site
You can remove a Site to make it unavailable. This removes all Events, Users, and Subjects for the Site, but does not delete any data. After removing a Site, you can restore it, if needed. To remove a Site:
- Change the current Study to the Study whose Site you want to remove.
- Select Tasks > Build Study.
The Build Study page for the current Study opens. - In Actions column for the Create Sites task, click the View icon.
The Manage All Sites in Study page opens, listing all Sites in the current Study. - In the table, click the Remove icon
 for the Site you want to remove.
The Confirm Removal of Site page opens. - Click Remove Site.
- In the confirmation dialog box, click OK.
The Manage All Sites page opens. The status for the Site is reported as “removed.”
Restore a Site
After removing a Site, you can restore it if you want to access it again. The relationships of Subjects to the Site and the Site to the Study are preserved. To restore a Site:
- Change the current Study to the Study whose Site you want to restore.
- Select Tasks > Build Study.
The Build Study page for the current Study opens. - In Actions column for the Create Sites task, click the View icon.
The Manage All Sites in Study page opens, listing all Sites in the current Study. - In the table, click the Restore icon
 for the Site you want to restore.
The Confirm Restore of Site page opens. - Click Restore Site.
- In the confirmation dialog box, click OK.
The Manage All Sites page opens, and the Site status is no longer “removed.”