6.6.1 Accessing Rule Designer
Accessing Rule Designer
You can access Rule Designer from the Build Study page or from the Manage Rules page. Each option is outlined below:
1. To access Rule Designer from the Build Study page:
- Log into OpenClinica.
- On the Tasks menu, select Build Study.
- In the Create Rules row Actions column, click
 (the Rule Designer icon – see below).
Accessing Rule Designer from the Build Study page

2. To access Rule Designer from the Manage Rules page:
- Log into OpenClinica.
- On the Tasks menu, select Build Study and in the Create Rules row, click
 (the View icon)
OR
On the Tasks menu, in the Monitor and Manage Data section, select Rules. - On the Manage Rules page, click . (See below).
Accessing Rule Designer from the Manage Rules page

The Rule Designer interface displays.
The Rule Designer interface

6.6.2 Building Rules in Rule Designer
The Rule Designer interface is divided into three main panes:
- The left hand pane, which is further divided into three subtabs: View by CRF, View by CRF Version, and View by Event. Every time each of these subtabs is selected, a list of CRFs/ Events will be listed. Each of these CRFs/ Events has an adjacent node which can be clicked to expand into a hierarchy/ minimize to display or hide any associated Item OID. You will then be able to locate, select, and finally drag and drop any of the desired OIDs to the applicable entries on the main (center) tab.
- The center pane, which is divided into three main tabs: Designer, XML and Test tab. The Designer tab contains entries that you can use to drag and drop OIDs to the desired fields (i.e. Target, Rule OID, Rule Expression). Note that if you hover to any of the entry fields on the Designer tab, there will be an associated pop-up help menu that will get displayed. For example, if your cursor is placed on the Target field, there will be a back pop-up message displayed to provide an explanation of a Target field. The XML tab displays the associated XML lines generated as you are updating the fields on te Designer tab. The Test tab can be accessed once all of the information entered on the Designer tab is valid.
- The right hand pane, which is further divided into two subtabs: The Help subtab and the Item Metadata subtab. The help tab contains direction how you can build your rule on the Designer tab.The Item Metadata subtab contains the metadata associated to selected OID/ record. The Item Metadata gets updated everytime a new OID/ record is selected.
On the top right of the page, there are 3 additional links that you may access at any point: New Rule, Open Rule and Exit Rule Designer.
Building a New Rule in Rule Designer
1. In order to create a new rule, you will initially need to access the Designer tab in Rule Designer.
2. Specify the target field. The Target field is the variable which you want the error message to appear on. It is also associated with any discrepancy note/ email action.
3. If you want the Rule to run at a specified time each day, turn on the option to Run On Schedule. These were specifically designed for Participate Notification Action Rules so that Participants can be notified of upcoming forms that should be completed. Though any Rule can be set to run on a schedule, it is not recommended to set a large number of Rules to run on schedule since this could slow server processing. Rules are run automatically whenever data is saved, and can also be run in batch via Manage Rules or Manage CRFs.
4. Specify the Rule_OID field. This is a unique identifier of any new rule that you are creating and this is how your rule will be referred in the database. It must be 32 characters or shorter, be in uppercase, cannot include any spaces/special characters (underscore permitted)
5. Specify the Rule Expression. This is the condition that will trigger certain actions. You may use the Arithmetic, Logical or Relational Operator in order to build the rule expression. For more information regarding using thee operators, refer to section 6.3: Creating Rules. You can also use the drag and drop CRF Item form the left hand pane in order to build your rule.
6. Specify what actions will be triggered as a result of implementing the rule. The available actions are in the “Actions” drop down menu:
- Discrepancy Note. This will trigger a discrepancy note on a certain CRF Item. Refer to Notes and Discrepancies section for more information.
- Email action. This will prompt the system to generate an automated email to individual(s). Both the email action and discrepancy notes form edit checks.
- Notification Action. This sends an SMS and/or email notification to Patient Participants, or an email to any specified email address. Variables can be used in the SMS/email Subject and/or in the body of the notification. Click on the button for the variable you want to include. For more information on the variables that can be included, see Notification Action.
- Show action. This will trigger a certain CRF Item be displayed as a result of meeting a certain criteria.
- Hide action. A CRF Item will be hidden if the rule condition is met. Note that both Show and Hide Action are used to implement dynamic logics.
- Insert action. This will prompt the system to insert data from one CRF item into another based on previously established rules.
- Event action. This allows you to pre-schedule an Event or Events based on the Startdate or Status of a specified Event.
7. Note that each rule may trigger one or more actions. To add more actions, simply access the drop down menu for the second time and select applicable actions. The second action will be lined below the first action. If you want to remove action, simply click on the remove ![]() icon next to each action.
icon next to each action.
8. Specify the data entry stages where the rule can be run. In OpenClinica, there are 4 possible values: Admin Data Entry, Initial Data Entry, Double Data Entry, Batch. Select all of the checkboxes if you want them to run at all stages.
9. Click Validate. This will verify if the form contains valid rule. If the rule is valid, you will get a successful confirmation message “Form has no errors. This is a Valid Rule”
Building a New Rule in Rule Designer
1. In order to create a new rule, you will initially need to access the Designer tab in Rule Designer.
2. Specify the target field. The Target field is the variable which you want the error message to appear on. It is also associated with any discrepancy note/ email action.
3. If you want the Rule to run at a specified time each day, turn on the option to Run On Schedule. These were specifically designed for Participate Notification Action Rules so that Participants can be notified of upcoming forms that should be completed. Though any Rule can be set to run on a schedule, it is not recommended to set a large number of Rules to run on schedule since this could slow server processing. Rules are run automatically whenever data is saved, and can also be run in batch via Manage Rules or Manage CRFs.
4. Specify the Rule_OID field. This is a unique identifier of any new rule that you are creating and this is how your rule will be referred in the database. It must be 32 characters or shorter, be in uppercase, cannot include any spaces/special characters (underscore permitted)
5. Specify the Rule Expression. This is the condition that will trigger certain actions. You may use the Arithmetic, Logical or Relational Operator in order to build the rule expression. For more information regarding using thee operators, refer to section 6.3: Creating Rules. You can also use the drag and drop CRF Item form the left hand pane in order to build your rule.
6. Specify what actions will be triggered as a result of implementing the rule. The available actions are in the “Actions” drop down menu:
- Discrepancy Note. This will trigger a discrepancy note on a certain CRF Item. Refer to Notes and Discrepancies section for more information.
- Email action. This will prompt the system to generate an automated email to individual(s). Both the email action and discrepancy notes form edit checks.
- Notification Action. This sends an SMS and/or email notification to study Participants who are users of Participate, or an email to any specified email address.
- Show action. This will trigger a certain CRF Item be displayed as a result of meeting a certain criteria.
- Hide action. A CRF Item will be hidden if the rule condition is met. Note that both Show and Hide Action are used to implement dynamic logics.
- Insert action. This will prompt the system to insert data from one CRF item into another based on previously established rules.
- Event action. This allows you to pre-schedule an Event or Events based on the Startdate or Status of a specified Event.
7. Note that each rule may trigger one or more actions. To add more actions, simply access the drop down menu for the second time and select applicable actions. The second action will be lined below the first action. If you want to remove action, simply click on the remove ![]() icon next to each action.
icon next to each action.
8. Specify the data entry stages where the rule can be run. In OpenClinica, there are 4 possible values: Admin Data Entry, Initial Data Entry, Double Data Entry, Batch. Select all of the checkboxes if you want them to run at all stages.
9. Click Validate. This verifies that the form contains valid rule. If the rule is valid, the following confirmation message displays: “Form has no errors. This is a Valid Rule.”

If some of the rule components are invalid, an error message displays on the top of the page detailing the sources of the errors. Refer to the sample of screenshot below.

10. You also have the option of saving the rule to OpenClinica. To achieve this purpose, you select “Save”. You will get a confirmation message “Submitted successfully to your instance”.
6.6.3 Testing Rules in Rule Designer
Testing a New Rule in Rule Designer
OpenClinica Rule Designer offers an easy interface to test the rules so that you will be able to instantaneously observe the simulation of the rule that you just created on CRF Items. The Test tab serves as a “mock-up” of rules if it were to be deployed on actual CRF Items. Based on the outcome of the test, you can determine if further changes to the rule are necessary.
1. In order to test a rule, you must ensure that your rule is valid. Refer to Building a New Rule in Rule Designer section for more information. Once complete, access the Test tab on the center pane.
2. Initially, you will notice that there will be only 2 tabs displayed on the Test tab. The upper tab contains the information pertaining to the action you selected on the Designer tab. The bottom tab contains data fields for the impacted CRF items. You can modify the input variables on this tab as desired.
3. Modify the input parameters of the impacted CRF Items. Once complete, click “Test”
4. Once run, there will be an additional tab displayed on the bottom of the second tab named “Verify Results”. This tab contains the outcome of the test if the rule were to be deployed as is in OpenClinica. You can evaluate the result and determine if you need to commit further edits on the rule. You can also modify the input variables from step 2 and rerun the test again as many times as possible.

The Test tab before the rule is executed. Note that there are only 2 tabs available.
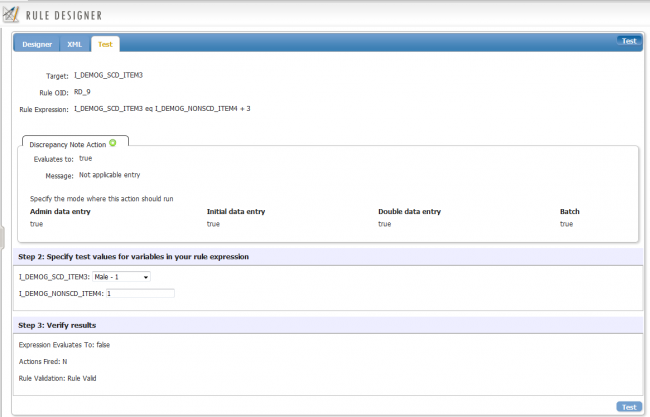
The Test tab is displayed after the rule is executed (tested) for the first time. Note that “Verify Results” tab is now displayed.