How to contribute and what to work on
Read the overview of how to contribute here.
Basics of the OpenClinica Code
A typical feature might consist of a database change as well as middle-tier and back end integration.
For database changes, OpenClinica uses a 3rd party library called liquibase to upgrade the database & schema from version to version. Liquibase does a good job in maintaining the OpenClinica versions and making sure scripts are run at install/upgrade time. If the code requires a database change, such as adding a table, altering a table etc, it is important to put in liquibase script.
The business layer code implementation is based on a typical UI-Controller-transaction management model. The UI layer is common uses jsps, with JSTL libraries along with javascript and Jquery libraries.
There are 2(3) kinds of controllers used all across the OpenClinica application
- Base controller is SecureController –> This is used widely all across the application and extends SingleThreadedModel (which is deprecated Java Servlet API 2.4). If you are developing a controller, please avoid extending this. As there is no reason to use SingleThreadedModel in OpenClinica application and this would choke up the system resources when many simultaneous requests are made.
- Base Controller as CoreSecureController–> In order to avoid the performance issues stated above with SecureController, we removed the SingleThreaded model and came up with this servlet controller for data entry module. This can be used as an alternative.
- The Spring MVC controller–> this would be the best way available in OpenClinica. The suggested approach to avoid all the problems stated above. You can look at rules framework to see the examples of existing approach.
Similarly on the transaction management side, there are 2 broader approaches:
- Hibernate-spring transaction model
- JDBC/PSQL approach
All the legacy code is written in preparedStatements using JDBC. and 90% of the existing classes use this. For example, if you have to deal with any of the objects such as Study or CRF, it would be easier to use the existing beans. However, if you have a new set of tables and have a transaction model attached to it. use the Hibernate/Spring approach. There are already existing implementation for hibernate part of the code,
As you might be aware, we are extensively utilizing javascript libraries for implementing the printable forms module, and this is the preferred paradigm for future development.
Thanks and please do not hesitate to ask questions or seek guidance on the forum.
Setting up Your Development Environment
Clone from GitHub
Clone OpenClinica from https://github.com/OpenClinica/OpenClinica
Developing with the Eclipse IDE
This guide covers the installation and configuration of a development environment using Eclipse, which is the IDE used by the OpenClinica development team. Other IDEs can be used, although their configurations instructions are not covered here.
Prerequisites
| Name | Recommended Version | Link |
|---|---|---|
| Java Development Kit (JDK) | 1.7.x | www.oracle.com |
| Eclipse | Eclipse IDE for Java EE Developers – Indigo (3.7.1) | www.eclipse.org/downloads |
| Apache Maven | 3.0.x | maven.apache.org/download.html |
| Apache Tomcat | 7.x | tomcat.apache.org/download-60.cgi |
Install prerequisites
- Install the JDK, export the
JAVA_HOMEenvironment variable to point to the JDK directory; - Install Maven, export the
M2_HOMEenvironment variable to point to the installation directory; - Extract the Tomcat installation file.
- Add the
bindirectories of the JDK and Maven installations to yourPATHenvironment variable.
# On Windows set JAVA_HOME=<path to the JDK installation>
set M2_HOME=<path to the Maven installation>
set PATH=%JAVA_HOME%bin;%M2_HOME%bin;%PATH%

# On Unix export JAVA_HOME=<path to the JDK installation>
export M2_HOME=<path to the Maven installation>
export PATH=$JAVA_HOME/bin:$M2_HOME/bin:$PATH
To check if this configuration is ok, run mvn -version in your command prompt.
Build the project
Go to the directory where you checked the code out and run
mvn clean install -Dmaven.test.skip=true
Configure Eclipse
Extract the contents of the Eclipse installation file, then edit the eclipse.ini file. Add the -vm option to point to the javaw executable in the JDK (not the one in the JRE), and change the minimum and maximum memory settings (respectively -Xms and -Xmx).
[...]
-vm
<point to $JAVA_HOME/bin/javaw>
-vmargs
-Dosgi.requiredJavaVersion=1.5
-Xms256m
-Xmx1024m
Start Eclipse, create a new workspace and go to Help > "Install New Software...". In the field "Work with", enter the plugin installation URL as listed in the table below. After installing each plugin, you will be prompted to restart your Eclipse. Restart it and install the next plugin in the list.
| Plugin name | URL |
|---|---|
| m2eclipse | download.eclipse.org/technology/m2e/releases |
| MercurialEclipse | cbes.javaforge.com/update |
| Spring IDE | dist.springsource.com/release/TOOLS/update/e3.7 – Check only Spring IDE Core (required) |
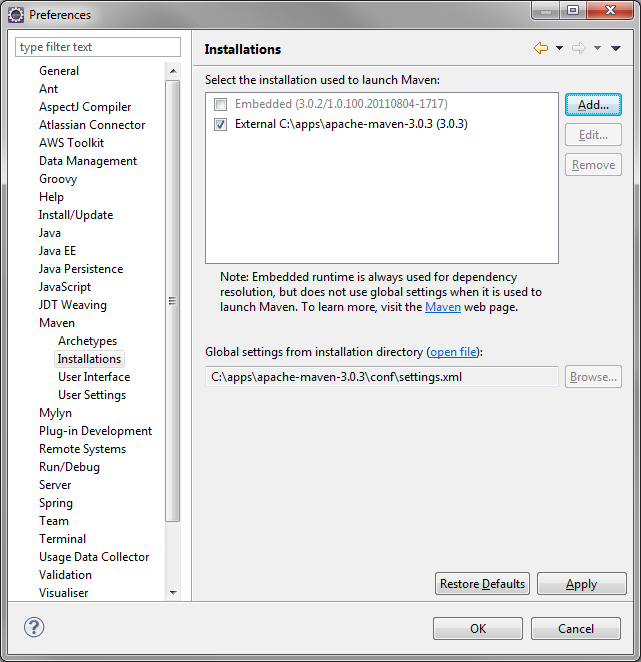
After restarting Eclipse, go to Window > Preferences. In the left hand side menu, select Maven > Installations, and point to your local Maven installation.
Configure the project
Click File > Import > Existing Maven Projects.
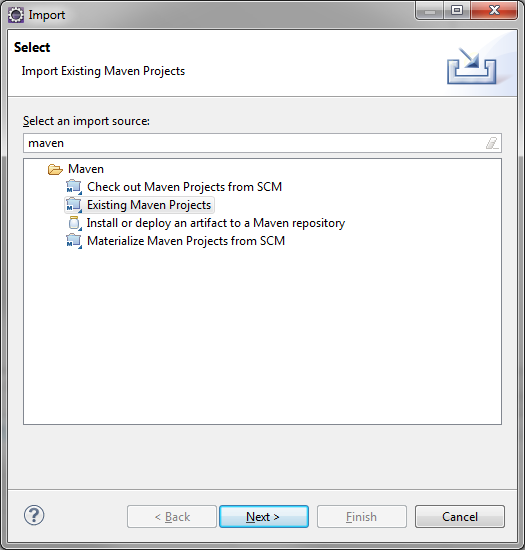
Point to the directory where the code is, mark all the projects, and select the following plugin connections actions:
| Maven Build | Action |
| Packaging war | Install m2e-wtp |
| maven-jar-plugin:<version>:jar | Install mavenarchiver basic support |
| maven-jaxb2-plugin:<version>:generate | Install m2e connector for Jaxb2 Maven plugins |
Your configuration should look like in the screenshot below.
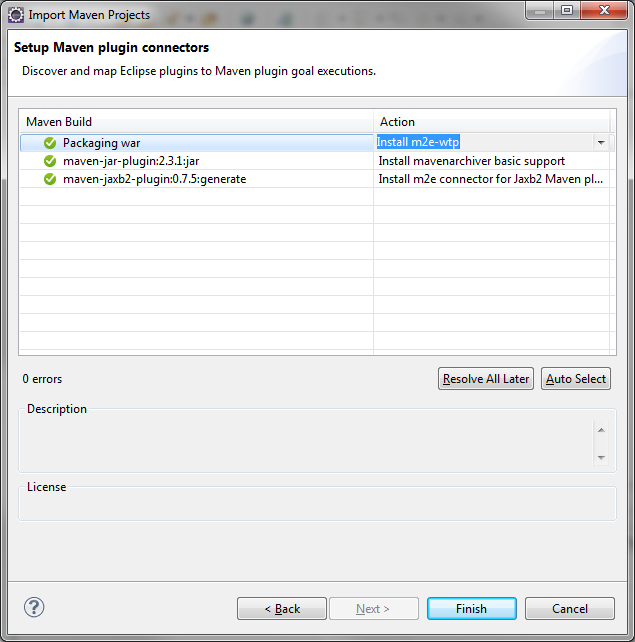
Eclipse will prompt you to download and install the connectors. Click “Next”.
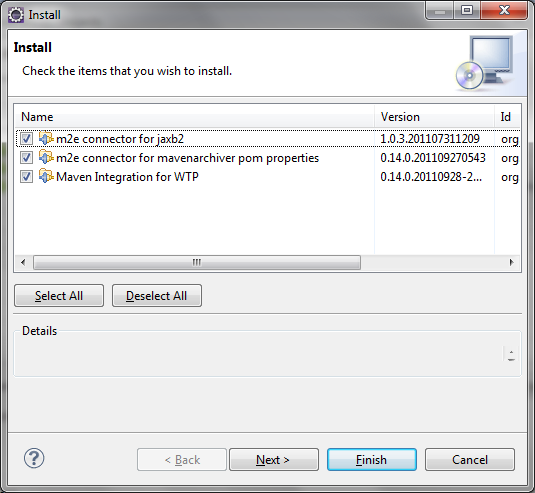
Confirm the installation of the m2e plugins. Restart Eclipse so the changes will take effect. You should then see the OpenClinica projects configured in your IDE.
Eclipse may show a JavaScript related error message when build your project. This is likely a bug on the IDE or its plugins, but has no impact in the environment setup.
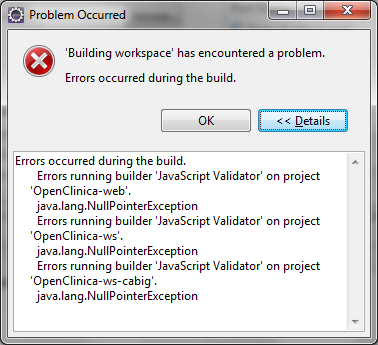
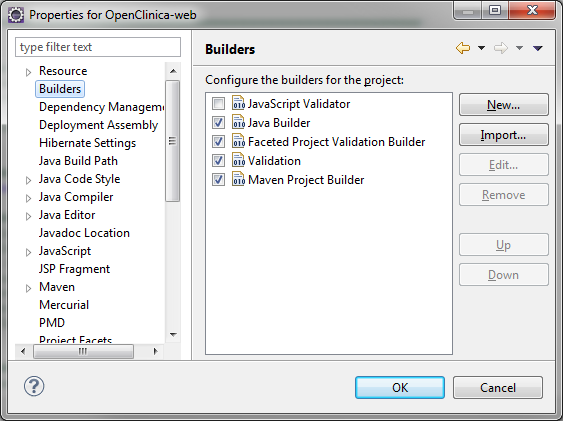
To fix this error message, right-click your OpenClinica-web project and select “Properties”. On the left hand side menu, select “Builders”. Disable the JavaScript Validator builder for this project. Repeat the procedure to disable it for the ws and ws-cabig projects.
You may see some warnings and errors not related to Java files (e.g., XML validation). To turn those alerts off and to have a faster build, go to “Window” > “Preferences”, then under “Validation” check “Suspend all validators”.
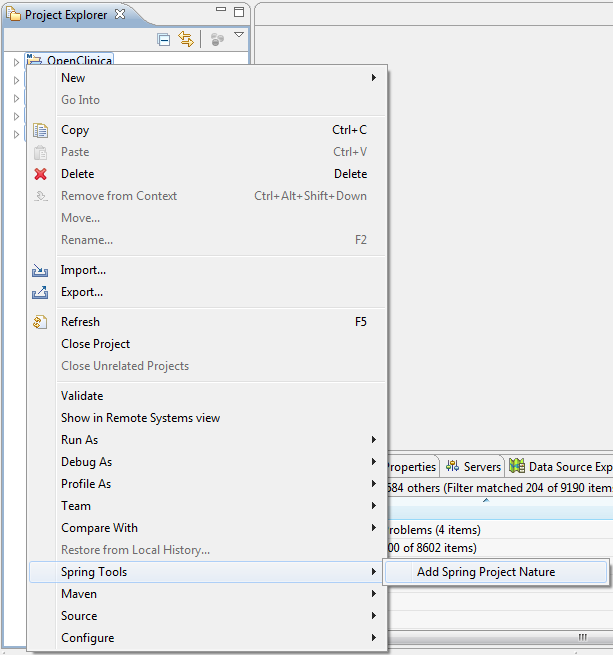
Enable the Spring plugin by selecting all the projects in the “Project Explorer” view, right click them and select “Spring Tools” > “Add Spring Project Nature”.
Create a server
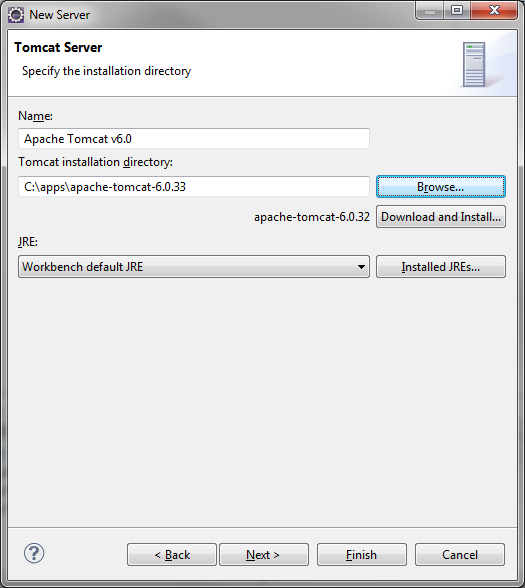
In the “File” menu, select “New”, then under “Servers”, select “Server”. Expand “Apache”, click “Tomcat v6.0 Server” and click “Next”. Under “Tomcat installation directory”, browse to the directory where you extracted Tomcat. Click “Next”:
Select in the list on the right hand side the projects you want to deploy in the server, click “Add >”, then “Finish”.
Configure the server
Double-click the name of your server in the “Servers” view to open the server configuration screen. Under the “General Information” section, click the link “Open Launch Configuration”, then click the tab “Arguments”. Add the following properties to the field “VM arguments”.
-Xmx512m -XX:MaxPermSize=256m 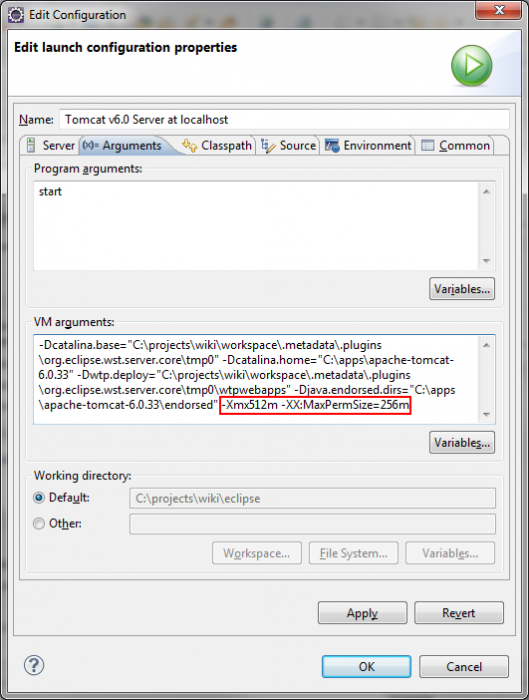
Under the “Timeouts” section, set both “Start” and “Stop” to 999. Save the changes to the server by clicking “File” > “Save”.
Configure JRebel (Optional)
Prerequisites
Download the JRebel installer corresponding to your operating system (not the Eclipse plugin, which will be installed in the next step) from http://zeroturnaround.com/jrebel/current/. Copy the license file (.lic) to the same directory where you installed JRebel. This license file must be in the same directory as the jrebel.jar file. JRebel will work in trial mode without the license file.
Configure Eclipse with the JRebel Eclipse plugin.
Download the JRebel Eclipse plugin from http://www.zeroturnaround.com/update-site. Select all the items under the first group “JRebel”.
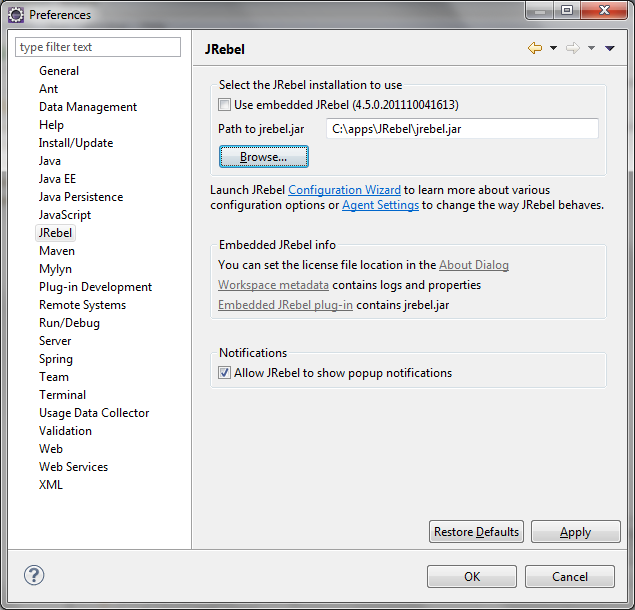
Restart Eclipse when prompted. The JRebel Configuration Wizard screen should appear after Eclipse starts. Click “Cancel”. Go to “Window” > “Preferences”, and under “JRebel”, uncheck “Use embedded JRebel”. Click “Browse” and locate the jrebel.jar file in the JRebels installation directory.
On the left hand side, select “Java” > “Debug” > “Step filtering”. Check “Use Step Filters”, “Filter synthetic methods” and “Step through filters”.
Use the “Add Filter…” button to add the following filters:
com.zeroturnaround.*
org.zeroturnaround.*
Click “Select All” to check all filters in the filters list. Your configuration should look like the screenshot below.
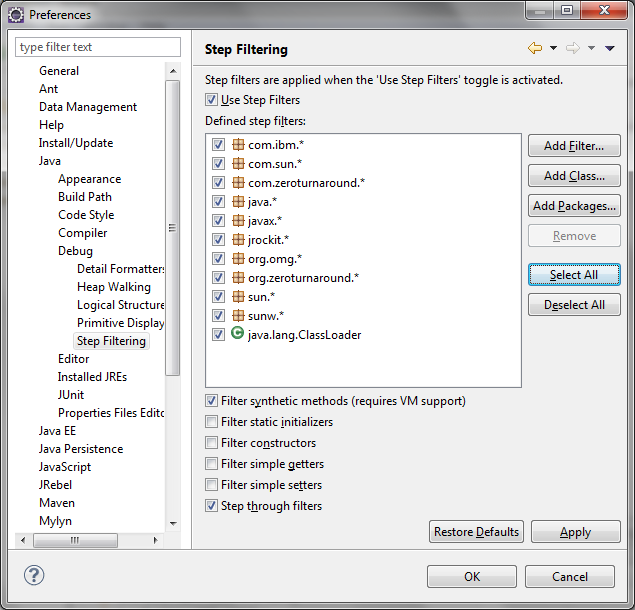
Click “Ok” to close the preferences window. Ensure that “Project” > “Build automatically” is checked.
Configure server for JRebel
Double-click the entry in the “Servers” view corresponding to your Tomcat server to open the server configuration page. Under the section “JRebel Integration”, check “Enable JRebel agent”.
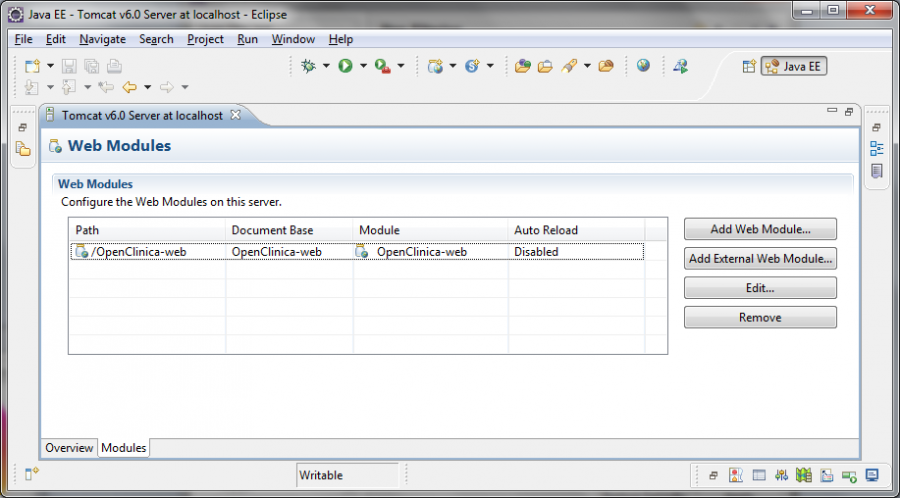
On the bottom-left corner of the server configuration page, click the tab “Modules”. A list of web modules deployed to the server is displayed. For each deployed module, select it in the list and click “Edit…”. Uncheck the box “Auto reloading enabled”. Once all the modules are configured, click “File” > “Save” to save the server configuration. Your modules configuration should look like the screenshot below.
Configure Maven for JRebel
Create or edit your ~/.m2/settings.xml file, where ~ corresponds to the users home directory. If you dont have one, copy it from the $M2_HOME/conf/settings.xml. Add the following XML fragment within the <settings> tag of your file:
<profiles> <!-- This tag may already exist in your file -->
...
<profile>
<id>JRebel</id>
<properties>
<useJRebel>true</useJRebel>
</properties>
</profile>
...
</profiles>
<activeProfiles> <!-- This tag may already exist in your file -->
<activeProfile>JRebel</activeProfile>
</activeProfiles>
Open a command prompt and build your project with the command mvn clean install -Dmaven.test.skip=true. Refresh the project in Eclipse.
Check the JRebel configuration
Start your server in the “Servers” view of Eclipse. Once the server is started, switch to the “Console” view. Scroll to the very beginning of the log file and make sure JRebels header is there.
#
JRebel 4.5.1 (201110191452)
(c) Copyright ZeroTurnaround OU, Estonia, Tartu.
[...]
#
The log file should also describe files monitored or changed by JRebel
JRebel-Spring: Monitoring Spring bean definitions in [...]
You can now change Java classes or JSP files and have JRebel redeploying them without restarting the server.
Customize Properties With a Build Profile
A development filter file can be used to override the default properties during development. This filter is applied only to the developers environment and has no effect on other developers, instances or distribution packages.
Un-comment out the filters on lines 545-548 in the top-level “pom.xml”. Otherwise, developer-specific Maven build profile instructions will not work.
Create a Filter File
A filter file can be used to create an OpenClinica package with configuration values different from the default.
For example, here are the steps required to create a sandbox configuration.
- Create a file named sandbox.properties in the source/main/filters directories of all modules. There is a file named default.properties in these directories that can be used as a template. Or, use an empty file and define on it only the values that are different from the ones defined in default.propertes (i.e., if a property is not specified in sandbox.properties, the value defined in default.properties will be used).
- Make sure the filter file was created for all OpenClinica modules (core, web, and ws). The build will fail if it cannot find the filter file for a module.
- Build OpenClinica using the sandbox configuration in the command line, by typing:
mvn clean package -Dconfig.id=sandbox
Now, create a filter file following the example above. Just dont build the project with Maven yet, as a slightly different configuration should be used. For the file name, follow the dev-<username>-<optional_identifier>.properties convention (e.g., the user John Doe could create a file named dev-jdoe.properties or dev-jdoe-quickfix.properties).
Its important to create the filter file for all Maven modules (core, web, and ws) otherwise the Maven build will fail.
Build from source
Use this file to override properties defined in the default.properties file during the build. Its possible to copy all the content on the default.properties file to it, but thats not recommendable – copy only the properties that will be changed, as all missing properties will still be taken from default.properties.
Create a Maven Build Profile
A Maven build profile will add the filter to the build process. Open the Mavens user settings file (normally located on ${user.home}/.m2/settings.xml, where ${user.home} correspond to the users home directory) and add create a profile tag within the profiles tag of the file, following the example below (make sure the value of the <config.id> tag matches the name of the filter file created previously):
<profile>
<id>config-local</id>
<activation>
<activeByDefault>true</activeByDefault>
</activation>
<properties>
<config.id>dev-jdoe</config.id>
</properties>
</profile>
Build the Project
Build the whole project using
mvn clean install
in the root project level. Notice that the -Dconfig.id parameter should not be used here, as this configuration was already defined in the build profile.
Optional step: Check the properties files in the target directories to make sure the properties were replaced according to the defined filter.
Restart Eclipse (to reload the profile configuration), refresh the project files and perform a clean build. Start Tomcat and the changes made to the filter file should be reflected in the application.
Switch to another configuration
The steps to switch to a different configuration are:
- Create the filter files for all modules
- Change the value of the <config.id> property in the settings.xml file
- Restart Eclipse, if open – Eclipse seems to read the settings.xml file only during startup
To use the default configuration (i.e., all values read from default.properties only), simply comment the whole config-local profile in the settings.xml file.
Development Tools
Mercurial Source Control
- Mercurial PowerPoint Slides – by Doug Rodrigues, OpenClinica, 16-Nov-2011
- TortoiseHg
- MercurialEclipse
- MacHG
- HgInit: Subversion Re-education – Explains the conceptual differences between Subversion and Mercurial)
- Mercurial SCM – Mercurials home page. Contains very interesting information in the user guide and wiki.
- Mercurial Cheat Sheet
