These installation instructions have been verified on the following Windows operating systems versions:
- Windows Server 2003 Standard Edition SP2
- Windows Server 2003 Standard Edition SP1
Please note that all these instructions require Administrator-level permissions.
These instructions are for installing version 3.3 of OpenClinica. Screenshots shown in these instructions might look different than the screens on your system because your operating system might not be exactly the same. For the same reason, your screenshots might not correspond exactly with those in the written instructions. Where the screenshot differs from the written instruction, always follow the written instruction.
All characters in the installation commands are case sensitive. Also note that any additional white space between or after characters in commands could cause installation errors.
9.3.1 Overview of Installation on Windows Systems
Use the following process to acquire, install, and configure OpenClinca and its software dependencies. In each step, click the link to view detailed instructions for that step:
- 9.3.2 Ensure your system complies with software dependencies and operating system requirements.
- 9.3.3 Install Java
- 9.3.4 Install PostgreSQL
- 9.3.5 Install Tomcat
- 9.3.6 Starting and Stopping Tomcat
- 9.3.7 Set Up the PostgreSQL Database
- 9.3.8 Configure Tomcat to Work with OpenClinica and OpenClinica Web Services
- 9.3.9 Configure the OpenClinica Installation
- 9.3.10 Verify the Installation
- 9.3.11 Install OpenClinica Web Services Package
- 9.3.12 Configure OpenClinica Web Services
- 9.3.13 Verify the Installation of OpenClinica Web Services
After completing the OpenClinica installation, see the Overview of OpenClinica for instructions to start using the application. A good first step is to define one or more users (especially a Study Director), and then build a Study.
9.3.2 Software Dependencies and Operating System Requirements
Windows Configuration
Your Windows operating system must be configured to show file extensions by default. To configure this behavior:
1. Open a Windows Explorer window.
2. Select Tools > Folder Options.
3. Click the View tab.
4. In Advanced settings, clear the Hide extensions for known file types checkbox.
5. Click Apply.
Software Dependencies
OpenClinica runs on any Servlet/JSP container that implements the Servlet 2.4 and JavaServer Pages 2.0 specifications from the Java Community Process. OpenClinica was developed to run on and has been tested with Apache Tomcat 7.0.52.
OpenClinica runs on the PostgreSQL relational database. Using a
JDBC (Java Database Connectivity) driver, the database connects to the OpenClinica web application and provides the data to the user.
New installations require the following software dependencies, all of which are open source. These installation instructions walk through the process of downloading, installing, and configuring them for use with OpenClinica.
- Java 7 Standard Edition Development Kit 7.0 update 52 (Note: Java frequently changes its naming conventions.)
- Tomcat 7.0.52
- PostgreSQL 8.4.7.2
Other Versions of Dependent Software
The software dependencies OpenClinica uses are frequently updated with minor versions and revisions. Sometimes only a matter of weeks separates the release of two adjacent versions. In some cases, the particular revision number used may no longer be available. In general, you should be able to use more recent minor versions and revisions of the software dependencies. For example, if the installation instructions refer to PostgreSQL 8.4.7.2, then PostgreSQL 8.4.8 should work successfully too (but not PostgreSQL 9).
Record the version or revision number of all the software you use. If you have concerns about a particular combination, post your question to the OpenClinica Forums.
9.3.3 Install Java
The OpenClinica software is written in the Java programming language, so you must have Java installed on your system in order to run the OpenClinica application. Follow these instructions to install Java:
- OpenClinica 3.3 is designed to run on a Java 7 SDK platform. To avoid conflicts with other versions of Java, clear out any other Java installations on the system. Select Start > Control Panel > Add Remove Programs, then remove any Java JREs and SDKs.
- Create the directory c:ocinstall.
- From one of the following websites, download the Java 7 SE Development Kit 7.0 update 52 (jdk-7u51-windows-i586.exe ) into c:ocinstall:
- From the Java website: http://www.oracle.com/technetwork/java/javase/downloads/jdk7-downloads-1880260.html
4. Run c:ocinstalljdk-7u51-windows-i586.exe.
5. The Open File – Security Warning message displays.
6. Click Run.
The Welcome to Java Installation Wizard opens.
7. Click Next.
The Custom Setup screen displays.
8. Click Change….
9. Change the path to c:oc jdk1.7.0_51, then click OK.
The Custom Setup screen should now look like this:
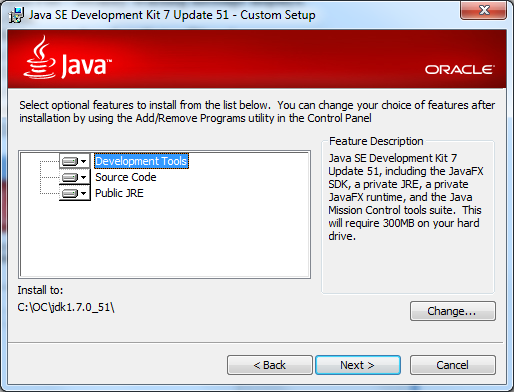
10. Click Next.
The Setup Wizard installs the JDK. When setup completes, a screen to install JRE7 displays.
11. Click Cancel, and then in the confirmation dialog box click Yes.
The Install Success screen displays.
12. Click Close.
13. A web browser window opens, presenting you with the option to register the JDK. Register, or close the window.
9.3.4 Install PostgreSQL Database
The OpenClinica software uses the PostgreSQL relational database management system. Complete these instructions to install PostgreSQL.
- From this location http://www.enterprisedb.com/postgresql-8421-installers-win32?ls=Crossover&type=Crossover , download the executable to c:ocinstall.
- Run the executable
The Open File Security Warning message displays - Click Run.
The PostgreSQL Installation Wizard opens. - Click Next.
The Installation directory screen displays. - Click Next to accept the default values.
The Data directory screen displays. - Click Next to accept the default values.
The Password screen displays. - Enter a password for the Postgres superuser. Record the password for use later in the installation process. Re-enter the password, and click Next.
The Port screen displays. - Click Next to accept the default value (5432).
The Advanced Options screen displays.
- Complete the screen as follows:
1. For Locale, select Default locale.
2. Clear the Install pl/pgsql in template1 database? checkbox.
3. Click Next.
The Ready to install screen displays - Click Next to start the installation.
When the installation finishes, the Completing the PostgreSQL Setup Wizard screen displays. - Clear the Launch Stackbuilder at exit checkbox, then click Finish.
9.3.5 Install Tomcat
- From either of the following websites, download the Windows Service Installer Version, apache-tomcat-7.0.52.exe, and save it to c:ocinstall:
From the Apache website: http://tomcat.apache.org/download-70.cgi
- Run
c:ocinstall apache-tomcat-7.0.52.exe
The Apache Tomcat Setup Installation Wizard opens. - When the Open File – Security Warning message displays, click Run.
- On the Welcome screen of the Apache Tomcat Setup Installation Wizard, click Next.
The License Agreement screen displays. - Click I Agree to accept the agreement.
The Choose Components screen displays. - Click Next to accept the default values.
The Configuration screen displays. - Click Next to accept the default values.
The Java Virtual Machine screen displays. - Click …, then select the path you installed the JDK into:
c:oc jdk1.7.0_51
The screen now should look like this: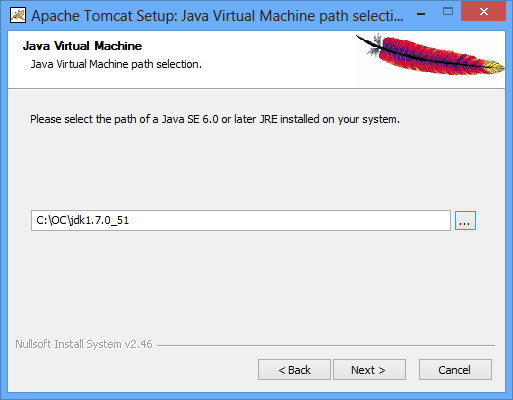
- Click Next.
The Choose Install Location screen displays - Edit the Destination Folder to be c:octomcat. The screen should look like this:
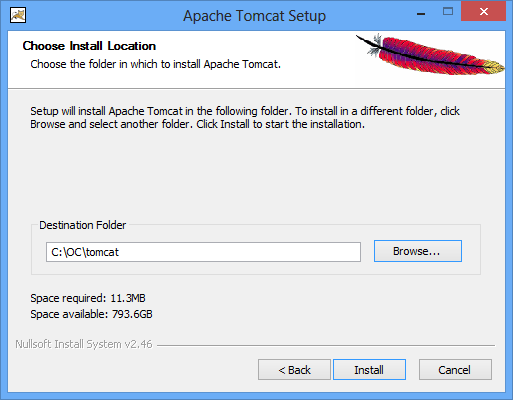
- Click Install to start the installation.
When the installation is finished, the Completing the Apache Tomcat Setup Wizard screen displays. - Complete the screen as follows:
0. Clear the Run Apache Tomcat checkbox.
1. Clear the Show Readme checkbox.
The screen should now look like this: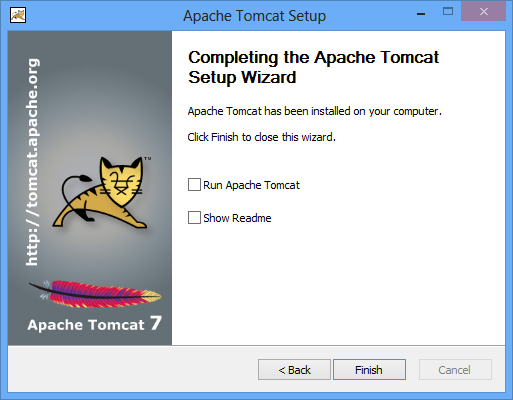
- Click Finish.
- Create the directory c:octomcatoldwebapps.
- Move the web apps provided with Tomcat that OpenClinica does not need by moving the contents of c:octomcatwebapps to c:octomcatoldwebapps.
9.3.6 Starting and Stopping Tomcat
Start Tomcat using any one of these methods:
- From the Apache Tomcat 7 Properties window:
- Select Start > Apache Tomcat 7.0 > Configure Tomcat to open the window.
- Click the General tab.
- On the General page, click the Start button to start Tomcat.
- Using the Windows run command:
- Select Start > Run.
- In the Run box, type cmd, then click OK.
- At the new command prompt, start Tomcat by typing
net start tomcat7
then press Enter.When you need to stop Tomcat, type
net stop tomcat7
then press Enter.
9.3.6 Install OpenClinica Package
- Download the OpenClinica software, OpenClinica-v.x.y.zip, from the OpenClinica website location, https://community.openclinica.com/project/openclinica. To download the software, you need a community account, which is free to create. You will be required to log in to this account to download the OpenClinica software.
After downloading the OpenClinica software, move it to the directory with the other software dependencies you downloaded:
c:ocinstall. - Right-click OpenClinica-v.x.y.zip and select Extract All.
The Extraction Wizard opens. - Click Next.
- In the next screen, change the directory to c:ocinstall, and click Next.
- In the next screen, clear the Show Extracted Files checkbox, and click Finish.
- Copy c:ocinstallOpenClinica-v.x.ydistributionOpenClinica.war to c:octomcatwebapps.
9.3.7 Set Up the PostgreSQL Database
Complete these instructions to setup PostgreSQL database.
- Select Start > Programs > PostgreSQL 8.4 > pgAdminIII.
- The pgAdminIII window opens. Right-click the PostgreSQL 8.4 (localhost:5432) icon, and select Connect, as shown here:
- Log in to the database server using the password you set up during the PostgreSQL installation.
- Create the database openclinica and the database user clinica, which OpenClinica uses to connect to the database:
0. Expand the databases, and select postgreSQL.
1. Select Tools > Query tool.
The Query window opens.
2. In the SQL Editor box, delete all the text.
3. In the SQL Editor box, type the following:
CREATE ROLE clinica LOGIN ENCRYPTED PASSWORD ‘clinica’ SUPERUSER NOINHERIT NOCREATEDB NOCREATEROLE;
4. Select Query > Execute, which runs the SQL query.
When the query completes, a message displays in the History window.
5. In the SQL Editor box, delete all the text.
6. In the SQL Editor box, type the following:
CREATE DATABASE openclinica WITH ENCODING=’UTF8′ OWNER=clinica;
7. Select Query > Execute.
When the query completes, a message displays in the History window.
8. Close the Query window, and click No when prompted to save changes. - The database password is set to clinica by default, which is not a secure password. Change the password as follows:
- In the pgAdminIII window, expand and select Login Roles.
- Select View > Refresh.
- The clinica database user is listed.
- Right-click the clinica user account and select Properties.
- In the Login Role for clinica box that displays, enter the new password and re-enter it, then click OK. Record the password for future use.
9.3.8 Configure Tomcat to Work with OpenClinica and (if installed) OpenClinica Web Services
- Select Start>All Programs > Apache Tomcat 7.0 > Configure Tomcat.
The Apache Tomcat 7 Properties window opens. - Please click the Java Options tab described in the ‘Configure Tomcat’ section and add the following
-XX:+UseParallelGC
-XX:ParallelGCThreads=n
-XX:MaxPermSize=180m
-XX:+CMSClassUnloadingEnabled
On Java Console set Maximum Pool Size to 1280.
Please note that the minimum RAM requirement is 1280 MB of memory for these settings, so the CPU is expected to have much higher RAM available.
Where n is the number of cores of your CPU. There should be no spaces before or after each entry. Each entry should be on a new line. The MaxPermSize value depends on the number of .war files that you are deploying. For instance, if you deploy web and web services, XX:MaxPermSize should be set to 360m.
-XX:ParallelGCThreads = # of cores of your CPU, as long as the number of processors on your CPU are lesser than 8.The Window should look like this for a 4 core processor:
This setting is based upon the number of war files deployed. The web war needs a 180m of PermGen and the ws war needs a 90m of PermGen memory settings. - The window should now look like this:
- Click Apply, which completes the configuration of Tomcat.
- Start Tomcat:
- Click the General tab.
- On the General page, click Start.
- In about five minutes, Tomcat will be fully started. Verify it is fully started by opening the file c:octomcatlogstomcat7-stderr.current date.out, and looking for this line:
INFO: Server Startup in XXXXX ms - After verifying Tomcat has fully started, in the General page of the Apache Tomcat 7 Properties window, click Stop.
- Wait two minutes for Tomcat to stop, then delete OpenClinca.war from c:octomcatwebapps.
9.3.9 Configure the OpenClinica Application
If you followed all the previous instructions exactly, there is only one property in the configuration file, datainfo.properties, that you may need to change in order for OpenClinica to start. There are other properties in the configuration file you will probably want to modify for your system, however.
- Using WordPad, open the configuration file:
c:octomcatwebappsOpenClinicaWEB-INFclassesdatainfo.properties - Edit values for the properties in the datainfo.properties file. You must change the value for dbPass to the password you selected when you set-up PostgreSQL. Change the values for any other properties. The datainfo.properties file for Windows is the same as for Linux.
- When you finish making changes, save the file.
- You may also need to configure OpenClinica for internationalization should you wish to utilize OpenClinica in different languages. Also, if you need to use some UTF-8 characters in your application, you may need to modify your default connecter configuration. For more information regarding configuring OpenClinica for internationalization and using UTF-8 characters, please refer to https://docs.openclinica.com/3-1-technical-documents/openclinica-and-internationalization/.
9.3.10 Verify the Installation
At this point, Java, Tomcat, PostgreSQL, and OpenClinica are installed and set up. Verify the installation was successful by following these steps:
- Restart Tomcat
- Open a web browser and access OpenClinica at the following URL:
http://localhost:8080/OpenClinica
(The port number may be different if you changed the configuration of your Tomcat instance that is running OpenClinica.) The OpenClinica Login page should display.
- Log in to OpenClinica using the default user name, root, and password 12345678. You will be forced to change the password for the user “root” to a secure password. See Update User Profile if you need more information.
- The user “root” is assigned to a default Study named “Default.” Create a user account for yourself, with the User Type set to “technical administrator” and the User Role set to Data Manager: for instructions to create the user account, see Create a New User.
- Log out and stop Tomcat if you now plan to install Web Services Package
9.3.11 Install OpenClinica Web Services Package
Web Services are optional. You do not need to install them if you are not planning on using web services.
- Download the OpenClinica-ws software, OpenClinica-ws-v.x.y.zip, from the OpenClinica website location: https://community.openclinica.com/project/openclinica. To download the software, you need a community account, which is free to create. You will be required to log in to the account to download the OpenClinica software. After downloading the OpenClinica-ws software, move it to the directory with the other software dependencies you downloaded: c:ocinstall.
- Right-click OpenClinica-ws-v.x.y.zip and select Extract All.
- The Extraction Wizard opens.
- Click Next.
- In the next screen, change the directory to c:ocinstall, and click Next.
- In the next screen, clear the Show Extracted Files checkbox, and click Finish.
- Copy c:ocinstallOpenClinica-ws-v.x.ydistributionOpenClinica-ws.war to c:octomcatwebapps.
- Restart Tomcat then stop Tomcat following the intructions from above.
9.3.12 Configure OpenClinica Web Services
If you followed all the previous instructions exactly, there is only one property in the configuration file, datainfo.properties, that you may need to change in order for OpenClinica Web Services to start. There are other properties in the configuration file you will probably want to modify for your system, however.
Note: Most of the properties are not needed or used for Web Services.
- Using WordPad, open the configuration file:
c:octomcatwebappsOpenClinica-wsWEB-INFclassesdatainfo.properties - Edit values for the properties in the datainfo.properties file. You must change all values from Database Configuration section of datainfo.properties file to reflect your settings in datainfo.properties file for OpenClinica application. Change the values for any other properties.
The datainfo.properties file for Windows is the same as for Linuxsee more information at description of datainfo.properties file for web services.
- If you are installing Web Services for OpenClinica 3.1.2 and earlier please edit adminEmail property (section 5 – adminEmail) if you would like e-mail to be send through ‘Contact’ link from Web Services welcome page.
- Other properties that can be configured for web services are:
0. Section 11 – Logging configuration - When you finish making changes, save the file.
9.3.13 Verify the Installation of OpenClinica Web Services
- Restart Tomcat
- Point your web browser to the OpenClinica Web Services welcome page: http://<<server url>>:8080/OpenClinica-ws. The OpenClinica Web Services Welcome page should be display.
- Verify the version number is v.x.x-Community, where v.x.x is the version number you upgraded OpenClinica Web Services to. The version number is displayed in the lower right corner of the page.
Web Services should have the same version as OpenClinica application.