Learn how to create, respond to, and close queries in OpenClinica. Queries help ensure data accuracy and compliance by flagging discrepancies or missing information.
A query is an inquiry or alert regarding potentially incorrect or incomplete data. Queries can be:
- Manually created by users
- Automatically generated by the system when certain conditions occur (for example, when closing a form with unaddressed errors)
⚠️ Warning: Only Data Managers and Monitors can close queries.
ℹ️ Note: Queries created or closed automatically by OpenClinica (for example, when you leave a form, remove a form or event, publish a form version, or run an import) are attributed to the System user in the Queries table. This distinguishes them from queries added manually by users.
Annotations are notes added to a form that do not contain clinical data. They are typically used for workflow tracking or internal communication.
Reasons for Change are notes entered by a user when modifying data on a form that has already been marked as Complete. These notes provide traceability for data edits.
Access Levels for Query Management
| Access Level | Description |
| Read-Only | Allows users to view form data only. Users with Read-Only access cannot create, update, or respond to queries. |
| Review | Allows users to view form data and create or update queries, but not edit form data. |
| Edit | Allows users to enter or modify data and create or update queries. |
| Close Query | Available only to Data Managers and Monitors. These roles can close or reopen queries. |
Queries Page
The Queries page is the central location for reviewing all notes—queries, annotations, and reasons for change—entered within a study or site.
You can sort and filter these notes by Query ID, Participant ID, Note Type, Resolution Status, Days Open, Assigned User, CRF, and other columns.
The Queries page includes two sections:
Query Summary Table
Queries Table
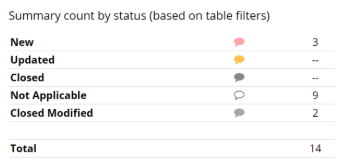
Query Summary Table
The Query Summary Table displays a count of all query resolution statuses and their totals as shown in the Queries Table.
These totals reflect the number of items currently displayed in the Queries Table, based on any filters applied.
When filters are added to the Queries Table, both the total number of rows and the Summary Table totals update automatically to reflect the filtered view.
Queries Table
The Queries Table lists all queries, annotations, and reasons for change recorded in the study.
You can filter the table to display only specific note types (for example, queries only, annotations only, or reasons for change only), or any combination of the three.
The table can also be printed or downloaded for offline review.

Columns and Filtering Options
Query ID – A unique identifier automatically assigned to each query when it is created.
If the view is filtered to show only annotations or reasons for change, this column displays N/A.
Detailed Notes – Displays the full content of the query, annotation, or reason for change.
Assigned User – Displays the user assigned to the query.
If no user is assigned, the column will appear empty (no name shown in parentheses).
Click Show More at the top of the table to display additional columns.
Available columns include:
You can filter any column that includes a gray filter box.
For example, to filter by Reason for Change, click the gray filter box under the Type column and select Reason for Change.
Query and Annotation Status Icons
The following table describes the icons and statuses that appear in the Queries panel.
| Icon | Status | Description |
 | No Query | Click this bubble to create a new query. |
 | New | A query has been added by a user with Review access to the form (ex. Monitor or a Data Manager) or was automatically generated by OpenClinica based on built-in edit checks. |
 | Updated | A user with Review access to the form has added information to the query. |
 | Closed | The query is considered resolved by the Data Manager or Monitor. |
 | Closed Modified | A slightly lighter version of the Closed icon indicates that data was changed after the query was closed. |
 | Multiple New Queries | Indicates that multiple new queries exist. You can select each query from the sidebar. |
 | Multiple Updated Queries | Indicates that multiple updated queries exist. You can select each query from the sidebar. |
 | One or Multiple Annotations | Indicates that one or more annotations exist. You can select each annotation from the sidebar. |
ℹ️ Note: System-generated queries appear in the Queries table with System listed as the user.
Review Data Associated with a Query
You can review query-related data using one of two view options, accessible from the Actions column in the Queries table.
| Icon | View option | Description |
 | View Query Only | Opens a shaded window showing the queried item’s value with the query and item history in the foreground. You can add comments, assign the query, or email the assigned user. All users with Review access to the form can update queries; only Data Managers and Monitors can close queries. |
|
| View Query Within Record | Opens the entire form in Edit, Review or Read Only mode (depending on user permissions) with all queried fields highlighted. This view displays full form context, allowing users with Edit access to review and update related data. Use this option when you need to review or modify data in context. ℹ️ Note: Opening a form in Edit mode may trigger field calculations and conditional logic, which can automatically recalculate or update field values and generate corresponding audit log entries. If you do not want to trigger calculations or logic, use View Query Only. |

After reviewing, you can update the query comment, close the query details by clicking ×, and review the entire form in question.
Data Managers and Monitors have the additional option to close the query.
Queries for Hidden or Deleted Items
In some cases, queries may remain even when the associated item or record is no longer visible on the form:
Conditionally displayed items:
If a query was added to an item that is only visible based on another response, and the lead-in response changes, the queried item may become hidden. The query still exists and must be resolved.Repeating records:
If a query was added to a row that has since been deleted, the query remains active but no longer appears on the form.
When this occurs, OpenClinica displays a message informing you of the hidden item and providing an option to resolve the query.
To proceed:
Click OK to review the remaining data on the form, or
Return to the Queries screen and use the View Query Only option for that query (as instructed in the message).
Create a Query
You can create a query to inquire about participant data that appears incorrect, incomplete, or inconsistent with source records.
Common Use Cases
Participant data does not match source records.
Data appears clinically inaccurate or contains typographical errors.
A form must be marked Complete, but an edit check prevents it.
Required information is missing from a form.
A form within an event was not started on time.
ℹ️ Note: You can only add or respond to queries and annotations when you have Edit or Review access to the form, as defined by your user role. Users with Read-only access cannot create or respond to queries.
Each query is automatically assigned a unique Query ID within the study environment (Test or Production).The ID appears in the Queries widget but is not visible until you close and reopen the Form. It also appears on the Queries table.
You can add multiple queries regardless of any existing ones.
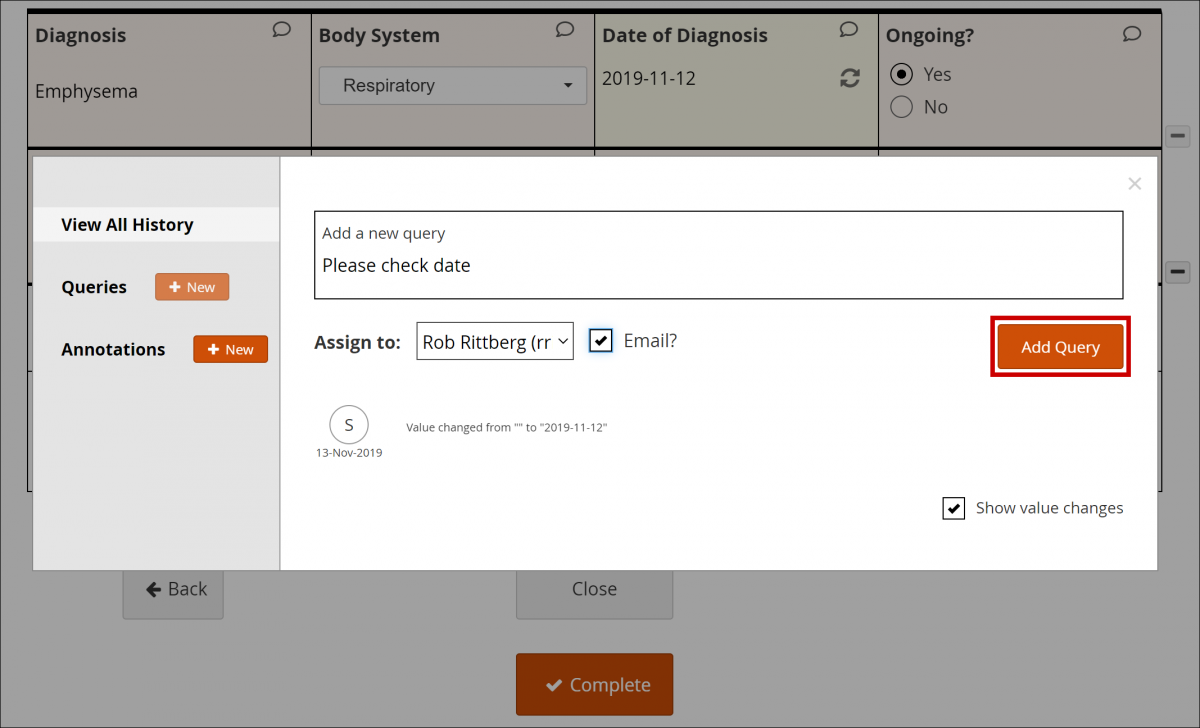
Steps to Create a Query
- Open the Form.
- Click the Query Bubble in the field where you want to create a query.
- Click the +New button next to Queries.
- In the Add a new query field, enter a clear description of the issue.
- (Optional) Select a user from the Assign to dropdown.
- If you want to email that user to notify them about the query, check the box next to Email. When a query notification email is sent, it includes the Query ID for easy access.
- Click Add Query.
💡 Best Practices
- If a form has not been started when expected, a Data Manager can add a query to the event’s start date.
- When creating a query, assign it to the correct recipient.
- If action is required excluding if the query needs to be closed, the Email checkbox should be checked off.
- Create a new query for a single issue instead of combining multiple issues.
- Always create a new query rather than reopening one that has already been closed.
View Query History
To view the history for all queries and annotations on a single item:
Click View All History, or
Select an individual query or annotation from the left panel.
To include value changes in the history, select the Show Value Changes checkbox.
Respond to or Update a Query
Use Case(s)
- A response is required for the query to be resolved.
- Participant data must be changed for the query to be resolved.
Users can update queries by responding to a query and/or changing data in the form. If form data changes, you must enter a Reason for Change.
ℹ️ Note: You can only add or respond to queries and annotations when you have Edit or Review access to the form, as defined by your user role. Users with Read-only access cannot create or respond to queries.
To Respond to or Update in a Form
- Open the Form.
- Click the Query Bubble in the field you want to create a query for.
- Select the query you want to respond to or update.
- (Optional) If you need to change information in a form, close the Query widget, and make changes to the Form manually. You must provide a Reason for Change before completing the Form.
- In the Respond to query field, enter text explaining the query response.
- (Optional) Select a user from the Assign to dropdown.
- If you want to email that user to notify them about the query, check the box next to Email. When a query notification email is sent, it includes the Query ID for easy access.
- Click Update to save your response and keep the query open.
To Respond to or Update a Query from the Queries Table
- Click View Query Only or View Query within record in the Actions column of the Queries table.
- (Optional) If you need to change information in a form, close the Query widget, and make changes to the form manually. You must provide a Reason for Change before completing the form.
- In the Respond to query field, enter text explaining the query response.
- (Optional) Select a user from the Assign to dropdown.
- If you want to email that user to notify them about the query, check the box next to Email. When a query notification email is sent, it includes the Query ID for easy access..
- Click Update to save your response and keep the query open.
Best Practices for Managing Queries
General Guidelines
All users can view queries assigned to them by expanding the Quick Links header in the left-hand sidebar and selecting Queries Assigned to Me.
Data Managers can also access their assigned queries directly from the Home screen by clicking Queries Assigned to Me.
When a query is updated or responded to, assign it to the correct recipient.
If action is required, select the Email checkbox to notify the assigned user.
Data Managers and Monitors should review the full list of queries regularly to identify and resolve any unassigned queries.
💡 Tip
Queries on conditional or repeating fields may remain active even if the field is no longer visible on the form (for example, if a conditional response hides the item or a repeating record row is deleted).
OpenClinica displays a message when this occurs. Click OK to review the remaining data on the form. The hidden query still exists and must be addressed.
Close a Query
Data Managers and Monitors can close queries when the issue has been resolved.
These roles are also the only users who can reopen a closed query.
Use Cases
The issue has been corrected in the form.
A user has provided a valid explanation for the existing data.
ℹ️ Note: Some queries may close automatically due to system actions such as form removal, version updates, or field visibility changes. These closures are attributed to the System user.
Close a Query In a Form
- Open the Form.
- Click the Query Bubble in the field containing the query.
- Select the query you want to close.
- Click the Close button.
Close a Query from the Queries Table
In the Queries table, locate the query you want to close.
In the Actions column, click View Query Only or View Query Within Record.
Click Close.
💡 Tip: Queries can also be closed in bulk using the Data Review Table. For more information, refer to Data Review Tables.
ℹ️ Note: Only Data Managers and Monitors have permission to close queries.
Annotations
You can add annotations to a field to record workflow-related notes or comments.
Annotations cannot be assigned, responded to, or closed.
Use Case
Add annotations to track workflow notes or internal comments on a form field.
💡 Tip: Do not include clinical information in annotations.
To Enter an Annotation:
- Open the Form.
- Click the Query Bubble in the field for which you want to create an annotation.
- Click the + New button next to Annotations.
- In the Add a new annotation field, enter text for the annotation.
- Click Add Annotation.
ℹ️ Note:
- Annotations are indicated with an i icon.
- They appear as N/A in the Query ID column and Not Applicable in the Resolution Status column.
- You can view annotation history via View All History or by selecting individual annotations in the left panel.
- Selecting Show value changes displays associated value changes.
Download Queries, Annotations, and Reasons for Change
At the top of the Queries table, click Download.
In the Format field, select Comma-Separated Values (CSV) or Portable Document Format (PDF).
Click Download Notes.
Print Queries, Annotations, and Reasons for Change
At the top of the Queries table, click Print.
When the print window opens, choose one of the following methods:
Press Ctrl + P (Windows) or Command + P (Mac).
Click OK, then right-click the window and select Print.