

2.5.1 Import the Data File
Users whose role has appropriate permission can import data from the OpenClinica web interface. The Study or Site in the import file must be the same as the current Study or Site.
To import the data:
- From the navigation bar, select Tasks > Import Data.
The Import CRF Data page opens. - Browse for the XML file that contains the import data, select the file, and click Open.
The filename you selected is listed on the Import CRF Data page. - On the Import CRF Data page, click Continue.
OpenClinica validates the XML file. If there are any validation errors, the Alerts and Messages sidebar panel reports the problems. Correct the errors in the file, then in the Import CRF Data page, browse to select the filename, and click Continue.If there are no validation errors, OpenClinica displays a page summarizing the CRF data being imported, and presents the results of the Hard Validation Error Checks, including any errors. For example, it reports an error if a date format is invalid.
Correct any problems in the file, then, in the Import CRF Data page, browse to select the filename, and click Continue.
- If there are no Hard Validation Errors, to continue to import the data, click Continue.
- In the confirmation dialog box, to complete the data import, click OK. To cancel the import, click Cancel.
If you completed the import, the CRF(s) for the Subject(s) specified in the import file now contain the imported data, and the status of the CRF(s) are set to the status specified in the import file. - If the CRF contains empty fields for any calculated values, manually open the CRF and save each page that contains the calculated values.
OpenClinica only calculates the values when you save the page manually. For details, see Complete a CRF. - If there are Rules associated with the CRFs where the data was imported, check to see if you need to manually run the Rules. As of OpenClinica 3.1.3, the Rule option <Run ImportDataEntry=”true”> ensures that Rules are run when importing data. If this option was set to “false” in the Rule, go to Tasks>Monitor and Manage Data>CRFs. Then, on the top row for the CRF (original), click the view icon. Scroll to the bottom of the page and click Run All Rules for this CRF.
2.5.2 Data File for Import
To import Event CRF data, generate a properly-formatted XML file that contains the data to import. The XML file includes the Object Identifiers (OIDs) that OpenClinica uses to uniquely identify the entities in the Study. The XML file is compliant with the Clinical Data Interchange Standards Consortium Object Data Module (CDISC ODM), version 1.2 or 1.3.
To generate the XML file for importing data:
- Determine OIDs for the Subjects, Study, Event Definitions, Forms, Item Groups, and Items that you want to import data for. See details at Determine OIDs.
- Generate the import file using the OIDs and the data. For details, see Generate Data Import File.
2.5.3 Determine OIDs
Use the following methods to determine Object Identifiers (OIDs). Record the OIDs for use in the data import file. The OIDs for Study, Study Event Definitions, Forms (CRFs), Item Groups, and Items were created as part of Study Setup. The OIDs for Study Subjects were created when the Subject was added to the Study.
To determine OIDs for Study Subjects, view the Subject Matrix, then click Show More. The Subject OIDs are in the OID column. For the example Subject Matrix shown here, the OID for Subject CAM107 is SS_CAM107:

To determine OIDs for the Study, Study Event Definitions, CRF, Item Groups, and Items, use one of these methods:
- View study details in the OpenClinica web interface.
- View the Study Metadata file. You should be familiar with XML file structure to use this method.
2.5.3.1 View Study Details to Determine OIDs
- Select Tasks > View Study.
A page with details about the current study opens. - From the Oveview section, record the Study OID.
- From the Sites section, record the Site OID.
- From the Event Definitions section, record the Event OIDs.
- For the Event Definition whose CRF OIDs you want, click the View icon.
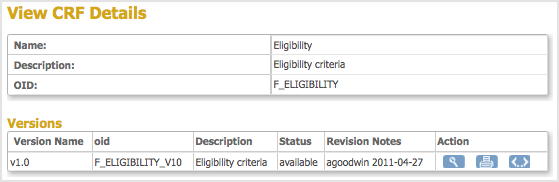
The View Event Definition page opens, displaying a table of CRFs for that Event. - In the CRFs table, click the View icon for the CRF whose OIDs you want.
The View CRF Details page opens and displays a table of Versions. - From the Versions table, record the OID for the version of the CRF you want to use.
- For the CRF version you want, click the Metadata icon
 .
.
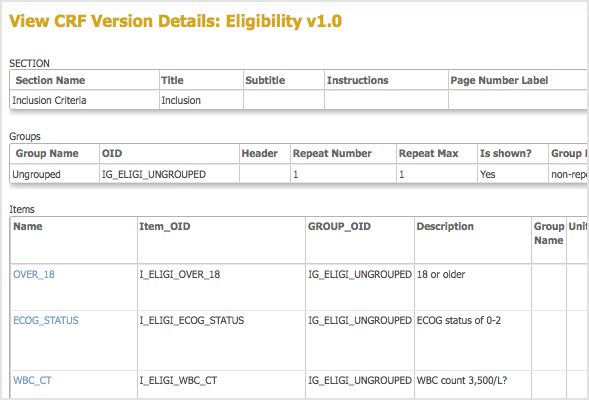
The View CRF Version Details page opens. - From the View CRF Version Details page, record the OIDs for the Item Groups and Items.
2.5.3.2 View the Study Metadata File to Determine OIDs
If you are familiar with XML file structure, you can determine OIDs using the Study metadata file:
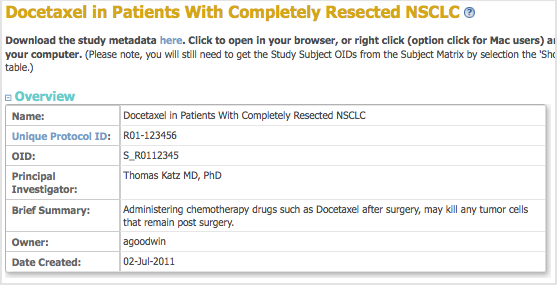
- Download the Study metadata file: Select Tasks > View Study, then follow the instructions at the top of the page.
- Open the Study metadata file in a browser or text editor.
Following is an excerpt of a Study metadata file that provides an example of the structure, showing only the tags that are relevant to finding and determining OIDs needed for the data import file. Comments <!– … –> indicate where the OID values are. You can download and view the complete Study metadata file for the example Study.
Starting with the <Protocol> tag, the general structure is that the OID for an element is defined in a <…Ref> tag. After that, a <…Def> tag for the element contains tags that define the OIDs for the subelements, and so on, through the hierarchy. The heirarchy is: Study Event Definition > Form (CRF) > Item Group > Item.
<?xml version …?>
<ODM … >
<Study OID=”YourStudyOID“> <!– Get the Study OID here. –>
<GlobalVariables>
…
</GlobalVariables>
<BasicDefinitions>
…
</BasicDefinitions>
<MetaDataVersion OID=”YourMetaDataVersionOID“… > <!– Get the MetaDataVersion OID here. –>
<Protocol>
<StudyEventRef StudyEventOID=”YourFirstStudyEventOID” …/> <!– Get the OID for your first Study Event here –>
<StudyEventRef StudyEventOID=”YourSecondStudyEventOID” …/> <!– Get the OID for your second Study Event here –>
…
</Protocol>
<StudyEventDef OID=”YourFirstStudyEventOID” … > <!– This section contains the OIDs for the Forms (CRFs) in the Study Event whose OID is YourFirstStudyEventOID –>
<FormRef FormOID=”YourFirstFormOID” … /> <!– Get the OID for the first CRF used in this Study Event here –>
<FormRef FormOID=”YourSecondFormOID” … /> <!– Get the OID for the second CRF used in this Study Event here –>
…
</StudyEventDef>
<StudyEventDef OID=”YourSecondStudyEventOID” … > <!– This section contains the OIDs for the Forms (CRFs) in the Study Event whose OID is YourSecondStudyEventOID –>
</StudyEventDef>
…
<FormDef OID=”YourFirstFormOID” …> <!– This section contains the OIDs for the Item Groups in the CRF whose OID is YourFirstFormOID –>
<ItemGroupRef ItemGroupOID=”YourFirstItemGroupOID” … /> <!– Get the OID for the first Item Group in this CRF here –>
<ItemGroupRef ItemGroupOID=”YourSecondItemGroupOID” …/> <!– Get the OID for the second Item Group in this CRF here –>
…
<OpenClinica:FormDetails … >
…
</OpenClinica:FormDetails>
</FormDef>
<FormDef OID=”YourSecondFormOID” …> <!– This section contains the OIDs for the Item Groups in the CRF whose OID is YourSecondFormOID –>
…
</FormDef>
<ItemGroupDef OID=”YourFirstItemGroupOID” … > <!– This section contains the OIDs for the Items in the Item Group whose OID is YourFirstItemGroupOID –>
<ItemRef ItemOID=”YourFirstItemOIDInYourFirstItemGroup” /> <!– Get the OID for the first Item in this Item Group here –>
<ItemRef ItemOID=”YourSecondItemOIDInYourFirstItemGroup” /> <!– Get the OID for the second Item in this Item Group here –>
…
<OpenClinica:ItemGroupDetails … >
…
</OpenClinica:ItemGroupDetails …>
</ItemGroupDef>
<ItemGroupDef OID=”YourSecondItemGroupOID” … > <!– This section contains the OIDs for the Items in the Item Group whose OID is YourSecondItemGroupOID –>
…
</ItemGroupDef>
…
<ItemDef OID=”YourFirstItemOIDInYourFirstItemGroup” … > <!– This section contains details for the Item whose OID is YourFirstItemOIDInYourFirstItemGroup –>
…
</ItemDef>
<ItemDef OID=”YourSecondItemOIDInYourFirstItemGroup” … > <!– This section contains details for the Item whose OID is YourSecondItemOIDInYourFirstItemGroup –>
…
</ItemDef>
…
2.5.4 Create the Data Import File
Create the data import XML file using the OIDs for your Study, and the data for each Item. Use the example in this section as a template for the structure of your data import file. You can also download example files.
Starting with the <SubjectData> tag, the general structure is that the tag for an element contains the tags for its subelements, and so on, through the hierarchy. The heirarchy is: Study Subject > Study Event Definition > Form (CRF) > Item Group > Item. So within a <SubjectData> tag are the <EventData> tags for that Subject, and so on.
For Repeating Events and Repeating Item Groups, specify the value 1 for the first Repeat Key, 2 for the second Repeat Key, and so on.
Following is an XML import file that imports data into a demographics form in the sample Juno study:

To create an XML data import file:
- Download the import template
- Open the import template in an XML editor
- Save the template as an XML file.
- Modify the template as needed to meet the requirements of the data you are importing. Instructions are provided throughout the template for guidance.
2.5.5 Validate and Check the Data Import File
When you import a data file, OpenClinica validates the file format and performs validity checking for the data, then displays any error messages in the Alerts and Messages sidebar panel. Correct any errors in the file and import it again.
OpenClinica also displays Summary Statistics of imported and skipped records and displays detailed information about the import. Details on the validation and rules applied during import are listed below the screen shot.

Validation that OpenClinica Performs on the Data Import File
- XML is well-formed against the ODM.
- The Study OID in the import file matches the current Study in the OpenClinica session you are performing the import from.
- Study Subject OIDs exist for the current Study.
- Study Event Definition OIDs exist for the current Study.
- OIDs for the CRF versions exist for the Study Event Definition OID.
- Study Subject OIDs are scheduled for the Study Events.
- Data values for the Items comply with the metadata. For example, if the metadata for an Item calls for a value of 1 or 2, the data value for that Item in your import file must be 1 or 2.
- Data values are in the correct format. For example, when an integer is required, a decimal value generates an error.
Edit Checks that OpenClinica Performs on the Data Import File
If your study is configured to flag errors in Edit Checks, OpenClinica checks the following:
- The status of the CRF (prior to import) is not “double data entry started” or “data entry complete.”
- Data is in the correct format. For example, a date that is not in the required YYYY-MM-DD format generates an error.
- Data values are within limits specified for CRF Items. For example, when the CRF accepts 90 to 110 degrees for temperature, a value of 200 is not accepted.
- Data values match acceptable criteria for CRF Items. For example, if a Yes answer is required for an Item and the value in the import file for that Item is No, a discrepancy note is required.
- Required fields are not empty.
2.5.6 Example Data Import File
This sample file is provided as an example only – your OIDs and item values will vary.
Click the file to open or download it, using the standard features in your browser for accessing linked files.
For best results, copy the content of the file to an XML editor and save as an XML file type.
XML editors Notepad++ (for Windows) and TextWrangler (for Mac) are available for free download on the internet.
- Simple Data Import File with One Item Group: One Subject, one Event, one CRF, one Item Group, multiple Items.