2.8.1 Overview of Subject Matrix
To access the Subject Matrix, click Subject Matrix in the navigation bar.
The Subject Matrix is a table with Event information for all Subjects in a Study. You can view, enter, and change information for Subjects and their Events in the Study, starting either with the Event or from the collection of all information for the Subject. There is one Subject per row, with the Study Subject ID in the first column. The other columns are for each Event Definition in the Study.
Each cell in the matrix contains an icon that identifies the status of the Event for the Study Subject. Move the cursor over an icon in the matrix to view and access a Subject’s data and to access actions you can perform for that Event. Refer to the Icon Key in the sidebar for icon descriptions, and see About the Event Status for more details.
When the current Study/Site is set to the overall Study level, the matrix shows all Subjects in the Study. When the current Study/Site is set to a Site, the matrix shows only Subjects at the Site.
To add a Subject to the Study, click the Add New Subject link, which is just above the column headers in the matrix. For more details, see Add Subject.
To work with a Subject across multiple Studies in your OpenClinica system, or to change information about a Subject that cannot be changed using the Submit Data module, instead use the Administer Subjects features in the Administration Module.
2.8.2 View and Enter Event Data in Subject Matrix
To view or enter data for an Event for a Subject, move the cursor over the icon in the cell.
Subject Matrix After Hovering Over the Icon in the Registration Visit Column for Subject ID CAM102:
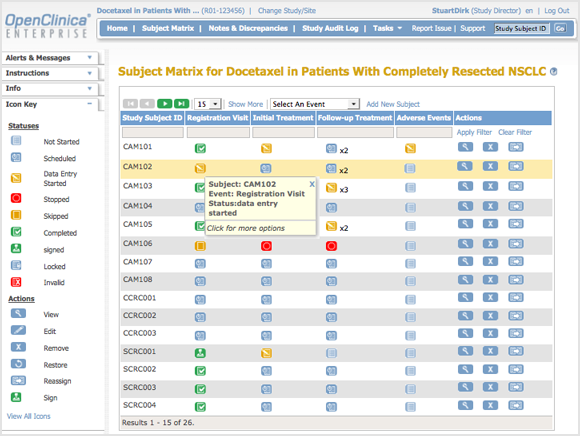
To see the actions you can perform for that Event, click the icon.
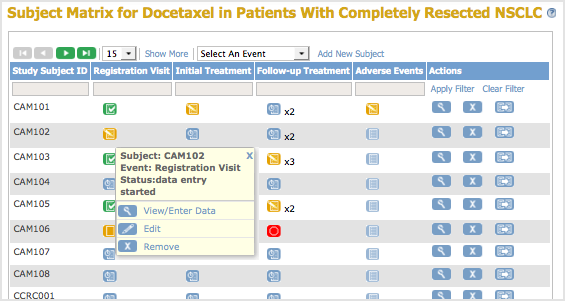
You can then select the action you want to perform, or click X to close the list of actions. Depending on your Role and the status of the Event, the actions include: Schedule, View, Enter Data, Edit, Remove, or Add Another Occurrence.
Subject Matrix After Clicking the Icon in the Registration Visit Column for Subject ID CAM102:
2.8.3 Show More Information About Subjects in Subject Matrix
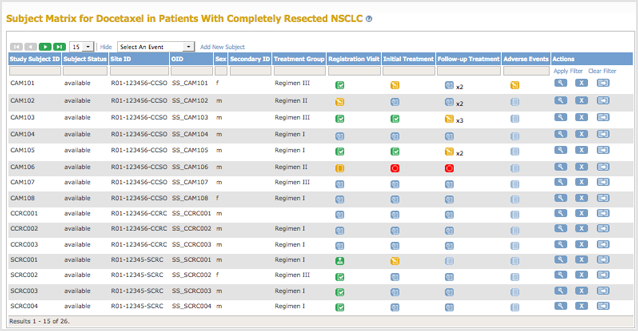
To see more information about Subjects in the Subject Matrix, click the Show More link, which is just above the column headers in the matrix. The matrix widens to add the Subject Status, Site ID, OID (see Object Identifiers in the Glossary), Sex, Secondary ID, and Group information.
When the matrix is expanded, you can stop showing the additional columns by clicking the Hide link, which is just above the column headers in the matrix.
Subject Matrix After Clicking Show More Provides Additional Information About Subjects:
2.8.4 Find and Organize Data in Subject Matrix
These features in the Subject Matrix help you find and organize data for the Study Subjects.
Number of Subjects Per Page
The bottom left corner shows the total number of subjects as well as the number currently in view. When there are more Subjects in the Study than can be listed on the page, use the green arrows above the table to scroll through the pages of Subjects. When there is only one page of Subjects, the arrows are gray.
To change the number of Subjects shown on a page, click the drop-down list next to the arrows and select a value: 15, 25, or 50 per page.
Sort Data By Column
By default, the Subject Matrix is sorted by Study Subject ID, with the lowest ID value first. To sort the data by a column, click the column header. Some columns cannot be sorted on; when a column cannot be sorted on, the cursor does not change shape when you hover over the column header. To reverse the sort order, click the column header again. An arrow next to the column header indicates the current sort order: up for ascending and down for descending.
For example, click Study Subject ID to show data with the highest ID value first, and the lowest value last. The arrow in the column header then points down. Click again to show the lowest value first.
Filter Data to Show Only Matches for Specified Criteria
You can filter the information shown in the Subject Matrix to show only Subjects whose data matches criteria you specify. You can specify criteria for one Event column and any of the other columns:
- For the column whose data you want to filter, click the gray field below the column header.
- If a drop-down list displays, select the value you want from it. If no list displays, type in the string of characters you want to include, and press Enter or click Apply Filter (which is to the right of the gray fields).
- Repeat the above steps to filter by additional columns.
- To remove filtering for a column, either clear the text you typed, or from a drop-down list, select the blank (top) item.
When filtering is applied, the Subject Matrix shows only those Subjects that contain the data you specified.
To clear all filtering and show all data, click Clear Filter (which is to the right of the gray fields).
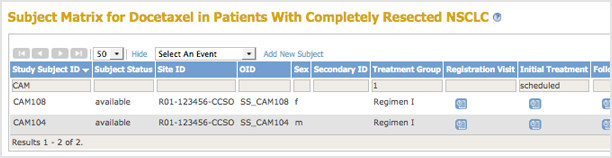
Example of Sort and Filter in Subject Matrix
When Show More in Subject Matrix is selected, as shown in the previous example image, the following filtering and sorting were performed:
- For Study Subject ID, type CAM in the gray field and press Enter.
The matrix shows only Study Subject IDs that contain CAM. - For Treatment Group, from the drop-down list in the gray field, select Regimen I. A 1 displays in the field to indicate that value was selected.
The matrix shows only the Subjects whose ID includes CAM and who are assigned to Regimen I. - For the Initial Treatment Event, from the drop-down list in the gray field, select scheduled.
The matrix shows only the Subjects whose ID includes CAM, who are following Regimen I, and whose Initial Treatment is scheduled. - Click the Study Subject ID column header to show the highest value first.
The order of the rows changes and a down arrow appears in the column header.
Example of Subject Matrix After Filtering and Sorting:
2.8.5 Actions for a Subject in Subject Matrix
In the Actions column for a Subject in the Subject Matrix, click the icon for the action you want. The icons that appear depend on the status of the Subject and your user Role.
 View icon displays a page of detailed information for the Study Subject. From there, you can enter and change Event information for the Subject. For details, see Enter Data for an Event: Completing CRFs.
 Signed icon indicates all the Events for a Subject are marked complete, and you can sign the Subject Case Book. After you click the icon, you apply your electronic signature, which requires your user name and password.
 Remove icon removes a Subject from the Study or Site. You can restore the Subject to the Study or Site later.
 Restore icon appears in the display after the Subject was removed. Restore adds the Subject back into the Study.
 Reassign Study Subject icon reassigns a Study Subject to a different Site in the Study.
2.8.6 View Event Details in Subject Matrix
To view the details for a Study Event from within the Subject Matrix, select the Event from the Select an Event drop-down list, located above the column headers.
This page is similar to the default Subject Matrix, dipslaying the table with one row per Subject, but the columns are for the Case Report Forms (CRFs) for the Study Event you selected. The first column, Event Status, contains an icon that indicates the overall status of the specified Event for that Subject.
Each cell in the CRF columns contains an icon showing the status of the CRF for that Subject. Hover the cursor over an icon to see more information in a pop-up window. To see the actions you can perform for that Event, click the icon. You can then select the action you want to perform for that particular CRF, including View, Edit, Remove, and Print. Removing an Event marks any CRFs that contain data as Invalid; if needed, you can later restore a CRF you removed. For details about Editing, see Enter Data for an Event: Completing CRFs. Click X in the corner of the pop-up window to close it.
Event Details in Subject Matrix for the Registration Event, After Clicking an Icon for a CRF
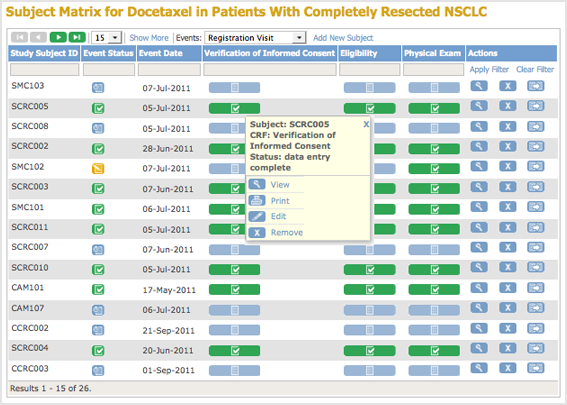
To restore the default Subject Matrix view after viewing Event details, select All Events from the drop-down list.
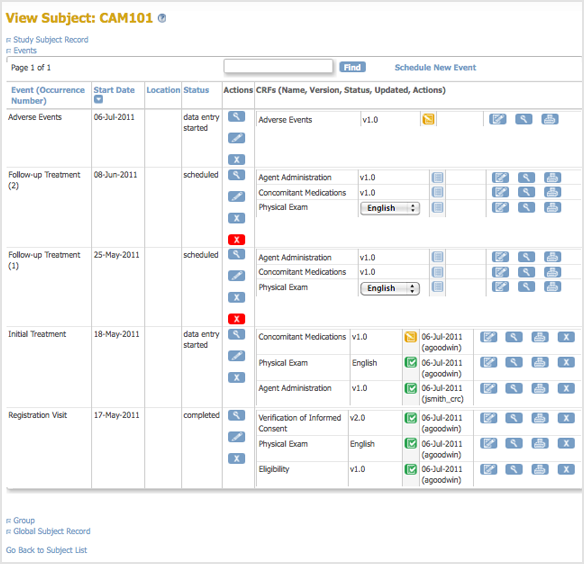
2.8.7 View and Edit Details for a Subject in Subject Matrix
To view detailed information for a Subject, click the View icon ![]() in the Actions column. This is a way to see the Subject casebook, that is, all Study information for the Subject. The View Subject page for that Subject opens, with the following sections: Study Subject Record, Events, Group, and Global Subject Record.
in the Actions column. This is a way to see the Subject casebook, that is, all Study information for the Subject. The View Subject page for that Subject opens, with the following sections: Study Subject Record, Events, Group, and Global Subject Record.
To show or hide the information for a section, click the plus or minus sign next to that section. The Events section is shown by default.
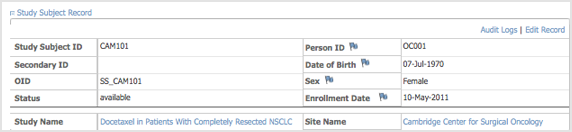
Study Subject Record Section
The Study Subject Record section provides overall information about the Subject including the OID (Object Identifier) and other fields such as Date of Birth that are shown if your Study was configured to do so. To view all captured transactions for the Subject, click the Audit Log link. To make changes for the Study Subject, click the Edit Record link, which opens the Update Study Subject Details page.
Events Section
The Events section shows a table of all the events assigned to a Study Subject.
To find Events by name or location, enter the value you are looking for in the text box and click Find.
To add an event for a Subject, click Schedule New Event, which opens the Schedule Study Event page.
Each row in the Events table shows details for an Event for that Subject, reported in the first column.
The other columns of the Events table show details for that Event occurrence:
- Start Date
- Location
- Status
- Actions, represented by icons, that you can perform for the Event
- CRFs for the Event
For each CRF in the Event, the table shows:
- CRF Name
- Version
- Status, represented by icons
- Updated, which reports when the CRF was last updated and who updated it
- Actions, represented by icons, that you can perform for the CRF
You can remove a CRF for a Subject; after being removed, the CRF is marked as Invalid. You can restore a CRF that has been removed.
For more details about editing a CRF, see Enter Data for an Event: Completing CRFs.
By default, Events are ordered by Start Date, with the most recent Start Date first. Click a column header to order by that information. Click again in that column to reverse the sort order.
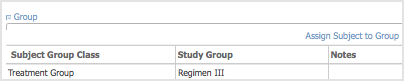
Group Section
The Group section shows the Groups the Subject is assigned to. To add a Subject to a Group, click Assign Subject to Group, which opens the Update Study Subject Details page.
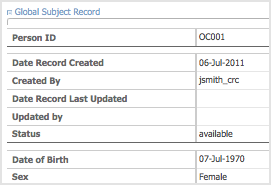
Global Subject Record Section
The Global Subject Record section shows the Subject Record.