You can schedule visit-based events or add common events from several areas within Study Runner, if your user role has the appropriate permissions:
The Participant Matrix
The Participant Details screen
The Tasks menu
The sections below describe each method.
Schedule a Visit-Based Event from the Participant Matrix
In the Participant Matrix, click on the Participant Event you want to schedule.
Click Schedule.
From the Study Event Definition drop-down, select the event you want to schedule.
(Optional) Update the Start Date/Time. The current date is selected by default.
(Optional) Enter an End Date/Time.
(Optional) To schedule additional events, click Schedule Another Event and enter the details. Repeat as needed.
Click Proceed to Enter Data to begin data entry.
Schedule a Visit-Based Event from the Participant Details Screen
On the Participant Details screen, under Visits, click Add New.
Select a Visit Name from the drop-down list.
Update the Start Date if needed. The current date is selected by default.
(Optional) Click Show advanced options to edit the Start Time or End Date/Time.
(Optional) To add multiple visits, click + Add another visit and enter the additional visit details.
Click Add visits to confirm.
ℹ️ Note: Once you schedule a non-repeating event for a participant, it will no longer appear in the Add Visits window.
Schedule a Visit-Based Event from the Tasks Menu
In the Study Runner header, click Tasks.
Select Schedule Event.
Enter the Participant ID.
Select a Study Event Definition from the drop-down list.
(Optional) Update the Start Date/Time. The current date is selected by default.
(Optional) Enter an End Date/Time.
(Optional) To schedule multiple events, click Schedule Another Event and add additional entries.
Click Proceed to Enter Data to open the Participant Details screen.
Add a Common Event from the Participant Details Screen
Under Common Events (for example, Adverse Events or Concomitant Medications), click Add New.
ℹ️ Note: Common Events do not require a visit date. When you click Add New, the form opens immediately.
View an Event
Click the View button in the three dots menu on the Participant Details screen.
Edit an Event
Click the Edit button in the three dots menu on the Participant Details screen.
Update the event information such as dates, status or attributes.
Select Submit Changes to save or Cancel to discard.
ℹ️ Note: Available actions may be available based on your user role.
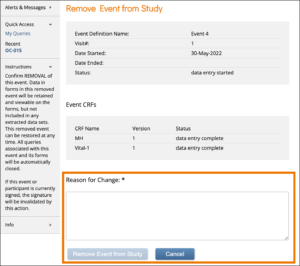
Remove an Event
Click the Remove button in the three dots menu on the Participant Details screen. Enter a Reason for Change and click Remove Event from Study.
ℹ️ Note: If an Event is removed after being signed, the signature is invalidated, and if restored, the form must be signed again.
Restore an Event
If you have removed an Event you want to restore, click the Restore button in the three dot Event Actions menu on the Participant Details screen. Enter a Reason for Change and click Restore Event to Study.
ℹ️ Note: If an Event is removed after being signed, the signature is invalidated, and if restored, the Event must be signed again. When data was entered on the Form prior to the Event being removed, “The event this form is in has been removed” appears at the top of the Form.