3.1.1 Verify Source Data
Users whose Roles have appropriate permission can verify source data in OpenClinica. To perform Source Data Verification, follow these steps:
- Change the Current Study or Site to the one you want to perform Source Data Verification for.
- Select Tasks > Source Data Verification.
The Source Data Verification page for the current Study or Site opens.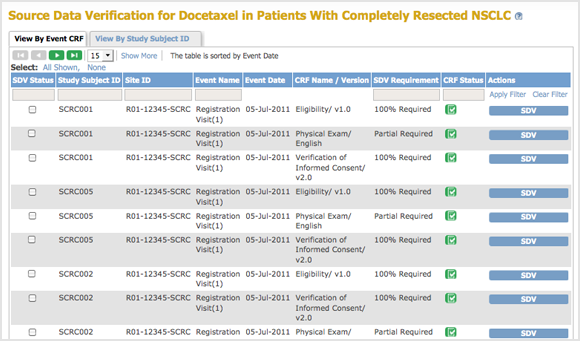
- Customize the view so the page shows only those CRFs or Subjects whose data you want to verify. By default, the view is By CRF, which lists only CRFs that are marked complete and therefore ready for Source Data Verification. The By Subject view lists all Subjects in the current Study or Site.
- View details for the CRFs whose data you want to verify. How you access the CRF depends on how you set the view in the SDV page:
- In the Event CRF view, for the CRF you want to view, click the icon in the CRF Status column.
- In the Study Subject ID view, click the View icon in the Actions column for the Subject. The page shows all Event CRFs ready for verification for that Subject. Click the CRF Status icon for the CRF you want to view.
The completed CRF opens in a new window.
- Review the data in the CRF. You can add a Query type Discrepancy Note to record a question about any Item.
- When you finish reviewing data in the CRF, click the Close button in the CRF window, which closes it. (Note that if you click Exit instead, the window remains open, showing Subject details.)
- To mark the data as verified, in the Source Data Verification page click the SDV button for the CRF.
In the SDV status column, the checkbox is replaced by an SDV Complete icon . In the Audit Log for the Subject, the Event CRF Source Data Verification Status is reported as true, and the date, time, and user are also recorded.
 - Continue viewing details and marking CRFs as verified, changing the view as needed. You can mark multiple CRFs as verified in any of these ways:
- All Eligible CRFs for a Subject: In the Study Subject ID view, click the SDV button for the Subject to mark all eligible CRFs for that Subject as verified.
- Selected CRFs or Subjects: In either the CRF or Subject view, select the checkbox in the SDV Status column for all CRFs or Subjects you want to mark as verified. You can deselect a row by clicking the checkbox again, or clear all selected rows by clicking the None link (located above the column headers). Then click the SDV All Checked button at the bottom of the page.
- All CRFs or Subjects Shown: In either the CRF or Subject view, to select all CRFs or Subjects on the page, click the All Shown link (located above the column headers), which selects all checkboxes in the SDV Status column on that page. You can deselect a row by clicking its checkbox, or clear all selected rows by clicking the None link (located above the column headers). Then click the SDV All Checked button at the bottom of the page.
3.1.2 Customize the View in Source Data Verification
You can customize the view in the Source Data Verification page to adapt it for the workflow you use. For example, you can review all CRFs for a Subject to verify that Subject. Or if you use a sampling method, you can review a sample of CRFs for a Site, then mark all CRFs for that Site as verified. This section describes the ways you can customize the view.
3.1.2.1 View by CRF or by Subject
You can view Source Data Verification information by CRF or by Subject:
- By CRF: Click the View By Event CRF tab, and the table shows all CRFs in the current Study or Site that have been marked complete and therefore are eligible for Source Data Verification. CRFs are listed by Event Date, with the oldest at the top of the table. The CRF view also reports whether or not Source Data Verification is required for a CRF (shown in the SDV Requirement column, and specified in the CRF Event Definition). With this CRF view, you can mark one CRF or selected CRFs as verified.
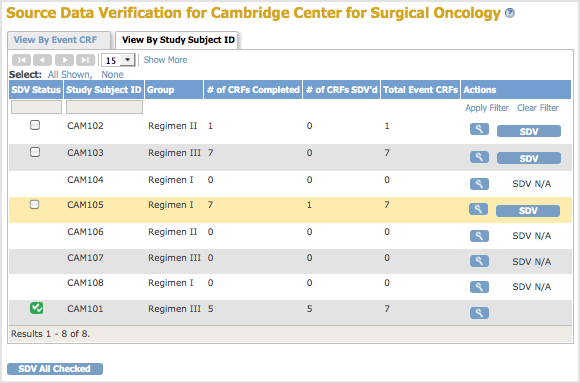
- By Subject: Click the View By Study Subject ID tab, and the table shows all Subjects in the Study, reporting how many CRFs are eligible for verification and how many have already been verified for each Subject (shown in the # of CRFs Completed and the # of CRFs SDV’d columns). The view lists all Subjects, even those with no CRFs eligible for Source Data Verification (SDV N/A appears in the Actions column for Subjects who have no CRFs ready for Source Data Verification). With this Subject view, you can mark all CRFs for one or more Subjects as verified. You can also show the By CRF view for any Subject by clicking the View icon for that Subject, in order to access the Subject’s CRF data.
Source Data Verification Page with the By Subject ID View for the Current Site; the Pointer is Hovering Over the Row for Subject CAM105, Temporarily Highlighting the Row in Yellow:
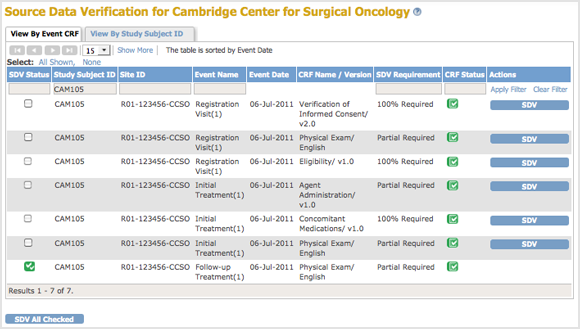
After Clicking the View Icon for Subject CAM105 in the By Subject ID View, the Page Shows CRFs Eligible for Source Data Verification for Subject CAM105. Below Column Headers, the Study Subject ID Field Indicates the Data is for CAM105:
3.1.2.2 Find and Organize SDV Data
In either the CRF or Subject view, you can:
- Navigate through the table pages and change the number of CRFs or Subjects shown per page
- Show more data for all rows, or hide it
- Filter the data in the table so it shows only the CRFs or Subjects you want to see
These features work the same way as in the Subject Matrix: for more information, see Find and Organize Data in the Subject Matrix.
3.1.3 View Source Data Verification Status
In the CRF view, icons in the SDV Status column indicate those CRFs that have had Source Data Verification completed (![]() ) and those that have not (
) and those that have not (![]() ). Use the filter for the SDV Status column to show only those CRFs with SDV complete, or only those CRFs that have not had SDV completed.
). Use the filter for the SDV Status column to show only those CRFs with SDV complete, or only those CRFs that have not had SDV completed.
In the Subject view, icons in the SDV Status column indicate those Subjects that have had Source Data Verification completed (![]() ) and those that have not (
) and those that have not (![]() ). In addition, you can see how many CRFs have had SDV completed for each Subject (shown in the # of CRFs SDV’d column), along with the number of CRFs eligible for verification for that Subject (shown in the # of CRFs Completed column), which provides a summary of the SDV status by Subject.
). In addition, you can see how many CRFs have had SDV completed for each Subject (shown in the # of CRFs SDV’d column), along with the number of CRFs eligible for verification for that Subject (shown in the # of CRFs Completed column), which provides a summary of the SDV status by Subject.
3.1.4 Reset Source Data Verification Status
Source Data Verification status can be reset from verified to unverified either manually by user with appropriate permissions, or automatically by the OpenClinica software under certain conditions. Once marked as unverified, the CRF can be verified again at any time. The Study Audit Log tracks any change in Source Data Verification status for a CRF.
- Manually: To manually change the Source Data Verification status for any CRF, in the Source Data Verification page, click the SDV Complete icon in the SDV Status column:
- In the Source Data Verification By Event View, you click the icon for a CRF. After you click the icon, it becomes a checkbox, and the CRF is no longer reported as verfied.
- In the By Subject View, you click the icon for a Subject to reset the SDV Status for all CRFs for that Subject. After you click the icon, it becomes a checkbox, and all CRFs for that Subject are no longer reported as verfied.
- Automatically: The OpenClinica software automatically resets the Source Data Verification status for a CRF from verified to unverified in these cases:
- When the CRF data changes
- When an Annotation Discrepancy Note is added to the CRF