
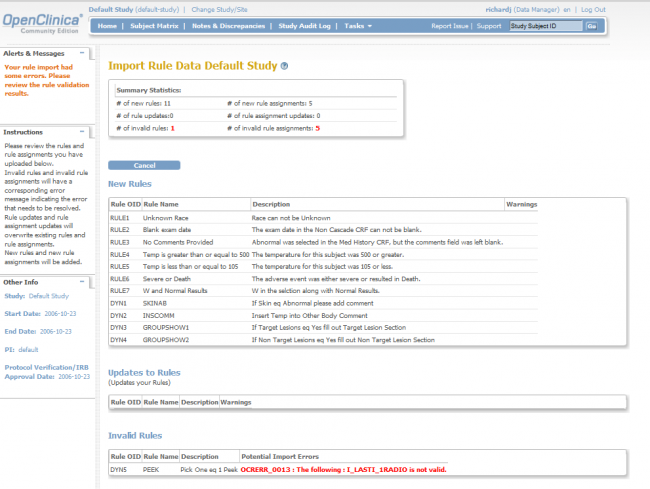
 .The Import Rule Data screen displays.


6.4.1 Rule Assignment and Rule Definition
RuleAssignment
A Rule Assignment executes a Rule Expression for a specific target. It contains the following entities.
- Target: The item that will be affected by the Rule or for which the RuleAction is being performed.
- RuleRef: The RuleOID that will be executed and specifications for when the Rule should be run.
Within a RuleAssignment you may have one or more RuleRefs.
A RuleRef also specifies the Action(s) you want the Rule to perform.
Out of the box actions by OpenClinica currently include
o DiscrepancyNoteAction
o EmailAction
o NotificationAction
o InsertAction
o ShowAction
o HideAction
o EventAction
- Run: This specifies when the Rule should be executed. Specify “true” or “false” (must be in lower case) for each possible status as follows:
If “false” for any of the following options, the Rule will not execute for the specified setting.
- AdministrativeDataEntry
If “true” the Rule will run if a user saves a change to the data after the form has been marked “complete.” - InitialDataEntry
If “true” the Rule will run when the user clicks Save after initial data entry. - DoubleDataEntry
If “true” the Rule will run when the user clicks Save after double data entry. - ImportData
If “true” the Rule will run when data is imported into the form. - Batch
If “true” the Rule will run if a user runs the Rule in batch mode (via Tasks>Monitor and Manage Data>Rules and then click the Run icon OR via Tasks>Monitor and Manage Data>CRFs>View the CRF and click the link Run All Rules for This CRF).
RuleDef
Rule Definitions in OpenClinica are independent entities. The same Rule definitions could be used in multiple assignments. Rule Definition elements are themselves made of multiple elements.
- RuleOID
A user-defined, unique OID for the Rule. This must be entered in all upper-case alphanumeric characters. Underscores are also allowed. - Name
A brief, user-provided description of what the Rule does. This is only visible on the Manage Rules screen (Tasks>Monitor and Manage Data>Rules). - Description
A detailed, user-provided description of what the Rule does. This is only visible on the Manage Rules screen if the user clicks the Show More link above the table. (Tasks>Monitor and Manage Data>Rules, and then click Show More). - Expression
The condition that triggers the Rule action. Expressions can include logical operators, mathematical operators, and can be performed using dates. For more information see Expression Element and Rule Expressions.
6.4.2 Expression Element
The expression element appears in RuleDef Element. It is an expression that evaluates to a result when it is run. For example the expression below might evaluate to true or false depending on the value of ITEM_OID.
| <Expression> ITEM_OID eq 50</Expression> |
OpenClinica defines a specific language for creating these expressions. This language supports Logical, Arithmetic, and Conditional operators. We will list those in tables below. Alongside operators OpenClinica supports the user of Integers, Strings and OpenClinica variables in order to do the evaluation.
The expression above is using ITEM_OID, which is an OpenClinica variable and 50, which is a number, with the operator being an equal. OpenClinica out of the box supports the following operators
| The Equality and Relational Operators | ||
| eq | Equal to | Variables used with this operator could be of any type |
| ne | Not Equal to | Variables used with this operator could be of any type |
| ct | Contains | Variables used with this operator could be of any type |
| gt | Greater Than | Variables used with this operator should be of a number type |
| gte | Greater Than or Equal to | Variables used with this operator should be of a number type |
| lt | Less Than | Variables used with this operator should be of a number type |
| lte | Less Than or Equal to | Variables used with this operator should be of a number type |
Some example expressions using the above operators
- ITEM_OID eq YELLOW
- ITEM_OID lt (-15)
- ITEM_OID gt 5
- 5 gte ITEM_OID
- YELLOW ne GREEN
- ITEM_OID ct “2014”
| The Conditional Operators | ||
| and | and | Variables used with this operator should be of a boolean type |
| or | or | Variables used with this operator should be of a boolean type |
Some example expression using the above operators
- ITEM_OID eq YELLOW and ITEM_OID_2 gt 5
- (ITEM_OID eq YELLOW) and (ITEM_OID_2 gt 5)
- (YELLOW neq GREEN ) or (ITEM_OID_2 gt 5)
| The Arithmetic Operators | ||
| + | Addition | Variables used with this operator should be of a number type |
| – | Subtraction | Variables used with this operator should be of a number type |
| * | Multiplication | Variables used with this operator should be of a number type |
| / | Division | Variables used with this operator should be of a number type |
Some example expression using the above operators
- ITEM_OID + 35 eq 50
- ITEM_OID 10 eq 34 AND ITEM_OID_2 gt 45
- ((ITEM_OID 10) eq 34) AND (ITEM_OID_2 gt 45)
Statements can be used in these expressions. Now OpenClinica utilizes what is known as contextual statements, meaning as in the examples above you can put
ITEM_OID and OpenClinica will automatically complete the statement so to make it legal. Lets use an example
<Target Context=”OC_RULES_V1″>SED_OID[ALL].CRF_OID.GROUP_OID.ITEM_OID</Target> <Expression> ITEM_OID eq 50</Expression> |
What will actually happen here when this expression is being evaluated is that ITEM_OID will be substituted by
| SED_OID[ordinal].CRF_OID.GROUP_OID.ITEM_OID |
In order to support cross form edit checks we actually include a complete statement. One side not regarding that is we cannot use ALL in the expressions.
Dates within Rules
Rules supports the following operators to be used with dates
| The Equality and Relational Operators | ||
| eq | Equal to | ITEM_OID eq 2008-12-12 |
| ne | Not Equal to | ITEM_OID ne 2008-12-12 |
| gt | Greater Than | ITEM_OID gt 2008-12-12 |
| gte | Greater Than or Equal to | ITEM_OID gte 2008-12-12 |
| lt | Less Than | ITEM_OID lt 2008-12-12 |
| lte | Less Than or Equal to | ITEM_OID lte 2008-12-12 |
The format of the date included in an expression should be yyyy-MM-dd .
Example: January 01, 2010 should be written as : 2010-01-01
You can also use _CURRENT_DATE to compare values against the current server date. For example, with a NotificationAction, to notify Participants of a Form that must be completed on the next day, you could use an expression such as:
<Expression>SE_OID.STARTDATE eq (_CURRENT_DATE +1) and SE_OID.STATUS ne “complete”</Expression>
This would send a notification one day in advance of the expected form completion date as long as the form was not already completed by the Participant.
6.4.3 Target Element
We will further explain how the Target element is setup.
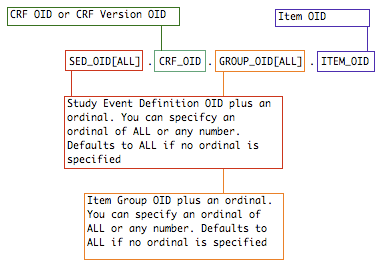
Rules are assigned to a particular data item in a CRF, via the Target element. The Target must be a valid Item OID, and can be a full or relative OID path. The full OID path would include Event Definition, optional ordinal, CRF, CRF Version, Group, optional ordinal, and Item. A relative path can also be specified by providing only part of the path, normally just the Item OID. Each RuleAssignment may have multiple RuleRefs.
| <Target Context=”OC_RULES_V1″>SED_OID[ALL].CRF_OID.GROUP_OID[ALL].ITEM_OID</Target> |
As mentioned above the Target element will specify which item the rules will be evaluated against. Although your expression may be evaluating multiple variables, you must specify one variable on which the error message will appear and the action will occur for. Every one of the OIDs must be in upper case. To specify the exact item we need to provide the following information.
- SED_OID[ALL] We need to tell OpenClinica which Study Event definition the Item were after is going to be. We can also specify an ordinal if this happens to be a repeating event, this could be set to ALL or an integer. If you set it to ALL then all event repeats will evaluated. If you specify a specific integer then only that specific event will be evaluated.
- CRF_OID We specified which Event Definition this item is in, now we need to specify which CRF or CRF Version this item is in. Specifying a CRF Version OID will allow the rules to be evaluated against only that specific version. Whereas specifying a CRF OID will allow evaluating against all CRF versions.
- GROUP_OID[ALL] We specified the Study Event Definition and the CRF where the item is, now we need to specify the Group this item is in. This is important because a group might be a repeating or a non-repeating one. If it is a repeating Group OpenClinica allows you to specify if you want the rule to be evaluated against all of the repeats for the variable or a specific ro one of the repeats (a specific row in the repeating group-table) by setting the ordinal to ALL or an integer.
- ITEM_OID Finally we specify which item this rule will be evaluated against. If you have specified a DiscrepancyNoteAction or EmailAction, this is the also the variable that will be specified in the Discrepancy Note or the Email.
As you see we identify the entities by using their OIDs (unique identifiers ). You can deduce from the example above that OpenClinica defines its own syntax to create these statements. The separator used throughout all these statements is the .
6.4.4 Action Types
An ActionType is specified in the RuleAssignment and determines what should happen when the expression executes. ActionTypes include DiscrepancyNoteAction, EmailAction, NotificationAction, HideAction, InsertAction, ShowAction, and EventAction. A parameter must always be provided that defines when the action will be triggered to execute – either when the expression evaluates to true or to false.
The DiscrepancyNoteAction is used to automatically log discrepancy notes on the target item.
When triggered, this action provides a message, specified in the rule definition, to the data entry user. The user can choose to update the value(s) he has provided that caused the rule to fire, or he may proceed with the values unchanged by clicking save on the information again. In this case the DiscrepancyNoteAction will log a discrepancy note on the Target with a status of New and a type of Failed Validation Check. The color of the discrepancy note flag will turn to red.
In the Description field of the discrepancy note, the text will start with the RuleDef OID followed by a colon. After the colon the Message defined by the rule creator will display.
DiscrepancyNoteAction is executed after CRF validations are executed and as the data is being saved to the database.
If a DiscrepancyNoteAction has already been executed on a given target, and the value has not changed, a second discrepancy note will not be logged on the item again.
The EmailAction is used to send email to an email address or list of addresses.
When triggered, this action provides a message, specified in the rule definition, to the data entry user. The user can choose to update the value(s) he has provided that caused the rule to fire, or he may proceed with the values unchanged by clicking save on the information again. In this case the EmailAction will send an email to the list of addresses specified in the rule definition. These addresses are specified when the Rule is created. No record of the email action is saved in OpenClinica.
EmailAction is executed after CRF validations are executed and as the data is being saved to the database.
The NotificationAction is used to send an SMS and/or email notification to a Study Participant (when used in conjunction with OpenClinica Participate), or to send an email notification to any specified email address.
When triggered, this action provides a notification to the specified recipients. To send a notification to Study Participants, address the message to ${participant}. OpenClinica replaces ${participant} with the communication means for the Participant as specified when the Participant was connected to OpenClinica. The means of communication for Participants can be SMS, email, or both based on the connection information provided. (For more information, see Connect Participants.
The elements of a NotificationAction include the following:
To: ${participant} and/or a specific email address to whom you’re addressing the notification. Separate multiple addresses with a comma.
Subject: The subject of the notification (similar to the Subject line of an email)
Message: The content of the notification.
Parameters can be passed to the “To” and “Message” elements as follows:
Parameter | Description | To | Message |
${participant.firstname} | Participant first name | x | |
${participant.loginurl} | Participant URL with automatic login | x | |
${participate.url} | Participant URL without automatic login (requires an access code) | x | |
${study.name} | The name of the Study as defined in OpenClinica. | x | |
${participant.accessCode} | The single-use code the Participant must use to access OpenClinica Participate. | x | |
${event.name} | The name of the Event as specified in the Build Study task in OpenClinica. | x | |
${participant} | The Participant contact information as provided when the Participant was connected to the Study. This may have been a mobile phone number (for SMS notification), email address, or both. OpenClinica automatically sends the notification to any and all means that were provided for the Participant. | x |
For example, the following Rule will send a notification to any Participant who has an Event scheduled for the following day:

Notice that the Rule Expression uses _CURRENT_DATE and compares it to SE_INITIALTREATMENT.STARTDATE to determine that the Event is scheduled for the next day. (In other words, if TODAY is equal to the day BEFORE the visit and the status is not yet “completed”, send a notification. If you want to send a reminder one day AFTER the visit, you would use _CURRENT_DATE eq SE_INITIALTREATMENT_STARTDATE +1, meaning that the rule will trigger if _CURRENT_DATE is one day AFTER the visit was scheduled and the status is not yet “completed”.)
To force a line break, use n at the end of a line.
The ShowAction is used to show previously hidden CRF items or groups.
Note: A ShowAction Rule must be written in combination with a HideAction Rule. A Rule with a ShowAction will not work properly if there is no HideAction associated with it. Both actions must be created under the same Rule OID.
Within this action type is a DestinationProperty. This property is an OID of either an item or a group. When action is triggered, the items or groups specified will be shown.
To specify more than one item, or more than one group, there must be multiple DestinationProperty OIDs. This can not be a comma separated list of OIDs.
When triggered, and when the CRF items to be shown are in the same section of the CRF, this action provides a message, specified in the rule definition, to the data entry user. The message is used to alert the data entry person of new fields that are shown on their current section. Also, the items that are currently shown will be highlighted in yellow.
If the items are in a different section of the CRF, or another CRF entirely, the user will not see the message nor will they see the items highlighted in yellow to indicate they have been shown.
The Show action is not supported across event definitions.
ShowAction is executed after CRF Validations, and DiscrepancyNote, Email, Insert and Hide actions have been executed. Data has already been saved into the database before the new hidden items are shown.
Note: If the Rule XML ifExpressionEvaluates parameter equals blank (i.e. ifExpressionEvaluates = “”), once imported, the value will default to FALSE.
The HideAction is used to hide previously shown CRF items or groups.
Note: A HideAction Rule must be written in combination with a ShowAction Rule. A Rule with a HideAction will not work properly if there is no ShowAction associated with it. Both actions must be created under the same Rule OID.
Within this action type is a DestinationProperty. This property is an OID of either an item or a group. When the action is triggered, the items or groups specified will be hidden. To specify more than one item, or more than one group, there must be multiple DestinationProperty OIDs. This can not be a comma separated list of OIDs.
Items that contain a value in the database can not be set to hidden and will always be shown.
The Hide action is not supported across event definitions.
HideAction is executed after CRF Validations, and DiscrepancyNote, Email and Insert actions have been executed. Data has already been saved into the database before the items are hidden.
The InsertAction is used to insert data into CRF items.
Within this action type is a DestinationProperty. This property is an OID of an item. When the action is triggered, the specified item(s) will have a value inserted. To specify more than one item, there must be multiple DestinationProperty OIDs. This can not be a comma separated list of OIDs.
Within the DestinationProperty OID is the option to provide either a Value or a ValueExpression.
- Value is a static value you want inserted into the DestinationProperty. To insert a date, the format must be yyyy-mm-dd (e.g., 2014-12-24).
- ValueExpression allows you to calculate a new value or copy a value from one field to another. To use another items value as part of the ValueExpression you must provide a valid Item OID. ValueExpression supports all data types, including date and partial date (pdate).
The Insert action is not supported across event definitions.
The EventAction is used to schedule a future event or events. This is also known as scheduling or calendaring, and allows you to schedule one or multiple events based on the current event.
Within this action, the Target is the trigger that fires the rule. There is an EventDestination, which is the STARTDATE of the future event that the rule will schedule, and there is a ValueExpression that calculates the STARTDATE for the future event.
To define an EventAction, you must identify the Target, define the EventDestination, and ValueExpression, and specify the conditions for when to run the Rule (RunOnStatus). Following are three different techniques for implementing an EventAction:
- Schedule all subsequent events based on the date of the first event (View a sample)
- There is ONE Target (trigger) in this option – the Rule is triggered only for that Target
- If an Event STARTDATE is changed, this Rule does not update future Events
- Schedule all subsequent events based on the date of the current event (View a sample)
- There are MULTIPLE Targets (triggers) in this option – the Rule is triggered for any of the Targets
- If an Event STARTDATEis changed, this Rule dynamically updates all subsequent events
- Schedule the next event (and only the next event) based on the status of the current event (View a sample)
- This option does not display the entire visit schedule. Initially it only displays the first event. Once the first Event is started or completed, it displays the next event – and only the next event. Once the next Event data entry is started or completed, it displays the next event, and so on.
6.4.5 Testing Expressions
To ensure the logic you provided in a rule is correct, there is a Test Rule feature. This feature simply allows you to confirm that the rule is actually testing the feature you wanted to test. To fully test your rules, it is best practice to enter test data for a test subject.
Ensure the rule is uploaded to OpenClinica:
1. Complete writing the rule
2. Log into OpenClinica
3. Select Tasks > Build Study
4. On the Create Rules row of the Build Study page, click ![]()
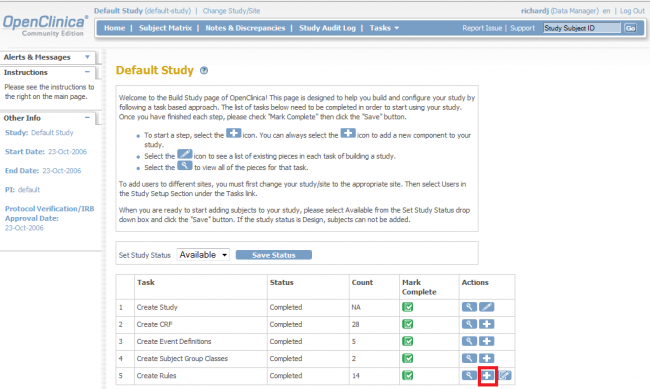
The following window displays:
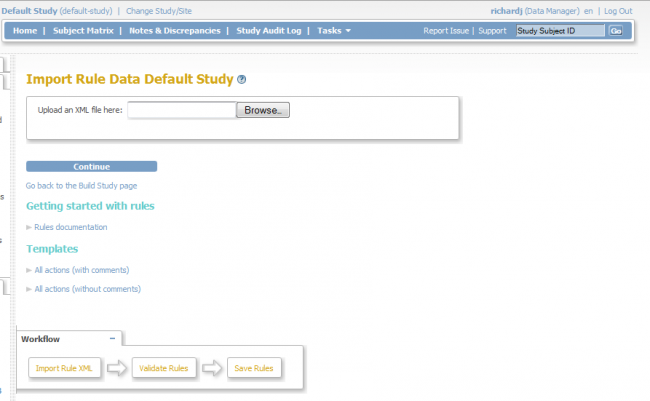
5. Click Browse, then locate and Open the XML file containing the rule to be uploaded. You may only upload one file at a time.
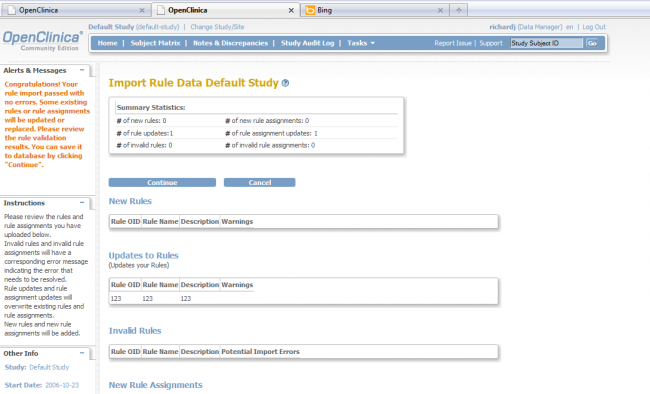
6. Click Continue, this will prompt the system to check the validity of the rule
7. If the rule is valid, a successful confirmation message is displayed. To save the rule in OpenClinica, you must select “Continue.” Otherwise, click “Cancel.”
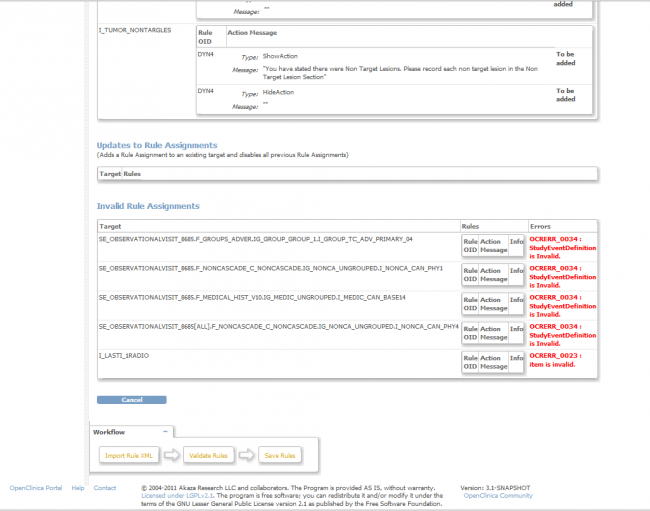
8. If the rule in invalid, the system displays an error message containing the source of errors. Note that for invalid rules there is no “Continue” button; “Cancel” is the only option at the bottom of the page.
9. Repeat step 1-7 as necessary to upload a new file/ update an invalid rule.
Testing Rules Expression in OpenClinica
In order to make creating/managing Rules easier, OpenClinica provides you with a tool to execute rules in a test environment. With the Test Rule page you will be able to modify, edit and run the rules for the desired results. You will be presented with a real time response on the validity of your test rules before uploading them into OpenClinica.
Once the rules get uploaded successfully to OpenClinica, you can verify the validity of the rule by:
1. On the Build Study page, click the View ![]() icon to access the Manage Rules for <<Study Name>> page. Click here for more information regarding the Manage Rules page.
icon to access the Manage Rules for <<Study Name>> page. Click here for more information regarding the Manage Rules page.
2. Locate the rule that you wish to validate and test
3. Under the “Actions” column of that rule, click the “Test” ![]() icon
icon
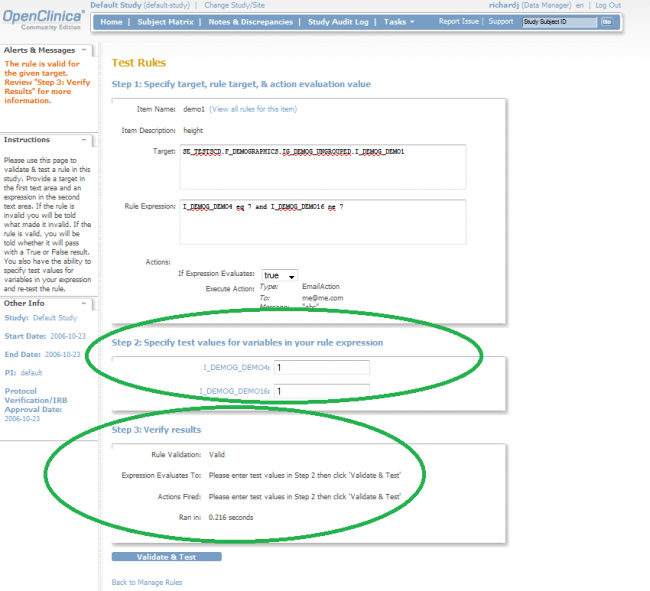
4. You will be prompted to the Test Rules page (see below). The Test Rules page allows you to enter specific information about the rule you want to test.

- Enter Target Name: This would be the same statement element as the Target element in RuleAssignment in the XML file
- Enter the Rule Expression: This would be the same element as the expression element in the RuleDef element in the XML file.
- Select the evaluation action from the drop-down true or false
5. Click Validate and Test
6. Note: If the rule is valid, you will be told whether it will pass with a True or False result. You also have the ability to specify test values for variables in your expression and re-test the rule. If the rule is valid, then a successful confirmation message is displayed. Also, addditional sections named “Step 2” and “Step 3” are displayed (see below). If a rule is invalid, OpenClinica will provide you with feedback in the form of an error message with information on why your rule was considered invalid.
7. Now, you can specify the test values for variables in the rule expression at your discreton and verify if the rule functions as expected by clicking “Validate and Save”. Repeat this step as necessary.