About Study Events
In OpenClinica, a Study Event has a type, date(s), status, and a package of Case Report Forms (CRFs) associated with it. A Study Event is also referred to as an Event.
Each Event is assigned an Event Definition, for example, Registration Visit.
Events can be repeating (occur more than once) or non-repeating (occur once).
For repeating Events, an ordinal is assigned to each occurrence of the Event (for example, FOLLOWUP[1], FOLLOWUP[2], FOLLOWUP[3], etc.).
There are different ways that Study Events can be configured:
- Scheduled Study Event: When CRFs are expected for each subject as part of the planned sequence for the Study.
- Unscheduled Study Event: When the CRFs are designed to collect data that might or might not occur for any Subject, such as for early termination due to a serious adverse event.
- Common Study Event: When the CRFs are used for more than one different event, such as a Concomitant Medications Log.
Events can be scheduled automatically using a Rule with an EventAction, or can be scheduled manually as outlined below.
Schedule a Study Event
- Access the Schedule Study Event page in one of these ways:
- In the navigation bar, select Tasks > Schedule Event. You’ll need to provide the Study Subject ID.
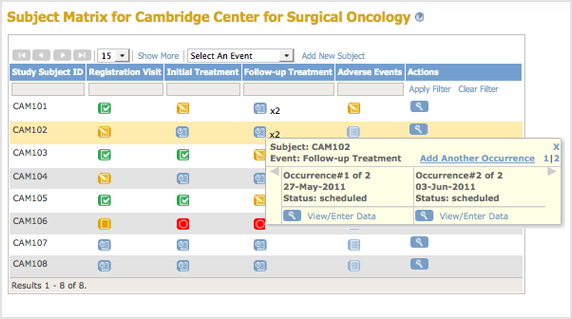
- In the Subject Matrix, for the Subject you want to schedule, click the icon in the Event column you want to schedule. What you can do depends on the type of Event, the current status of the Event, and your user role:
- For a non-repeating Event, after you click the Not Started icon
 , click the Schedule link in the pop-up window.
 - For a repeating Event, the cell shows the number of occurrences of the Event that have already been scheduled or completed. After you click the icon in the cell, click the Add Another Occurrence link in the pop-up window.
- For a new Subject, see Add Subject.
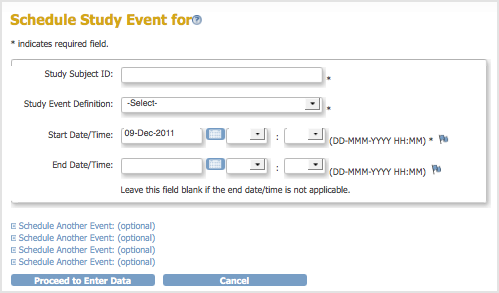
The Schedule Study Event page opens.
- Enter information in the Schedule Study Event page. When you enter the dates, either type them in the field in the correct format, or click the calendar icon to select them. The End Date is optional: keep it empty if it does not apply.
- After you complete scheduling the information, you can schedule another event or select the option to enter data.
- After entering information for all events you want to schedule, click Proceed to Enter Data.
- If you do not want to enter data about the Event until later, click Cancel, or if you do want to, enter the data. For details, see Enter Data for an Event.
Schedule an Event from Tasks in the Navigation Bar
Schedule an Event from the Subject Matrix Page