5.6.1 About Subject Group Classes
Use Subject Group Classes in OpenClinica to categorize Subjects within a Study, such as for treatment options. For example, you might create a Subject Group Class called Treatment Group that contains three Subject Groups within the Class: Regimen I, Regimen II, and Regimen III. There can be multiple Group Classes within a Study. For example, you can also have a Group Class for age with these Groups: Adolescent, Adult, and Elderly. You can specify that a Study Subject be required to be assigned to a Group, or allow assignment to Groups as optional. A Study Subject can be assigned to more than one Group Class, but can be assigned to only one Group within a Group Class.
5.6.2 Create Subject Group Class
To create Subject Group Classes and Groups within a Class:
- Select Tasks > Build Study.
The Build Study page opens for the current Study. - You can see the number of existing Group Classes for the current Study in the Count column for Create Subject Group Class. To see more information, click the View icon in the Actions column.
- On the Build Study page, click the Add icon in the Actions column for the Create Subject Group Class task.
The Create a Subject Group Class page opens.
- Complete the fields on the page. This information is primarily used for reporting and affects workflow and data collection in OpenClinica only when a Subject Assignment to a Group Class is required.
- Provide a name for the Group Class. For example, Age Group.
- Select the type of Group Class. For example, Demographic.
- Specify if assignment to the Group Class is required or optional.
- Enter a name and description for each Group within that Group Class. For example:
- Adolescent: Subjects under 18 years old.
- Adult: Subjects between 18 and 65 years old.
- Elderly: Subjects over 65 years old.
- Click Confirm Subject Group Class.
The Confirm Subject Group Class page displays, showing you the information you just entered. - Click Submit Subject Group Class.
The Build Study page displays. The Count for Create Subject Group Class has increased by 1, a reflection of the Group Class you just added.
5.6.3 Edit Subject Group Class
After creating a Subject Group Class, you can modify the information for it:
- Select Tasks > Build Study.
The Build Study page opens for the current Study. - Click the View icon in the Actions column for the Create Subject Group Class task.
The Manage All Groups page opens, listing information about all Subject Group Classes for the current Study.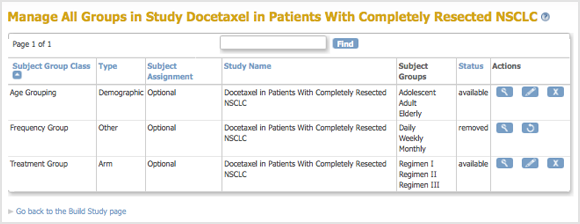
- You can click any column header that is in blue (a link) to sort by that column. You can also enter a string in the Find field to filter the list to show only those Group Classes whose name, Type, or Subject Assignment includes that string.
- In the Actions column, click the Edit icon for the Group Class you want to modify.
The Update a Subject Group Class page opens for the Group Class you selected. - Make changes to the Group Class and Group information.
- Click Confirm Subject Group Class.
The Confirm a Subject Group Class page displays, showing you the information you just entered. - Click Submit Subject Group Class.
The Manage All Groups page displays, reflecting the changes you made.
5.6.4 Remove or Restore Subject Group Class
You can remove a Subject Group Class. After removing a Group Class, no additional users can be assigned to the Group Class, however the records for any Subjects already assigned to that Group Class will still reflect the assignment. To remove a Subject Group Class:
- Select Tasks > Build Study.
The Build Study page opens for the current Study. - Click the View icon in the Actions column for the Create Subject Group Class task.
The Manage All Groups page opens, listing all Subject Group Classes for the current Study. - In the Actions column, click the Remove icon for the Group Class you want to remove.
The Confirm to Remove a Subject Group Class page opens for the Group Class you selected. - Click Remove Subject Group Class.
- In the confirmation popup window, click OK.
The Manage All Groups page displays. The Group Class you removed is listed in the table, but the Restore icon is in the Actions column, having replaced the View and Edit icons.
You can restore a removed Subject Group Class, which means that Subjects can again be added to it. To do so:
- Select Tasks > Build Study.
The Build Study page opens for the current Study. - Click the View icon in the Actions column for the Create Subject Group Class task.
The Manage All Groups page opens, listing all Subject Group Classes for the current Study. - In the Actions column, click the Restore icon for the Group Class you want to restore.
The Confirm to Restore a Subject Group Class page opens for the Group Class you selected. - Click Restore Subject Group Class.
- In the confirmation popup window, click OK.
The Manage All Groups page displays. The Group Class you restored now has View and Edit icons in the Actions column instead of the Restore icon.