15.6.1 About Discrepancy Notes
The OpenClinica Notes and Discrepancies module provides a means for users to document, communicate, and manage issues about data in a clinical trial, in order to facilitate verification of the accuracy and completeness of the data. In the clinical trial community, these issues are sometimes referred to as queries, and are sometimes managed with data clarification forms. When you set up a Study, as part of the Study Parameter Configuration details, you specify whether or not Notes and Discrepancies will be used in the Study.
A Discrepancy Note is also referred to as a Note.
There are various situations where you use Discrepancies Notes. For example:
- You can create a Discrepancy Note when capturing or validating data in order to flag an item as incomplete or as having a value that is not expected.
- You can leave a required field in a CRF empty if you provide a Discrepancy Note that provides an explanation.
- OpenClinica can automatically create a Discrepancy Note when you save a CRF that contains errors in the data, as determined by OpenClinica’s edit checking.
- OpenClinica can also automatically generate Discrepancy Notes when Rules run.
After you create a Discrepancy Note, another user, such as a Clinical Research Coordinator, reviews the Discrepancy Note and replies with information to help resolve the issue.
The original Note is referred to as the parent note. Responses to the original note are referred to as child notes. The thread of a single parent Note with the child Notes under it is referred to as one Discrepancy Note.
A Discrepancy Note is associated with a single data element, usually a CRF Item, such as a diagnosis, medication, or weight, but it can also be associated with the Subject record, such as sex or date of birth, or the Study Event, such as the date.
Once a Discrepancy Note is created, it cannot be deleted. If a Discrepancy Note is created in error, a common practice is to add a new Child Note with a Status of Closed.
To use Notes and Discrepancies, your browser must have:
- JavaScript enabled
- Pop-up blockers disabled
A Discrepancy Note has four key properties, which the user assigns when creating the note:
- Note Type
- Status
- Description
- Detailed Note
After the Discrepancy Note has been created, you cannot change the Note Type. To update the other properties, you add new child Notes.
15.6.2 Types of Discrepancy Notes
The purpose, behavior, and workflow are different for each Note Type. The Note Types that can be assigned to an element depend on when in the process the Note is created. OpenClinica has these Note Types:
- Failed Validation Check
- Query
- Reason for Change
- Annotation
Failed Validation Check
A Failed Validation Check Note Type is for data that does not comply with expected values. When initially created, the Status is New. The Note then requires further review to determine if the data is acceptable. A Failed Validation Check Discrepancy Note can be created in these ways:
- A user entering data can manually create this Note Type.
- OpenClinica can automatically generate this Note Type when validating a field or using Rules or when running an Edit Check. OpenClinica first displays a warning message. If the user does not change the value to one that conforms to the expected values for the Item, it creates a Failed Validation Check Discrepancy Note.
OpenClinica also generates this Note Type when importing data if the data does not conform to expected values.
Query
A Query Note Type is used to ask a question about data provided for an Item. For example, a Data Manager might create a Query Discrepancy Note to ask a Clinical Research Coordinator about an Item that seems incomplete or incorrect, even though the item has met all automated edit checks. This is a typical workflow:
- The originator creates the Query Note. The Status is New. The originator assigns the query to the user who can answer the question.
The user it is assigned to updates the Query by adding a new child Discrepancy Note to the parent thread. The user might or might not modify the data value in conjunction with the update. If the user believes the issue is resolved, the user sets the Status to Resolution Proposed and assigns it to the originator, or, if the user believes further consideration is required, the user sets the Status to Updated.
- The originator reviews the response and if satisfied, marks it as Closed, or adds further comments, assigns it back to the user, and sets the Status to Updated.
Reason for Change
If a Study is configured to include Force Reason for Change, any change made to the CRF after the CRF data entry is marked complete requires a Discrepancy Note. Typically, use the Reason for Change Note Type to address the change, but the change can also be addressed with a Query or Failed Validation Check Note Type. A Reason for Change Discrepancy Note always has a Status of Not Applicable.
Annotation
Annotation Discrepancy Notes are to make comments or provide information about the data that cannot be adequately represented in the CRF. Refer to guidelines for your CRF and Study about appropriate use of Annotations. Annotation Notes always have a Status of Not Applicable.
15.6.3 Status of a Discrepancy Note
The status for a Discrepancy Note provides an indication of who is responsible for the next step. The Discrepancy Note Type determines what status values are allowed. These are the possible values:
- New
 : The initial status for a Query or Failed Validation Check Note Type.
 - Updated
 : Used when responding to a Note, but the response requires further follow up or additional information.
 - Resolution Proposed
 : When a user addresses a Note by fixing a data problem or by explaining why the existing data is correct, the user provides an explanation in a child Note, and sets the status to Resolution Proposed. A Monitor, Data Manager or Study Director then reviews the proposed resolution and updates the status.
 - Closed
 : The final action for a Failed Validation Check or Query Note Type. When a Note has a status of Closed, it cannot be changed in any way. Child Notes cannot be added and the status must remain Closed. Only users with certain Roles can mark a Discrepancy Note as Closed.
 - Not Applicable
 : This status is for Reason for Change and Annotation Note Types because no further action is required. The Not Applicable status cannot be used for Failed Validation Check and Query Note Types.
When there is more than one Discrepancy Note associated with a CRF Item, the most urgent status is shown in summary presentations that include Discrepancy Note status. When you view the Discrepancy Notes for the Item, you see the status for each Discrepancy Note.
15.6.4 Working with Individual Discrepancy Notes
15.6.4.1 Create a Discrepancy Note
Discrepancy Notes can be created automatically by OpenClinica, or by users.
Automatically-Created Discrepancy Notes
OpenClinica can automatically generate a Discrepancy Note as part of an Edit Check or data validation:
- When a CRF is marked complete and you make a change to an Item in it, OpenClinica automatically creates a Reason for Change Discrepancy Note for you to fill out, if the Study Parameters Configuration setting for Forced Reason for Change in Administrative Editing is marked “Yes.”
- When you enter data into a CRF, if you do not provide a value for a required field and click Save, OpenClinica prompts you to provide a value. You must either provide the missed value or click the flag next to the item to create a “[Missing data in a required field.]” Discrepancy Note.
- When you import data into OpenClinica, if there are errors, OpenClinica automatically generates a Failed Validation Check Type of Discrepancy Note.
User-Created Discrepancy Notes
A user can generate a Note in OpenClinca during data entry or when reviewing a CRF, as follows:
- When viewing or entering data for a CRF Item, click the Add Discrepancy Note icon
 next to the Item.
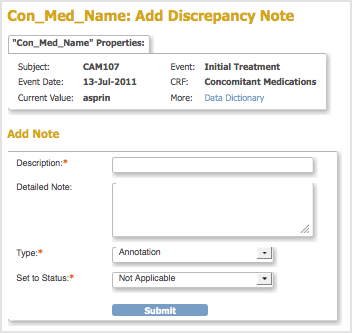
The Add Discrepancy Note window opens for that Item. - In the Add Discrepancy Note window, complete the fields. Some of the options are available only for appropriate User Roles or based on the circumstances under which you are creating the Discrepancy Note. Some of the options available are different after you’ve created the Note and can be assigned when you Update the Discrepancy Note:
- Complete the Description and Detailed Note fields.
- Select the Type from the drop-down list. The list includes only the appropriate options. If you accessed the Discrepancy Note by viewing rather than editing, you can only select the Query Type.
- Select the Status for the Discrepancy Note from the drop-down list. The list includes only the appropriate options.
- For a Query Note Type, select from the Assign to User drop-down list the user you recommend to take the next step for the Note; note that OpenClinica will not prevent other users from taking the next action for the Note. To send an email to the assigned user, select the Email Assigned User checkbox. You cannot assign other Types of Discrepancy Notes when creating the Note.
- Click Submit.
A message replaces the contents of the window, indicating the Note was created. The window then closes automatically. - In the CRF page, the flag icon for the Item is no longer blue, but instead is a color that reflects the status of the Discrepancy Note.
The Add Discrepancy Note Window:
Multiple Discrepancy Notes for a CRF Item
If a Discrepancy Note already exists for an Item, and you want to create a new, different Note for the Item:
- In the CRF, click the flag icon for the existing Discrepancy Note for that Item.
OpenClinica opens the Notes and Discrepancies window, which contains details for the Item. - In the Notes & Discrepancies window, click Begin New Thread.
- Complete the process as if adding a new Discrepancy Note.
15.6.4.2 View a Discrepancy Note
To see a list of Discrepancy Notes or to find a Discrepancy Note, see Manage Discrepancy Notes.
To view a Discrepancy Note in OpenClinica:
- Go to the CRF page that contains the Discrepancy Note.
- Hover over the flag icon for the Item that has the Discrepancy Note.
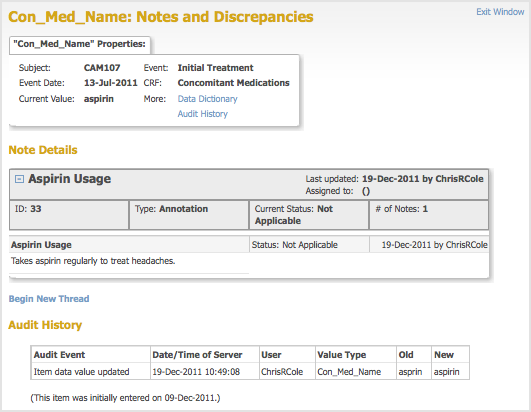
OpenClinica displays a pop-up window with summary information about the Discrepancy Note. - Click the flag icon to view details about the Discrepancy Note.
OpenClinica displays details for the Discrepancy Note in a Notes and Discrepancies window.
If there are multiple Discrepancy Notes associated with the Item, each Note is presented in a separate table, and has a unique Note ID. - When you finish viewing the Note details, close the Notes and Discrepancies window by clicking Exit Window in the top right corner.
Example of an Annotation Discrepancy Note:
15.6.4.3 Update a Discrepancy Note
You can update any Discrepancy Note, even if it is assigned to someone else.
To update a Discrepancy Note:
- View the Discrepancy Note in one of these ways:
- Go to the CRF page that contains the Discrepancy Note and click the flag icon for that Item.
- From the Notes and Discrepancies table, click the View icon for the Discrepancy Note.
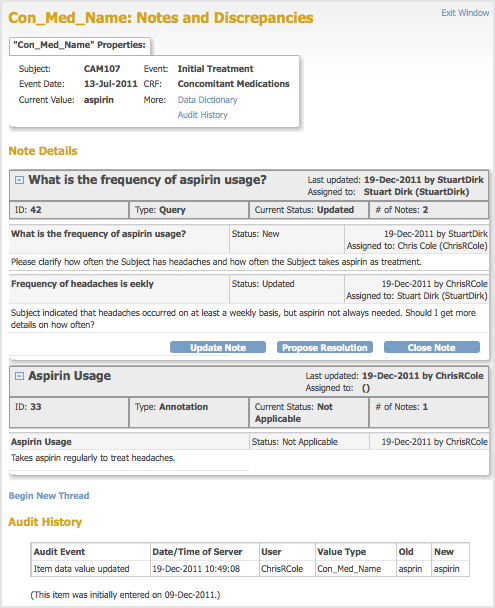
- In the Discrepancy Note window, click the button that represents the status you are setting the Note to. For example:
- If you will add more information that needs to be reviewed, click Update Note.
- If the information you plan to provide should be enough to allow the Note to be Closed, click Propose Resolution.
- If your User Role allows it and you have enough information, you can close the Discrepancy Note by clicking Close Note.
The window expands, showing fields that allow you to add a thread to the Note.
- Complete the fields: Description, Detailed Note, Status, and if appropriate given the Status value, Assign to User and Email Assigned User. Note that you can specify a user to assign the Discrepancy Note to if the Type is Query or Failed Validation Check.
- Click Submit to save the updated information but keep the window open, or click Submit and Exit to save the updated information and close the window. If you do not want to save any of the information you provided in updating the Note, click the Exit Window link (in the upper right corner).
The Discrepancy Note includes the information you provided as a new child note in the thread. In the CRF and in the Notes and Discrepancies table, the color of the flag icon for that Note changes to reflect the new status.
Example of an Updated Discrepancy Note:
15.6.5 Manage Discrepancy Notes
15.6.5.1 Notes and Discrepancies Table
Use the OpenClinica Notes and Discrepancies table to view a summary of Notes and Discrepancies for the current Study or Site.
A quick way to see the table with only the Notes and Discrepancies assigned to you is from the OpenClinica home page. The home page opens when you first log in to OpenClinica, or you can access it at any time by clicking Home in the navigation bar. The home page reports how many Notes and Discrepancies are assigned to you in the current Study or Site. Click the link to see those Notes in the Notes and Discrepancies table.
To view the table of all Notes and Discrepancies for the current Study or Site, click Notes & Discrepancies in the navigation bar. From the table, you can also find Notes and Discrepancies that match criteria you specify, and take action on individual Notes. The features you can access depend on your user Role in OpenClinica.
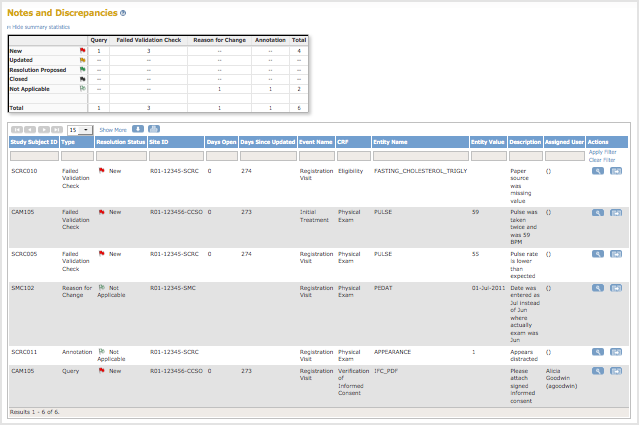
At the top is a table of summary statistics, which you can show or hide.
Below the summary statistic is the main table, which contains one row for each Discrecpancy Note. In this table:
- Entity Name refers to the CRF Item that the Note is associated with.
- Entity Value is the value recorded in the CRF for the Item.
- Description is the description provided in the Discrepancy Note.
- Assigned User is who the Discrepancy Note is assigned to, if anyone.
15.6.5.2 Actions to Take for Discrepancy Notes
Following are actions you can take for Notes and Discrepancies, from the Notes and Discrepancies table.
- Print: To print the table in its current view, click the Print icon, which is above the column headers.
- View More Information for Notes: To see the detailed description and other information for all Discrepancy Notes, click the Show More link, which is above the column headers.
- View Details for a Note: To view all details for a single Discrepancy Note, click the View icon in the Actions column for that row. The Discrepancy Note opens in a window. To close the Discrepancy Note, click Exit Window.
- View CRF and Note Details: In the Actions column, click the View within Record icon
 . OpenClinica opens the Discrepancy Note as well as the CRF page the Note is associated with. If the CRF Status is Completed, you may also edit data in the opened CRF page. Otherwise, you may only view the data on the page, but can modify the Discrepancy Note. After you close the Note and the CRF, OpenClinica displays the Notes and Discrepancies table.
 - Update a Note: For instructions to update a Discrepancy Note when you view it, see Update a Discrepancy Note.
- Find and Organize Notes
- Download Notes
15.6.5.3 Organize and Find Discrepancy Notes
These features help you organize and find Notes and Discrepancies using the table. They are similar to the features you use to find and organize data in the Subject Matrix.
Number of Discrepancy Notes Per Page
The bottom left corner shows the total number of Discrepancy Notes relevant to you as well as the number currently in view. When there are more Notes than can be listed on the page, use the green arrows above the table to scroll through the pages of Notes. When there is only one page of Notes, the arrows are gray.
To change the number of Notes shown on a page, click the drop-down list next to the arrows and select a value: 15, 25, or 50 per page.
Sort Notes By Column
To sort the table by Study Subject ID, Days Open, or Days Since Updated, click that column header. To reverse the sort order, click the column header again. An arrow next to the column header indicates the current sort order: up for ascending and down for descending.
For example, click Study Subject ID to show Notes in that order, with the lowest Study Subject ID value first. Click the column header again to show the highest Study Subject ID value first. The arrow in the column header then points down.
Filter Notes to Show Only Matches for Specified Criteria
You can filter the information shown in the Notes and Discrepancies table to show only Notes and Discrepancies whose data matches criteria you specify:
- For the column whose data you want to filter, click the gray field below the column header.
- What you enter in a field depends on the type of field:
- If a drop-down list displays, select the value you want from it; a value representing your selection appears in the gray field.
- If no drop-down list displays, type the string of characters you want to include, and press Enter or click Apply Filter (which is to the right of the gray fields).
- Repeat the above steps to filter by additional columns.
- To remove filtering for a column, either clear the text you typed, or from a drop-down list, select the empty (top) item. Then press Enter or click Apply Filter.
When filtering is applied, only those Notes and Discrepancies that contain the data you specified are shown.
To clear the filter and show all data, click Clear Filter (which is to the right of the gray fields).
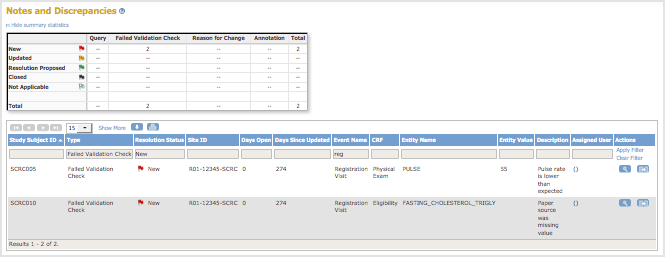
Example of Sort and Filter in Notes and Discrepancies
- For Type, select the Failed Validation Check option.
The field displays the option (or a numerical code representing the option). - Press Enter or click Apply Filter.
The table shows only Notes of the Failed Validation Check Type. - For Resolution Status, from the drop-down list in the gray field, select New.
The field displays that option (or a numerical code representing that option). - Press Enter or click Apply Filter.
The table shows only Notes whose Status is New and whose Type is Failed Validation Check. - For Event Name, in the gray field, type Reg, and press Enter or click Apply Filter.
The table shows only Notes whose Event includes Reg in the name, whose Status is New, and whose Type is Validation Check. - Click the Study Subject ID column to sort by that column.
The rows in the table are in Study Subject ID order, with the lowest value first.
Example of Notes and Discrepancies Table After Filtering and Sorting:
15.6.5.4 Download Discrepancy Notes
You can download Discrepancy Notes to a file:
- Use the Notes and Discrepancies Filter so the table shows only the Notes you want to download. All data for those Notes will be downloaded, that is all the data that appears when you click Show More, even if you did not click Show More.
- Click the Download button
 , which is located above the column headers.
The Download Notes window opens.

- Select the format for the downloaded file from the drop-down list:
- Comma separated values (CSV), which is best for use with other software, such as a spreadsheet or database.
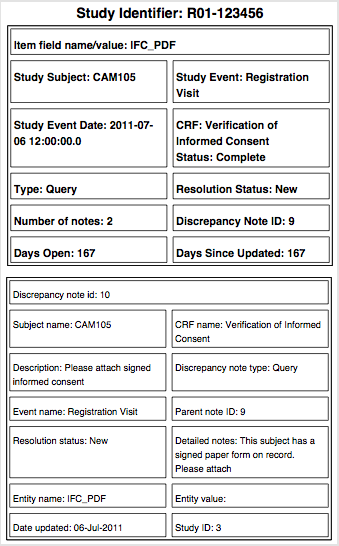
- Portable document format (PDF), which creates a file that is easy-to-read and to print.
- Click Download notes.
Depending on your browser settings, you might be prompted to open or save the downloaded file. - In the downloaded file:
- The CSV file contains one row for each Note, whether it is a child or parent Note.
- The PDF file shows a parent Note in bold, followed by the child Notes associated with the parent Note, in the normal font style.
- In the Download Notes window, click Close Window.
Example of Page from Downloaded Discrepancy Notes, PDF File:
Example of Records from Downloaded Discrepancy Notes, Comma Sepated Values File:

