When a CRF is created as part of Study Setup, many aspects of the CRF and data entry for it are configurable. These instructions provide general guidelines; when you enter data for a CRF, the process might differ.
- Open the CRF. There are different ways to open the CRF to enter data, including the following:
- In the Subject Matrix, find the Subject and Event you want to complete the CRF for, then click the icon in the cell for that Event, and click View/Enter Data.
- When you Schedule an Event, after completing the Schedule Study Event page, click Proceed to Enter Data.
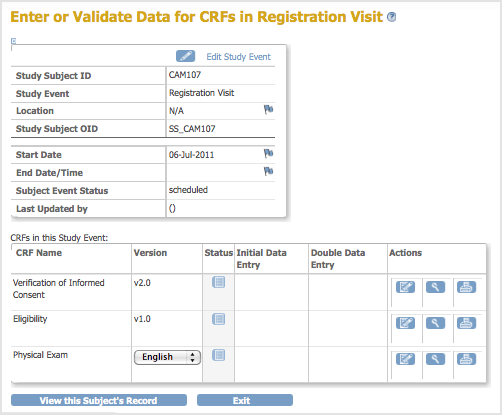
The Enter or Validate Data for CRFs page opens. The page reports the Event information followed by a table of all CRFs in that Study Event, with one CRF per row.

- If there is more than one version of the CRF available for the current Site or Study, select the one you want from the drop-down list in the Version column.
- If you want to print the CRF, click the Print icon for that CRF. The printout will include any data already entered in the CRF. To view a read-only version of the CRF, click the View icon. Note that when the CRF is viewed or printed in this manner all hidden fields in the CRF are displayed.
- To enter data for a CRF, click the Enter Data icon in the Actions column for that CRF.
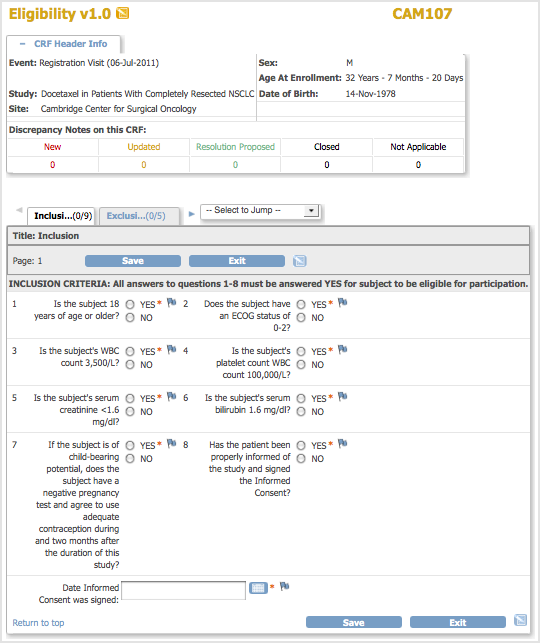
The CRF opens, showing the first Section. Details about the CRF and entering the data depend on how the Study was configured during Study Setup.Example CRF — Eligibiity for Study Subject CAM107:
- To view information about the Subject, Event, and Discrepancy Notes, click the plus sign (+) next to CRF Header Info, which is at the top of the page. To hide the Header Info, click the minus sign (-).
- Select the Section you want to enter data for. The title of the current Section is listed in a tab below the CRF Header Info. To select a different Section, click the tab for that Section (tabs are below the CRF Header Info) or select the Section from the drop-down list next to the tabs.
- Enter the information for the current Section. The icon changes from
 to
to  , indicating the page now contains unsaved data. Items are numbered if the CRF was defined that way, with the total number of Items completed for that Section and total number of Items in the Section shown in the tab. For example, (0/5) indicates 5 Items in the Section, with no data entered in any of the Items. Instructions for completing Items in the Section are be shown at the top of the page or with each Item, if the CRF was defined that way. If you enter a value that differs from what is required for the CRF, have a question, or want to make a note, add a Discrepancy Note by clicking the Add Discrepancy Note icon
  for the Item and then completing the Note. For details, see Notes and Discrepancies.
 - After completing a Section (page):
- If you don’t want to save the information you entered for a Section, click Exit to end data entry.
- If you want to keep the information you entered for that Section, click Save.
If there are any problems with the data you entered, OpenClinica does not save the data, but displays messages about the information that is incorrect. Specifically, it checks that all required values are provided and that values entered comply with validation checks and Rules that are defined for the CRF. Correct any mistakes in the data or provide a Discrepancy Note for them, then click Save.
Upon saving the Section, OpenClinica performs any calculations that were set up for the Section of the CRF. After saving the Section, OpenClinica displays the next Section of the CRF.
- Complete all Sections in the CRF, saving each Section as you complete it.
- In the last Section:
- If all information has been entered for the CRF, select the Mark CRF Complete checkbox, then click OK in the confirmation dialog box. If a password is required, supply your password in the dialog box that opens. You can later edit the data in the CRF, even after marking it complete.
- If all information has not been completed, do not select Mark CRF complete. you can edit the CRF later to complete the information and mark the CRF complete at that time.
- If double data entry is required for the CRF, select the Mark CRF Complete checkbox. You or another user will need to enter the data for the CRF again before it can be verified as complete.
- Click Save in the last Section.
If the CRF has been marked complete, the Enter or Validate Data for CRFs page opens, and the status for the CRF shows Data Entry Complete, or Data Entry Started if you did not mark it complete. The Study Events sidebar panel also shows the updated status for the Event. - If you want to print the completed CRF, click the Print icon for the CRF in the Enter or Validate Data for CRFs page.
