2.1.1 Add New Subject from Subject Matrix
To add one Subject and schedule the first Event for the Subject:
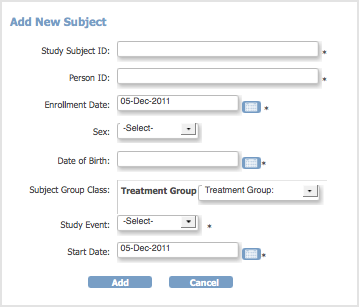
- In the Subject Matrix, click the Add New Subject link.
The Add New Subject page opens. Complete the information on the page as described in the following steps. Some of the information might be optional for your Study; an asterisk (*) indicates a required field. For a description of the terms, see the Glossary. - Enter the Study Subject ID. Note: For your Study, OpenClinica might be configured to automatically generate the ID.
- Enter the Enrollment Date in the specified format, or click the calendar icon to select it.
- Select the Sex.
- Enter the Date of Birth in the specified format, or click the calendar icon to select it.
- Select the Group(s) from the drop-down list, if any Subject Group Classes were defined in the Study setup.
- Select the first Study Event from the drop-down list.
- Enter the Start Date for the Event, or click the calendar icon to select it.
- Click Add to add the Subject to the Study, or click Cancel and no data about the Subject is saved.
2.1.2 Add Subject from Tasks Menu
To add more than one Subject, schedule one or more Events for the added Subjects, or provide more than the most common information for the new Subjects:
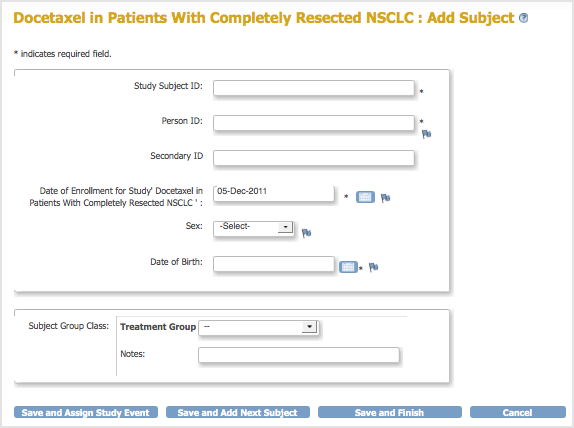
- Select Tasks > Add Subject.
The Add Subject page opens. Complete the information on the page as described in the following steps. Some of the information might be optional for your Study; an asterisk (*) indicates a required field. For a description of the terms, see the Glossary. - Enter the Study Subject ID.
- Enter the Person ID.
- Enter the Secondary ID.
- Enter the Date of Enrollment in the specified format, or click the calendar icon to select it.
- Select the Sex.
- Enter the Date of Birth in the specified format, or click the calendar icon to select it.
- Select the Group(s) from the drop-down list, if any Subject Group Classes were defined in the Study setup, and enter any notes.
- Click one of these buttons, depending on what you want to do next:
- Save and Assign Study Event: Adds the Subject and opens the Schedule an Event form for the Subject.
- Save and Add Next Subject: Adds the Subject and opens the Add Subject form again so you can add another Subject.
- Save and Finish: Adds the Subject and displays the Subject Matrix.
- Cancel: Does not save the Subject and displays the Subject Matrix.
2.1.3 Assign or Reassign Subject to Site
When you add a Subject, the Subject is added to the current Study or Site. Typically, you set the current Site and add Subjects to it. However, you can add a Subject to the overall Study and later assign the Subject to a Site. You can also change the Site a Subject is assigned to.
The Site a Subject is assigned to is reported in the Study Subject Record. You can also see the Site assignment in the Subject matrix. When the current Study or Site is set to the Site level, the Subject matrix shows only the Subjects assigned to that Site, so any Subject in the matrix is assigned to the current Site. When the current Study or Site is set to the Study level, view the Site assignments in the Subject Matrix by clicking the Show More link. The Site ID field reports the Site assignment, where the Site ID names were established when the Sites were created.
To assign a Subject to a Site, or to reassign a Subject to a different Site:
- Change the current Study to the Study level.
- Locate the Subject in the Subject matrix.
- In the Actions column for the Subject, click the Reassign icon
 .
.
The Reassign Study Subject page opens, with the Subject’s current assignment selected.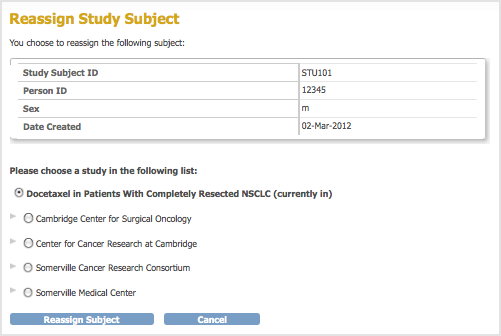
- Select the Site you want to assign the Subject to and click Reassign Subject.
The Confirm Reassign Subject page opens. - Click Submit.
The Subject is now assigned to the Site you specified.
2.1.4 Adding a Subject to More than One Study
After adding a Subject to a Study in OpenClinica, the Subject can participate in other OpenClinica Studies. Add the Subject to each Study, using the same Person ID. When you add a Subject to a second or subsequent Study, OpenClinica presents you with a confirmation screen, and ensures that the Sex and Date of Birth for that Subject match the values already in the database for the Subject.