


3.3.1 Managing Form Access and Permissions
This page explains how access to study data works in OpenClinica 4. It describes which aspects of access are configurable and how these settings interact to determine what actions users can perform on each form.
Form permissions define how users interact with forms—whether they can view, review, or edit data—while user roles define broader privileges across the study.
Together, these settings ensure that each user has the appropriate level of access to perform their study tasks securely and efficiently.
Roles and Access Overview
Base Roles
Base roles define overall permissions and default form access for common study functions (for example, Clinical Research Coordinator, Site Monitor, Data Manager).
Custom Roles
Custom roles are derived from base roles to meet study-specific requirements.
For example, a custom CRC role may have reduced permissions compared to the standard CRC role.
For details on creating and managing custom roles, refer to User Roles.
Form Categories
Form categories define how OpenClinica applies access rules to different types of forms.
Each category—Contact Forms, Tagged Forms, and Untagged Forms—follows distinct rules for visibility, permissions, and storage. Understanding these categories helps ensure that each form’s data is protected and accessible to the right users.
Contact Forms
Contact forms contain specially designated Personally Identifiable Information (PII) data.
A form is automatically treated as a Contact Form when it includes one or more fields configured to use the external value / bind::oc:external contactdata.
Forms can include both contact and non-contact data fields, but only fields using contactdata are treated as contact data for storage and access purposes.
For information on adding contact data fields to forms, refer to one of the following, depending on your method of form design:
By default:
- CRCs and Investigators can edit contact forms.
- Other roles have no access unless additional permission tags are applied.
ℹ️ Note: To add or revoke access to contact form(s) for specific roles, see the How Access to Contact Data Works section below.
If a form contains both contact and non-contact fields, only the contact fields follow the special access and storage rules described in Understanding Contact Data.
Tagged Forms
Tagged forms are forms with a manual permission tag applied in Study Designer.
These tags allow study designers to grant or restrict form access for specific roles.
For example, you can:
- Hide a form from a particular role by setting it to No Access.
- Grant Read-only, Review, or Edit access to other roles.
Access to tagged forms must be explicitly granted; as they are set to No Access by default.
For information about how to create manual permissions tags in Study Designer, refer to Permission Tags.
Untagged Forms
Untagged forms are study forms that neither contain specially designated Personally Identifiable Information (PII) data nor have manual permission tags applied.
Default access is based on the user’s base role but can be configured to one of the following levels: Read-only, Review, or Edit.
Access Levels
Different access levels are available depending on the type of form—for example, Contact Forms, Tagged Forms, or Untagged Forms.
These access levels determine what a user can do with each form, such as viewing, reviewing, or editing data.
| Access Level Availability by Form Type | ||||
| Access Level | Description | Contact Forms | Tagged Forms | Untagged Forms |
| Read-only | User can view form data but cannot edit or create queries. | ❌ | ✅ | ✅ |
| Review | User can view data and create or update queries, but not edit data. | ❌ | ✅ | ✅ |
| Edit | User can enter or update form data. | ✅ | ✅ | ✅ |
| No Access | User cannot view or open the form. | ✅ | ✅ | ❌ |
ℹ️ Notes:
While adding and updating queries is governed by your form access level, access to close queries is determined by your role permissions in addition to form access level. Closing queries is only possible in Review and Edit modes for roles that have this ability.
- For example, Monitors and Data Managers with Review or Edit access can close queries, while non-DM / non-Monitor users with Review or Edit access can only update them.
- ⚠️ Important: If a Monitor or DM does not have access to a form, the query will not be visible, and therefore they will not be able to close it.
Similarly, SDV access is determined by your role permissions in addition to form access level. SDV is only possible in Read-only, Review, and Edit modes for roles that have this ability.
Only form data access is configurable through this feature—other actions such as viewing or editing contact data outside of forms, adding participants, scheduling events, and removing records remain controlled by the role definition.
How Access to Contact Data Works
Access to contact data is intentionally limited and controlled through a combination of role permissions and form-level tags.
Default Access
By default:
- CRCs and Investigators (site-level users) can view and edit contact data entered directly in the system.
- All other users (including both site- and study-level users) do not have access.
- These defaults can be further refined by applying manual permission tags and updating form-level access settings.
Adjusting Access with Permission Tags
Use Manual Permission Tags to add or revoke access to contact form(s) for specific roles:
To adjust access:
- Apply a Manual Permission Tag to the contact form in Study Designer.
- Set the desired access level in User Role configuration: Read-only, Review, Edit, or No Access.
💡 Example Scenarios
- Restricting access:
A CRC user is responsible for completing certain study forms but should not have access to contact data.- Create a custom role based on the CRC base role.
- Apply a Manual Permission Tag to a Contact Form in Study Designer and set the CRC role access level to No Access to prevent users with that role from opening contact forms.
- Granting access:
Monitor users need to view contact forms to perform their study duties.- Apply a Manual Permission Tag to a Contact Form and set the Monitor role access level to Read-only or Review, depending on the level of access required.
⚠️ Important: If a form is both a Contact Form and has a manual permission tag, the manual tag’s access level takes precedence.
⚠️ Before Publishing a Permission Tag:
- Confirm Tag Settings: Verify the tag’s configuration to prevent unintentionally granting or denying access.
- Check User Roles: Review the User Role screen to ensure no users have been inadvertently granted or denied access to the form.
💡 Tip: Always double-check both tag settings and user roles to maintain accurate access control for all forms.
How Contact Data Is Displayed in Study Runner when Manual Tags Used
To protect participant privacy, contact data is visible only where appropriate and is masked or excluded in other views. Manual permission tags override default access to Contact Forms, but do not necessarily override access to contact data as a whole.
The table below summarizes where contact data may appear in the system, how visibility of contact forms is affected by manual permission settings, and any exceptions or special considerations for each area.
ℹ️ Note: For more information about the differences between contact data and contact forms, refer to Contact Data vs. Contact Form.
| Area | Contact Data vs Form | Manual Tag: No Access | Manual Tag: Access | Notes |
| Participant Matrix – Single Event View | Contact Data | N/A | N/A | N/A |
| Contact Form | ❌ No | ✅ Yes | When a user has no access to a contact form via manual permissions, they will see the form status icon in the Participant Matrix Single Event View, but not be able to view / edit the form. | |
| Participant Details Page – General Information section | Contact Data | ⚠️ CRC/ Investigator | ⚠️ CRC/ Investigator | Certain contact information (for example, Email, Mobile) may display based on study configuration for CRCs and Investigators only. This cannot be overridden by manual permission tags. |
| Contact Form | N/A | N/A | N/A | |
| Participant Details Page – Visits Section | Contact Data | ❌ No | ✅ Yes | Visible within form for users with access. |
| Contact Form | ❌ No | ✅ Yes | Form cards are visible and forms are available to open when the user has read-only, review or edit access. | |
| Queries Page / SDV Page | Contact Data | ❌ No | ❌ No | Contact data cannot be queried or source data verified, and therefore is not present. |
| Contact Form | ❌ No | ✅ Yes | Visible if access granted via manual permission tag. | |
| PDF Casebooks | Contact Data | ❌ No | ❌ No | Contact data is present in the form details but masked for privacy for all users, regardless of form permissions. |
| Contact Form | ❌ No | ✅ Yes | Form data will be present if the user has access to the form via manual permission tag. | |
| Clinical Data Extracts and ODM-XML/JSON Casebooks | Contact Data | ❌ No | ❌ No | Contact data is present in the participant audit details, but masked for privacy, regardless of form permissions. |
| Contact Form | ❌ No | ✅ Yes | Form data will be present if the user has access to the form via manual permission tag. | |
| Clinical Data API | Contact Data | ❌ No | ❌ No | If audit data is included in the API response, the contact data is present but masked for privacy, regardless of form permissions. ℹ️ Note: Contact data is available through the Contact Data API only to CRCs and Investigators. For more information, refer to Retrieve Participant Contact Information. |
| Contact Form | ❌ No | ✅ Yes | Form data will be present if the user has access to the form via manual permission tag. | |
| Participant Audit Log | Contact Data | ⚠️ CRC/ Investigator Only | ⚠️ CRC/ Investigator Only | Visible only to CRCs and Investigators in the participant section. Masked for all other users, regardless of form permissions. |
| Contact Form | ❌ No | ✅ Yes | Form data will be present if the user has access to the form via manual permission tag. | |
| Consent | Contact Data | ❌ No | ✅ Yes | Available to view when the user has read only, review or edit access via manual permission tag. |
| Contact Form | ❌ No | ✅ Yes | Available to view when the user has read only, review or edit access via manual permission tag. | |
| Attestation | ❌ No | ⚠️ CRC/ Investigator Only | Contact data visible only to CRCs and Investigators. Masked for all other users with access. | |
| Insight | Contact Data | ❌ No | ❌ No | Contact data is not passed to Insight. |
| Contact Form – RLS enabled | ❌ No | ✅ Yes | Form data will be visible in Insight (and controlled via manual permission tag if RLS [row-level security permission syncing] is enabled). | |
| Contact Form – No RLS | ✅ Yes | ✅ Yes | Form data will be visible in Insight if RLS (row-level security permission syncing) is not enabled since permissions are managed separately in Insight in that case. |
Security and Privacy Safeguards
- Icons and Visual Indicators
Contact forms display a contact data icon, and tagged forms display a permission tag icon. These help you identify sensitive forms at a glance. - Data Masking
Contact data is always masked in exports (ODM XML, ODM JSON, and PDF Casebooks). - Audit Logs
Only CRCs and Investigators can view contact data in the participant section of the audit log. Other users see masked values, including when audit data is exported. - Role Reference
The Contact Form Edit privilege is displayed on the User Roles page for transparency.
3.3.2 LMS Integration
OpenClinica enforces role-based training to ensure users are prepared before accessing study data in production. This page explains how training enforcement works, what users and administrators can expect, and how to configure training requirements for user roles.
Overview
OpenClinica training has two components:
| Training Type | Description |
| Required training | Role-based training configured by a Study Administrator. Users must complete this before accessing the Production environment in Study Runner. |
| Optional training | Self-service resources, including Resources beacon content and tooltips, available at any time for onboarding and reference. Completion is not tracked. |
How Training Enforcement Works
When you log in to Study Runner, OpenClinica checks whether you have completed any required training for your assigned role. If training is incomplete, you are redirected to the Training Page before you can access the Production environment.
Each training module includes a quiz. To be marked complete, you must score 80% or higher on the accompanying quiz.
Once you complete all required training, access is granted automatically and you are redirected to the Study Runner homepage. Training status updates in real time — no manual refresh is needed.
If your role does not require training, or if training is already complete, the Study Runner homepage opens normally.
ℹ️ Note: Training enforcement applies to both new and existing users. If your role requires training, the Training Page appears at login regardless of when your account was created.
Training Completion and Role Assignments
Training completion is tracked at the user account level within a customer domain. This means:
- If you are assigned the same role across multiple studies in the same domain, you only need to complete training once.
- If you are assigned a different role, you must complete the training required for that role.
Environment and Study Behavior
Training enforcement depends on which environment and study you select:
- Production: Required training is enforced.
- Test: Training is not required, allowing you to practice workflows and explore functionality without completing training first.
For users assigned to multiple studies, enforcement depends on the study selected. If a study does not require training, the study homepage opens normally. If it does require training and you have not completed it, you are redirected to the Training Page.
ℹ️ Note: On the Change Study page, both Production and Test studies appear. Training requirements apply only to Production studies. For more information, refer to Change Study.
Training Completion Records and Audit Logging
OpenClinica records and retains completion data for the five core LMS-based trainings, regardless of whether they are configured as required for a given role.
After a core training is completed, OpenClinica stores the completion record internally to support long-term retention, protect records from alteration or deletion, and provide audit evidence for inspections.
Training Module Completion
When the LMS confirms completion of an individual training module, OpenClinica creates a Training_Module_Complete audit log entry. Each entry includes:
- Audit event name (Training_Module_Complete)
- System date and time when completion is recorded
- Target object (the user the training data is associated with)
- The user associated with the completion
- Training name
- Value ({blank} / Yes)
All Required Training Complete for User Role
After you complete all required training for a user role, OpenClinica creates an All_Required_Training_Complete audit event. This event is logged in each study where you are assigned the applicable role to support traceability across study contexts.
This event is created in the following situations:
- A user newly completes all required training for their role.
- A user who has already completed required training is assigned to a new study with the same training requirement.
- Core Training Required is enabled for a role whose currently assigned users have already completed the required training.
These audit events ensure consistent documentation of training compliance across studies and role assignments.
View Training Status for Your Study
To see which users have completed or not yet completed required training, use the People Table on the Share Page. The People Table displays a Training Status column for each user assigned to the study, allowing you to quickly identify who has and has not completed required training.
- Navigate to the Share Page for your study.
- Review the People Table and check the Training Status column for each user.
| Training Status | Meaning |
| Complete | All required training for the user’s role has been completed. |
| Not Complete | Required training for the user’s role has not been completed. The user cannot access the Production environment for this study until training is completed. |
| Not Applicable | No training is required for the user’s role. |
ℹ️ Note: The Training Status column only appears in the People Table when at least one user role in the study has training required. If no roles require training, the column is hidden.
Export Training Completion Records
If you need a record of training completion for audit or compliance purposes, download the User and Role Audit Log. This log includes the Training_Module_Complete and All_Required_Training_Complete audit events described above and can be used to verify completion outside of the application.
ℹ️ Note: For more information on accessing the User and Role Audit Log, refer to Using OpenClinica as an Administrator.
Configure Training Requirements
This section is for Administrators responsible for configuring user roles.
Training requirements can be configured for each user role. If Core training is required, the specific course is automatically chosen for each of the five core base roles:
- Clinical Research Coordinator (CRC) / Data Entry Person
- Investigator / Data Specialist
- Data Manager
- Monitor
- Viewer
Enable Core Training for a Role
To require Core training for a role, enable the Core Training Required option in the role settings. Once enabled, all users assigned to the role must complete the designated training before accessing the Production environment for the study.
- Navigate to Settings → User Roles.
- Select the role you want to configure and click Edit.
- In the Edit Role window, scroll down to the Training Requirements
- Enable Core Training Required.
- Click Save.
💡 Tip: You can also set the training requirement when creating a new user role.
💡 Tip: If you have tight timelines between a study being published to Production and first patient in (FPI), consider assigning users to the Test environment first before granting Production access. Users can complete training through the Resource Center and complete it at their own pace. Because training completion is tracked at the user account level, their completed training will already be on record when you are ready to grant Production access.
3.3.3 Using Multifactor Authentication
You can enable multi-factor authentication (MFA) for your OpenClinica domain by contacting the OpenClinica Customer Service team.
ℹ️ Note: MFA is an optional security feature. It is only required if it has been enabled for your OpenClinica domain.
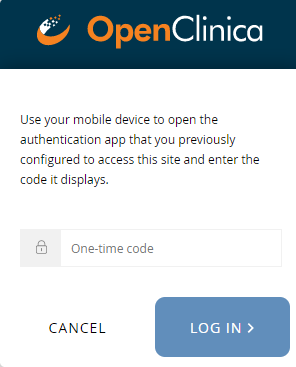
When you enable multi-factor authentication, users are prompted to:
- Download either the FreeOTP app or the Google Authenticator app to your smartphone.
- Scan a barcode.
- Enter the access code from their device.
Initial User Sign-up:
Subsequent Logins:
Note: Once you have enabled multi-factor authentication, you no longer need to scan a barcode. Only username, password, and an access code are required to sign in. The barcode should be treated as your password and should not be shared with anyone (including via screenshare).
If This Feature is Enabled:
- All Study and Site Users are required to login with username, password, and an additional code.
- Data Specialists and Investigators will still sign participant records with only their username and password.
- Participant users logging into Participate are still only required to enter access codes.
- You cannot enable multi-factor authentication for a specific study, site, or user. It must be enabled per OpenClinica domain.
Additional Information:
There is no link between a user’s authenticator app/device and the authentication server: Authenticator apps do not communicate with a server in any capacity. If a user deletes an MFA entry in their app, the server is not informed in any way and the user will still be expected to enter their One Time Password (OTP) upon login.
Troubleshoot syncing the device clock to the server time: We suggest the user compare their MFA device time to something official (e.g. https://www.time.gov/) – ensure that the users understand that MFA is sensitive down to the second. Some mobile devices fetch the time from their local Wi-Fi device and may be inaccurate.
If a user loses their MFA device or authenticator entries: they will have to make a request to their OpenClinica administrators to reset their MFA credentials, which will prompt them to re-configure MFA and give them a new QR code to scan.
Note: Our current implementation of MFA/OTP requires a second device such as a phone or tablet running iOS or Android and using one of the apps listed above.
3.3.4 Publish History
The Share screen tracks the publication history for each environment (Test and Production). Scroll to the bottom of the Share screen to see the publication history.
To View a Previously Published Version of the Study:
Click the View Study Design link to the right of the version you’d like to view.
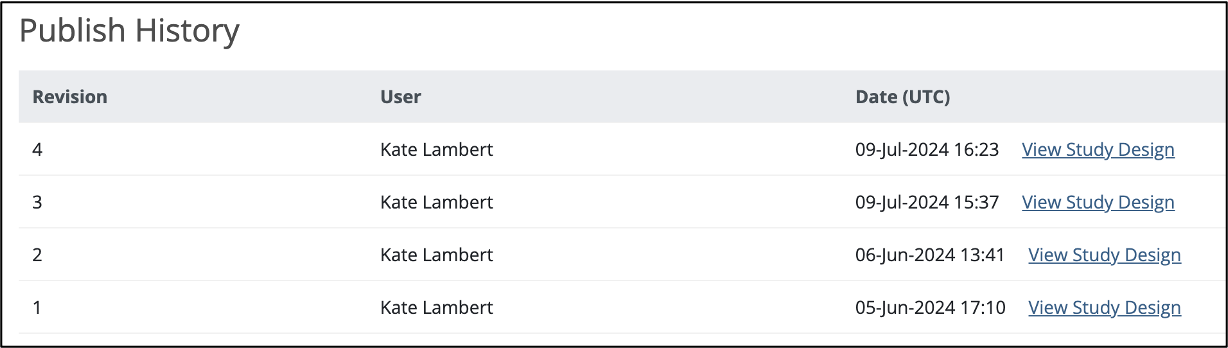
A read-only version of the previously published study design displays:

Though no changes can be made to this version of the study, you can:
- View form and event settings
- Download form versions,
- Preview forms
etc.
The header clearly indicates this is a read-only version, and includes a link to quickly access the current version of the study, which is fully editable.
Note: Some Form attributes (checklists, tags, and labels) show the values that they have in the current design, regardless of their state in the previously published version. In the Test environment, if a Form version was overwritten after a previous publication, only the newest version of that Form is available for preview and download. This is not a concern in the Production environment, since Form versions cannot be overwritten.
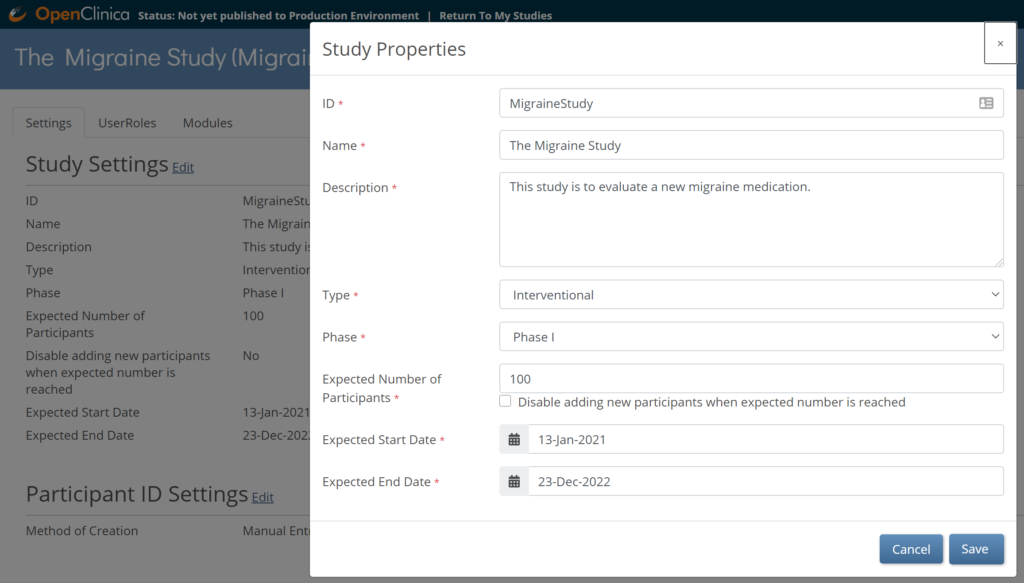
3.3.5 Editing Study Settings
To Edit Study Settings:
- To the right of Study Settings, click Edit.
- The Study ID field has a limit of 30 characters.
- Edit the study settings as needed, and click Save.
Note: The changes take effect immediately in both the Test and Production environments for that study.
Adding and Editing Participant IDs
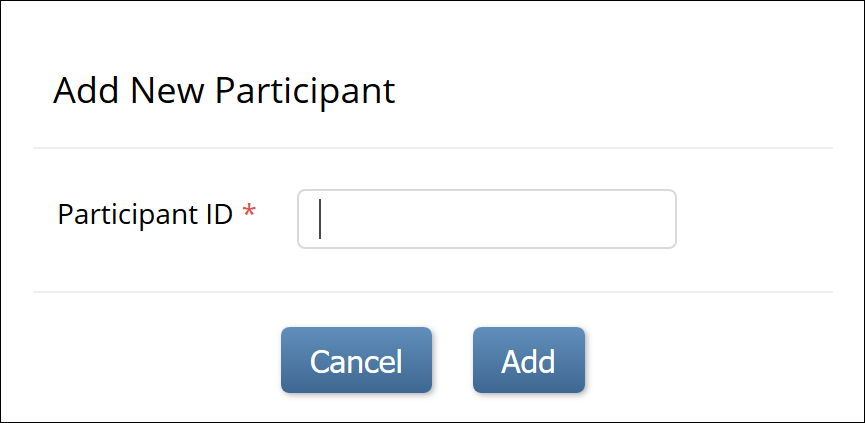
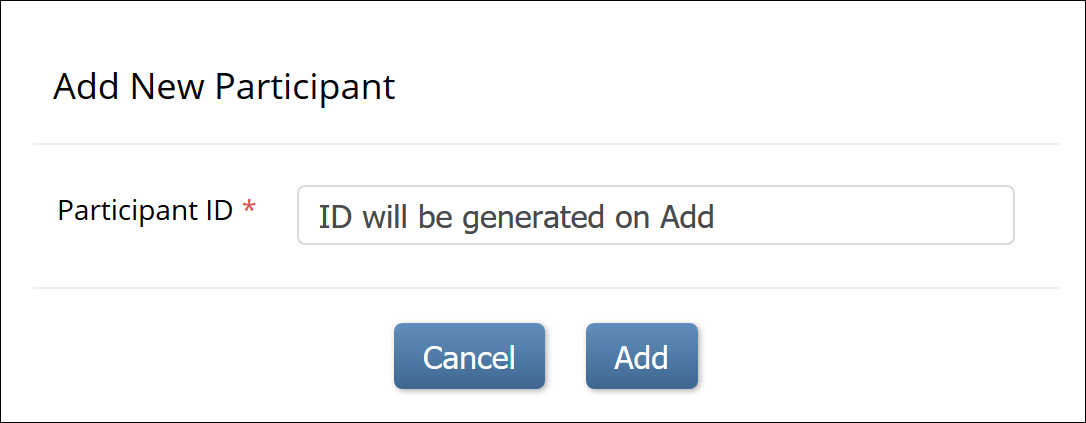
Participant IDs can be created with:
- Manual Entry: The user must enter the ID for each Participant.
- System-generated: The system will auto-generate the ID based on an ID Template that you specify.
To Change the Method of Creation to Allow Automatic Entry:
- From the My Studies screen, click the Settings (gear) icon under the study name, and select Settings.
- Click the Edit link next to the Participant ID Settings header.
- Click the radio button next to System-generated.
Note: If Method of Creation is set to System-generated, only Data Managers can edit the Participant ID. Data Managers can always edit IDs, even ones that are system-generated.
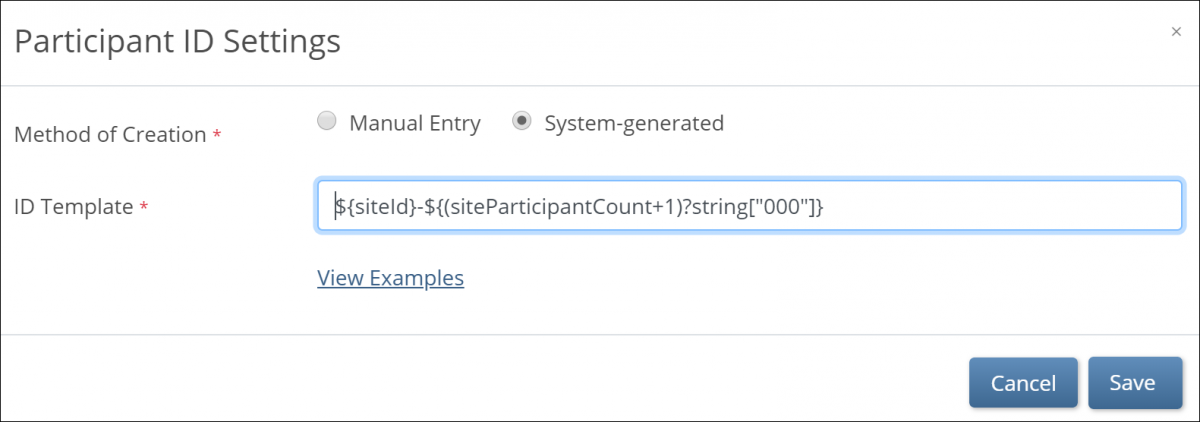
System Generated IDs
If you choose System-generated, you must specify the template for the system-generated ID.
You Can Generate Participant IDs by the Following Methods:
- The Participant Count Method: Generate Participant IDs sequentially.
- The Random Number Method: Generate Participant IDs using random numbers.
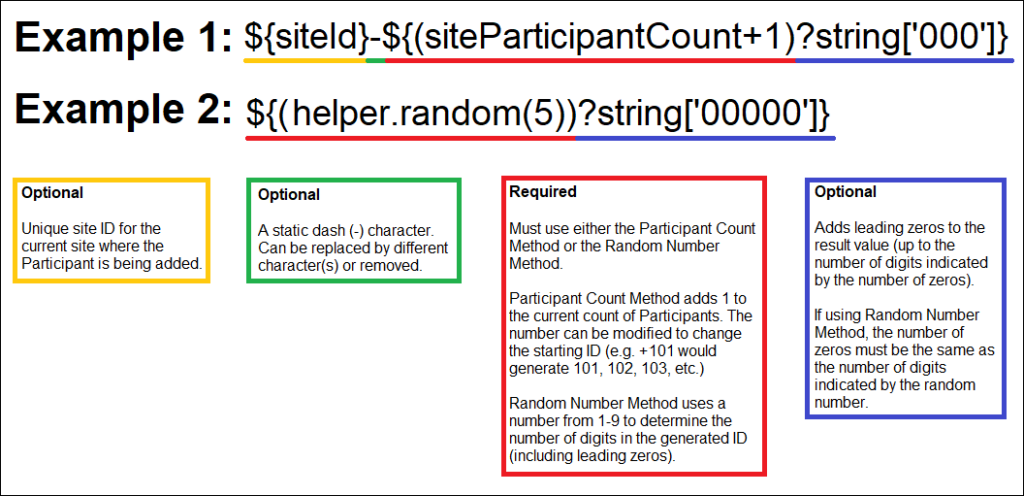
You Can Build Your ID Template Using One or More of the Following Components:
- ${siteId}: The unique identifier for the site the Participant is being added to.
- ${siteParticipantCount}: The current number of Participants at the site. This is generally used like ${(siteParticipantCount+1)} to have the ID increment the Participant count for each new Participant added.
- ${helper.random(n)}: Generates a random number with up to n digits each time a Participant ID is generated.
- ?string[000]: Added to the resulting values to pad them with leading zeros to equal the number of digits specified, for example, ${(siteParticipantCount+1)?string[000]} or ${(helper.random(5))?string[00000]}.
- Prefixes, suffixes, separators – Include other text (such as – or a Study-specific prefix) to include standard content in each ID.
Note: Each ID Template must include #2 or #3.
Examples: The Participant Count Method template, ${siteId}-${(siteParticipantCount+1)?string[000]}, for site University Hospital (Site ID = UH) would produce the IDs, UH-001, UH-002, UH-003, etc. For site Central Hospital (Site ID = CH) would produce CH-001, CH-002, CH-003, etc.
The Random Number Method template, P-${(helper.random(5))?string[00000]}, would produce IDs with a fixed prefix of P- followed by a 5-digit random number (including leading zeros), for example P-00362, P-82394, P-35070.
Notes About the Template:
- The template cannot exceed 255 characters, and the resulting Participant ID cannot exceed 30 characters.
- ${siteId} and ${siteParticipantCount} are both required but can be in any order.
- Static text can be added to any portion of the template, but cannot include the following characters:
- Slash (/)
- Backslash (\)
- Less Than (<)
- Greater Than (>)
- Ampersand (&)
- Quotation Marks {“)
- Apostrophe (‘)
Best Practice: There is no restriction for going beyond the minimum, but it is best practice to set up the minimum length to match the length of the maximum number of expected Participants.
If the template is invalid for any reason, the system uses a default template of ${siteOID} followed by a dash and a six-digit random number.
3.3.6 Accessing the Share Screen
Use the Share screen to add sites to a study and invite users to access it.
Access the Share Screen
You can open the Share screen from multiple locations in OpenClinica, depending on where you are working.
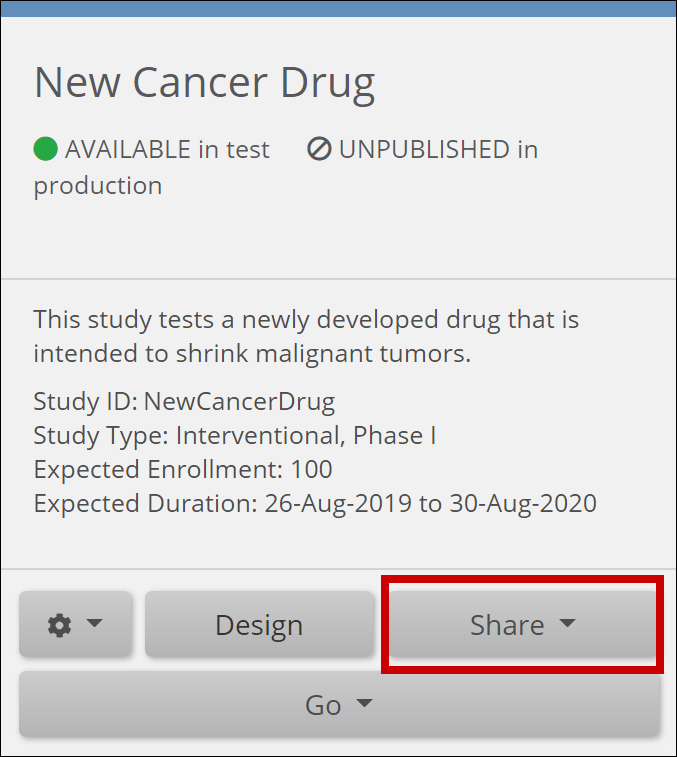
From the My Studies Screen
- Locate the study card.
- Click Share at the bottom of the study card.
- Select Test or Production on the study card to share.

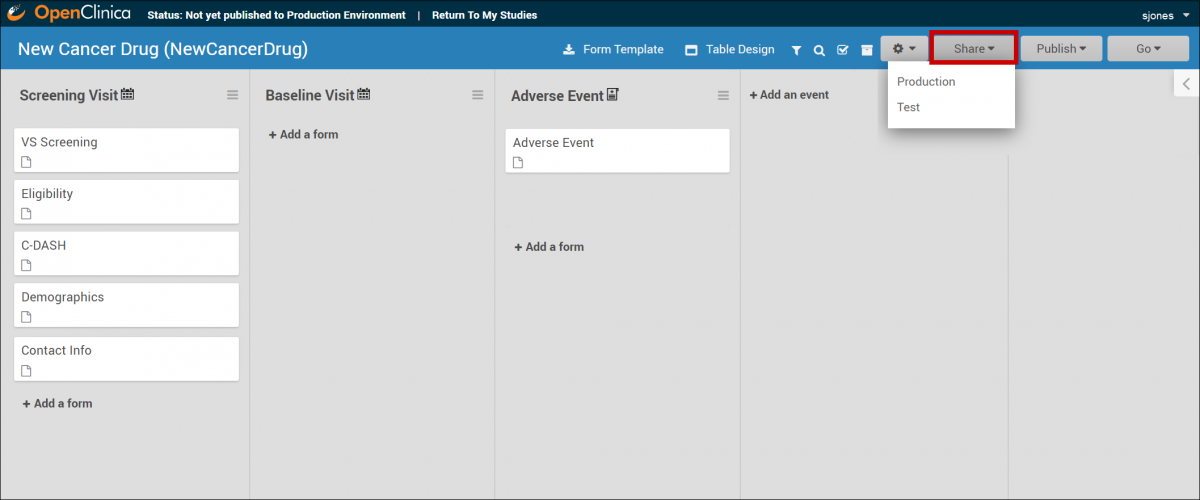
From Study Designer
- Open the study in Study Designer.
- In the header bar, Click Share.
- Select Test or Production to share.
From the Settings Screen
- Open the study Settings.
- Click Share.
- Select Test or Production to share.
The Share screen opens and displays options for managing site access and user invitations for the selected environment (Test or Production).
Next Steps
- For details on adding sites to your study, refer to Adding Sites.
- For details on inviting users to your study, refer to Inviting Users.
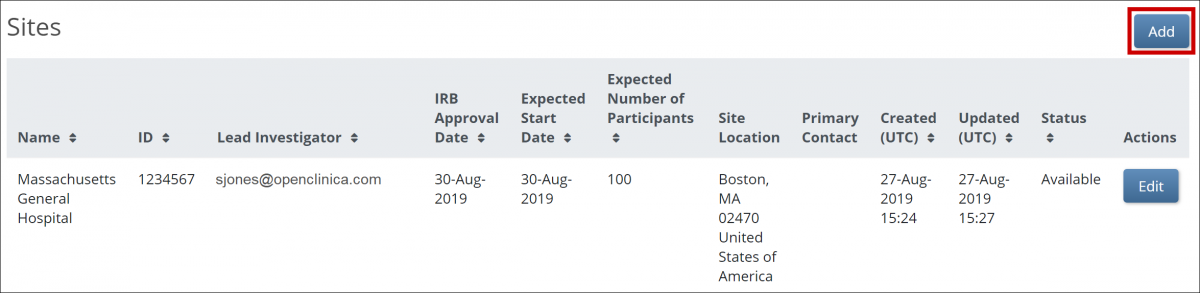
3.3.7 Adding Sites
Before inviting users to your study, ensure that at least one site is added. This applies even if your study collects data from only a single site.
Add a Site
Follow these steps to add a site:
- On the Share screen, scroll down to the Sites section and click Add.

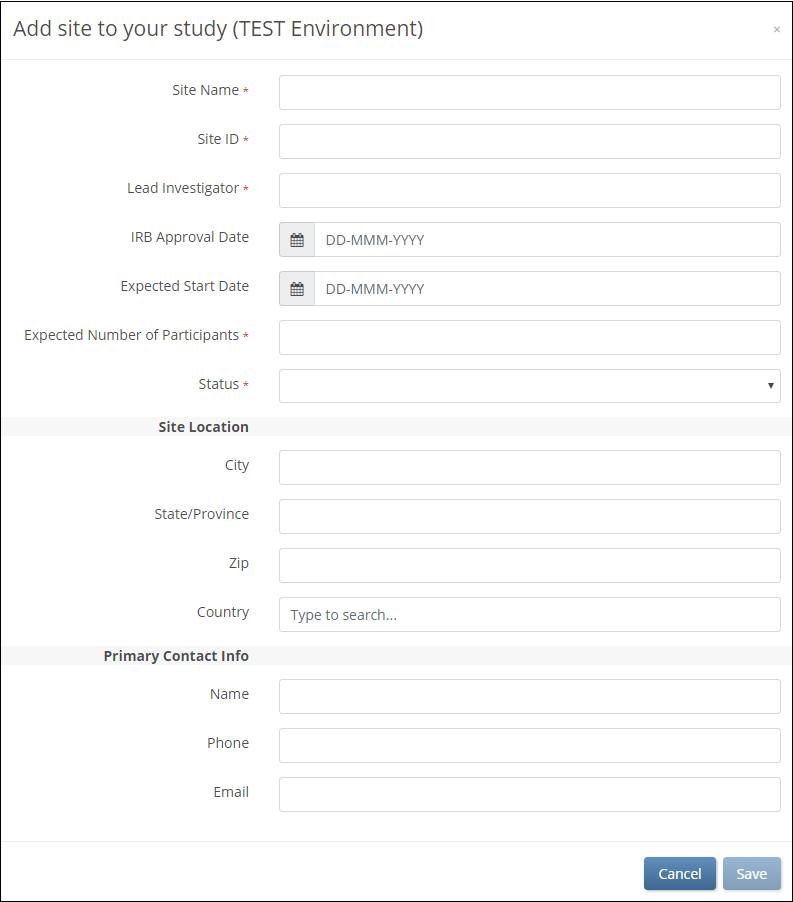
- On the Add Site screen, begin typing the site name.
- If the site already exists in another environment, select that site from the list. Fields are prefilled with site information.
- If you are creating a new site, enter the Site Name and enter information in the appropriate fields.
ℹ️ Note: The Expected Number of Participants field is required, but it does not limit the number of participants at the site. Participant limits can only be configured at the study level.
For more information on limiting participants in a study, refer to Create a Study. - After entering all site details, click Save.

Global Site Fields
Sites are global, meaning that if you use a site in Study A, you do not need to recreate it for Study B. When adding an existing site to a study, the following fields automatically populate:
- Site Name
- Time Zone
- City
- State/Province
- Zip
- Country
⚠️ Warning: Only users with the Admin or OpenClinica Team role can edit global site fields (Name, City, State/Province, Zip, Country, and Time Zone). Other users can view these values but cannot modify them.
Configure Site-Specific Settings
Once your study is published, you can configure additional site-specific CRF settings on the Site Details page within Study Runner.
For more details on managing sites, refer to Managing Sites.
3.3.8 Inviting Users
Invite new or existing users to access a study and assign appropriate roles and site access.
Invite a User to a Study
Before you begin, ensure you can access the Share screen for the study.
For instructions, refer to Using the Share Screen.
- On the Share screen, locate the People section.
- Click Invite.
- Begin typing in the user field and choose one of the following options:
- Invite a new user
- Select Invite a new user.
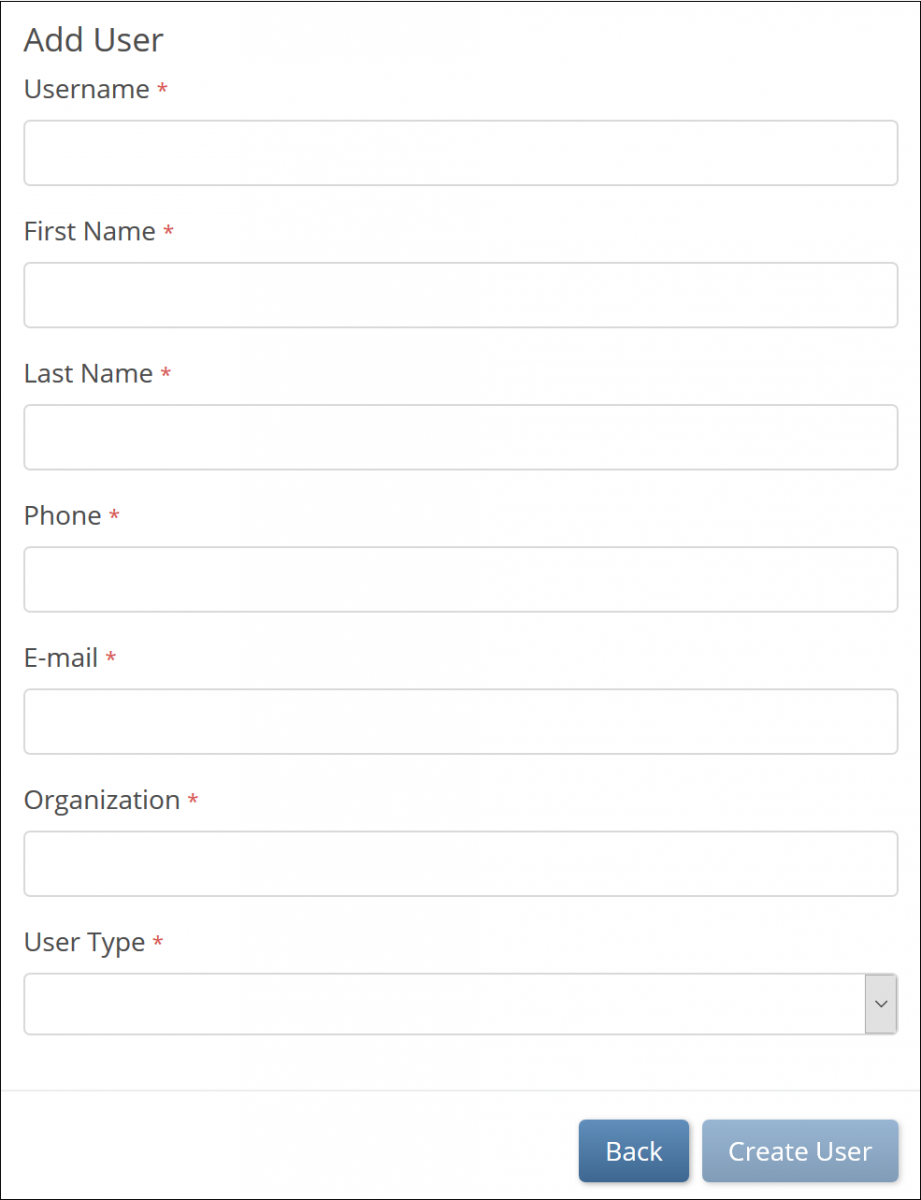
- On the Add User screen, enter values for all required fields.
- For information on “Admin” vs “User” user type, refer to User Access & Sharing.
- Click Create User.
- Invite a new user
⚠️ Note: The username you enter cannot be changed after the user is created. Verify the username carefully before submitting.

- Add an existing user
- Select an existing user from the drop-down list.
- The system sends a new email invitation to the selected user.
- Add an existing user
ℹ️ Note: Each username and email address in the system must be unique.
- When prompted, select a role from the list of available roles.
- For more information about the permissions associated with each user role, refer to User Access & Sharing.

💡 Tip: To grant access to multiple sites (for example, for a Monitor responsible for more than one site), click the Site field again and select additional sites as needed.
- Click Invite.
An email invitation is sent to the user, and the user appears in the People table on the Share screen.
Password Requirements
Before a user can access a study, they must create a password that meets the following criteria:
- At least 8 characters in length
- Includes at least one of each of the following:
- Lowercase letters (a–z)
- Uppercase letters (A–Z)
- Numbers (0–9)
- Special characters (!@#$%^&*)
Once the password is created, the user can sign in and access the study according to the assigned role and site permissions.