An Event is a group of Forms used in your Study. An Event may or may not correspond to a real-world visit. There are two main types of Events:
- Visit-Based Events
- Common Events
Visit-Based Events
Most Events in a clinical trial are Visit-Based Events, such as Week 2, Week 6, or Monthly Follow-up.
- These visits are scheduled relative to the baseline (for example, Week 2 occurs two weeks after baseline, Week 6 occurs six weeks after baseline).
- The visit schedule is defined in the Study protocol.
- Each visit includes a specific set of Forms to be collected.
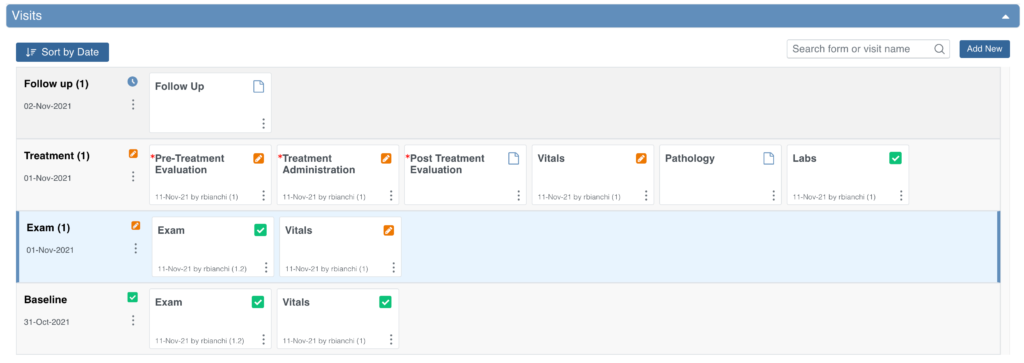
When you review the Visits section, the system automatically opens the earliest visit that is not complete. Incomplete visits display with a blue background.
A visit is considered complete when it has one of the following statuses: Complete, Skipped, Stopped, Removed, or Archived.
Common Events
Some Events are not tied to a visit date and occur outside of the regular schedule. Examples include:
- Adverse Events (AEs)
- Concomitant Medications (ConMeds)
- Early Termination
Common Events are used to collect information independent of visit timing.
They can be configured as:
- Repeating Events – for data that may occur multiple times per Participant (e.g., AEs, ConMeds).
- Non-Repeating Events – for data that can occur only once per Participant (e.g., Early Termination).

Event Types and Icons
| Icon | Event Type | Description | Example(s) |
|---|---|---|---|
 | Visit | An event that is associated with a visit date. The event can be repeating or non-repeating. | Week 2 Visit (non-repeating); Monthly Follow-Up for Disease-Free Survival (repeating) |
 | Common | An event that is not necessarily associated with a visit date. | Early Withdrawal or Termination (non-repeating); Adverse Events (repeating) |
 | Repeating | An event that repeats in your study, either a known or unknown, number of times. This icon will appear adjacent to one of the previous two when an event is a repeating event. | Concomitant Medications |
Scheduling an Event
Once a Participant has been added, you can schedule Events.
You can schedule Events from:
- The Participant Matrix
- The Participant Details screen
- The Tasks menu
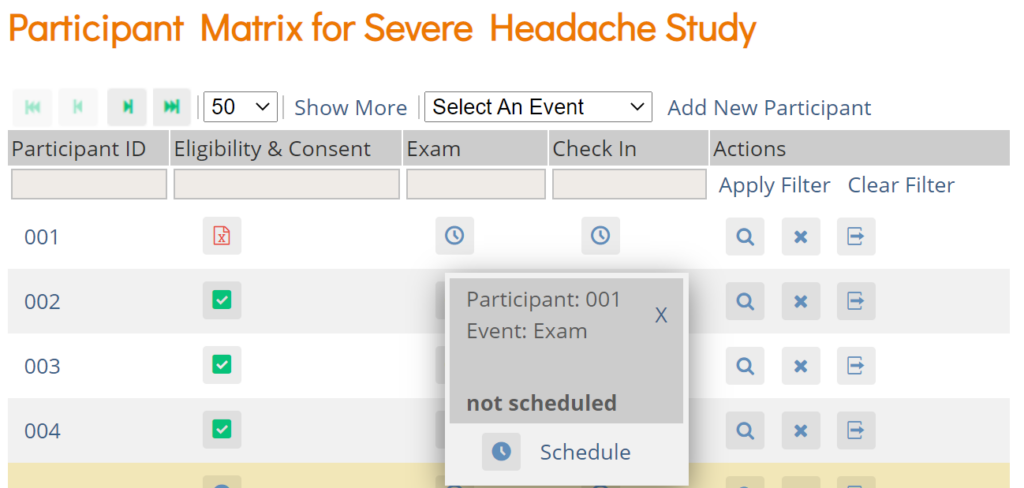
Schedule a Visit-Based Event from the Participant Matrix:
- Click the Schedule button for the Participant and the Event that you want to schedule.
- Select Schedule.
- Select a Study Event Definition from the drop-down list.
- (Optional) Select a Start Date/Time. The current date is the start date by default, but you can change it.
- (Optional) Select an End Date/Time.
- (Optional) To schedule additional Events, click Schedule Another Event, and enter information for that Event. Repeat as needed.
- To go to the Participant Details screen to enter data, click the Proceed to Enter Data button.
Schedule a Visit-Based Event from the Participant Details screen:
- Click the Participant ID or View button next to a Participant on the Participant Matrix.
- Under the Visits header on the Participant Details screen, click Add New.
- Select a Visit Name from the drop-down list.
- The current date is the start date by default, but you can change it.
- (Optional) Click Show advanced options to change the Start Time or End Date/Time.
- (Optional) To schedule additional Visits, click + Add another visit, and enter the new visit information. Repeat as needed.
- When you are ready, click Add visits. The recently added visits will be highlighted with a yellow border.
Schedule a Visit-Based Event from the Tasks Menu:
- Click the Tasks button in the header bar of Study Runner.
- Select Schedule Event.
- Enter a Participant ID in the Participant ID field.
- Select a Study Event Definition from the drop-down list.
- (Optional) Select a Start Date/Time. The current date is the start date by default, but you can change it.
- (Optional) Select an End Date/Time.
- (Optional) To schedule additional Events, click Schedule Another Event, and enter information for that Event. Repeat as needed.
- To go to the Participant Details screen to enter data, click the Proceed to Enter Data button.
To Schedule a Common Event from the Participant Details screen:
- Click the Participant ID or View button next to a Participant.
- Under a header for a common event on the Participant Details screen, click Add New.
Event Statuses
The table below displays Event statuses:
| Icon | Status | Description |
|---|---|---|
 | Not Scheduled | The Event has not been scheduled. Common Events, such as Adverse Events remain in this status throughout the study. |
 | Scheduled | The Event has been scheduled, but no data has been entered. |
 | Data Entry Started | A user has started to enter data, but not all of the Forms in the Event have a status of Completed. |
 | Completed | At least one Form in the Event has been completed. ℹ️ Note: The Event status changes to Completed automatically when all Forms are complete. You can also manually set the Event to Completed if at least one Form is complete. |
 | Skipped | The Event will not be completed. You can select this status from the Update Event screen when the Event is Scheduled. Events cannot be skipped if data entry has started. |
 | Stopped | The Participant has temporarily stopped participating in the Study. Entered data remains viewable and exportable. You can select this status from the Update Event screen when the Event is Scheduled or Data Entry Started. |
 | Removed | The Event has been removed. Users can still view Forms. This will supersede any of the other statuses. |
Event Attributes
Event Attributes (Independent Status Attributes) can be used in addition to Event statuses.
| Icon | Status | Description |
|---|---|---|
 | Signed | The Event has been signed. This icon appears in addition to the status. ℹ️ Note: If a signed Event changes in any of these ways, the signature is removed:
Multiple users can sign an Event. The most recent signature appears on the Form; previous signatures are recorded in the Audit Log. |
 | Archived | The Event was archived in Study Designer. This icon appears in addition to the status. |
 | Locked | A Data Manager locked the Event. No data can be added, and the Event cannot be removed. This icon appears in addition to the status. |
Form Actions
Some actions can be performed on Forms within Events. Permissions vary by role and/or form.
| Icon | Action | Description |
 | Enter/Edit | Enter or edit data in the Form. |
 | View | View data in the Form. |
 | Remove | Remove the Form from the Event. This is not permanent. |
 | Restore | Restore a Form that was previously removed. All data is restored. |
| Clear Form | Clear all Form data. The Form is reset to Not Started and all queries are closed. Audit history is retained. | |
 | Reassign CRF Version | Change the version of the Form if data has already been entered. |
Form Statuses and Icons
The table below displays Form statuses and icons:
| Icon | Status | Module | Description |
|---|---|---|---|
 | SDV Verified | N/A | The Form has been Source Data Verified. |
| SDV Required, Not Verified | N/A | The Form has at least one item requiring SDV that has not yet been verified. | |
| SDV Status Changed Since Verified | N/A | The Form was verified, but a change was made that requires re-verification. | |
| Query | N/A | There is at least one open query on the Form. ℹ️ Note: Users with review or edit permission to the form may add or update queries but cannot close them; Monitors and Data Managers with review or edit permission can also close queries; read-only users cannot create or update queries. | |
 | Consent Not Signed | eConsent | The eConsent Form has not yet been signed by the Participant. The Form icon appears once the Event containing the eConsent Form is scheduled. |
 | Consent Signed | eConsent | The Participant has signed the eConsent Form. The Form is marked Completed. It must still be countersigned by a CRC or Investigator. |
 | Consent Countersigned | eConsent | The Participant has signed the eConsent Form, and it has been countersigned by a CRC or Investigator. The Form is marked Completed. |
 | Requires Reconsent | eConsent | The eConsent Form was signed, but an OpenClinica user (CRC or Investigator) clicked Unconsent. The Form is marked Data Entry Started and reappears on the Participant’s dashboard for re-signing. |