This article describes two methods for automatically registering Participants and generating access codes for them. This allows for automated notification workflows that do not require site users to manually invite Participants before they can receive automated notifications.
Overview
Once a participant is added to a study where Participate and/or eConsent is enabled, a user account and an access code must be created for them so they can access the forms they need to complete.
Methods
There are three main methods for providing access to participants:
- Manual Individual Registration by Site User – Participant is invited by the CRC or the Investigator on the Participant Details Page (PDP). This method is detailed in the Invite Participants article.
- Individual or Bulk Registration via API – Participant record(s) are added or updated via the Participant API. This method is detailed in the Participants (Add or Update a Participant) and the Participants/Bulk (Add and Update Bulk List of Participants) articles for individual and bulk participant registration, respectively.
- Automatic Individual Registration – Notifications can be configured in Study Designer for Study Calendaring as well as for legacy Rule notifications configured in Study Runner when specific Participate tokens are included in the notification message. For notifications sent at the time a Participant is created via a Public URL form, this automated workflow only supports Study Calendaring notifications.
Note that if automatic Participant registration and access code generation is enabled via Study Calendaring or legacy Rule notifications, it is still possible to invite participants manually via the PDP.
Automatic Individual Registration
Automatically registering individual participants allows for a more efficient process for enrolling Participants at sites, while still allowing for the current process of manual invitation to be available for site users if needed.
- Utilizing Public URL: A Participant submits the Public URL form. A Study Calendaring action schedules an additional survey visit if the Participant is eligible for the study. Another Study Calendaring action sends the Participant a notification with a link to access and complete their next survey. No site user intervention is needed during this process.
- In-Office Participant Registration: A site user creates a Participant and enters data into a form that includes contact data such as email address or mobile phone number. Upon completion of this form, a Study Calendaring action or legacy rule schedules the next visit. Another Study Calendaring action or legacy rule sends the Participant a notification with a link to access and complete their next survey. No site user intervention is needed during this process.
Automating Participant Access Using Study Calendaring
One way to automate this process is by using the Study Calendaring feature within Study Designer. When the condition identified in the Study Calendaring notification is satisfied, the notification will be sent, triggering Participant registration and the generation of the participant access code if needed. If the participant was previously registered and an access code already exists, a new access code will not be generated. Rather, the existing access code will be sent in the notification.
- Open the Event Card in Study Designer and click the + next to Notifications.

- The Notification dialog pops up.

- In order to configure a notification that registers the Participant and generates the access code, you must include at least one of the two Participate tokens that include the access code: ${participant.accesscode} and ${participant.loginurl}. If neither of these tokens are included, the access code will not be generated when the notification is triggered.

- In the When field, select the event status that will trigger the notification to be sent.
- In the To field, add details about who should receive the notification when it is triggered:
- If the variable ${participant} is used, the notification will be sent to the email address and phone number that have been entered into OpenClinica for the Participant.
- With the Advanced Calendaring feature, it is also possible to define a notification that will only be sent via email or only sent via SMS, so the message can be customized per mode of delivery as needed.
- If one or more email addresses are used, the notification will be sent to those email addresses. If multiple email addresses are used, separate them with a comma.
- If the variable ${participant} is used, the notification will be sent to the email address and phone number that have been entered into OpenClinica for the Participant.
- In the Subject field, enter the subject for the notification.
- In the Message field, enter the message that will be sent to Participants, ensuring that ${participant.accesscode} and/or ${participant.loginurl} variables are included.

- Click Create.
- Publish the study.
Automating Participant Access Using Legacy Rule Notifications
Another way to automate this process is by configuring legacy Rule notifications within Study Runner. When the condition identified in the legacy Rule notification is satisfied, the notification will be sent, triggering Participant registration and the generation of the participant access code if needed. If the participant was previously registered and an access code already exists, a new access code will not be generated. Rather, the existing access code will be sent in the notification.
You can automate the process of generating the participant access code using Legacy Notification Rules.
- Refer to Rules article for general information on how to download the Rules Template and write legacy rules in OpenClinica.
- In the Target tag, include the Event OID for the event that will trigger the notification to go out, as well as the type of event trigger. Rules can be set to trigger on either event status or start date.
- Ex: If the notification should be sent when the status of an event with OID SE_Event0 changes, the target tag should read <TARGET>SE.EVENT0.STATUS</TARGET>.

- Ex: If the notification should be sent when the status of an event with OID SE_Event0 changes, the target tag should read <TARGET>SE.EVENT0.STATUS</TARGET>.
- Define the OID for the rule. This value should be added to the RuleRef OID and RuleDef OID tags.

- In the To tag, add details about who should receive the notification when it is triggered:
- If the variable ${participant} is used, the notification will be sent to the email address and phone number that have been entered into OpenClinica for the Participant.
- If one or more email addresses are used, the notification will be sent to those email addresses. If multiple email addresses are used, separate them with a comma.
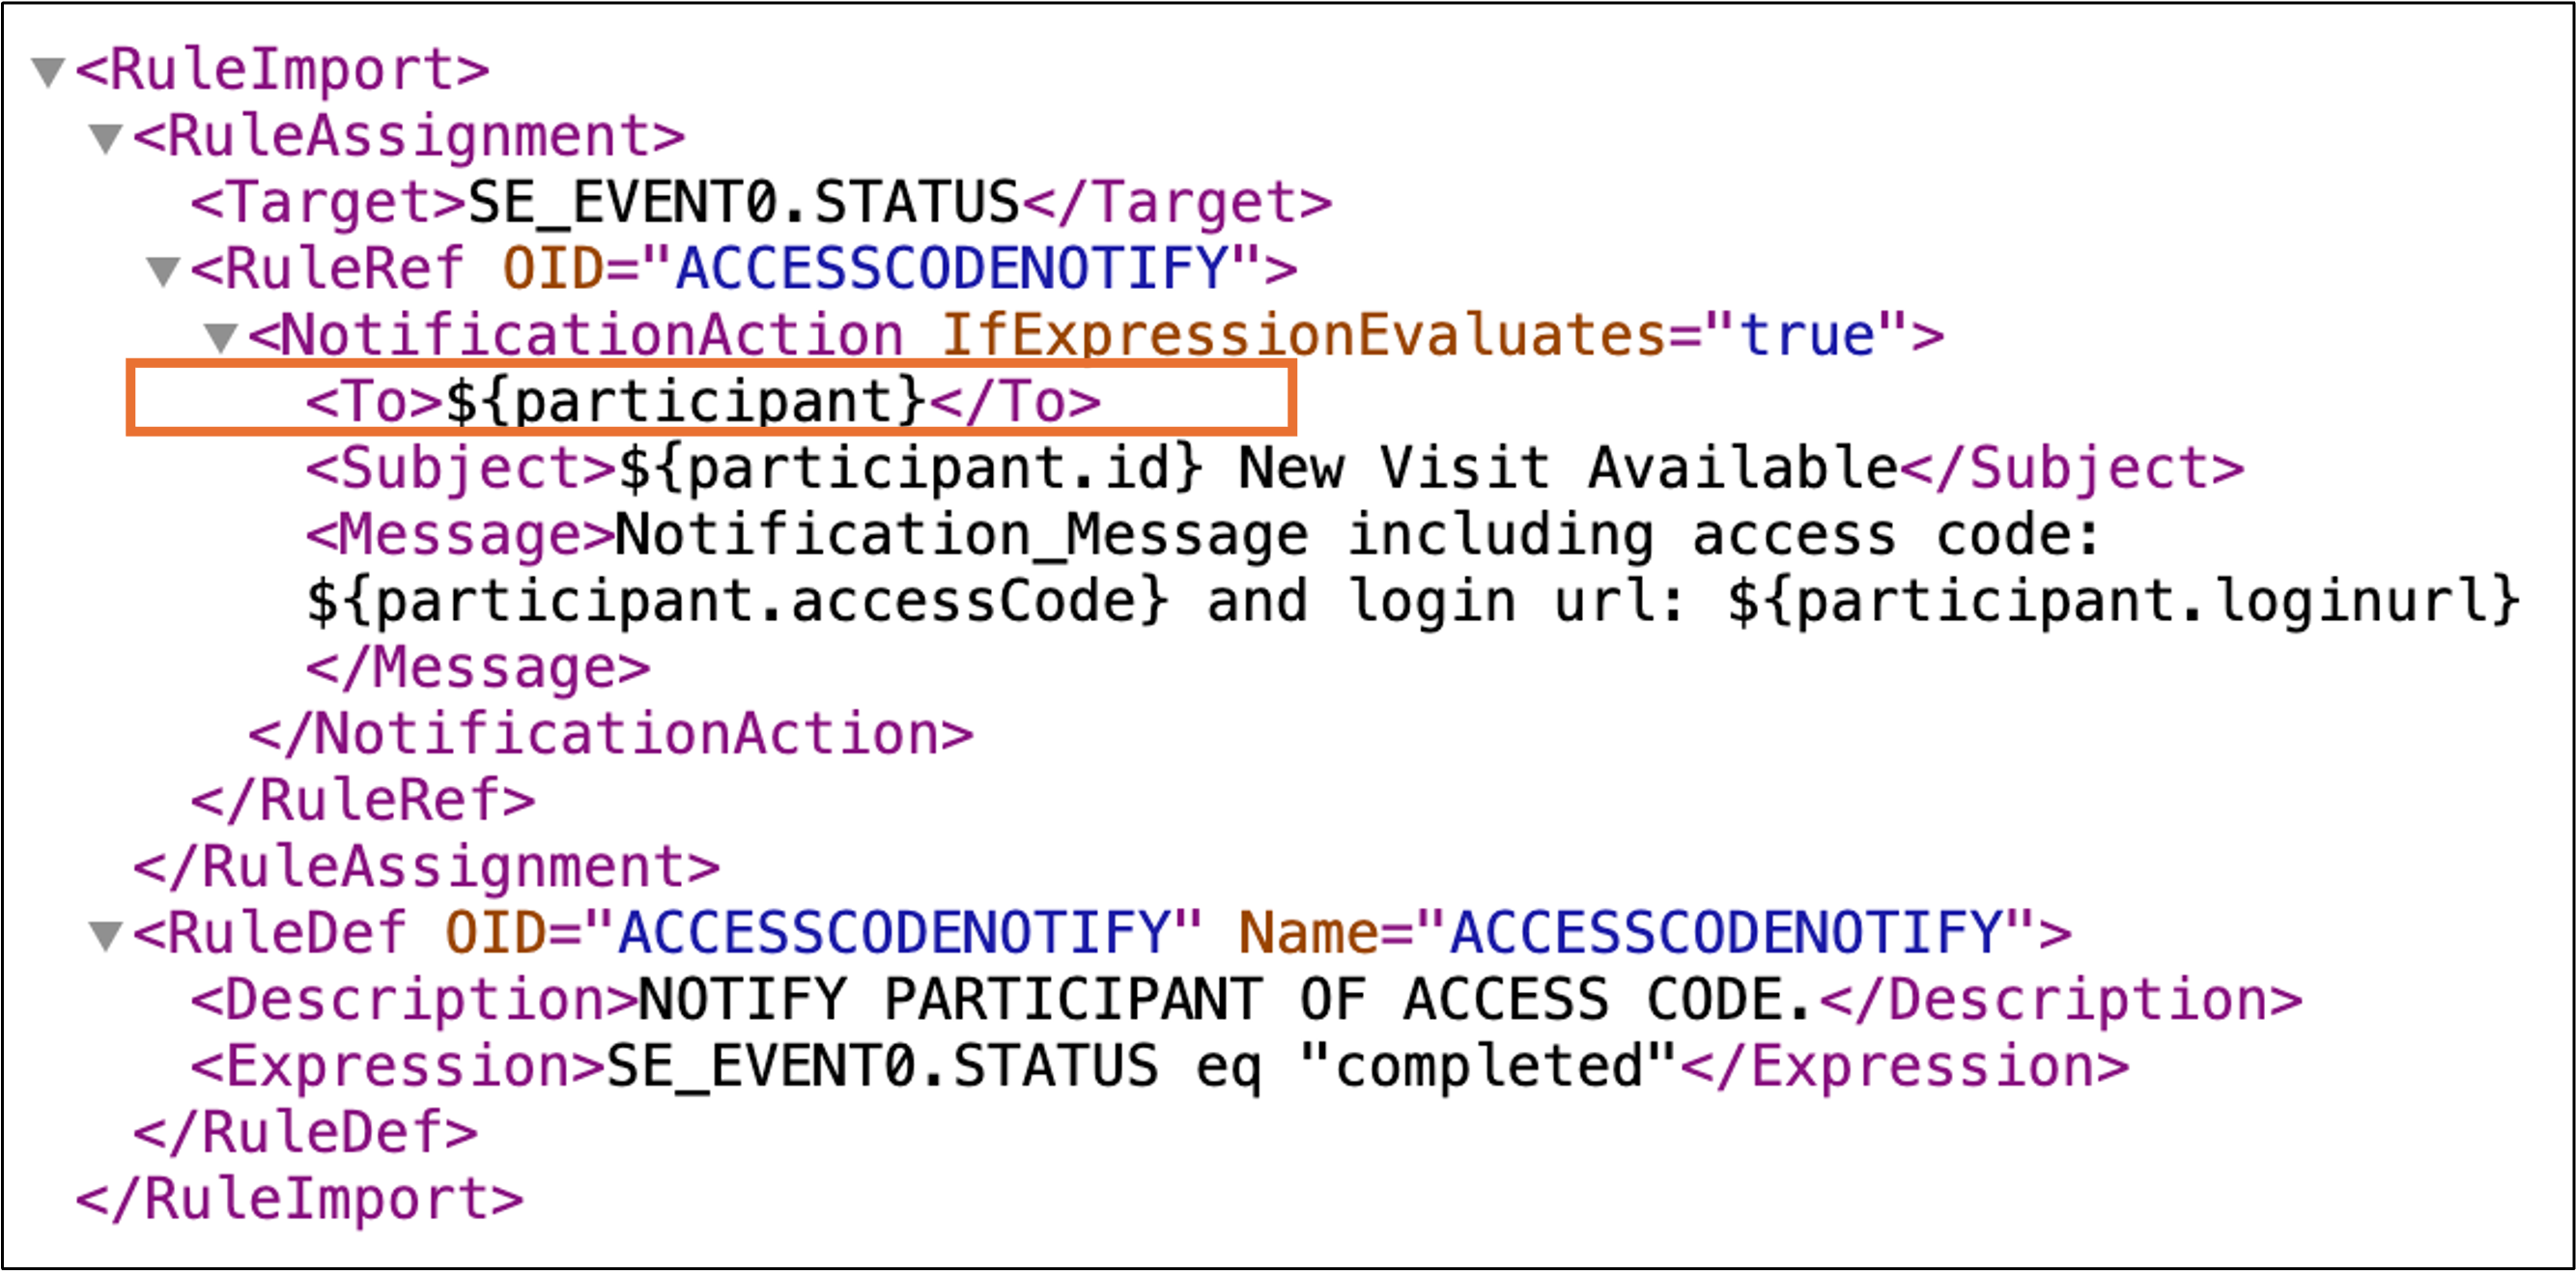
- In the Subject tag, enter the subject line for the notification.

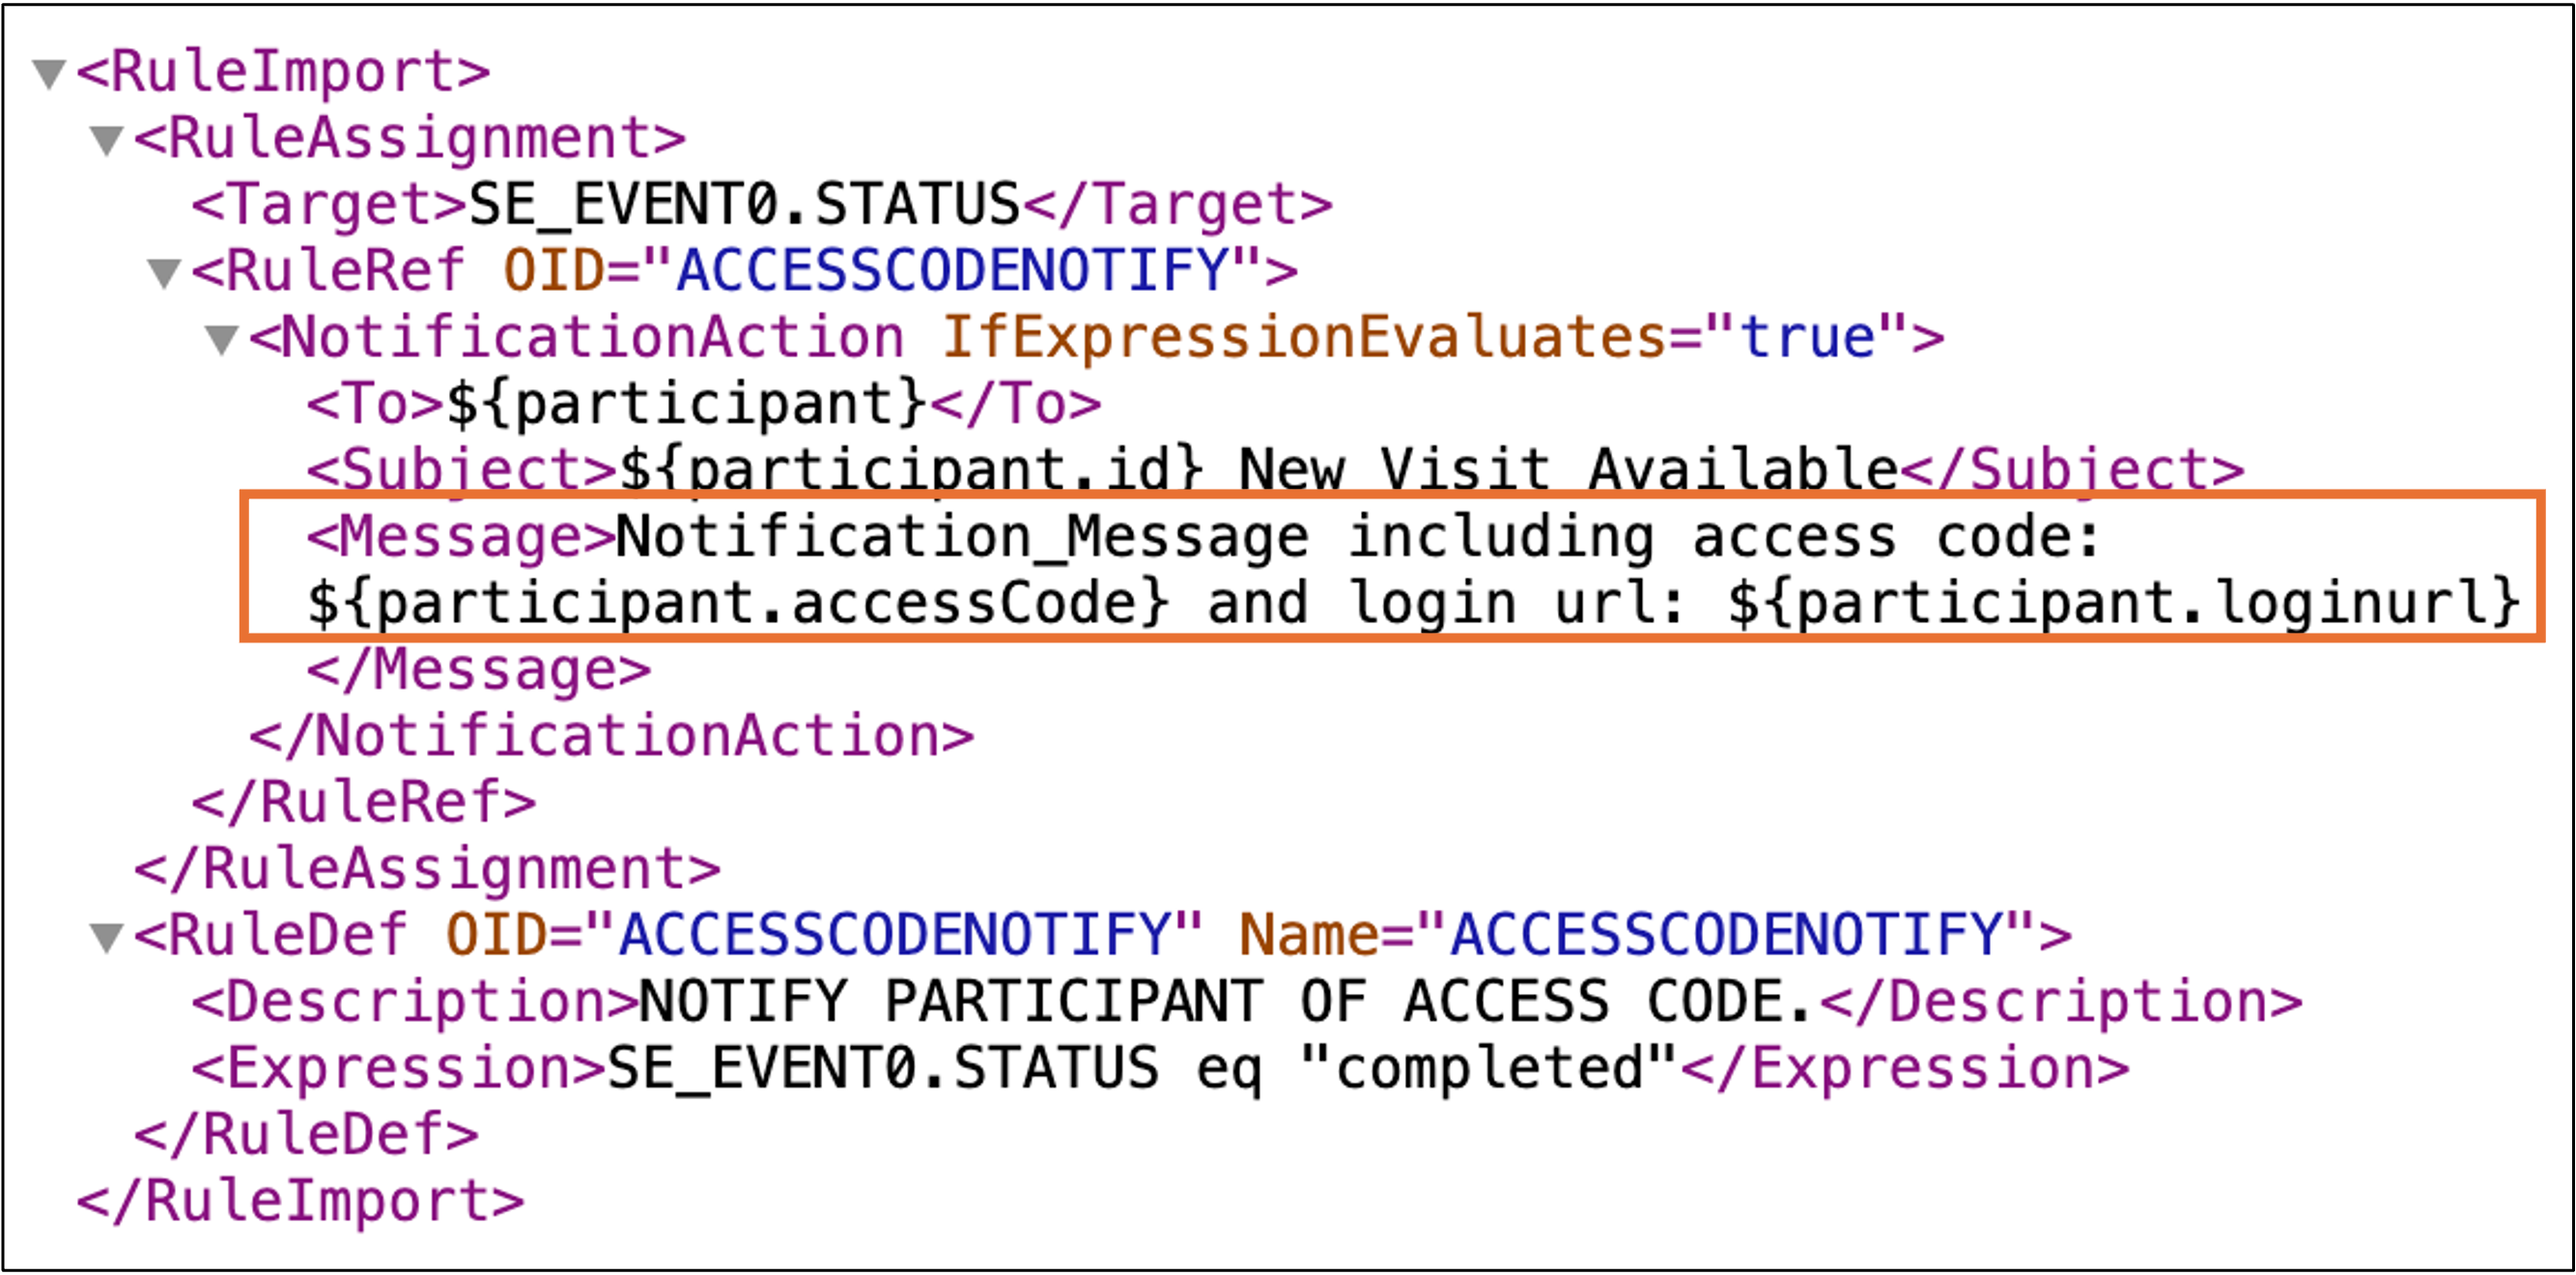
- In the Message tag, define the message that will be sent to participants. In order to automate Participant registration and access code generation, either the ${participant.accessCode} or ${participant.loginurl} token must be used. If neither of these tokens are included, the access code will not be generated when the notification is triggered.
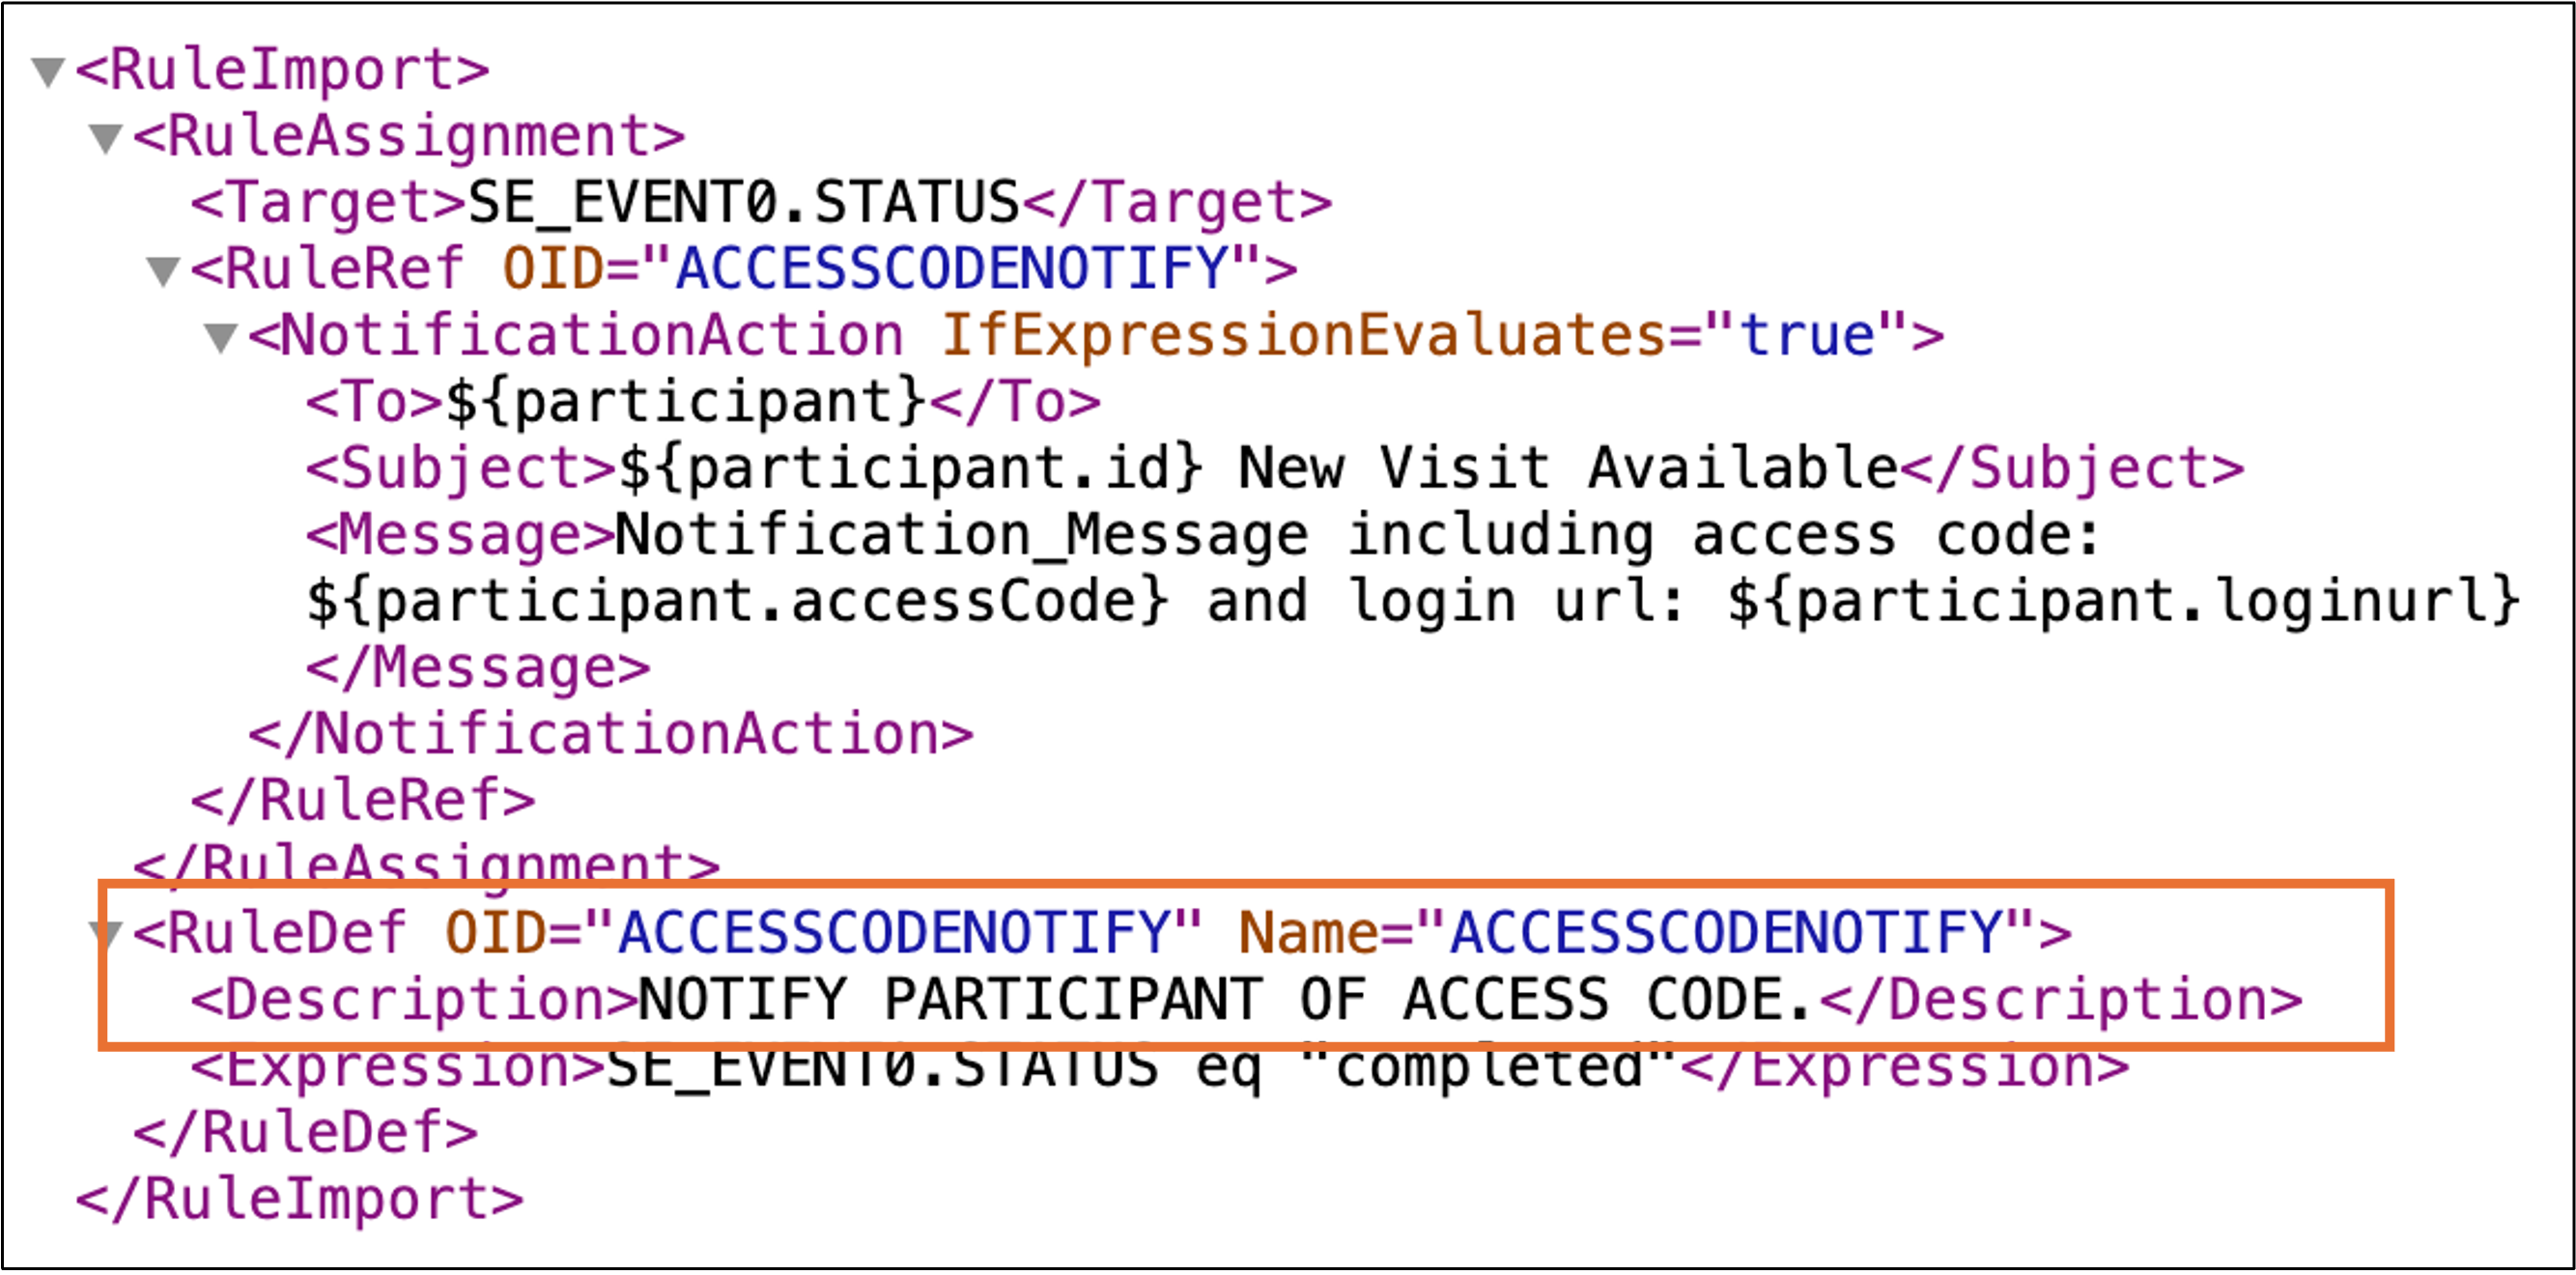
- Include the Name and a Description of the Rule so that it is easily identifiable in OpenClinica once it has been uploaded.
- In the Expression tag, include the Target as well as the condition that will cause the rule to run. For example, if the notification should send upon the completion of Event0, the rule expression would be SE_EVENT0.STATUS eq “completed”

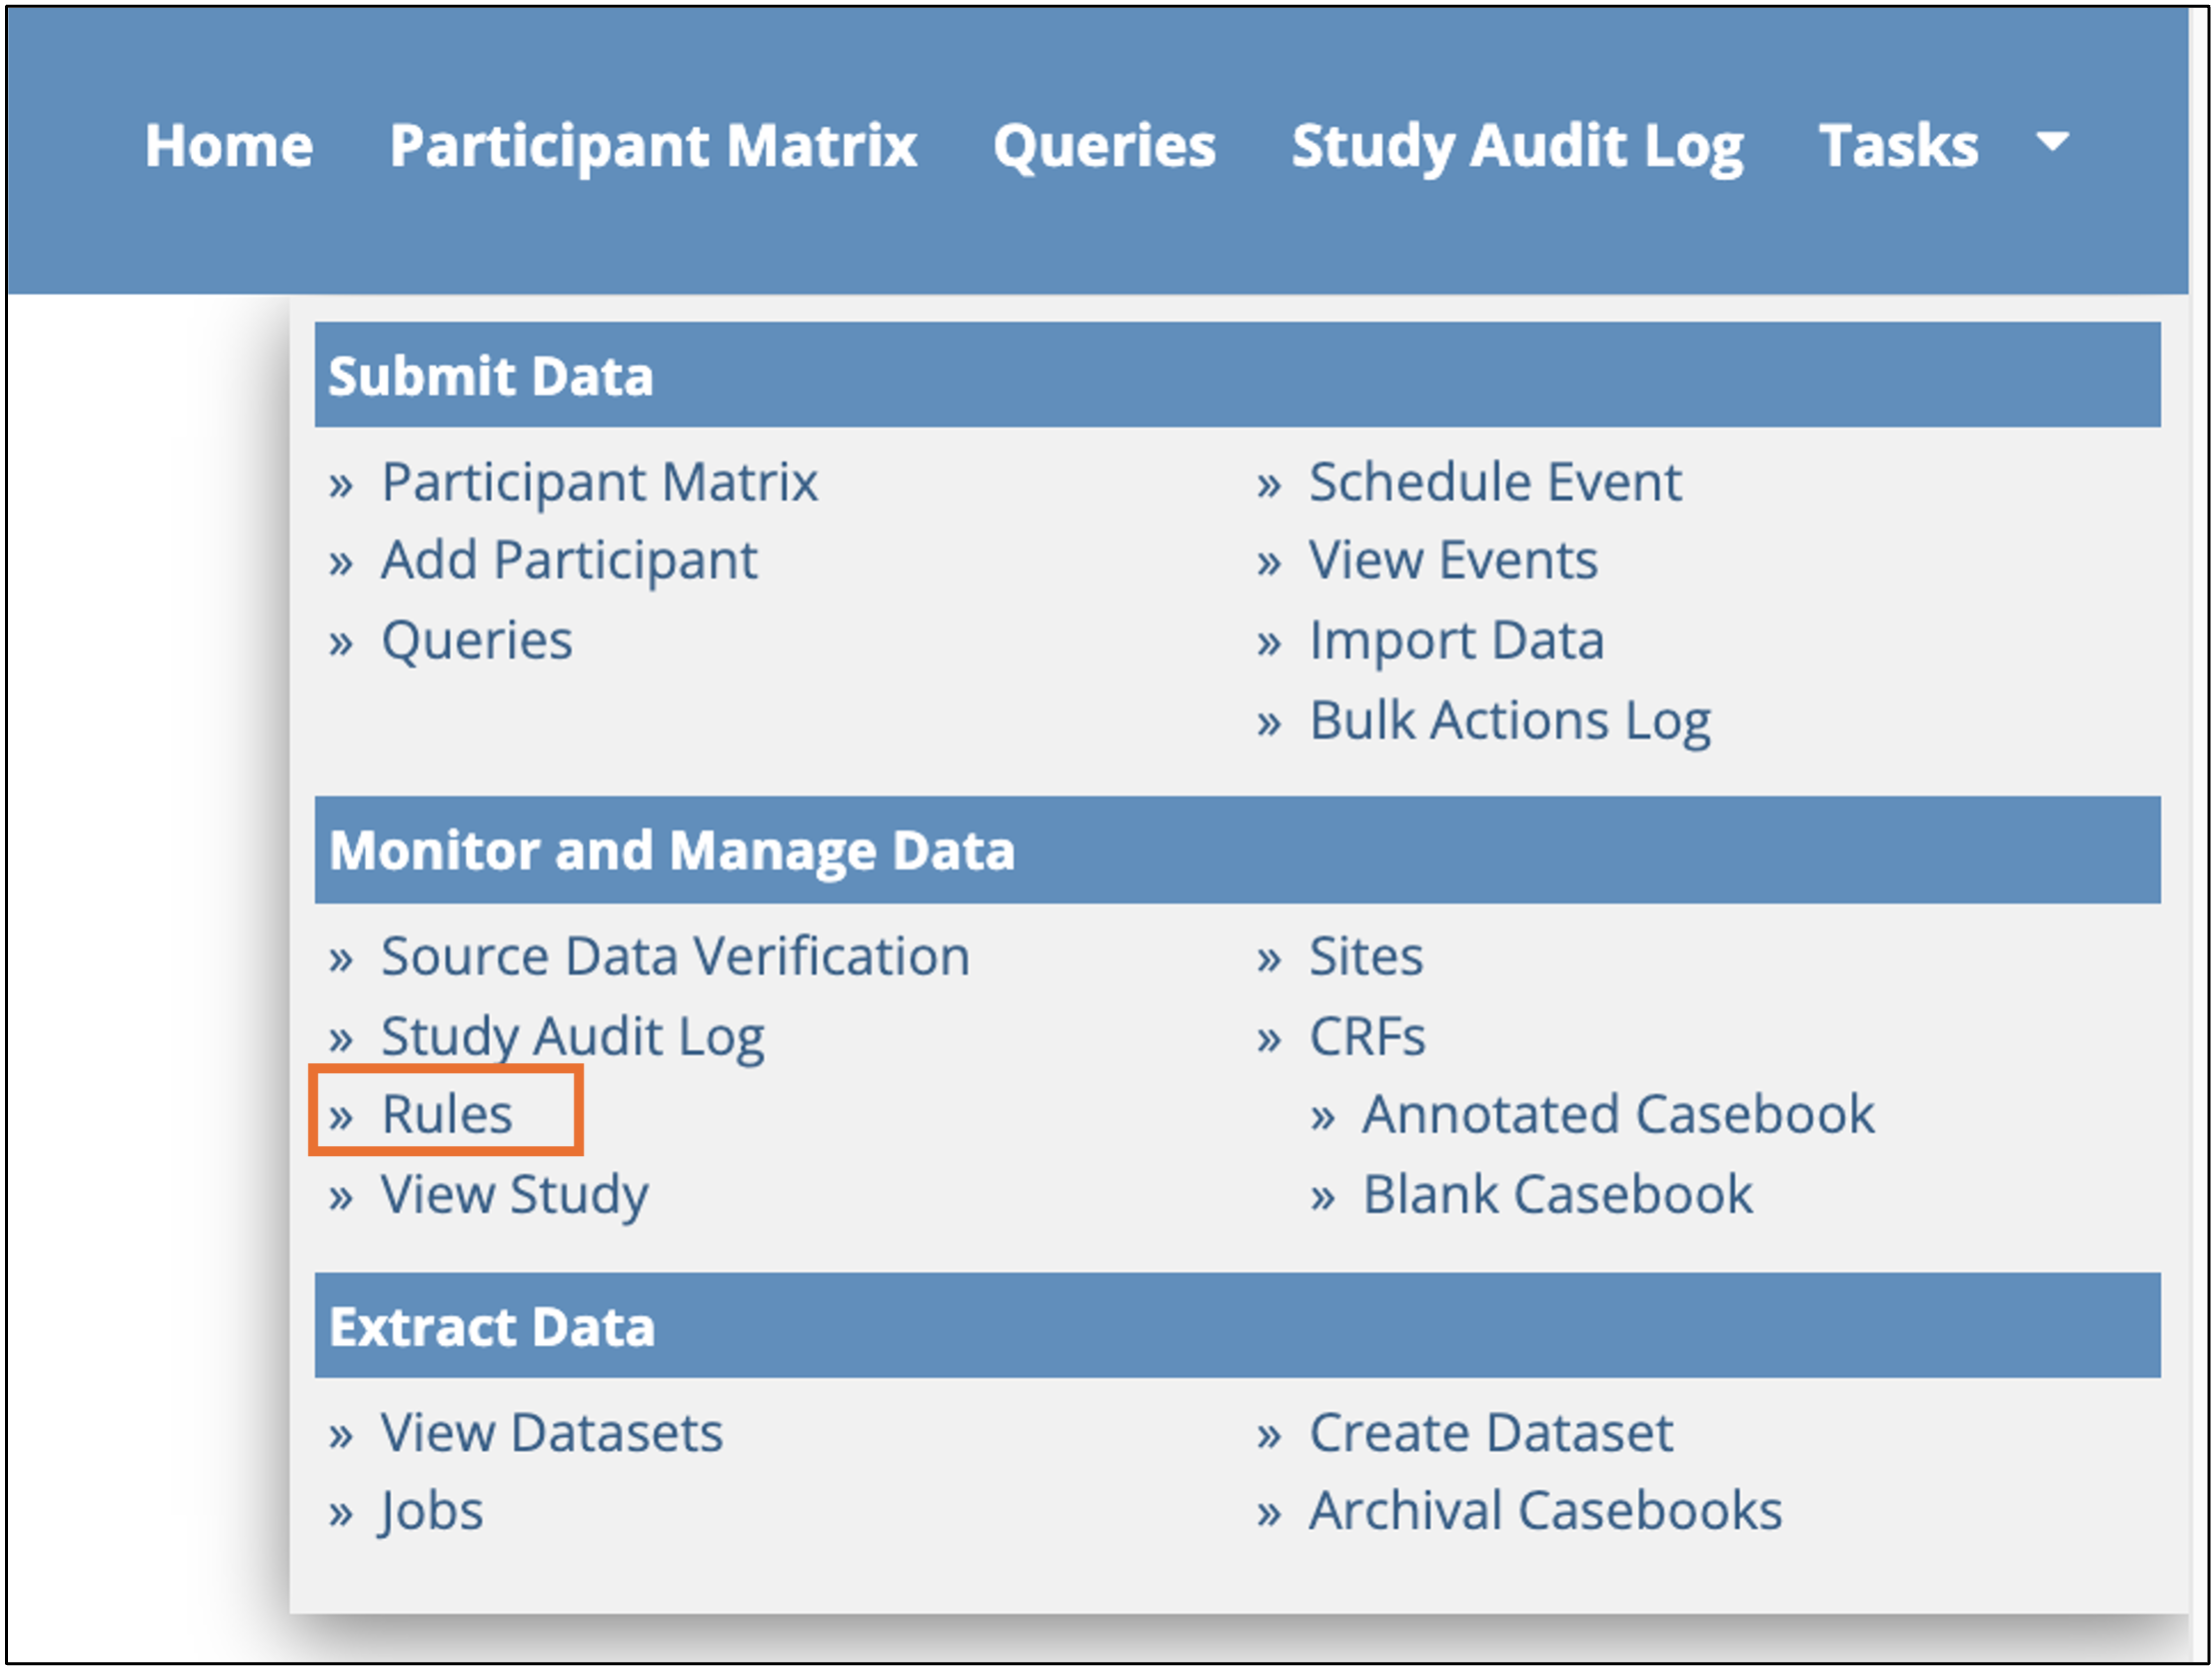
- Click on Rules under the Task menu in Study Runner
- Click Add Rules.

- Click Choose File. A dialog box will pop up. Navigate to the location where the rule is saved, select the XML rule file and click Open. Click Continue.
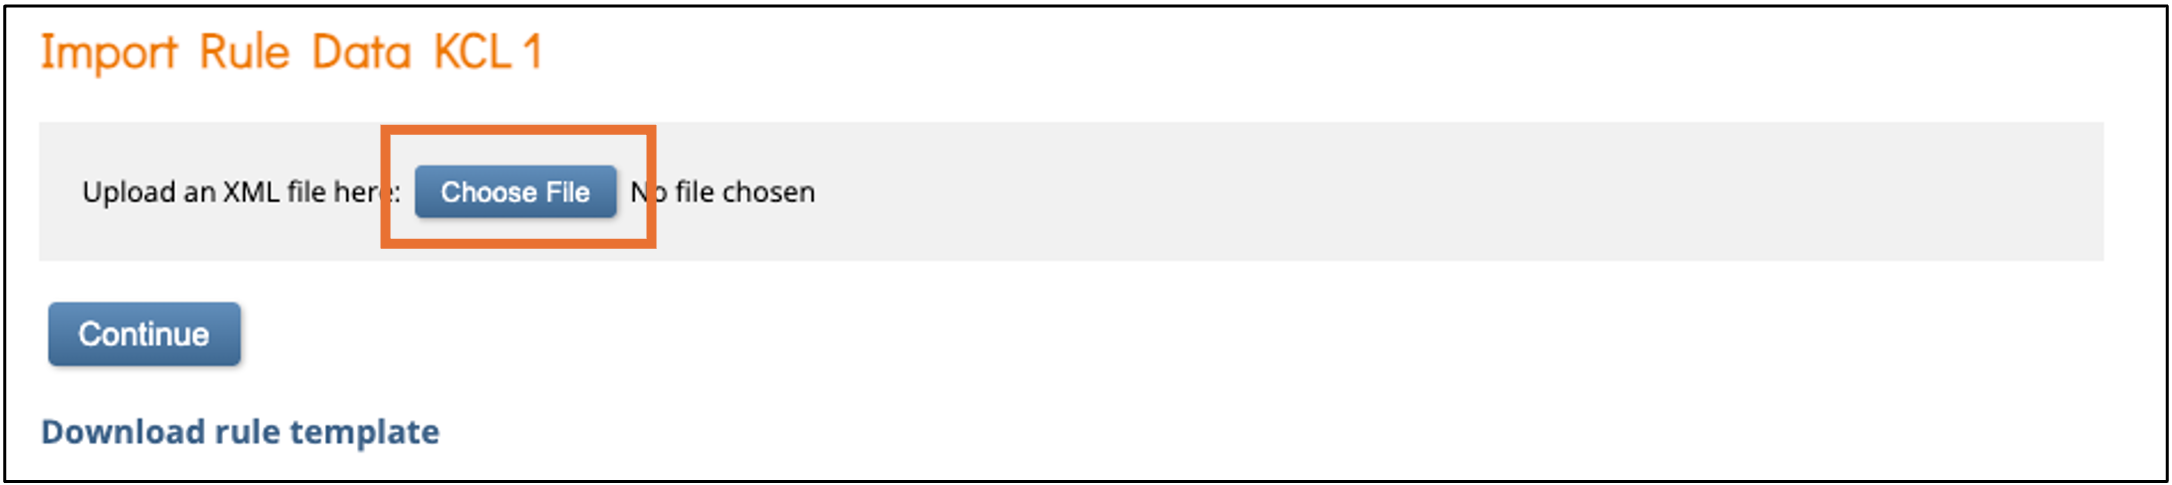
- Confirm that there are no errors in the rule. If there are errors, cancel, address the issues and upload the file again. If there are no errors, click Continue.

Limitations of Legacy Notification Rules
There is a known limitation for legacy rule notification triggered directly or indirectly by Public URL submission. Specifically, the limitation exists when a Public URL form is the only form within the visit.
The following designs cannot be used to automatically create the participant account and access code by including ${participant.accessCode} or ${participant.loginurl} tokens in a legacy notification rule:
- Direct Trigger: A legacy notification rule written to trigger on event completion when the event is completed upon Public URL form submission.
- Indirect Trigger: A legacy scheduling rule written to trigger on event completion when the event is completed upon Public URL form submission, which in turn triggers a legacy notification rule written to trigger on the scheduling of the next event.
- For example, Event1 includes only a Public URL form. Rule1 is written to schedule Event2 upon submission of the Public URL form in Event1. Rule2 is written to send a notification when Event2 is triggered. In this scenario, Rule2 cannot be used to automatically create the participant account and access code by including ${participant.accessCode} or ${participant.loginurl} tokens.
In both the direct and indirect scenarios, the participant account and access code will not be created.
Note that these scenarios do work with the Study Calendaring method of automating this process.
Study Runner
When a study has been designed such that the participant registration and access code are automatically generated when a notification is triggered, Clinical Research Coordinator and Principal Investigator users are not required to manually invite Participants to the study.
- The participant will only receive the standard invitation email or SMS notification if they are invited manually via the link in the PDP.
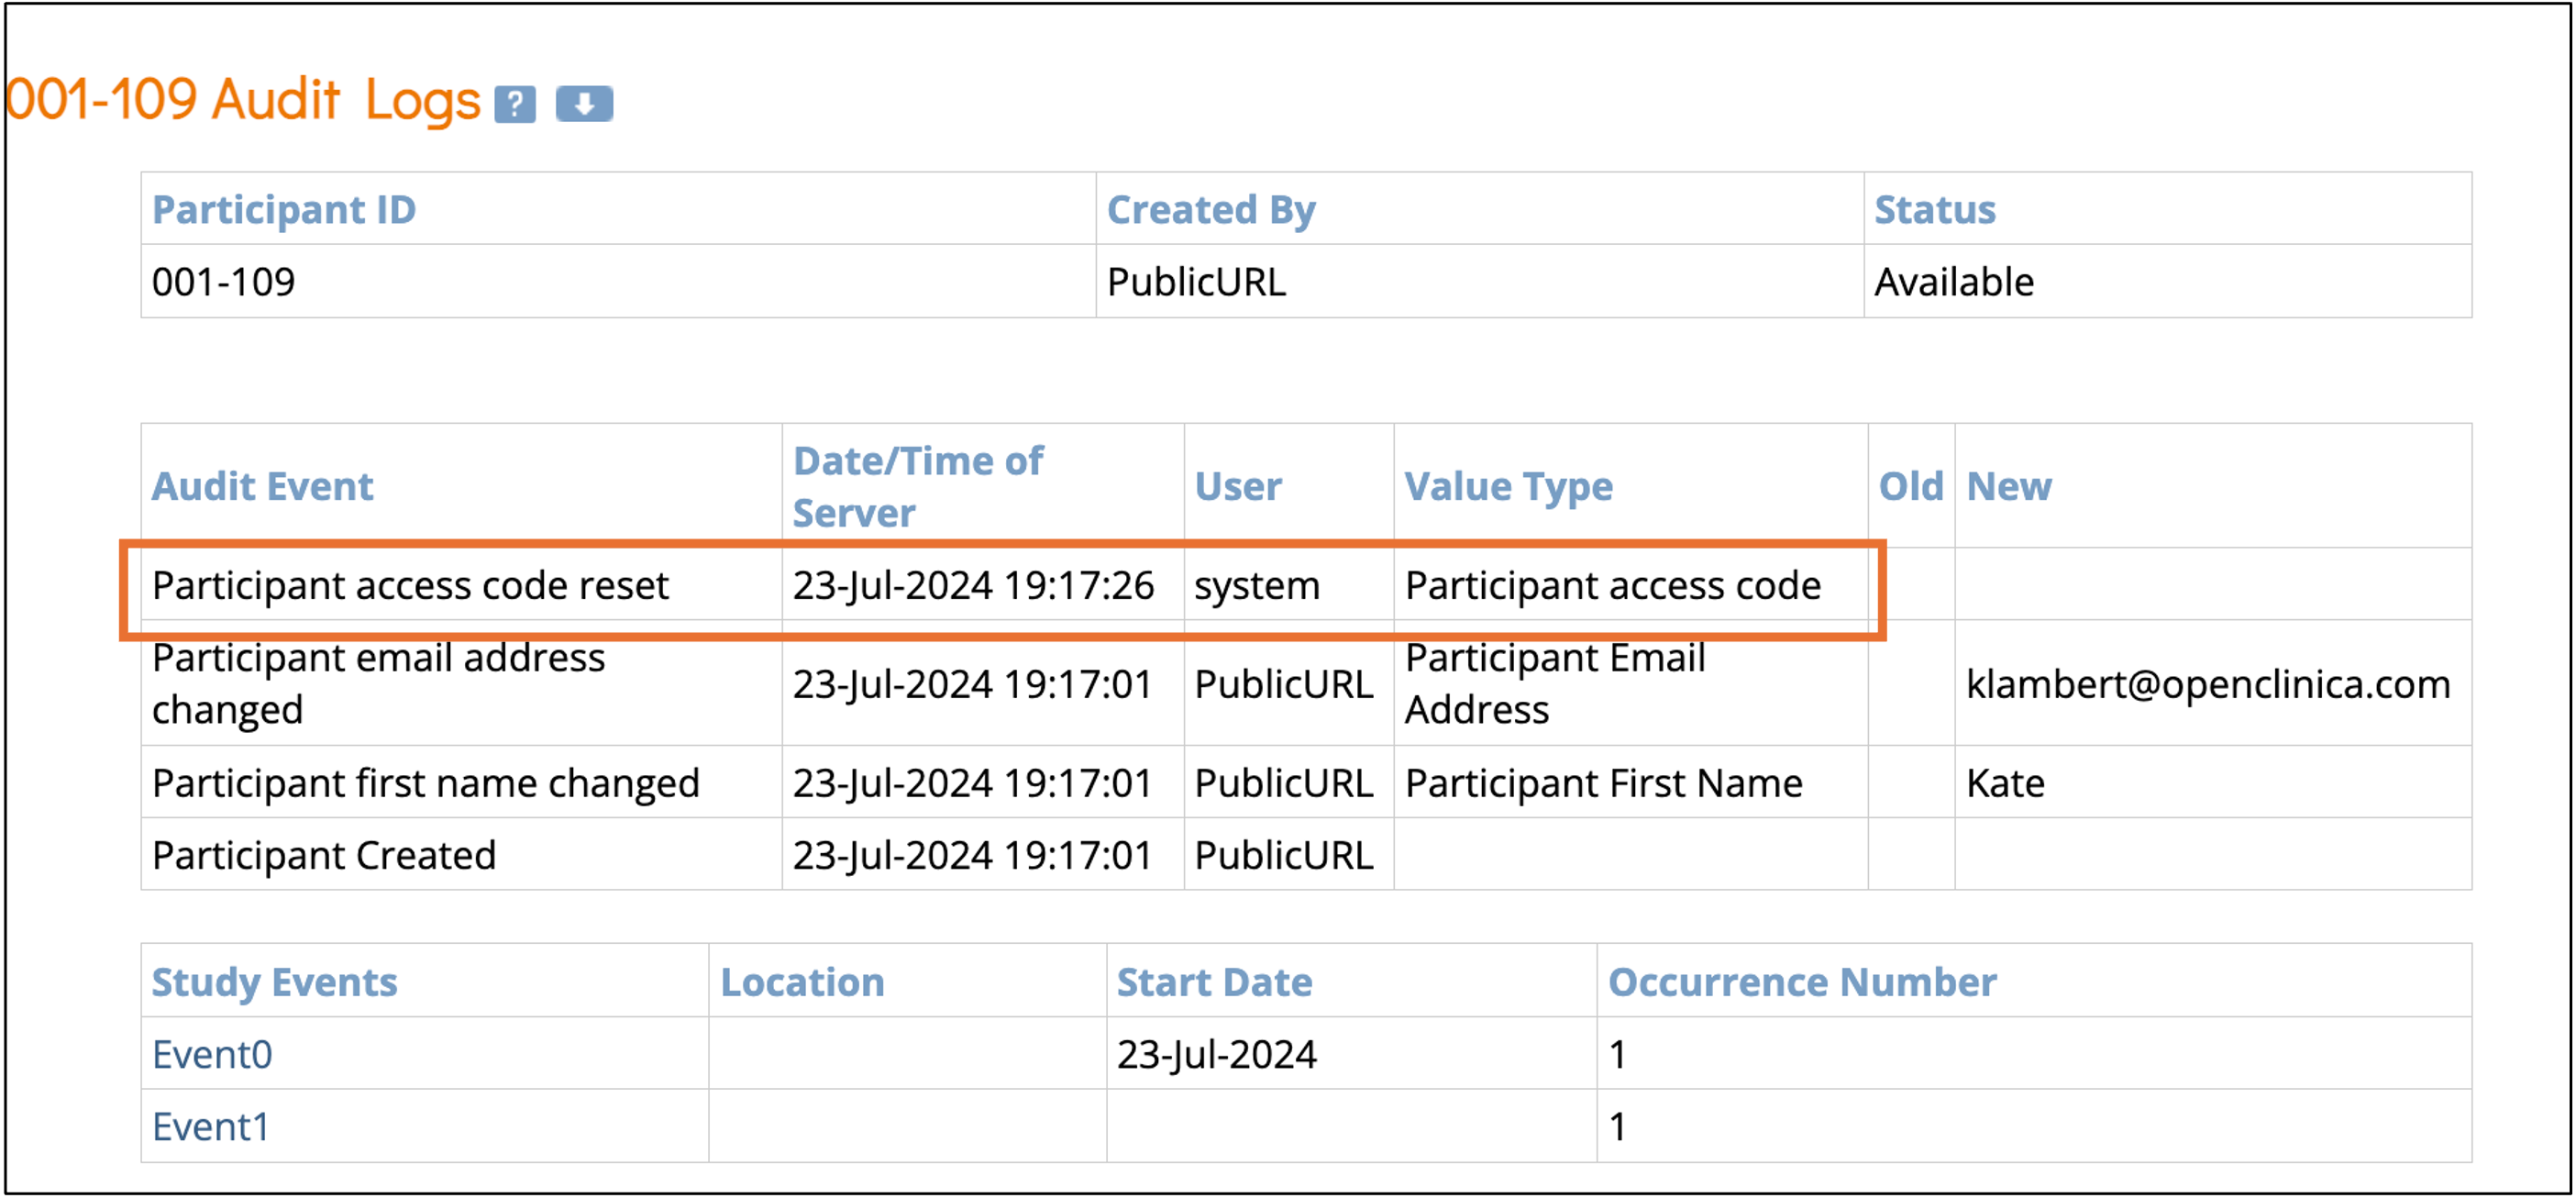
- Once the notification rule triggers access code creation, the access code will be available in the PDP and the participant will have a status of “Created”.

- If there is no email or phone number for the participant and therefore the notification is not able to be sent, the access code will still be generated.
- The creation of the access code is logged in the audit trail.
- If the access code has already been created, either via the automated or manual process, including either of the access code tokens in the notification will send the existing access code.