Definition: A rule is a logical expression used to automate a task. |
Examples:
|
Data Managers can create rules to automatically schedule events (EventAction) or automatically send notifications by email or SMS (NotificationAction).
You can download the Rules Template and edit it to create a rule to perform either an EventAction or a NotificationAction.
Note: You can only write rules based on the statuses in the table below. You cannot be written based on an event being Removed or Archived.
| Event Status | Text for Rule (case sensitive) |
| Not Scheduled | not_scheduled |
| Scheduled | scheduled |
| Data Entry Started | data_entry_started |
| Completed | completed |
| Skipped | skipped |
| Stopped | stopped |
| Signed | signed |
| Locked | locked |
Despite the use of the new data model, with Statuses and Independent Status Attributes, rules that use the old data model will still work correctly.
Quick Start Guide
To Create a Rule:
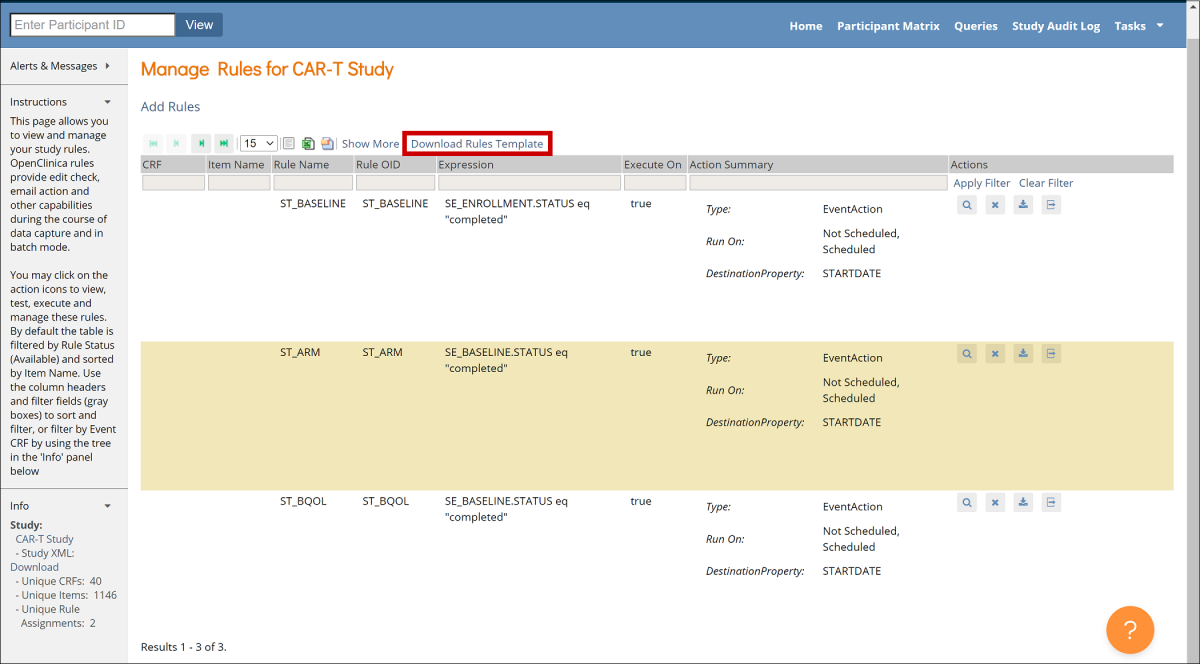
Step 1: Access the Manage Rules screen.
- Click Tasks in the header bar of Study Runner.
- Select Rules.
- The Rules option does not display when logged in at the Site level. Change to Study level to see the Rules option.
Step 2: To Download the Rules Template.
Click the Download Rules Template link at the top of the table.
Step 3: Open the Rules Template in an XML editor, such as Notepad ++ for Windows or TextWrangler for Mac.
Step 4: Find and record OIDs to reference Events and Forms.
- Click Tasks in the header bar of Study Runner, and select View Study.
- Click the Download the Study Metadata link at top of the screen and record OIDs, or scroll down on the screen and record OIDs from there.
See Locate Object Identifiers in a Study for more information on finding OIDs.
Step 5: In the Rules Template, delete any actions you do not want the rule to perform.
- If you are making an EventAction rule, delete the lines starting from <NotificationAction > to </NotificationAction> tags.
- If you are making a NotificationAction rule, delete the lines starting from <EventAction> to </EventAction> tags.
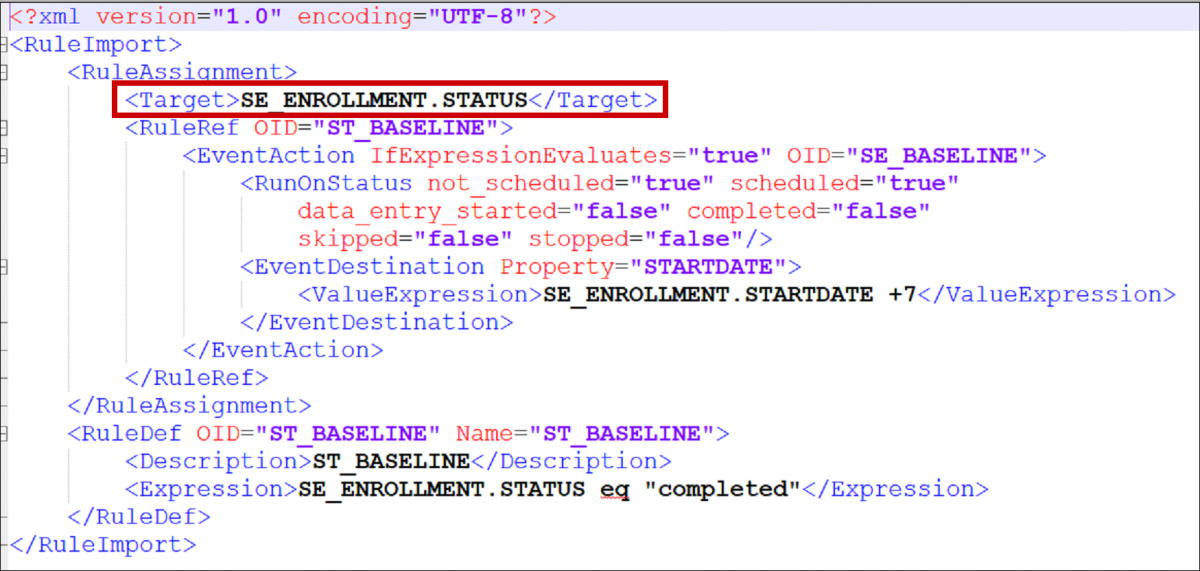
Step 6: Define the Target.
Any time a value changes, the rule evaluates the target. For example, you can use:
- Event Status: SE_EVENTOID.STATUS
- Event Start Date: SE_EVENTOID.STARTDATE
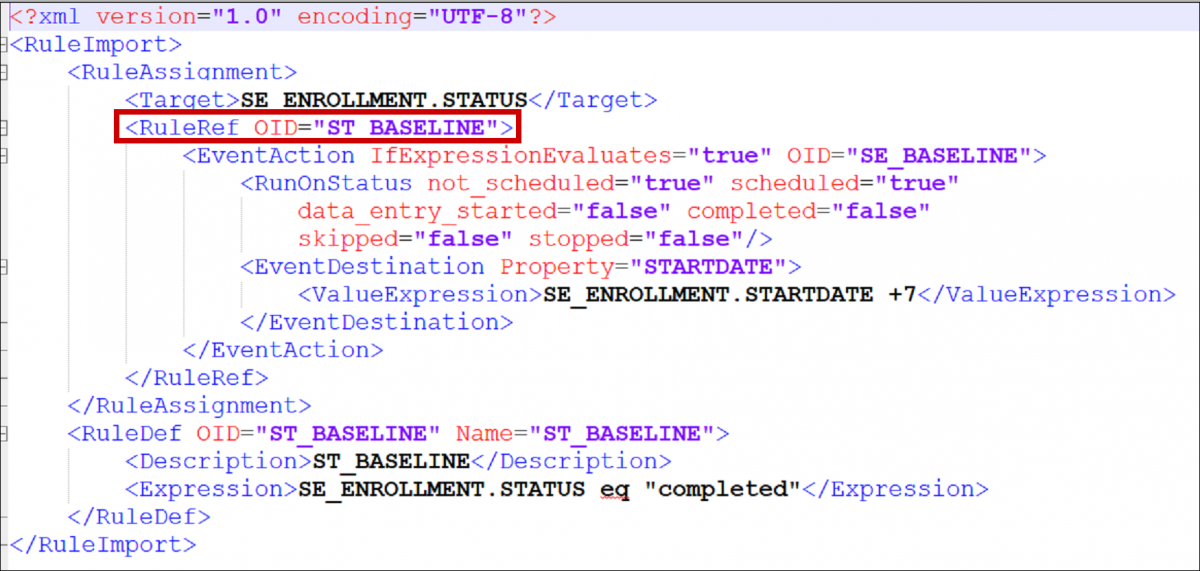
Step 7: Define an OID for the rule.
It must be entered in all capital letters. You can include numbers and underscores. It must be unique within the study and can only be 40 characters long.
(Optional): If you want the rule to run at a certain time, specify the time in 24-hour format.
Step 8: Enter the expression.
Expressions are the conditions that cause the rule to run.
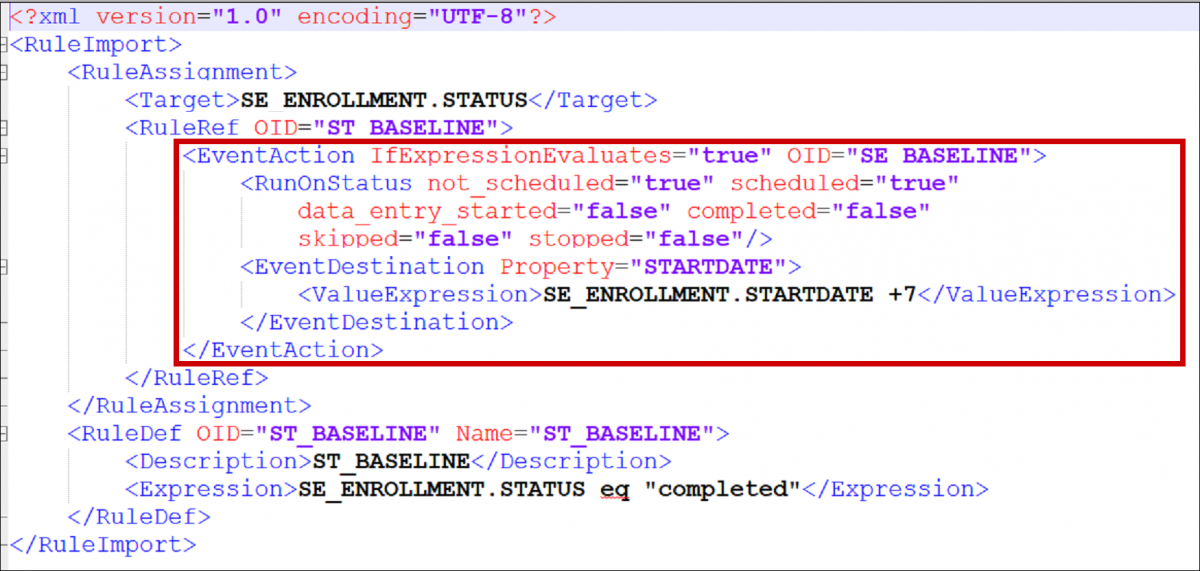
Event Action: If you want the rule to run when the event reaches a certain status, specify all of the statuses as true or false.
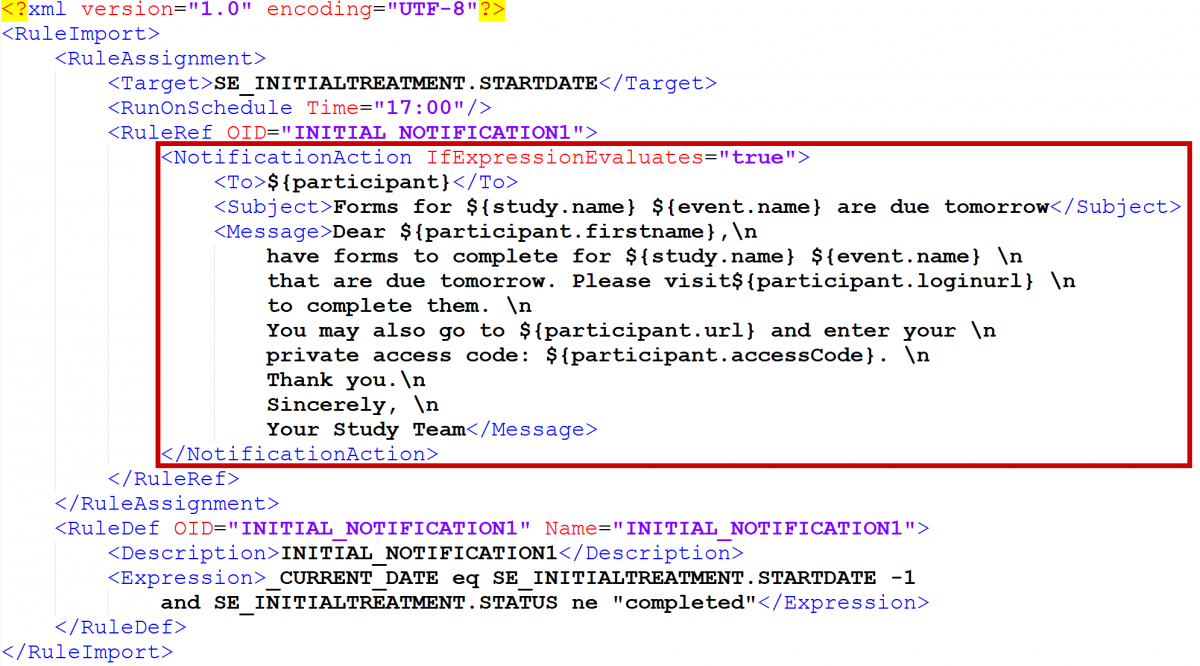
NotificationAction: Specify the recipient(s), subject of the notification, and message next to the corresponding tags. You can include multiple email addresses separated by commas. To use this rule, Openclinica Participate must be active.
Note: See syntax below, in the tables.
Step 9: Make sure all tags are closed, and save the file as an XML file.
Step 10: Click the Add Rules link at the top of the Manage Rules screen.
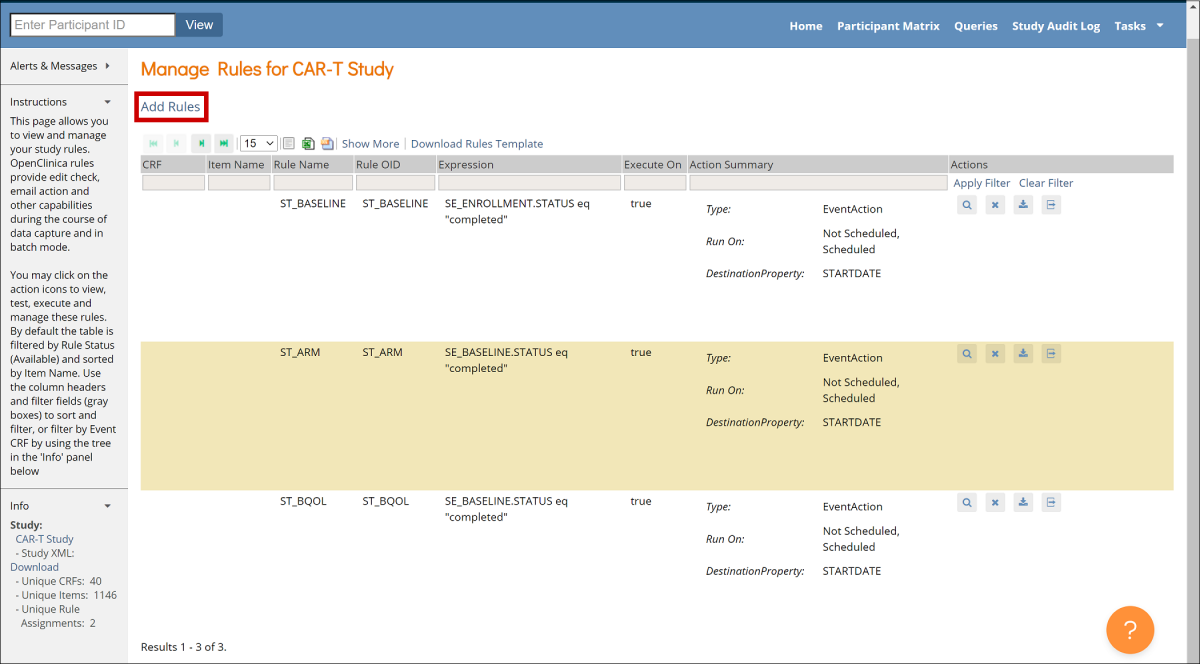
Step 11: Click Choose file, and select a file to upload. Then click the Continue button.
To View a Rule:
Click the View button next to the rule you want to view.

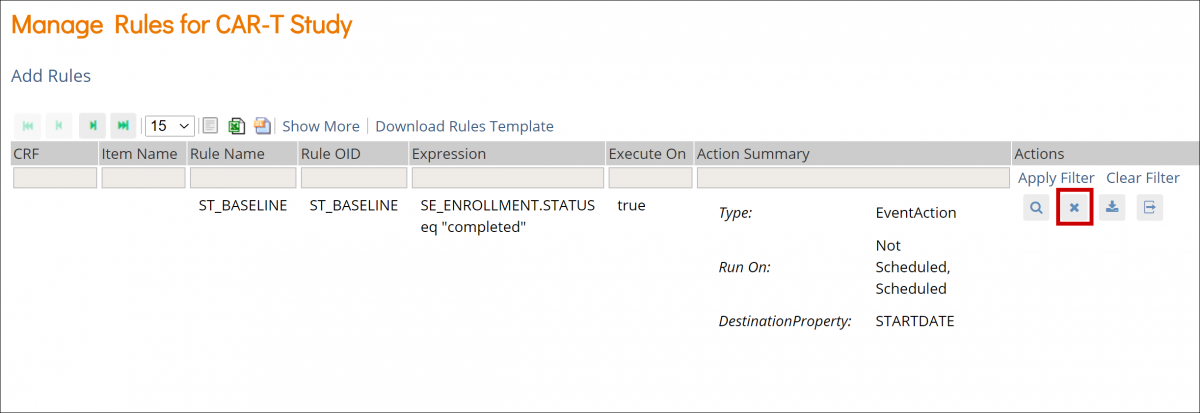
To Remove a Rule:
Click the Remove button next to the rule you want to remove.
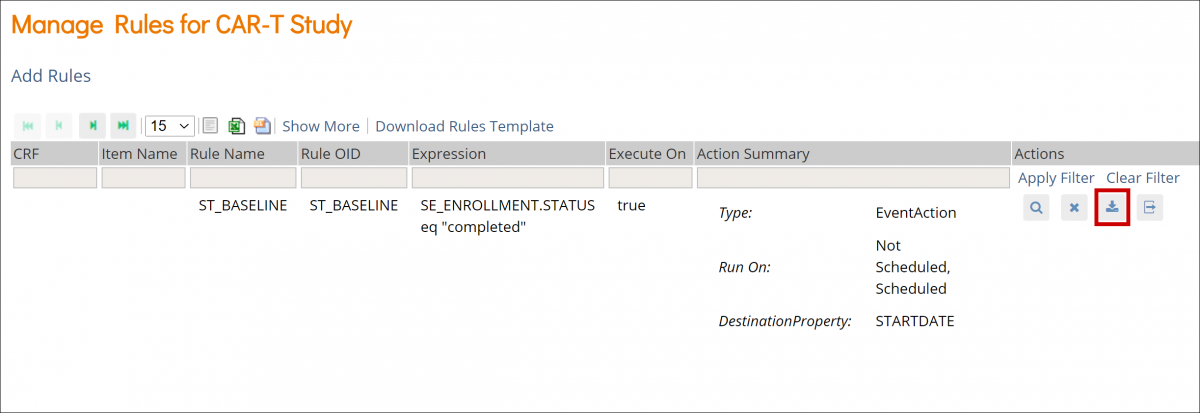
To Download a Rule:
Click the Download button next to the rule you want to download.
To Test a Rule:
- Click the Test button next to the rule you want to test.
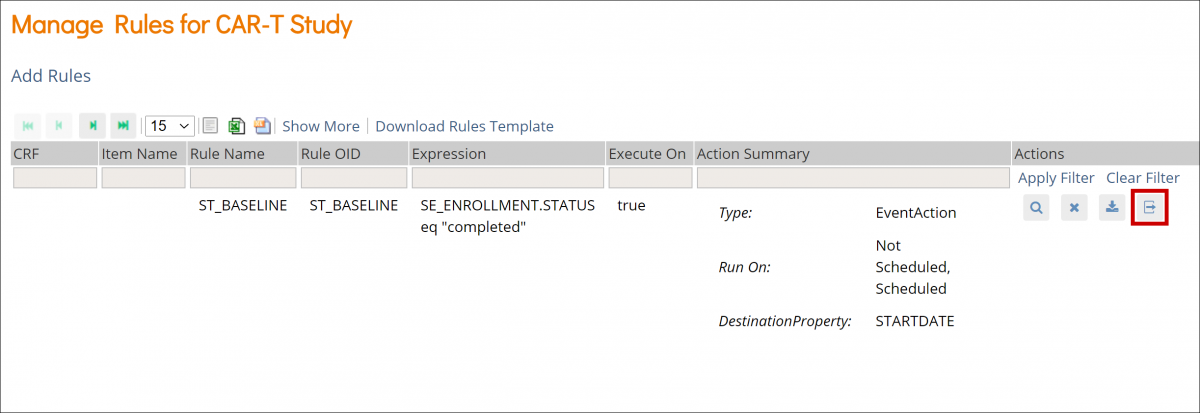
- Check that the Target, Rule Expression, and Actions are displayed correctly on the screen.
- Click the Validate & Test button.
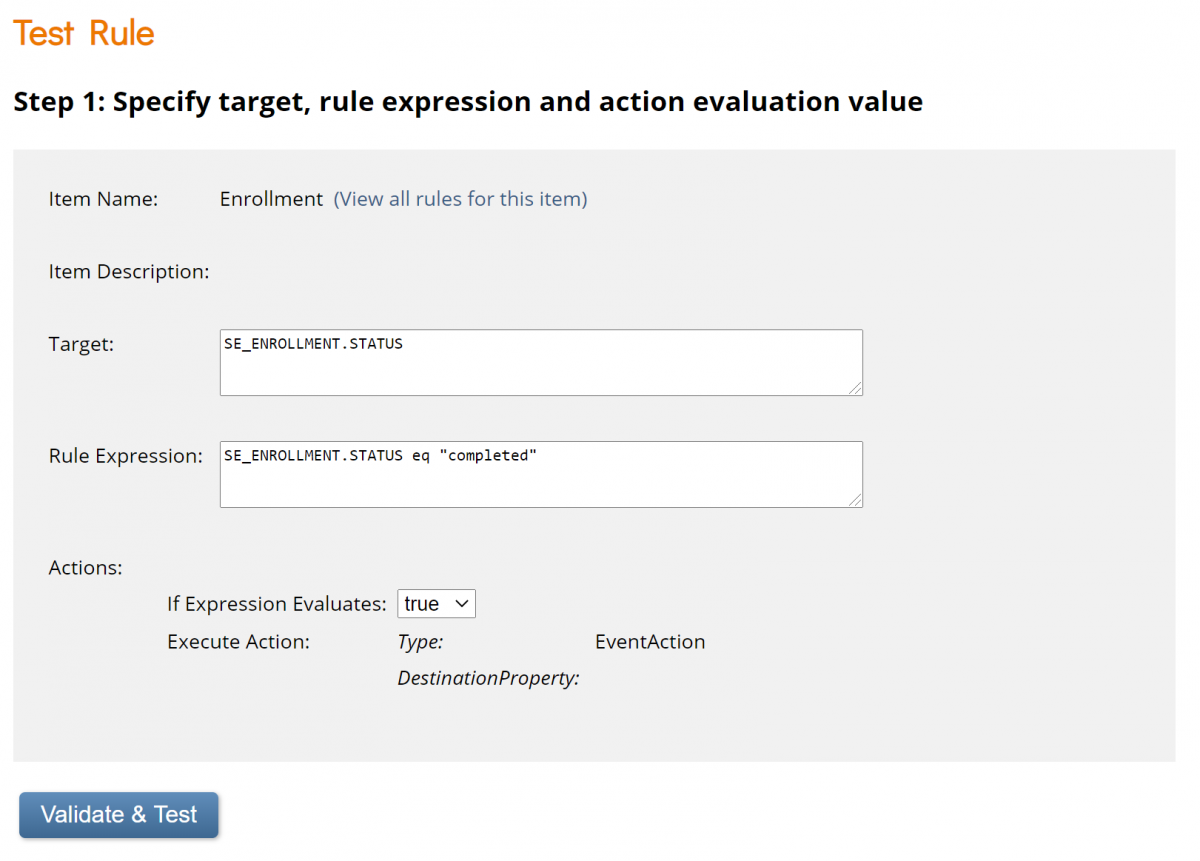
- Specify test values for variables in your rule expression.
- Click the Validate & Test button again.
- Review the results of the test. On the left-hand sidebar under Alerts & Messages, you will see a statement about whether the test was valid or invalid. Scroll down to Verify results for more details.
Actions
| Icon | Action | Description |
|---|---|---|
 | View | View the rule information, such as Target OID, Study Event Definition, CRF Name, etc. |
 | Remove | Remove the rule |
 | Download | Download the rule |
 | Test | Test to ensure that the rule works |
Rule Components
| Rule Components | Description |
|---|---|
| RuleDef | The rule definition, which includes the rule OID, name, description, and expression. This defines the rule, which is then assigned (referenced) in the RuleRef. |
| RuleRef | The rule definition/expression being used by the assignment is referred to in the RuleRef. This is an OID for the particular RuleDef. Each RuleRef may have multiple ActionTypes. |
| RunOn | For all actions except EventAction, the parameter that defines when the ActionType will execute. The current phases include InitialDataEntry, DoubleDataEntry, AdministrativeEditing, and Batch. |
| RunOnStatus | For EventAction, the parameter that defines when the EventAction will execute. The current status values include not_scheduled, scheduled, data_entry_started, completed, skipped, and stopped. |
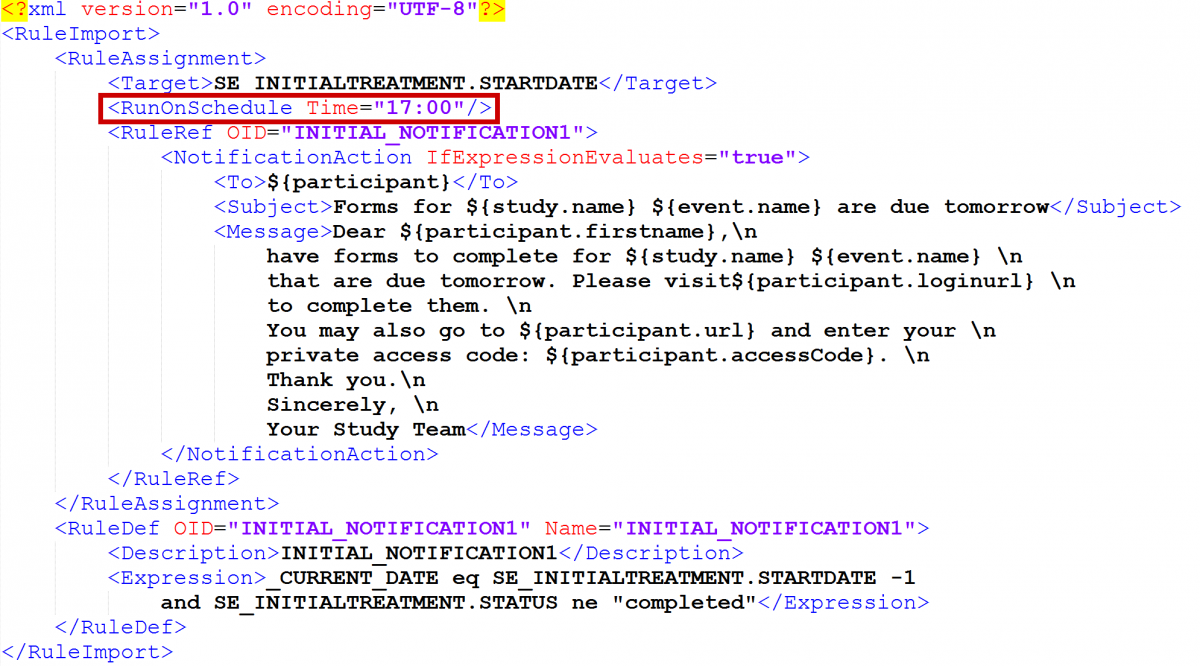
| RunOnSchedule | This will be evaluated and triggered the first time it becomes true based on a change of event status or other component of the expression. The rule will also be evaluated daily at the set hour and may trigger then if the expression is true. Note: When minutes are documented in the scheduled time, they are ignored. For example, if a rule is defined to run at 17:30, it will be queued up for processing with all rules defined to run between 17:00 and 17:59. The system will start processing rules on the hour (00), but it may take longer to process all rules depending on factors such as complexity of rule logic and number of rules and participants in the study. |
| Target | The target is the item where an action will be fired. This is a single item in a CRF. When this item is encountered in the CRF and the user selects the Save button, the system will execute the actions associated with a rule. |
| ValueExpression | A calculation or other expression that defines what will be populated in the DestinationProperty (for an InsertAction) or EventDestination (for an EventAction). |
Expressions
| Expression | Definition | Variable Type |
|---|---|---|
| eq | Equal to | Any |
| ne | Not Equal to | Any |
| ct | Contains | Any |
| gt | Greater Than | Number |
| gte | Greater Than or Equal to | Number |
| lt | Less Than | Number |
| lte | Less Than or Equal to | Number |
Example:
SE.ENROLLMENT.STARTDATE eq completed
Conditional Operators
| Operator | Function | Description |
|---|---|---|
| and | And | Variables used with this operator should be of a boolean type |
| or | Or | Variables used with this operator should be of a boolean type |
Example:
CURRENT_DATE -1 and SE.SCREENING.STATUS ne completed
Arithmetic Operators
| Operator | Function | Description |
|---|---|---|
| + | Addition | Variables used with this operator should be of a number type |
| - | Subtraction | Variables used with this operator should be of a number type |
| * | Multiplication | Variables used with this operator should be of a number type |
| / | Division | Variables used with this operator should be of a number type |
Example:
SE.ENROLLMENT.STARTDATE + 7
Dates within Rules: Equality and Relational Operators
| Expression | Definition | Full Expression |
|---|---|---|
| eq | Equal to | ITEM_OID eq 2008-12-12 |
| ne | Not Equal to | ITEM_OID ne 2008-12-12 |
| gt | Greater Than | ITEM_OID gt 2008-12-12 |
| gte | Greater Than or Equal to | ITEM_OID gte 2008-12-12 |
| lt | Less Than | ITEM_OID lt 2008-12-12 |
| lte | Less Than or Equal to | ITEM_OID lte 2008-12-12 |
The format of the date included in an expression should be yyyy-MM-dd.
Example:
January 01, 2020 should be written as: 2020-01-01
You can also use _CURRENT_DATE to compare values against the current server date.
For example, with a NotificationAction, to notify Participants of a Form that must be completed on the next day, you could use an expression such as:
<Expression>SE_OID.STARTDATE eq (_CURRENT_DATE +1) and SE_OID.STATUS ne “complete”</Expression>
This would send a notification one day in advance of the expected form completion date as long as the form was not already completed by the Participant.
Notification Action Parameters
| Parameter | Description | To | Message | Subject |
|---|---|---|---|---|
| ${participant.firstname} | The Participant First Name | X | ||
| ${participant.loginurl} | The Participant URL with Automatical Login | X | ||
| ${participant.url} | The Participant URL without Automatic Login | X | ||
| ${study.name} | The Name of the Study, as Defined in OpenClinica | X | X | |
| ${participant.accesscode} | The Single-Use Code the Participant Must Use to Access OpenClinica Participate | X | ||
| ${event.name} | The Name of the Event, as Specified in OpenClinica | X | X | |
| ${participant} | The Participant Contact Information, as Provided When the Participant was Connected to the Study. (This Could be a Mobile Number for SMS Notification, an Email Address, or Both); OpenClinica Automatically Sends the Notification | X | ||
| ${participant.id} | Participant ID | X | X | |
| ${site.id} | Site ID | X | X | |
| ${site.name} | Site Name | X | X | |
| ${study.id} | Study ID | X | X | |
| \n | Use at the End of a Line for a Linebreak | X |
For example, the following rule will send a notification to any Participant who has an Event scheduled for the following day:
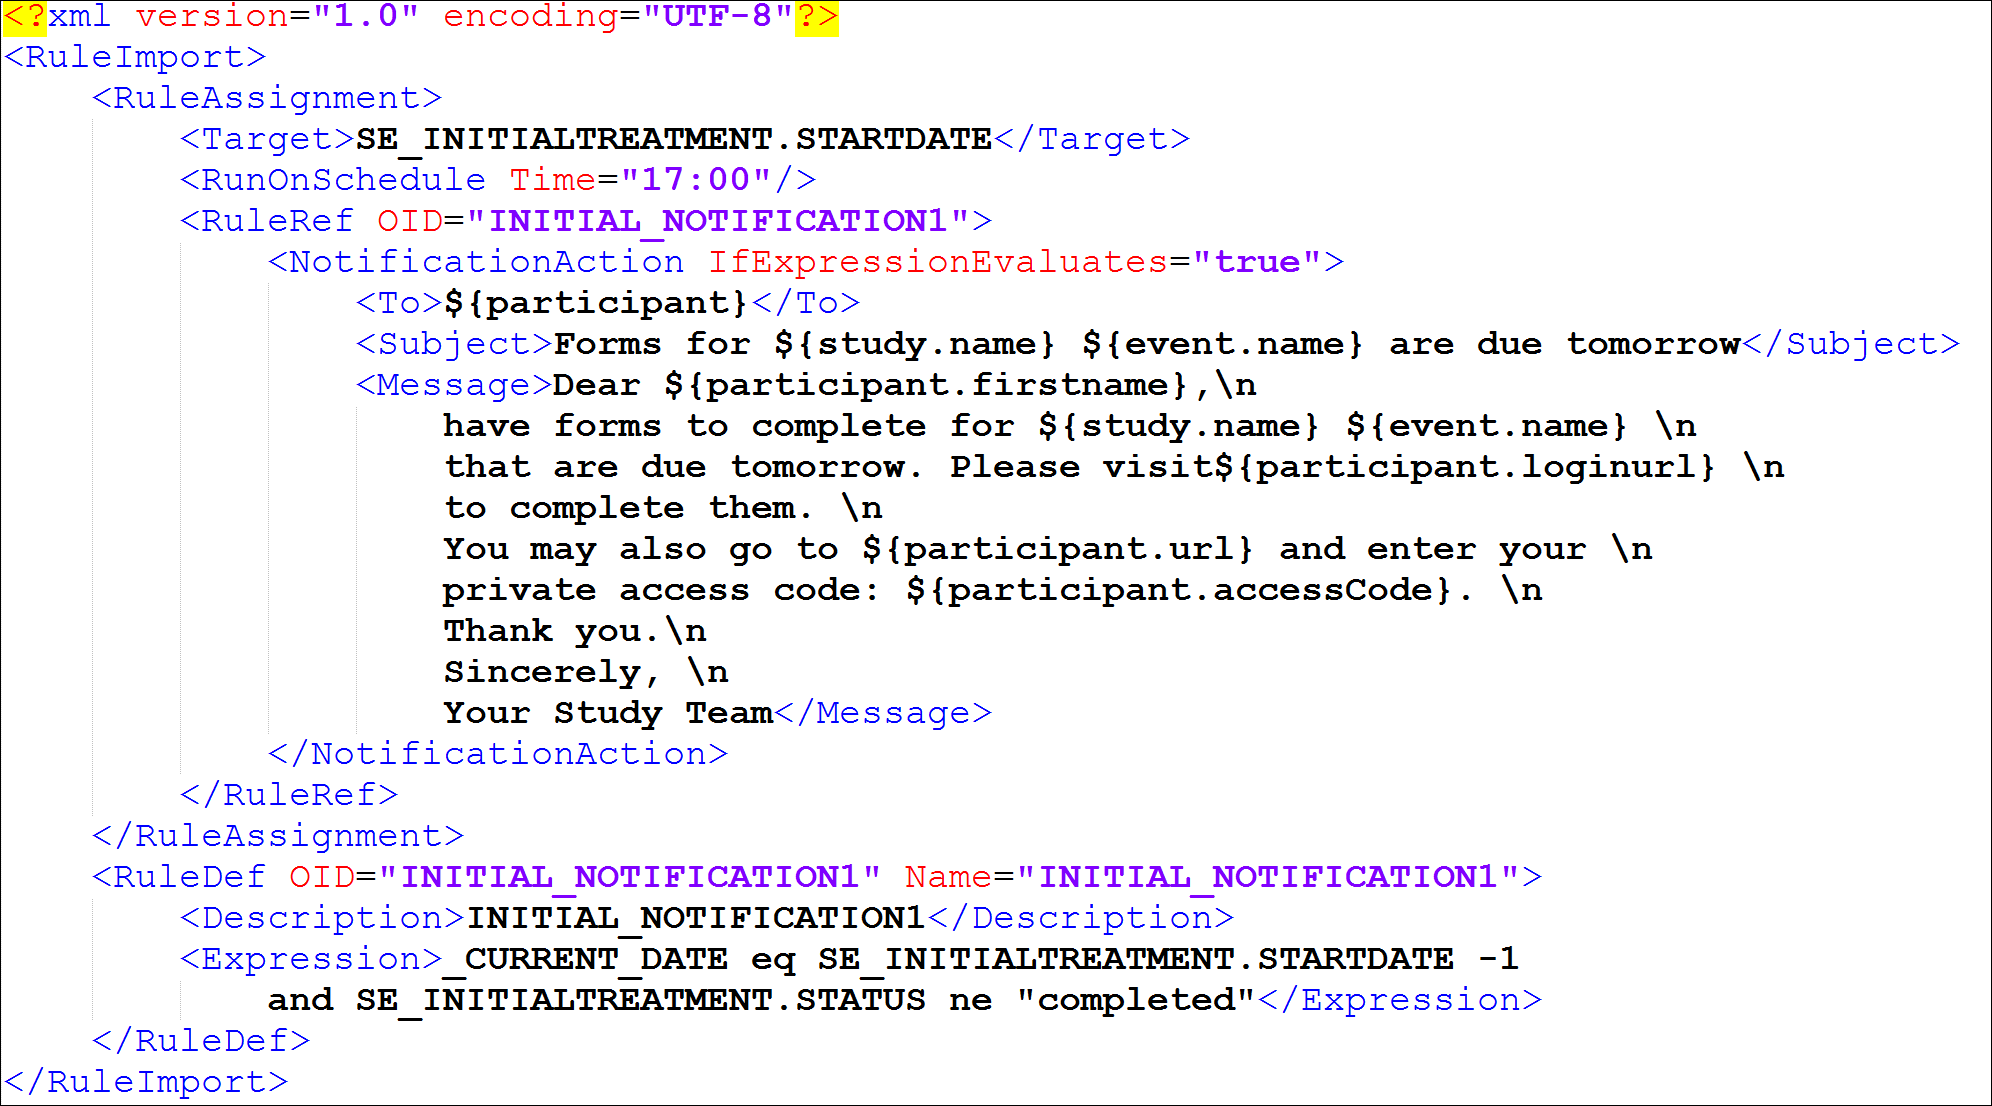
Notice that the Rule Expression uses _CURRENT_DATE and compares it to SE_INITIALTREATMENT.STARTDATE to determine that the Event is scheduled for the next day. (In other words, if TODAY is equal to the day BEFORE the visit and the status is not yet completed, send a notification.
If you want to send a reminder one day AFTER the visit, you would use _CURRENT_DATE eq SE_INITIALTREATMENT_STARTDATE +1, meaning that the rule will trigger if _CURRENT_DATE is one day AFTER the visit was scheduled and the status is not yet completed.)