1.4.1 Viewing and Entering Data on Forms
Next, let’s explore how to view and enter data.
Features
The features of OC4 data entry include the following:
- Participant Matrix: Easily see the data entry status of participants.
- Auto-save: Automatically save during data entry.
- Conditional field display: Only see relevant fields during data entry.
- Automatic calculations and edit checks: Automatically use calculations and checks.
- Queries: Easily create or view queries.
Forms
Forms are a collection of data entry fields for an Event or multiple Events. For example, the First Visit Event might contain the Eligibility, Consent, and Demographics Forms.
Types
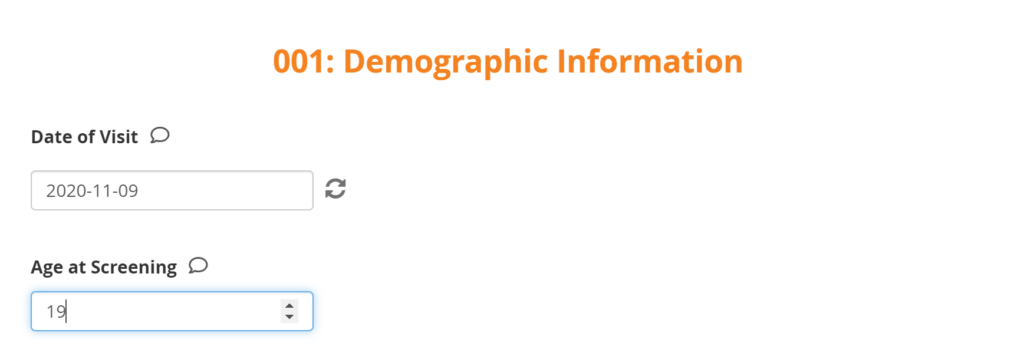
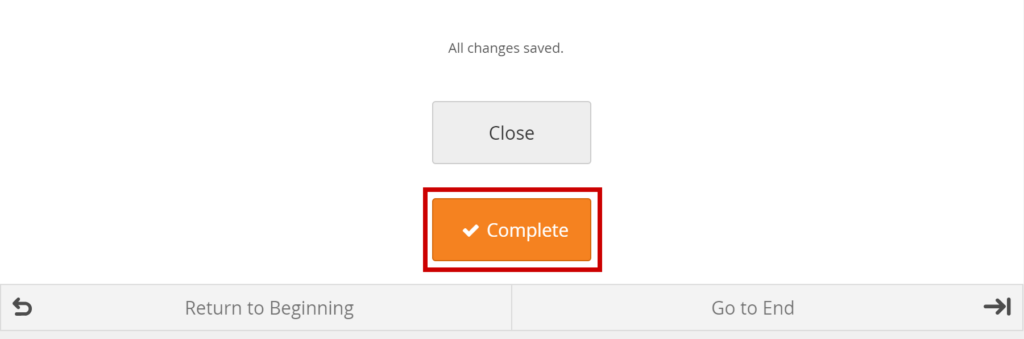
There are different types of fields, such as: select one, select multiple, integer, date, image, etc. Note that All changes saved appears at the bottom of the Form because all changes are saved automatically.
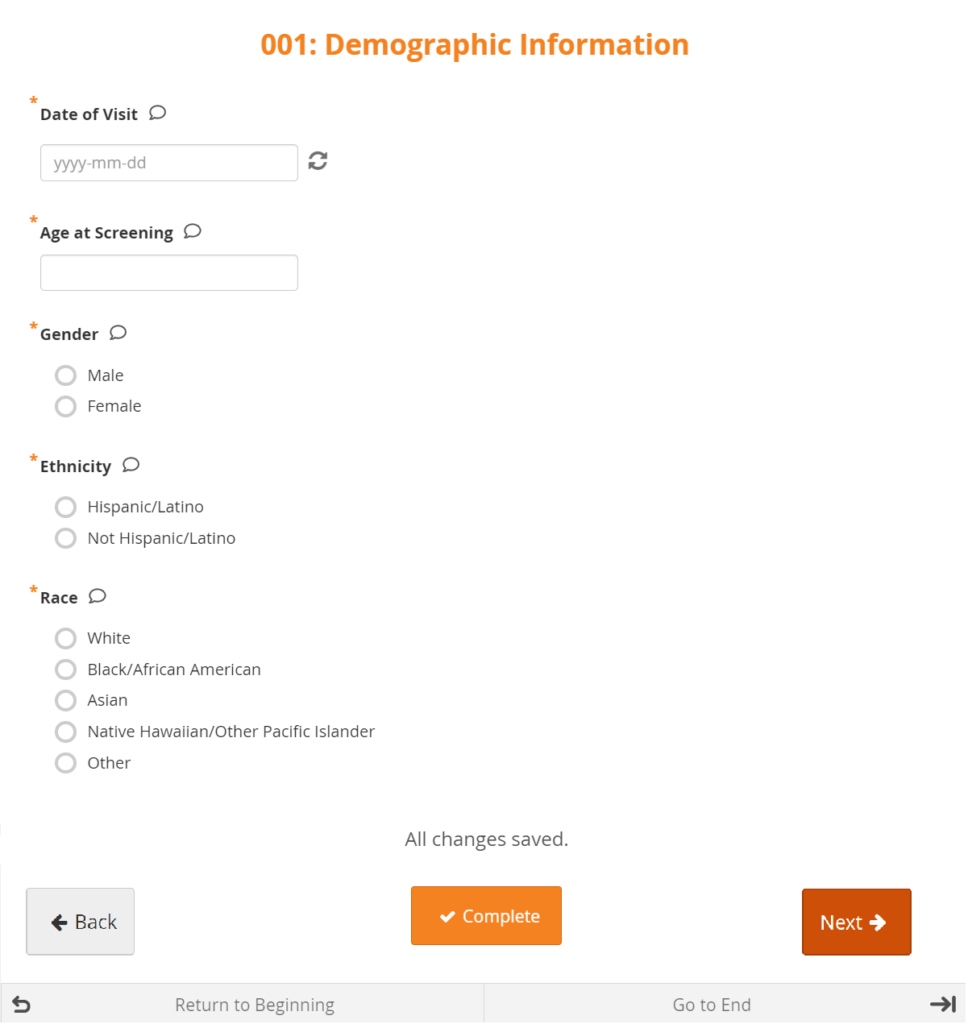
Layout
Forms can be simple (with one question per row) or grid (with one or multiple questions per box).

Conditional Fields
Some fields only appear if you enter a specific response in another field. For example, if the response to Do you smoke? is No, no related fields appear. If the response to Do you smoke? is Yes, other fields such as Packs per day might appear.
Edit Checks
If you enter a value that is invalid due to a constraint or do not respond to a required field, a message appears on the Form.

Closing or Marking a Form Complete
When you are finished entering data, you can close a Form and continue to enter data later or mark the Form Complete.
Before You Enter Data
- Add a Participant
- Schedule an Event
Entering Data
To Enter Data Directly into Visit Event Forms:
- On the Participant Details screen, click the Form Card to open the form in its default mode or click the Actions menu (three dot menu in the lower right corner of the Form Card) to select from the available actions on the form.
- The default mode for the Form Card will be based on the highest access mode available.
- If the form is editable and you have edit permission for the form, the form will open in Edit mode. However, if the form is Completed, it will default to open in Review-only mode, but can still be opened in Edit mode by using the Actions menu.
- If you do not have edit permission, it will open in Review-only mode if you have query editing access, or read-only mode if you do not.
- The default mode for the Form Card will be based on the highest access mode available.
- Enter information into each field and Submit when ready.
Enter Data Directly into Common Event Forms:
- On the Participant Details screen, click the Common Event header to expand it.
- Click the Add New button.
- Or, to enter data in an existing Form, click the menu in the Actions column and select Edit.
- Enter information into each field.
To Continue to the Next Page or Back to the Previous Page of the Form:
Click the Next button to proceed on the Form, and click the Back button to return to the previous page of the Form.
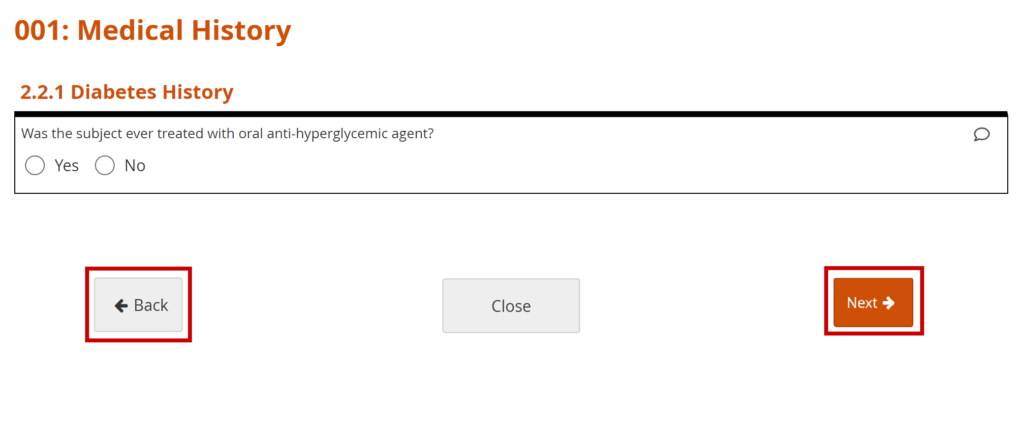
To Close the Form and Continue Data Entry Later:
Click the Close button.
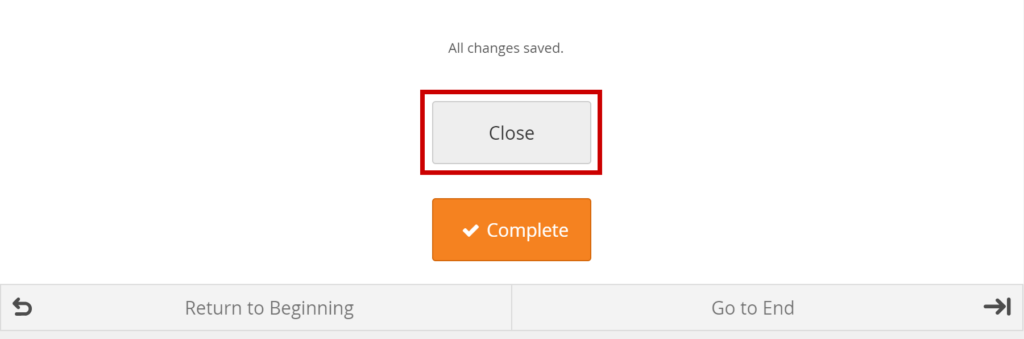
Mark Data Entry Complete:
Click the Complete button.
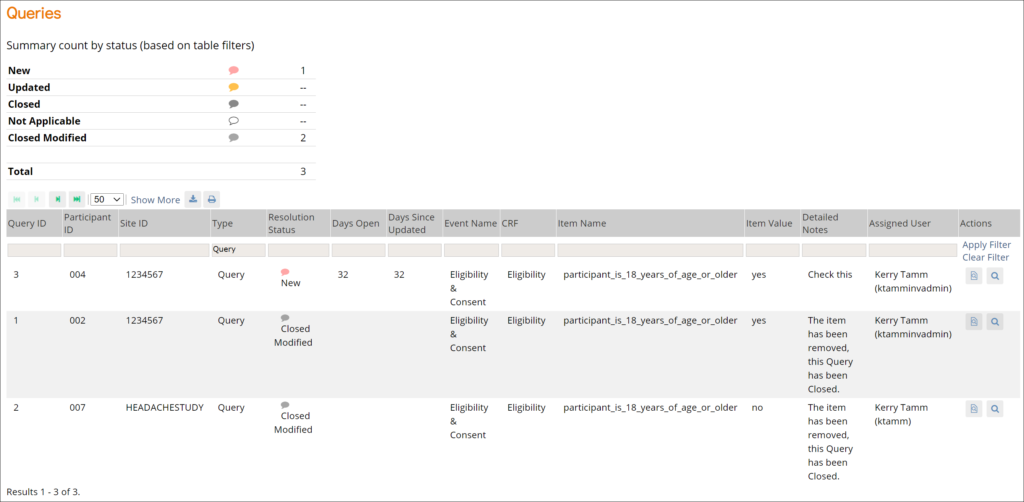
Queries
Queries are inquiries or alerts about data that needs to be reviewed.
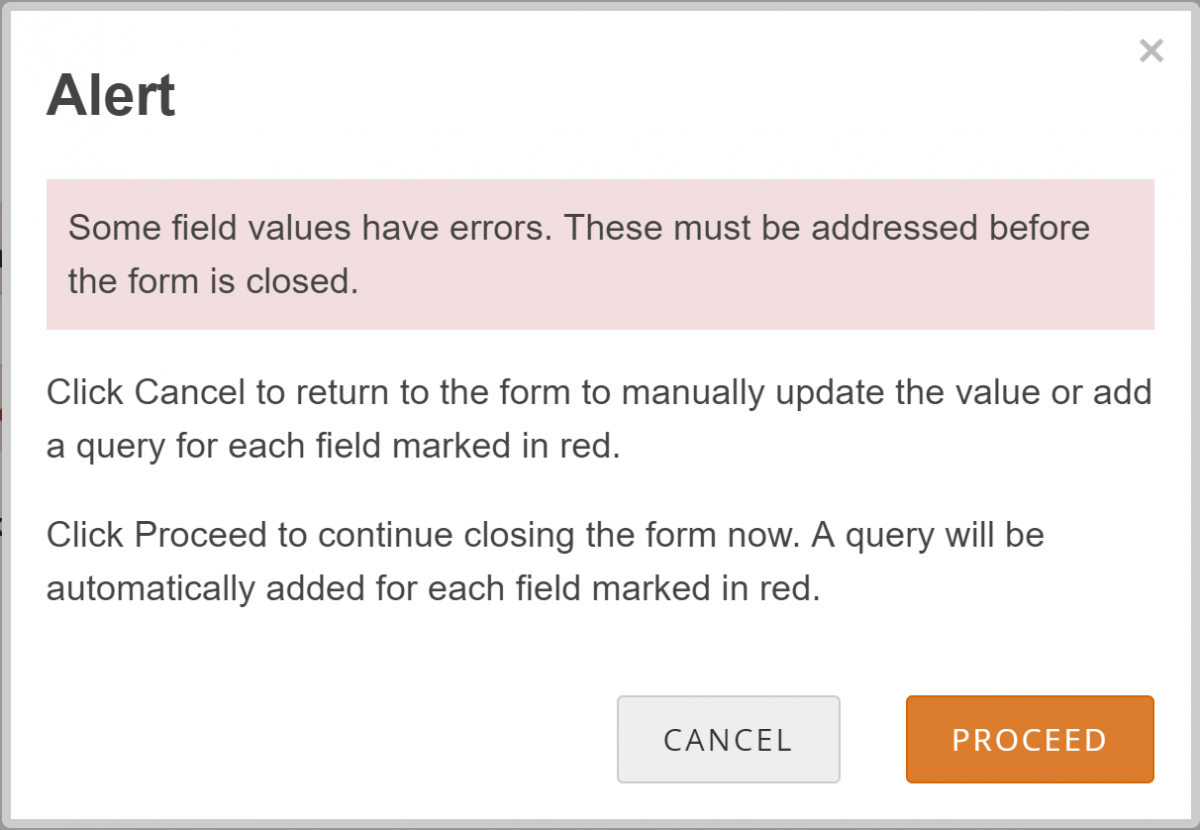
The system creates queries automatically if you close a Form that has unaddressed errors or you can manually create a query.
Another user can respond to it and/or change the response in the field. Only Data Managers and Monitors can close queries.
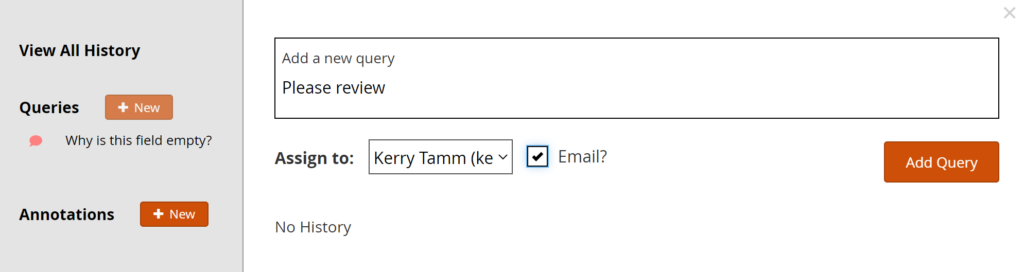
Add a Manual Query:
- Click on the Query Bubble next to the field you want to inquire about.
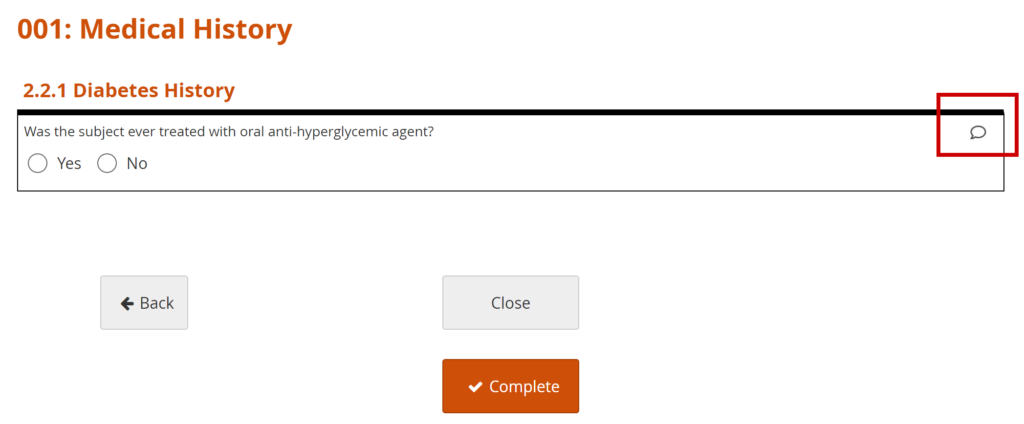
- Click +New.
- Enter text in the Add a New Query text box.
- (Optional) Select a user to assign the query to.
- (Optional) Check the Email? box to send an email notification.
Allow the System to Automatically Create a Query for the Value in Question:
- Click the Close button on a Form.
- Click the Proceed button.
- The system auto-generates a query based on the default message text defined in the Form.
1.4.2 Your Home Screen
Your home screen depends on your User Role, as shown in the table below:
| User Role | Home Screen | Displays |
| Data Manager/Admin | Welcome | Graphs of Study Progress |
| Investigator | Participant Matrix | Participants and Events |
| Clinical Research Coordinator | Participant Matrix | Participants and Events |
| Data Specialist | Participant Matrix | Participants and Events |
| Data Entry Person | Participant Matrix | Participants and Events |
| Study or Site Monitor | Source Data Verification | Forms to Review and Verify |
| Study or Site Viewer | Participant Matrix | Participants and Events |
Note: If you have a custom User Role, the role is still based on one of the existing roles. For example, instead of the Monitor role, there might be Monitor Site A and Monitor Site B. These are based on the Monitor role and have the same home screen and permissions.
1.4.3 Change Study
If you have access to multiple studies or sites, you can switch your active study based on your assigned role.
To switch between studies or sites:
- Click Change in the top navigation.
- Select the study or site you want to view from the list.
- Click Change to confirm your selection.

1.4.4 Managing Your Account
All users can update their profile information and password at any time.
Edit Profile Information
From the User menu, select My Profile.
Click Edit, and update your information as needed.
Note: You cannot change the email address associated with your account. To update your email address, contact your system administrator.
Change Your Password
On the My Profile page, click Change Password.
Enter your current password and your new password.
Click Save to confirm your changes.
1.4.5 Frequently Used Screens
The screens you most frequently use depend on your User Role. Below are descriptions of the five main screens in OpenClinica: Participant Matrix, Participant Details, Form Data Entry, Queries, Source Data Verification.
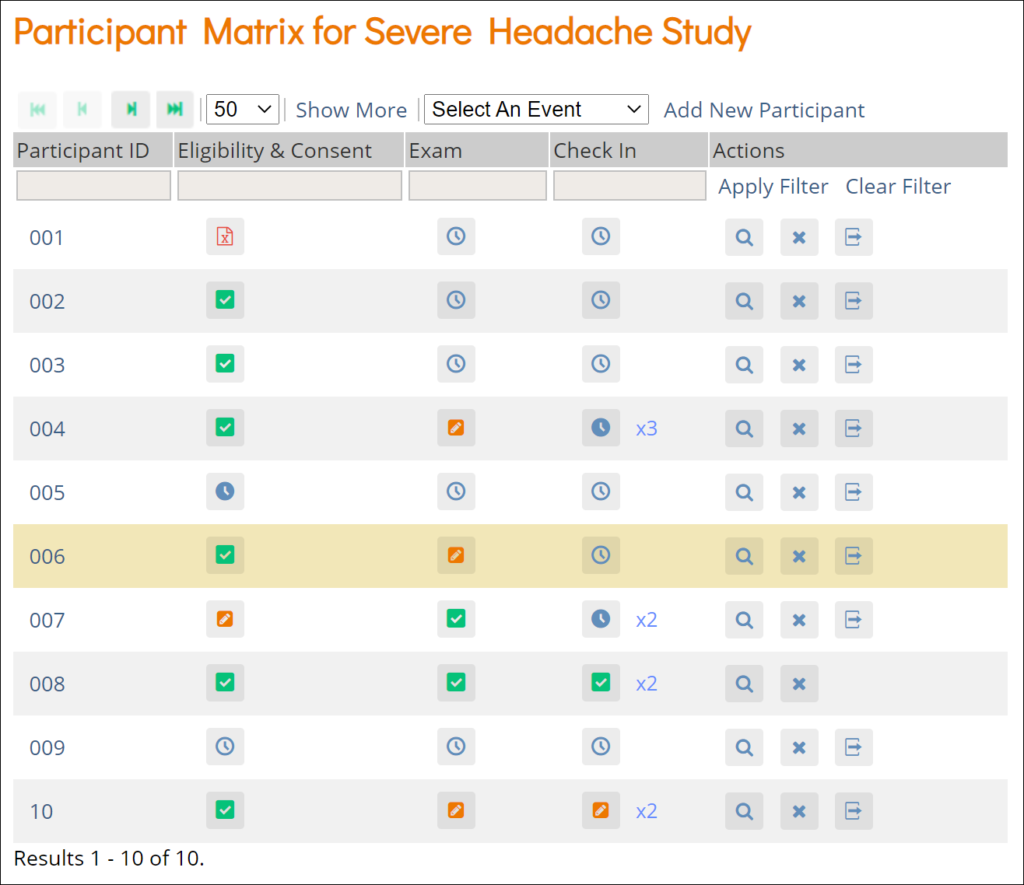
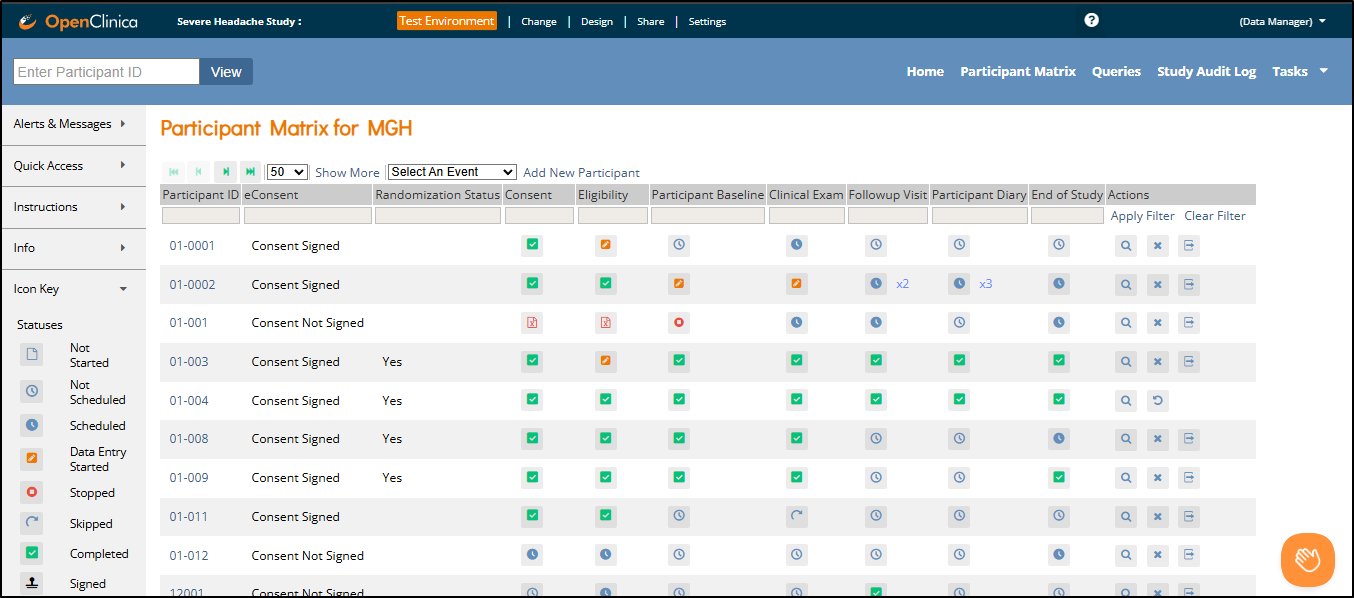
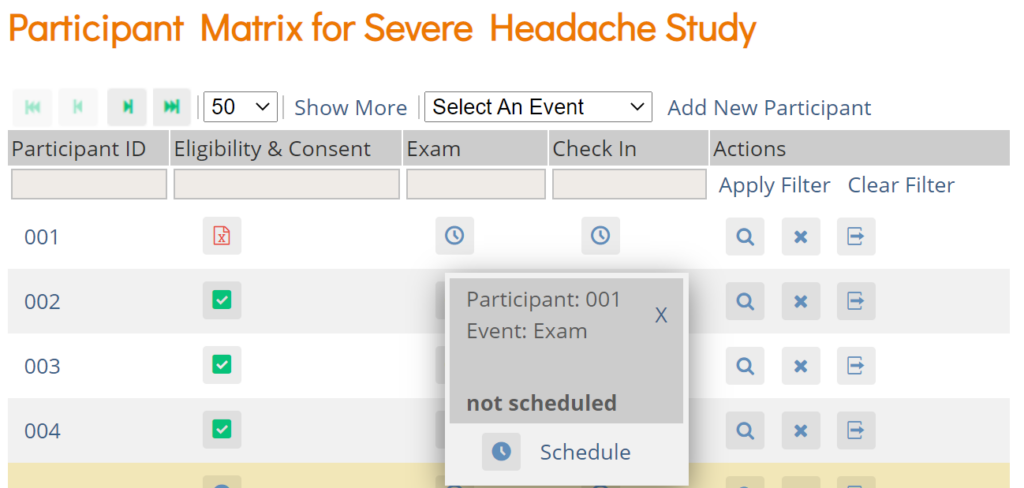
Participant Matrix: This screen displays a list of participant IDs, events, and event statuses. From this screen, you can view participant details, schedule events, remove/restore participants, and reassign participants to another site, depending on access.
- The Participant Matrix lists visit-based events across the top of the screen and participant IDs down the side.
- Each icon represents the status of the participant/event combination.
- A legend of the icons is listed on the left side of the screen.
- Hover over the icons in the Participant Matrix to see more details about the participant event.
- Click an icon for options to view and/or edit data, depending on your access.
- You can filter events by status.
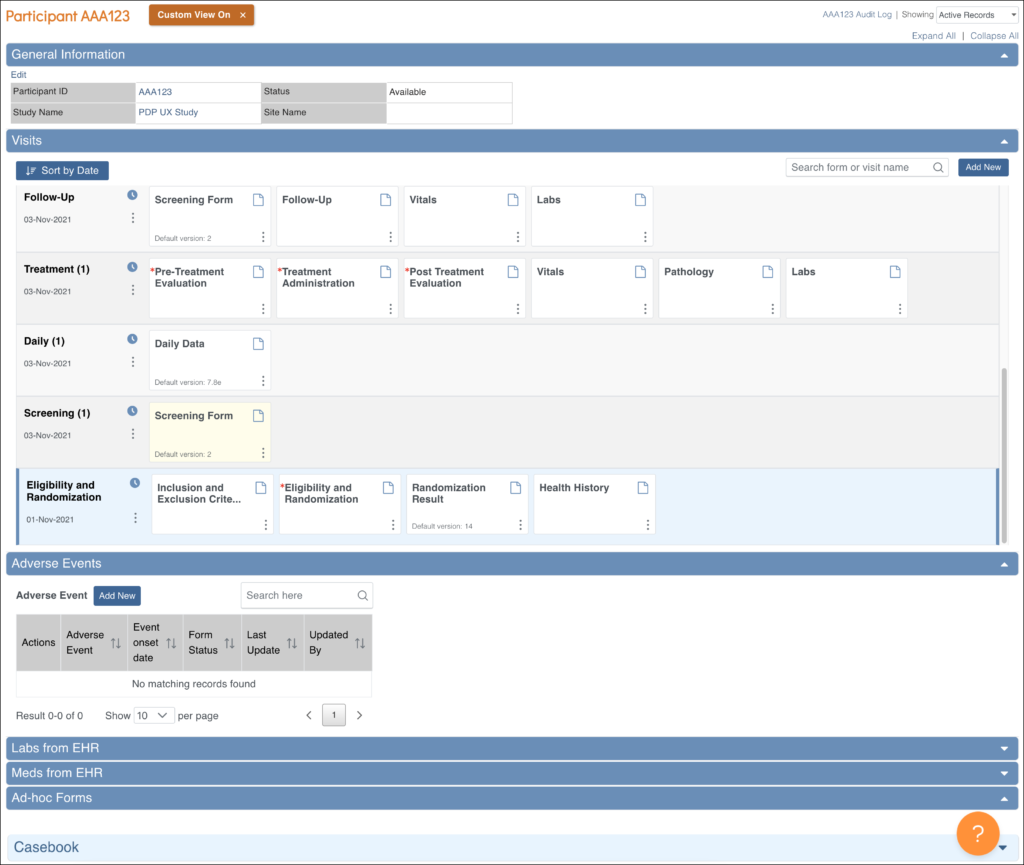
Participant Details: This screen displays the participant’s general information, events, and forms. From here you can view Forms, enter data into forms, edit form data, lock events, remove/restore events, clear forms, and reassign a form to another version (depending on access).
The Participant Details screen is divided into the following sections:
- General Information
- Visits
- Common Events
- Casebook
Form Data Entry: When you open a form, you can view, enter data, edit data, add queries or annotations, close, and complete forms. If a user makes a change to the data after the form has been completed, they must enter a Reason for Change.
Some features include:
- auto-save
- conditional fields
- calculations and edit checks
- concurrency locking
![]()
Queries: This screen displays all queries in the study environment. On this screen, you can view, add, update, and close queries, depending on access. Queries are usually added while reviewing forms from the Participant Details screen, but you can also add them when reviewing forms here.
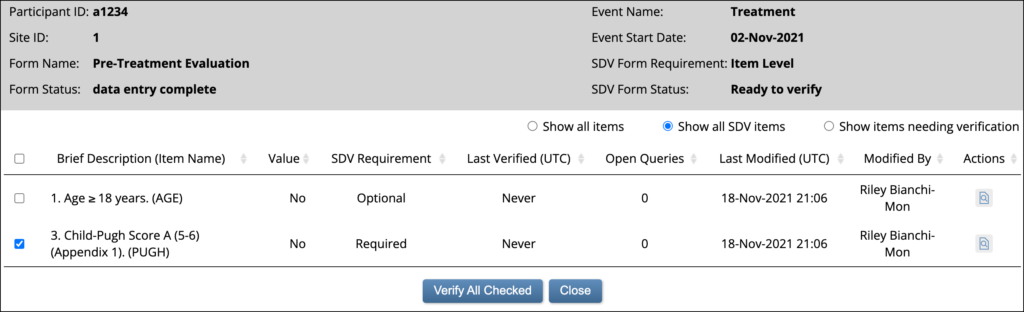
Source Data Verification: On this screen, you can view forms, view item data, and verify/unverify forms.
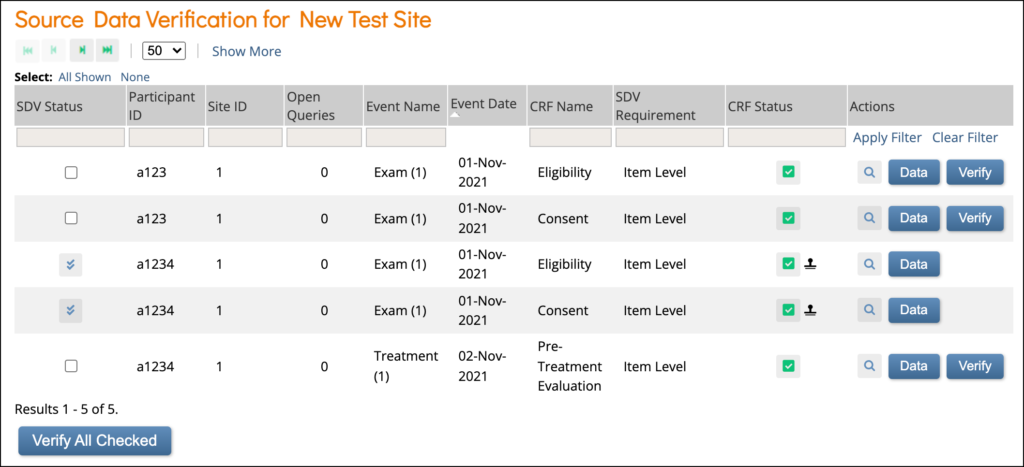
Item-Level SDV Screen:
1.4.6 Frequently Used Terms
The following table displays terms that are frequently used within OpenClinica.
| Term | Definition |
| Study | A study is a collection of events and forms that contain participant data. |
| Participant | A participant (sometimes referred to as a subject) is a person who provides data for the study.
|
| Event | An event is a collection of one or more forms. Events can be:
|
| Form | A form (or CRF) is an electronic record of participant data that can include:
Users with the appropriate level of form access can enter data into a Form.
|
| Study Designer | Study Designer is the interface where Data Managers create Events and Forms. |
| Study Runner | Study Runner is the interface where users enter data into the study in either Test or Production environments. Depending on your access level, you may be able to:
|
1.4.7 How to Log Out
You can log out of OpenClinica from the User menu.
To Log Out of OpenClinica:
- Click the User menu.
- Click Sign Out.

1.4.8 OpenClinica Navigation
There are two main areas in OpenClinica:
- Study Runner: the part of the system where your studies are carried out
- Study Build System: where studies are configured, then published to Study Runner
Study Runner:
All users can access Study Runner, but the home screen you will see depends on your user role, as does access to certain features. Features in Study Runner include:
- The Home screen, which can be the Welcome screen, Participant Matrix, or Source Data Verification screen (depending on role)
- The Participant Details screen
- The Queries screen
- The Study Audit Log
- The Tasks menu and associated tasks
- The User menu
- Quick Access links to queries assigned to you and recently accessed Participant information

The Header Bar Displays:
- Top Row (from left to right):
- The Study Name and Study ID
- If you are in the test environment it will display a banner to the right of the study id. This space will be empty in the production environment.
- The Change, Share, and Settings buttons. (Only users who are Data Managers and Administrators see the Design button.)
- Your user id and the downward arrow that will open your user menu, the contents of which depend on your specific role.
- Second Row (from left to right):
- Participant ID Search/Lookup
- Links to menus and certain areas within Study Runner
Study Build System:
Only Data Managers and Administrators can access the Study Build System. This includes the following screens, which are presented in detail throughout this guide.
1.4.9 The Participant Matrix
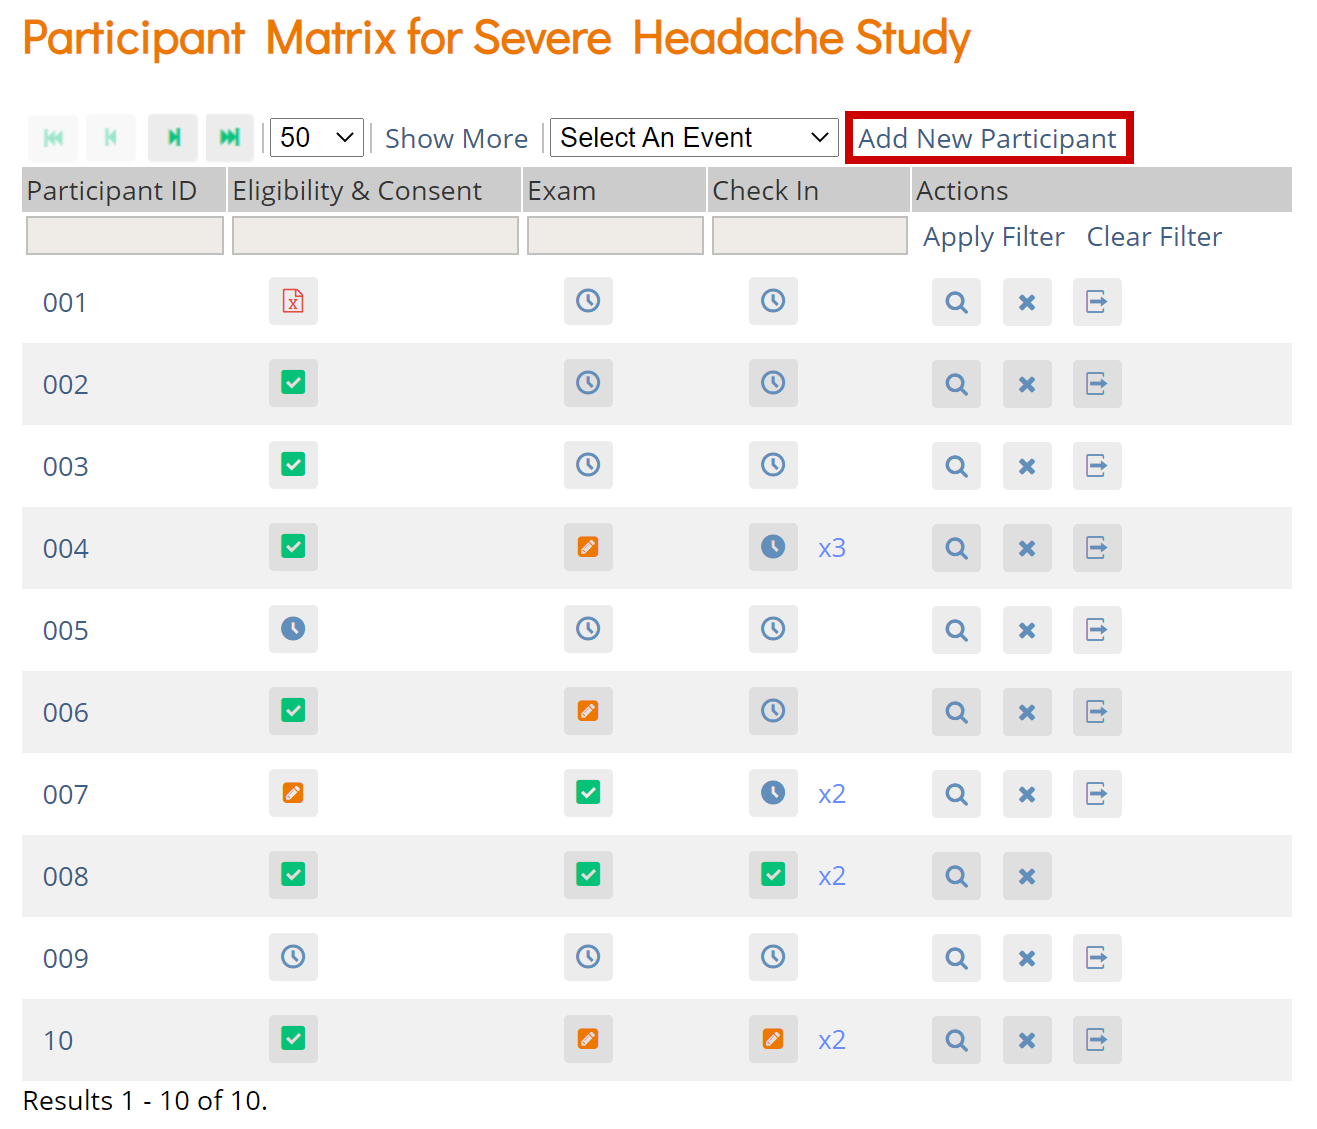
The Participant Matrix provides a centralized view of participants enrolled in your study or site. It helps you track participant status, identify records that require action, and navigate directly to related tasks.
If accessed at the study level, the Participant Matrix displays all participants in the study.
If accessed at the site level, it displays only participants at your assigned site.
There are two main views:
All Events View – Columns represent visit-based events (e.g., Screening, Baseline, Follow-up)
Single Event View – Columns represent forms within the selected event
Each row in either view represents a participant. You can hover over icons to see more details about event or form status. A legend appears on the left side of the screen as a quick reference for icon meanings.
Common Actions
You can use the Participant Matrix to:
Manage Participants:
- Add a participant (For more information, refer to Adding a Participant)
- Edit participant data
- Remove a participant
- Restore a participant
- Sign a participant record (Investigators and data specialists only. For more information, refer to Signing Participant Records.)
- Reassign a participant to another site (data managers only)
Manage Events and Forms:
- Schedule events
- View participant details
- View, enter, or edit forms (depending on access)
Matrix Layout
- In All Events View, the columns are the visit-based events defined in your study design.
- In Single Event View, the columns are the forms within the selected visit-based event.
- Common Events are not displayed in the matrix.
- The eConsent Status column appears if the Consent module is enabled and configured.
- Additional custom columns may be configured in the Study Designer. For more information on configuring Custom Column Headers, refer to Defining Custom Column Headers on the Participant Matrix and Queries Table within Design a Study.
Filtering Participants
You can filter participants using:
- The Select an Event dropdown at the top of the matrix
- Gray filter boxes under each column header
- Participant ID: Type partial or full ID
- Visit-Based Event Columns: Filter by status
- Custom Columns: Filter options vary by data type
- Status Column: (Visible when Show More is enabled) – View participants by overall status: Available, Removed, Signed, etc.

Status Icons
The Participant Matrix uses icons to visually indicate the status of each event and form. These icons help you quickly assess participant progress, identify where action may be needed, and understand system-imposed restrictions like locks or archival.
Each icon is associated with a specific state in the data collection process. The meaning of each icon varies depending on whether you are viewing events (in All Events View) or forms (in Single Event View).
Event Statuses
| Status | Description | |
 | Not Scheduled | The event has not yet been scheduled. |
 | Scheduled | Scheduled with a target date; no forms started. |
 | Data Entry Started | One or more forms started but all forms have not yet been completed. |
 | Stopped | Data collection halted during the course of the event. |
 | Skipped | No data was collected for the event, and it was explicitly marked as ‘Skipped’ by a user. |
 | Completed | All required forms completed |
 | Signed | Reviewed and signed by investigator. Resets if data changes For more information on event-level signatures, refer to Signing Participant Records. |
 | Locked | Locked by a data manager; no changes allowed unless it is explicitly unlocked. Events are generally locked after data entry and verification are complete to ensure that no more data changes occur. |
 | Archived | Archived in study configuration. When you click ‘All Records’, any archived events with or without data will be displayed. |
 | Removed | Removed from record; viewable/restorable via All Records. |
💡 Tip: For repeating events, the least complete status is displayed. For example, if the first event is data entry started and the second event is completed, only the status of data entry started will display.
Form Statuses
| Status | Description | |
 | Not Started | Data entry has not started for the form. |
| Data Entry Started | Data entry has been initiated for the form, but it has not yet been marked as complete by the user. |
| Completed | The user has entered data or queries for all required items and has marked the form as complete. Form data can still be edited. |
| Archived | Archived forms with data appear in All Records. |
| Removed | The form was removed from the participant’s record. Form data can be restored if needed. |
Actions
The Participant Matrix allows you to perform key actions on participants, events, and forms—depending on your role and current view (All Events vs Single Event). These actions let you manage the study workflow by updating participant records, handling visit schedules, and modifying form data.
Available actions vary by context:
- Participant-level actions are always available for each participant row.
- Event-level actions appear only in All Events View.
- Form-level actions appear only in Single Event View.
Participant-Level Actions
These actions allow you to manage participants directly from the matrix, such as removing or restoring a participant, reassigning them to a different site, or applying a signature.
| Action | Description | Location | |
| View | Opens the Participant Details Page. | Clicking on Participant ID | |
| Remove | Opens the Remove Participant screen. Prompts for a reason for change. Participant remains visible on Participant Matrix. | Actions column | |
| Restore | Opens the Restore Participant screen. Prompts for a reason for change. Restores participant to Active status. | Actions column | |
| Reassign | Transfers participant to another site. The participant will then be associated with the new site. Note that only users with the appropriate role can perform a reassignment. | Actions column | |
| Sign | Opens the signature screen. For more information about Signing Participants, refer to Signing Participant Records | Actions column |
Event-Level Actions
Available in All Events View
These actions allow you to manage visit-level data, including updating the schedule, locking the event, or signing it once complete. They are accessed by clicking on the participant event icon.
| Status | Description | |
| View | Opens the Participant Details Page to the selected visit. | |
| Edit | Opens the Update Study Event page, where you can modify the details of the event. | |
| Remove | Removes event from the Participant’s record. | |
| Restore | Restores previously removed event. | |
| Sign | Opens the signature screen for the selected event. For more information about Signing Participants, refer to Signing Participant Records | |
| Lock | Locks the selected event, preventing further changes. | |
| Unlock | Unlocks the event, allowing data entry or corrections to resume. |
Form-Level Actions
Available in Single Event View
These actions allow you to manage individual data collection forms within an event. They are accessed by clicking on the participant form icon.
| Status | Description | |
 | View | Opens the Form in Read Only or Review mode, depending on user permissions. |
 | Edit | Opens the Form in Edit mode. |
| Clear | Clears all data in the form, resetting its status to Not Started and closing all associated queries. The audit history is retained. | |
 | Remove | Removes form from the Participant’s event. |
 | Restore | Restores the removed form. |
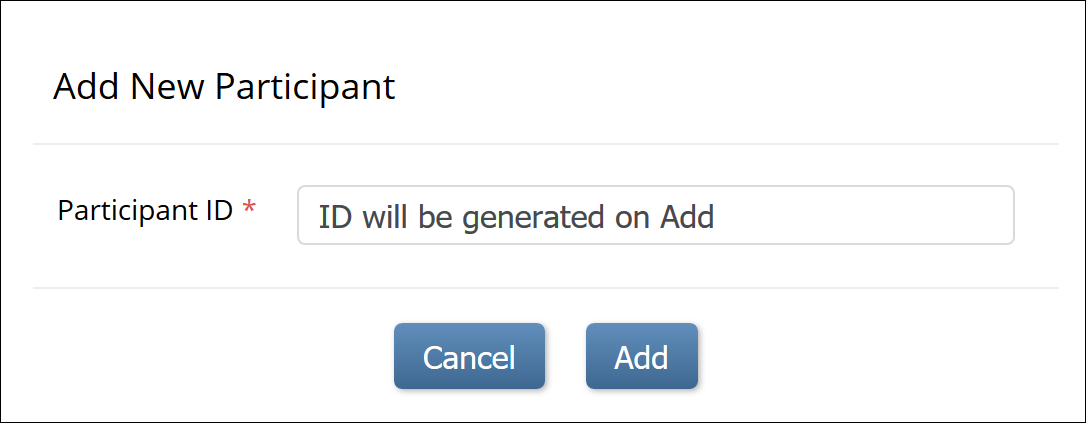
1.4.10 Adding a Participant
Great! Now that you’ve logged in, let’s add a participant.
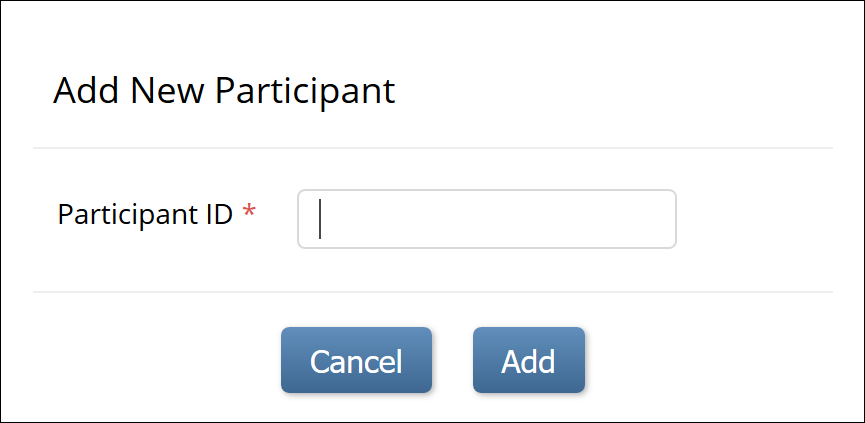
To Add a Participant:
- On the Participant Matrix screen, click the Add New Participant link above the matrix.
- Enter a Participant ID on the Add New Participant screen. (This should be a unique identifier, e.g. 001). If your study is set to auto-generate, an ID based on a pre-defined template appears.
- Click the Add button.
1.4.11 The Participant Details Screen
The Participant Details page (PDP) provides a comprehensive overview of all information related to a specific study participant in one location. This page allows you to review key participant details, enrollment status, study event progress, and track form completion and data entry for each visit. It helps ensure that required activities have been completed, and facilitates entering new data or updating existing information as the study progresses.
Depending on your level of access, you can:
- View, Add or Update Participant data, including the Participant Audit Log
- View Forms
- Enter/edit Form data
- Lock Events
- Sign Events
- Edit Events
- Add or Schedule Events
- Remove/Restore Events
- Clear Forms
- Reassign a Form to another version
Accessing the Participant Details Screen
On the Participant Matrix, click on the Participant ID or the View button corresponding to the participant whose information you want to view.
PDP Sections
The PDP is divided into the following sections:
- General Information
- Visit-Based Events
- Common Events
- Casebook (Casebook information can be found in the Download Single Participant Casebooks section of the Generating Participant Casebooks page)

General Information
The General Information section displays information about:
- The participant
- The study
- The site
- The participant status
- Participate information (if Participate module is active)
- eConsent status (if Consent module is active)
- Participant Audit Log
- Whether All, only Active, or only Removed records are displayed. (Active records displayed by default)

ℹ️ Note: If the Participant ID Method of Creation is set to System-generated, only Data Managers can edit the Participant ID. If it is set to Manual Entry, Data Managers, Clinical Research Coordinators (CRCs), Investigators, and Data Specialists can edit the Participant ID.
For more information on adding or editing participants, refer to Add Participant.
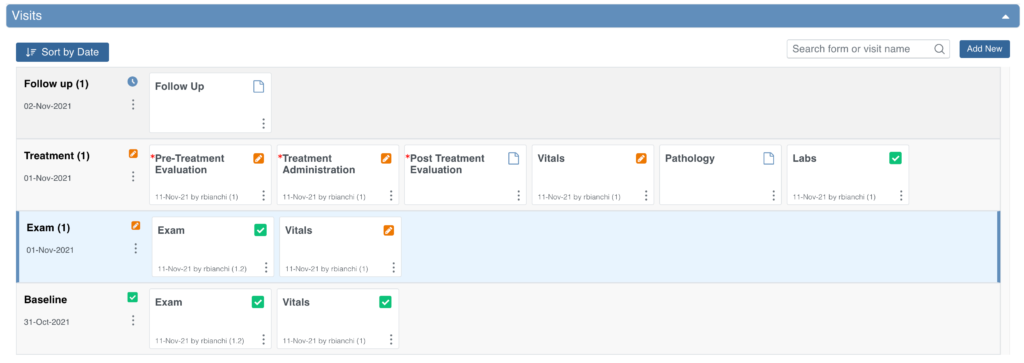
Visit-Based Events
Based on user permissions, the Visit-Based Events section allows users to:
- Schedule Visit-Based Events by clicking the Add New button on the right side of the Visits header. For more information, refer to Scheduling an Event.
- Easily view the status of Visit-Based Events and Forms for the Participant
- The icon legend on the left (Icon Key) provides a quick reminder of these meanings on-screen, or you can refer to the Status Icons section below for more information.
- If an event is repeating, the name may include an occurrence number in parentheses (for example, “Followup Visit (1)” indicates the first instance of a repeating visit).
- Perform actions on the Event via the three dots menu next to the Event:
- View or Edit the Event
- Lock the Event
- Sign the Event
- Remove or Restore the Event
- View or Edit a Form by clicking the middle of a Form card
- Perform actions on a Form in the Event via the three dots menu on the Form card:
- View or Edit Form
- Clear Form (set all values back to blank)
- Verify Form (SDV)
- Reassign Form to other form version
- Remove or Restore Form
- Search for a specific Event or Form name
- Sort the Visit-Based Events by Date
ℹ️ Note: For all Completed forms, clicking the form card on the PDP will always open the form in View mode only—regardless of the user’s role. This design helps prevent accidental changes to data in forms that were already completed. These forms can be edited via the three dots menu on the Form card.
ℹ️ Note: For all Participate-enabled forms, clicking the form card on the PDP will always open the form in View mode only—regardless of the user’s role or the form’s workflow status. This design helps prevent accidental changes to data entered by participants themselves. These forms can be edited via the three dots menu on the Form card.
For more information about Visit-Based Events, refer to Events.

Common Events
The Common Events section allows users to:
- Add new occurrences of Common Events
- Some common events are repeating, meaning you can have multiple occurrences (e.g., many Adverse Events).
- Perform actions on Common Event occurrences via the three dots menu in the Actions column:
- Lock the Event
- Sign the Event
- Remove or Restore the Event
- Perform actions on a Form instance in the Common Event via the three dots menu in the Actions column:
- View or Edit Form
- Verify Form
- Reassign Form to other form version
- View a table with data from all instances of Forms within Common Events
- Search for a specific instance of a Form within a Repeating Common Event
Columns for each Common Event form include:
- Actions that can be taken on the form instance
- Event and form name
- Form status
- Last updated date
- Updated by
- Custom columns containing form data. For more information on configuring custom columns, refer to Events & Forms.
For more information about Common Events, refer to Events.

Custom Views
The Participant Details screen opens by default with the Visit-Based Events displayed and all Common Events collapsed. Click the Expand All link to expand all Common Events, or click an individual Common Event section to expand only that section.
When you expand sections, the Custom View On button appears. To return the screen to its default state, click the X on the Custom View On button.
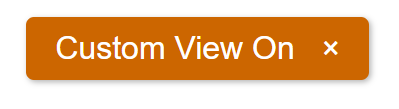
The Custom View On button will appear when you expand or collapse any section that is not part of your default view. It will also appear after changing the Showing filter or using the Search feature within Visit and/or Common Events. Your custom view will remain on for that participant until you update it again, go back to your default view by clicking the X, or log out of OpenClinica.
Status Icons
Status icons and colored symbols are used throughout the Participant Details Page to provide at-a-glance information about the progress of data entry for each event and form.
| Icon | Status | Description |
 | SDV Verified | This icon indicates that the form has been Source Data Verified (SDV). |
| SDV Required, Not Verified | This icon indicates that verification is required but has not yet been completed. Data Managers and Monitors can perform verification once data entry is complete. For more information, refer to Source Data Verification (Monitors) or Source Data Verification (Data Managers). | |
| SDV Status Changed Since Verified | This icon indicates that the data in the form was updated after verification was completed, so re-verification is required. For more information, refer to Source Data Verification. | |
| Query | This icon appears when a query has been raised within a form. For more information, refer to Queries (CRC), Queries (CRC), or Queries (Data Manager), depending on your role. | |
 | Consent Not Signed | The Consent form has not been signed by the participant yet. |
 | Consent Signed | The participant has signed the Consent form. |
 | Consent Countersigned | The participant has signed this Consent form and it has been countersigned by a site user (CRC or Investigator). For more information, refer to Consent in Study Runner. |
| Requires Reconsent | The previously added Consent signature has been invalidated or the Consent form has been reassigned to a new form version. The participant must sign again. | |
| Participate-Enabled Form | The form is accessible to the participant via the Participate module. This is configured during form creation in Study Designer. |
1.4.12 Events
An Event is a group of Forms used in your Study. An Event may or may not correspond to a real-world visit. There are two main types of Events:
- Visit-Based Events
- Common Events
Visit-Based Events
Most Events in a clinical trial are Visit-Based Events, such as Week 2, Week 6, or Monthly Follow-up.
- These visits are scheduled relative to the baseline (for example, Week 2 occurs two weeks after baseline, Week 6 occurs six weeks after baseline).
- The visit schedule is defined in the Study protocol.
- Each visit includes a specific set of Forms to be collected.
When you review the Visits section, the system automatically opens the earliest visit that is not complete. Incomplete visits display with a blue background.
A visit is considered complete when it has one of the following statuses: Complete, Skipped, Stopped, Removed, or Archived.
Common Events
Some Events are not tied to a visit date and occur outside of the regular schedule. Examples include:
- Adverse Events (AEs)
- Concomitant Medications (ConMeds)
- Early Termination
Common Events are used to collect information independent of visit timing.
They can be configured as:
- Repeating Events – for data that may occur multiple times per Participant (e.g., AEs, ConMeds).
- Non-Repeating Events – for data that can occur only once per Participant (e.g., Early Termination).

Event Types and Icons
| Icon | Event Type | Description | Example(s) |
|---|---|---|---|
 | Visit | An event that is associated with a visit date. The event can be repeating or non-repeating. | Week 2 Visit (non-repeating); Monthly Follow-Up for Disease-Free Survival (repeating) |
 | Common | An event that is not necessarily associated with a visit date. | Early Withdrawal or Termination (non-repeating); Adverse Events (repeating) |
 | Repeating | An event that repeats in your study, either a known or unknown, number of times. This icon will appear adjacent to one of the previous two when an event is a repeating event. | Concomitant Medications |
Scheduling an Event
Once a Participant has been added, you can schedule Events.
You can schedule Events from:
- The Participant Matrix
- The Participant Details screen
- The Tasks menu
Schedule a Visit-Based Event from the Participant Matrix:
- Click the Schedule button for the Participant and the Event that you want to schedule.
- Select Schedule.
- Select a Study Event Definition from the drop-down list.
- (Optional) Select a Start Date/Time. The current date is the start date by default, but you can change it.
- (Optional) Select an End Date/Time.
- (Optional) To schedule additional Events, click Schedule Another Event, and enter information for that Event. Repeat as needed.
- To go to the Participant Details screen to enter data, click the Proceed to Enter Data button.
Schedule a Visit-Based Event from the Participant Details screen:
- Click the Participant ID or View button next to a Participant on the Participant Matrix.
- Under the Visits header on the Participant Details screen, click Add New.
- Select a Visit Name from the drop-down list.
- The current date is the start date by default, but you can change it.
- (Optional) Click Show advanced options to change the Start Time or End Date/Time.
- (Optional) To schedule additional Visits, click + Add another visit, and enter the new visit information. Repeat as needed.
- When you are ready, click Add visits. The recently added visits will be highlighted with a yellow border.
Schedule a Visit-Based Event from the Tasks Menu:
- Click the Tasks button in the header bar of Study Runner.
- Select Schedule Event.
- Enter a Participant ID in the Participant ID field.
- Select a Study Event Definition from the drop-down list.
- (Optional) Select a Start Date/Time. The current date is the start date by default, but you can change it.
- (Optional) Select an End Date/Time.
- (Optional) To schedule additional Events, click Schedule Another Event, and enter information for that Event. Repeat as needed.
- To go to the Participant Details screen to enter data, click the Proceed to Enter Data button.
To Schedule a Common Event from the Participant Details screen:
- Click the Participant ID or View button next to a Participant.
- Under a header for a common event on the Participant Details screen, click Add New.
Event Statuses
The table below displays Event statuses:
| Icon | Status | Description |
|---|---|---|
 | Not Scheduled | The Event has not been scheduled. Common Events, such as Adverse Events remain in this status throughout the study. |
 | Scheduled | The Event has been scheduled, but no data has been entered. |
 | Data Entry Started | A user has started to enter data, but not all of the Forms in the Event have a status of Completed. |
 | Completed | At least one Form in the Event has been completed. ℹ️ Note: The Event status changes to Completed automatically when all Forms are complete. You can also manually set the Event to Completed if at least one Form is complete. |
 | Skipped | The Event will not be completed. You can select this status from the Update Event screen when the Event is Scheduled. Events cannot be skipped if data entry has started. |
 | Stopped | The Participant has temporarily stopped participating in the Study. Entered data remains viewable and exportable. You can select this status from the Update Event screen when the Event is Scheduled or Data Entry Started. |
 | Removed | The Event has been removed. Users can still view Forms. This will supersede any of the other statuses. |
Event Attributes
Event Attributes (Independent Status Attributes) can be used in addition to Event statuses.
| Icon | Status | Description |
|---|---|---|
 | Signed | The Event has been signed. This icon appears in addition to the status. ℹ️ Note: If a signed Event changes in any of these ways, the signature is removed:
Multiple users can sign an Event. The most recent signature appears on the Form; previous signatures are recorded in the Audit Log. |
 | Archived | The Event was archived in Study Designer. This icon appears in addition to the status. |
 | Locked | A Data Manager locked the Event. No data can be added, and the Event cannot be removed. This icon appears in addition to the status. |
Form Actions
Some actions can be performed on Forms within Events. Permissions vary by role and/or form.
| Icon | Action | Description |
 | Enter/Edit | Enter or edit data in the Form. |
 | View | View data in the Form. |
 | Remove | Remove the Form from the Event. This is not permanent. |
 | Restore | Restore a Form that was previously removed. All data is restored. |
| Clear Form | Clear all Form data. The Form is reset to Not Started and all queries are closed. Audit history is retained. | |
 | Reassign CRF Version | Change the version of the Form if data has already been entered. |
Form Statuses and Icons
The table below displays Form statuses and icons:
| Icon | Status | Module | Description |
|---|---|---|---|
 | SDV Verified | N/A | The Form has been Source Data Verified. |
| SDV Required, Not Verified | N/A | The Form has at least one item requiring SDV that has not yet been verified. | |
| SDV Status Changed Since Verified | N/A | The Form was verified, but a change was made that requires re-verification. | |
| Query | N/A | There is at least one open query on the Form. ℹ️ Note: Users with review or edit permission to the form may add or update queries but cannot close them; Monitors and Data Managers with review or edit permission can also close queries; read-only users cannot create or update queries. | |
 | Consent Not Signed | eConsent | The eConsent Form has not yet been signed by the Participant. The Form icon appears once the Event containing the eConsent Form is scheduled. |
 | Consent Signed | eConsent | The Participant has signed the eConsent Form. The Form is marked Completed. It must still be countersigned by a CRC or Investigator. |
 | Consent Countersigned | eConsent | The Participant has signed the eConsent Form, and it has been countersigned by a CRC or Investigator. The Form is marked Completed. |
 | Requires Reconsent | eConsent | The eConsent Form was signed, but an OpenClinica user (CRC or Investigator) clicked Unconsent. The Form is marked Data Entry Started and reappears on the Participant’s dashboard for re-signing. |