5.4.1 About CRFs in OpenClinica
A good way to familiarize yourself with a defined CRF is to look at its existing CRF .xls file and at the way OpenClinica presents it in the web interface:
- Click here to download a sample CRF defined for a Physical Examination, SAMPLE_PHYSICALEXAM_ENGLISH.xls. Save the file to your computer.
- Upload the defined CRF to your OpenClinica system.
- Set the current Study to the Study level.
- From the Tasks menu, in the Monitor and Manage Data module, select CRFs.
The Manage Case Report Forms page opens. - Click Create a New CRF.
The Create a New Case Report Form page opens. - In the MS Excel File to Upload field, click Browse, then navigate to the file you downloaded in step 1, SAMPLE_PHYSICALEXAM_ENGLISH.xls. Select the file, then click Open.
The path to the filename is shown in the MS Excel File to Upload field. - Click Preview CRF Version.
The Check CRF Version Data page opens, showing the CRF in the web interface format. - Click Continue.
The Create a New CRF Version – Data Committed Successfully page opens.
- View the defined CRF in OpenClinica:
- From the Tasks menu, in the Monitor and Manage Data module, select CRFs.
The Manage Case Report Forms page opens. - For Sample Physical Exam – English Version, click the View icon.
The defined CRF displays in the web interface format.
- From the Tasks menu, in the Monitor and Manage Data module, select CRFs.
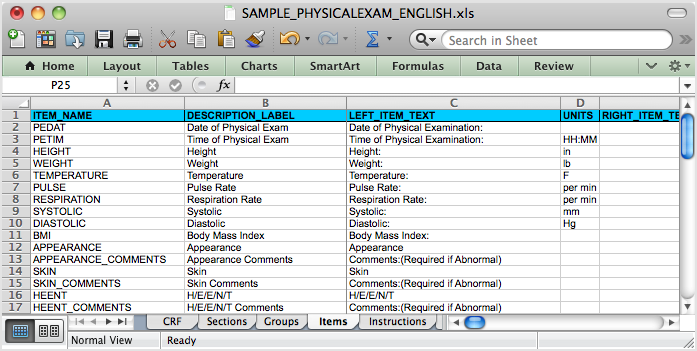
- In Excel, open the CRF file you downloaded, SAMPLE_PHYSICALEXAM_ENGLISH.xls.
- Compare the CRF when viewed in the web interface format to the defined CRF when opened in Excel.
A Sample Defined CRF when Viewed in the Web Interface:
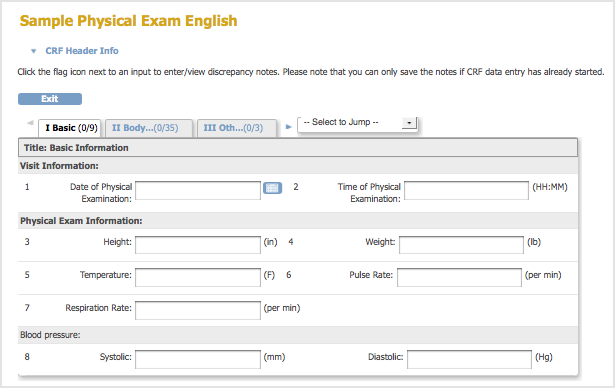
Note that when the CRF is previewed after upload, or viewed through ‘Manage CRFs’, any hidden fields in the CRF are visible.
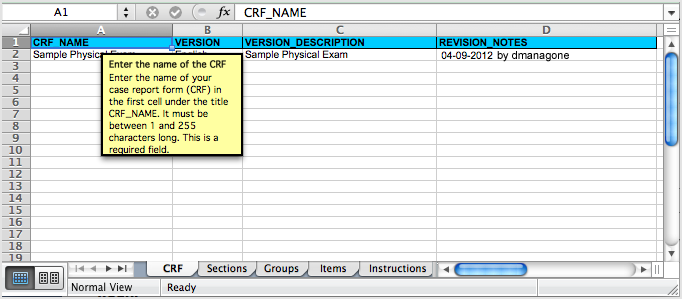
The Same CRF when Opened in Excel, Showing the Items Tab:
5.4.2 OpenClinica eCRF Specifications
OpenClinica provides a template to users for CRF design. This section explains each of the fields in the template and how those fields are either dependent or independent of each other. Best practices are provided as well as some examples of how the CRF Template can be used effectively.
Definitions and acronyms
- CRF Case Report Form, created in OpenClinica by uploading a CRF definition based on the CRF Template Excel file.
- Dynamics Skip Patterns/Skip Logic created using Rules and based on variables in the CRF template.
- Group – A mechanism for logically associating items within a CRF. Items within the same group may repeat together within a CRF.
- Item A variable within a CRF.
- OIDs Object Identifiers uniquely identify a study object such as a CRF, CRF Version, Item Group, or Item and are used to link objects to one another. OIDs for a given class of object are unique within an instance of OpenClinica, with the exception of Rule OIDs, which are only guaranteed to be unique within a study.
- Rules OpenClinicas mechanism to carry out cross form or cross field edit checks, skip logic and inserting data across CRFs. Rules are declared in XML and executed by the OpenClinica Rules Engine. Rules are declared external to the CRF Template but dependent on the variables defined in one or more CRFs.
- SCD Simple Conditional Display. A way of defining skip logic within the CRF Template, without the use of Rules.
- Section A mechanism for organizing items within a CRF for layout purposes. All items in a given section appear on the same page in a CRF. Multiple sections are displayed as tabs within the CRF.
- Tokens A means of displaying a Study Object value for use in a URL (e.g. in a parameterized link) or for use in other scripts (e.g. jquery). Tokens can also be used in Left Item Text, Right Item Text, Header, and/or Subheader to pass item values. The supported tokens are:
${studySubject} – Passes the current Subject ID
${studySubjectOID} – Passes the OID for the current Subject
${studyName} – Passes the current Study Name
${eventName} – Passes the current Event Name
${eventOrdinal} – For repeating Events, passes the Event repeat number (e.g., 2 for the second repeat)
${crfName} – Passes the CRF Name
${crfVersion} – Passes the CRF Version
${item[item_name]} – Passes the Item value
5.4.2.1 CRF Template - General Constraints
The OpenClinica CRF Template can only be edited and saved as a Microsoft Excel 2003.xls file. OpenOffice spreadsheets and later versions of Microsoft Excel can not be used reliably and may not be successful when uploaded to OpenClinica version 3.1.X.
The CRF Template is used to define the CRF on a client machine with MS Excel. Once the required information has been provided in the template, it must be uploaded to OpenClinica through the Add CRF page. Only certain privileged users are allowed access to this page.
During the upload process, a validation of the CRF design is performed. Errors that are caught at this stage will trigger messages to the user informing him of the error and changes necessary to fix the error.
5.4.2.2 Scope of CRFs and Items
A CRF (with its associated versions, groups, and items) is defined globally within an instance of OpenClinica and may be used in one or more studies. The groups and items defined within a particular CRF exist within the scope of the CRF only (though they will have globally unique OIDs). The CRF Physical Exam may have an item with ITEM_NAME blood_pressure and the CRF Vital Signs can have an item also named blood_pressure. OpenClinica treats these items as separate entities and they will have separate OIDs. Response sets also exist within the scope of the CRF only.
A CRF definition may be shared across OpenClinica instances by loading the CRF template spreadsheet into each instance. Each instance of OpenClinica generates OIDs at CRF upload time and those OIDs must be unique within that instance. Therefore the OIDs for the same CRF and items may be different across OpenClinica instances.
5.4.2.3 CRF Versioning
OpenClinica supports multiple CRF versions being in use at the same time. To create a new version, a user must keep the CRF_NAME field the same as the original, but update the CRF_VERSION field with a new value. This new version is uploaded by selecting the Create New CRF Version icon instead of adding a CRF through the Build Study module. The user does have the ability to overwrite a CRF Version if needed, however the CRF Version cannot have been assigned or used in any event definitions prior to the attempt to remove it.
When a new CRF Version is added, any item with the same ITEM_NAME as an item in a previous version of the CRF is treated as the same variable and will have the same OID, DESCRIPTION, and DATA_TYPE. The value of ITEM_NAME is case-sensitive, so items with ITEM_NAMEs ‘ItemA’ and ‘itema’ will be considered as different items by OpenClinica.
For Enterprise customers interested in using Datamart:
Please note that Datamart treats items in case-insensitive manner. Please make all ITEM_NAMES case-insensitive if you plan to use Datamart. Special characters and Postgres reserved words should not be used as item names.
New items that did not exist in prior CRF versions will be added and an appropriate OID generated.
Item metadata vs Item form metadata
Items in a CRF have two types of attributes. Item metadata attributes describe core intrinsic properties of the item. These properties are independent of the CRF Version and cannot change across CRF Versions. These properties include:
ITEM_NAME
DESCRIPTION
DATA_TYPE
GROUP_LABEL
Response Sets (see discussion below)
The properties ITEM_NAME, DATA_TYPE, and RESPONSE_LABEL cannot be changed after the CRF is created.
Item form metadata attributes describe the items representation or behavior on a CRF and may have a different value in each version of a CRF. Most of the attributes in the Items Worksheet in the CRF Template fall into this category.
Response sets
The item properties beginning with RESPONSE_ on the Items worksheet together define a response set in a CRF. The response set is a coded list of allowable values for the item. The response set is given a name (RESPONSE_LABEL) that allows it to be re-used within the CRF if desired, and the set itself is made up of a list of coded values (RESPONSE_VALUES_OR_CALCULATIONS) with corresponding text labels (RESPONSE_OPTIONS_TEXT). Each item in the list of coded values should meet the constraints defined by the item DATA_TYPE and WIDTH_DECIMAL.
Response sets are intended for use in items that utilize a form input control (INPUT_TYPE) that allows the user to select from a constrained list.
* Note that the RESPONSE_VALUES_OR_CALCULATIONS attribute can also be used in a separate context to create calculated/derived items.
Versioning of response sets should not change the mapping RESPONSE_OPTIONS_TEXT – RESPONSE_VALUES_OR_CALCULATIONS, but it can delete or add new (_OPTIONS_TEXT – RESPONSE_VALUES_OR_CALCULATIONS ) pair to existing set of values. For example, an item is a single-select and its RESPONSE_OPTIONS_TEXT defined as Absent,Mild,Moderate,Severe,Life-threatening while
RESPONSE_VALUES_OR_CALCULATIONS defined as 1,2,3,4,5. In another version of CRF it is possible to drop or add several values, but you cannot redefine mapping by setting Absent to have value other than 1.
5.4.2.4 CRF Template Properties
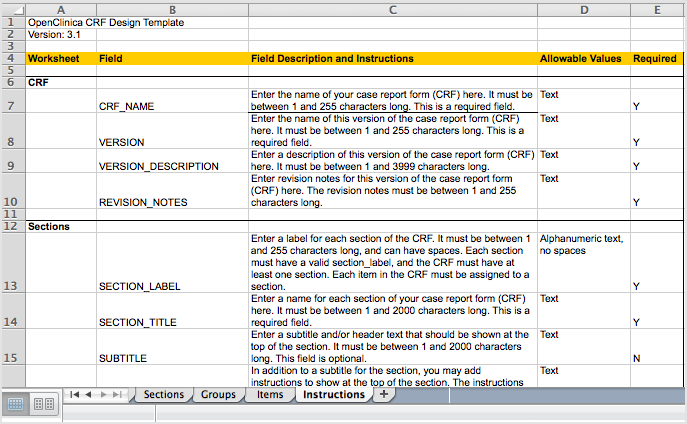
The CRF Template contains five worksheets. Four of the worksheets are intended for input by the user creating the CRF while the fifth worksheet provides instructions about each of the fields of the Template. When a user selects a cell in a column, a tooltip will popup explaining whether the field is Required or not, and other useful instructive text to help the user understand what the field is for.
In some cases HTML elements like Bold (<b>), Italics (<i>), Line Breaks (<br>), etc. can be used. In the cases where HTML elements are supported, they are designated as such in CRF Template Elements.
In OpenClinica 3.3, Tokens, were introduced. These are available for use in Left or Right Item Text, Header, or Subheader. They can be used to display the Study Object value for use in a URL (as in a Parameterized Link) or for use in other scripts (e.g., jquery). The supported tokens are:
${studySubject}
${studyName}
${eventName}
${eventOrdinal}
${crfName}
${crfVersion}
${item[item_name]}
Following is an example of a CRF that passes these tokens to a URL to bring up an image:

When the user clicks on the “Click here to open image” link, based on the following Right Item Text the CRF template, the imaging system (in this case www.example.com) is accessed and passes the values for studyName, eventName, crfName, and the SCAN_DATE item for the current Study, Event, and CRF.
Right Item Text:
<a href=”http://www.example.com/${studyName}/${eventName}/${crfName}/${item[‘SCAN_DATE’]}” target=”_blank”>Click here to open image</a>
5.4.2.5 CRF Template Elements
Definitions, restrictions and when to use the OpenClinica CRF Template Elements
5.4.3 Overview of Creating and Modifying CRFs
Before defining the CRF, design it by identifying all the Items that will be on it, the parameters for each Item, and how they will be organized on the form. For guidelines, see Designing a CRF.
This is the overall process for defining a Case Report Form (CRF) for use in your OpenClinica system:
- Download the CRF template or an existing, defined CRF. For detailed instructions, see Create a CRF.
- Modify the Items and other content in the defined CRF using Microsoft Excel. See Providing Content for a Defined CRF.
- Upload the defined CRF to your OpenClinica system, then identify and correct any errors.
- Assign the defined CRF to an Event Definition in a Study as part of the Build Study process. Review the Event Definitions for the Sites in the Study, and if necessary, modify the parameters for the defined CRF at the Sites in the Study.
5.4.3.1 About CRF Versions
You can use a defined CRF in multiple Event Definitions and in multiple Studies in OpenClinica. You can also create different versions of the defined CRF. When you assign a CRF to a Study Event, you can specify which versions of the CRF are available to that Event and can specify the default version to be used. For example, you can create a defined CRF in English and create another version in Spanish; then, when a user completes the CRF for a Study Subject, the user can choose the version of the CRF based on the language they prefer to work with.
When you define a CRF, OpenClinica creates a parent record (called the “original”), and a version that can be used to collect data. When you create a new version of the CRF, it has the same name as the “original,” but has a different version label assigned to it. When you make a change to a defined CRF, if there are other versions of the defined CRF that the change applies to, you will need to make the change to each version of the defined CRF.
5.4.4 Designing CRFs
When you design a CRF in OpenClinica, you can base it on an existing form you use (for example, a paper version), if you have one. But you will need to modify the form design so it works well in the OpenClinica web interface and takes advantage of OpenClinica’s features. Whether or not you have an existing form, you can benefit from these guidelines for designing the form before you create the defined CRF:
- List all the information (Items) you need to collect and record the parameters for each Item. For example, if you need to capture the Subjects temperature, the Item is Temperature, it is required, and the parameters are any number between 95.0 and 103.9, with up to one decimal place, in degrees Fahrenheit. You specify the range so that when a user enters data into the form, OpenClinica flags a value outside the acceptable range for further action.
- Determine if you will put all of the Items in one CRF or in multiple CRFs:
- If a portion of the CRF can be used for other Events or other Studies, you might want to define a CRF for just that portion so you can reuse it, and define a different CRF for the rest of the Items.
- If the information will be collected at different times during the Event, or at different physical locations (even within a Site), consider defining separate CRFs for each, or separate sections within the CRF for logistical convenience.
- Determine the sections in the CRF and what Items to put in each section. When you enter data into a CRF, you save one section at a time, so fewer Items in a section minimizes the risk you will lose data if you accidentally close a CRF without first saving it. Fewer Items in a section also means the page opens quicker, makes it easier to locate an Item, and minimizes the need to scroll.
5.4.5 Create a CRF
Before defining a CRF, you need to create the CRF you will use as a basis:
- From the Tasks menu, in the Study Setup module, select Build Study.
The Build Study page displays.
- For the Create CRF task, click the View icon.
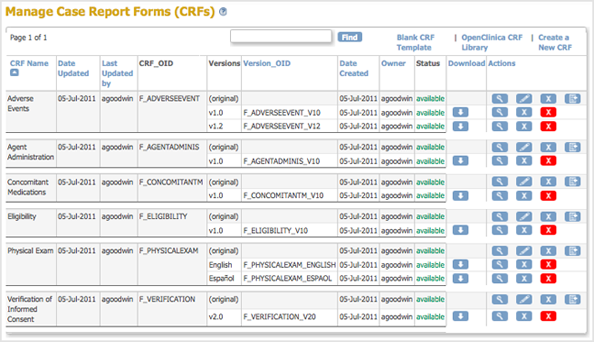
The Manage Case Report Forms (CRFs) page opens.
- From the Manage Case Report Forms page, download the CRF you will use as a basis for defining the CRF.
Note that when you save the Excel file in this process, the Excel filename (the name that precedes .xls) is not used by OpenClinica in any way.
Choose one of the following options to download the CRF you will use as a basis:- Download an Existing Defined CRF: When you want to define a CRF to be similar to one already in your OpenClinica system, download the existing defined CRF to use as a basis.
- From the Manage Case Report Forms page, click the Download icon in the Actions column for the version of the CRF you want to download.
- Save the file to your computer using a unique, descriptive name.
(Note that this is not the same as Creating a New Version of an Existing CRF)
- Download a Defined CRF from the CRF Library: You can use a defined CRF from the OpenClinica library as a basis for the CRF you are defining. The library includes CRFs for common types of clinical forms that were defined by OpenClinica experts and are aligned with CDISC Clinical Data Acquisition Standards Harmonization (CDASH) standards, as well as CRFs defined by the OpenClinica community.
- Go to the CRF Library page of the OpenClinica documentation site.
- Click Login, then log in using your OpenClinica username and password.
The CRF Library page displays.
- Select the link for the version of OpenClinica that you are using.
The list of available eCRFs displays:
- Click the link for the domain you are interested in. For example, Adverse Events.
The domain page displays and may include multiple versions of forms.
- Select the link for the form that best meets your needs.
If applicable, Rules associated with the form are available and should be downloaded in addition to downloading the form. - Save the CRF and associated Rules to your computer using unique, descriptive names.
- Download a Blank CRF Template: If you have experience defining CRFs or there are no existing CRFs that are similar to what you need, use a blank template:
- From the Manage Case Report Forms page, click Blank CRF Template.
- Save the template to your computer using a unique, descriptive name.
- Download an Existing Defined CRF: When you want to define a CRF to be similar to one already in your OpenClinica system, download the existing defined CRF to use as a basis.
After creating the CRF, provide content for it using Excel, then upload the defined CRF to OpenClinica.
5.4.6 Providing Content for a Defined CRF
When you define a CRF for use in OpenClinica, you use Excel (1997 to 2003 version) to provide the content in these four tabs (sheets) of the CRF .xls file:
- CRF
- Sections
- Groups
- Items
Each tab contains column headers that specify what belongs in that column; do not modify the column headers.
The fifth tab contains complete instructions for providing content for the CRF. You can also access instructions when you are providing content in the other tabs: click a column header and detailed instructions for that column display in a pop-up window.
To familiarize yourself with how the defined CRF in Excel relates to the presentation of that CRF in the OpenClinica web interface, see About CRFs in OpenClinica.
When you are first learning to provide content for defined CRFs for OpenClinica, work on only one or two Items at a time.
For more information, see OpenClinica eCRF Specifications in the OpenClinica Technical Documentation.
Instructions Tab in the Defined CRF:
Clicking a Column Header in the Defined CRF Displays Instructions for that Column in a Pop-Up Window:
5.4.7 Upload a Defined CRF
After using Excel to provide content for a defined CRF, upload the CRF to OpenClinca:
- From the Tasks menu, in the Study Setup module, select Build Study.
The Build Study page opens. - For the Create CRF task, click the View icon.
The Manage Case Report Forms page opens. - Click Create a New CRF.
The Create a New Case Report Form page opens.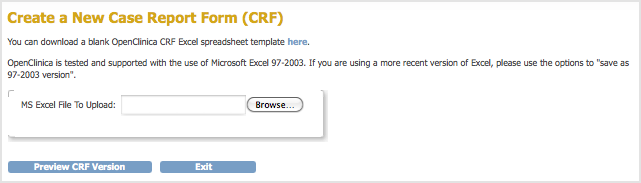
- Click Browse, then navigate to the defined CRF you want to upload. Select the file and click Open.
- In the Create a New Case Report Form page, click Preview CRF Version.
The Check CRF Version Data page opens. - If there are any errors, OpenClinica reports them at the top of the page and provides details for the cells containing the errors below that. Click Go Back, correct the errors in the defined CRF using Excel, and repeat steps 4 through 6.
Example of an Error Message for a Defined CRF:

Example Showing Details for the Errors that are in the Defined CRF:

- When the defined CRF you uploaded is free of errors, OpenClinica displays a preview of the web interface for the CRF, and the Alerts & Messages sidebar panel displays a success message. Review each section of the CRF in the web interface preview (click the tab for a section to show it), viewing drop-down lists, checking wording and arrangement of Items, and so on. Make notes of anything you want to change. To make changes, click Cancel, make changes using Excel and save the file, then repeat steps 4 through 6. (Note: do not click Continue while you are still changing the content of the defined CRF. If you do click Continue but still want to make changes, you will need to replace the existing CRF or create a new version of it.)
Preview a CRF: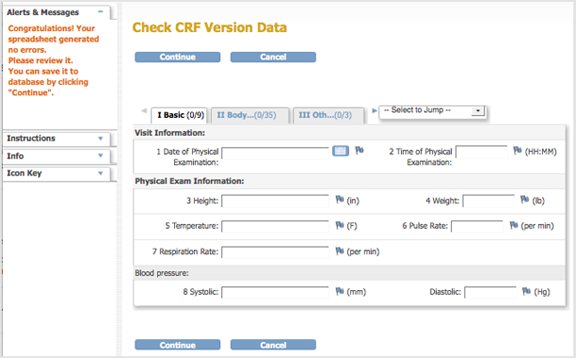
- After previewing the defined CRF and completing any changes, click Continue.
The Create a New CRF – Data Committed Successfully page opens.
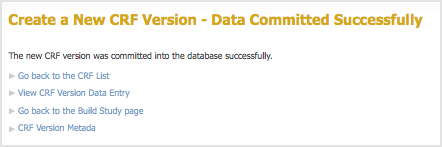
- Review the defined CRF:
- Click Go back to the CRF List.
The Manage CRFs page opens. - For the CRF you want to review, click the View icon in the Actions column for the version you defined (do not click the View icon in the row that is marked “original” version).
- Review each section of the defined CRF (click the tab for a section to show it), viewing drop-down lists, checking wording and arrangement of Items, and so on. Make notes of anything you want to change. If you need to make changes to the name or description, see Edit a Defined CRF. If you want to, you can instead, Replace the Defined CRF.
- Click Go back to the CRF List.
After completing all changes to a defined CRF, assign the CRF to an Event Definition for any of your Studies.
5.4.8 Table of CRFs
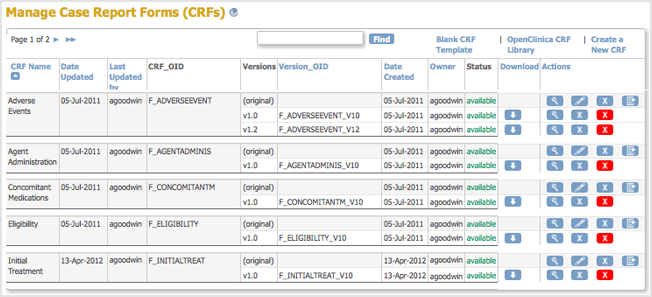
The table of CRFs lists all versions of all defined CRFs in your OpenClinica system and provides access to features for managing the defined CRFs. The available features in the table depend on your User Role and User Type. To access the table of CRFs:
- From the Tasks menu, in the Study Setup module, select Build Study.
The Build Study page opens. - For the Create CRF task, click the View icon.
The Manage Case Report Forms page opens.
The CRFs table is the same table you can access from the Monitor and Manage Data module. In addition to using this table to create, modify, and remove defined CRFs as described in other topics on this page, you can use this table to:
5.4.9 Edit the Defined CRF Name and Description
After adding a defined CRF to OpenClinica, you can change the Name and Description shown in OpenClinica for that CRF:
- Access the Table of CRFs.
- For the CRF whose Name and/or Description you want to change, click the Edit icon in the Actions column.
The Update CRF Details page opens.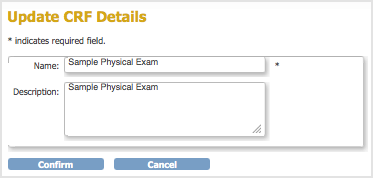
- Change the Name and Description, then click Confirm.
The Confirm CRF Details page opens.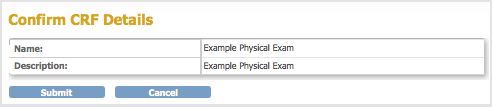
- Click Submit.
The Table of CRFs page opens and shows the updated name for the CRF.
5.4.10 Create a New Version of a Defined CRF
You can make changes to a defined CRF that is already in your OpenClinica system.
Start by downloading the existing defined CRF from OpenClinica: see Download an Existing Defined CRF in Create a CRF. Then make changes to defined CRF using Excel: see Providing Content for a Defined CRF. Finally, upload the new version to OpenClinica. When you upload it, you can either:
- Replace the existing version (under certain conditions), or
- Add the modified CRF as a new version
5.4.10.1 Replace a Defined CRF
You can replace an existing version of a defined CRF under the following conditions:
- You must be the CRF’s Owner, as listed in the Table of CRFs. The Owner is the user who uploaded the CRF you are replacing.
- The CRF cannot be assigned to any Event Definitions in any Studies.
- The values for CRF_NAME and VERSION for the CRF already in OpenClinica and the CRF you are replacing it with must match exactly.
If these conditions are not met, OpenClinica prevents you from replacing the CRF, but you can instead Add it as a New Version of the CRF.
To replace a CRF:
- Access the Table of CRFs.
- For the CRF you are replacing, click the Create New Version icon
 .
.
The Create a CRF Version for … page opens. In the example shown here, the CRF being replaced is Initial Treatment.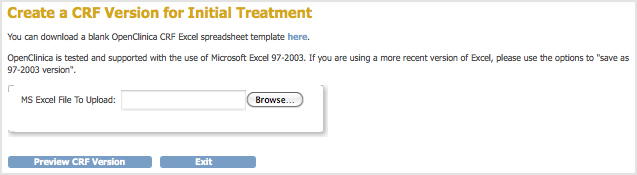
- Click Browse, then navigate to the CRF you want to upload. Select the file and click Open.
- Click Preview CRF Version.
The Create a New CRF Version – Confirm Delete Previous Same Version page opens.
In the example, the v1.0 version of the Initial Treatment CRF is being replaced: the CRF you are uploading has the value v1.0 for VERSION, and Initial Treatment for CRF_NAME.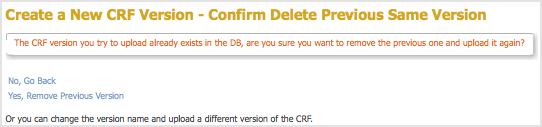
- Click Yes, Remove Previous Version.
The Check CRF Version Data page opens, presenting a preview of the CRF in the OpenClinica web interface. - Correct any errors as described in Upload a Defined CRF (step 6).
- After previewing the CRF and completing any changes, click Continue.
The Create a New CRF Version – Data Committed Successfully page opens. - Click Go back to the CRF List.
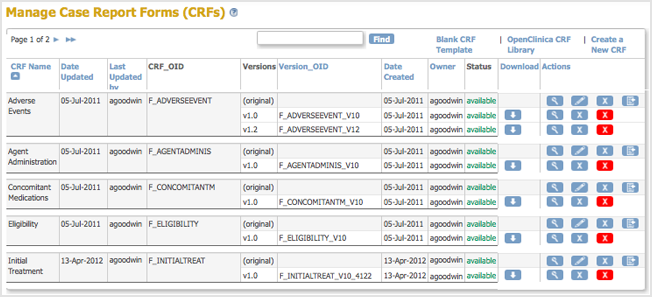
The Manage CRFs page opens.- There will be a new value for Date Updated if you the version you replaced was last uploaded on a previous date.
- There is a new Version_OID for the CRF you replaced. This is not the same as the value you specified for VERSION for the CRF, but is an internal identifier that OpenClinica uses to manage CRF versions.
5.4.10.2 Add a New Version of a Defined CRF
For background information, see About CRF Versions.
You can add a new version of a CRF to OpenClinica under the following conditions:
- The CRF_NAME in the new version of the defined CRF must match the CRF Name already in OpenClinica, but the value for VERSION must be different.
- For each ITEM_NAME, the DESCRIPTION, GROUP LABEL, and DATA_TYPE must exactly match the DESCRIPTION, GROUP LABEL, and DATA_TYPE already in OpenClinica. Changes to response sets are limited.
For more information, see CRF Versioning in the OpenClinica Technical Documentation.
When you add a new version of a CRF, the version already in OpenClinica remains. If you want to, you can remove the previous version from OpenClinica after adding the new version, or you can keep the previous version if you want users to be able to complete either versions going forward.
To add a new version:
- Access the Table of CRFs.
- For the CRF to which you are adding a new version, click the Create New Version icon .
The Create a CRF Version for … page opens. In the example shown here, a new version (Espanol) is being added for the Last Treatment CRF.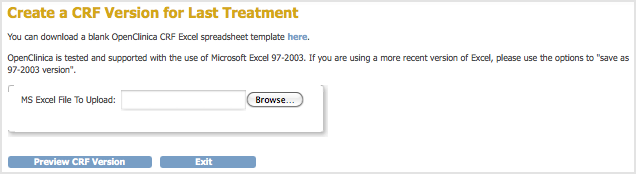
- Click Browse, then navigate to the CRF you want to upload. Select the file and click Open.
- Click Preview CRF Version.
The Check CRF Version Data page opens, presenting a preview of the defined CRF in the OpenClinica web interface. - Correct any errors as described in Upload a Defined CRF (step 6).
- After previewing the CRF and making changes, click Continue.
The Create a New CRF Version – Data Committed Successfully page opens. - Click Go back to the CRF List.
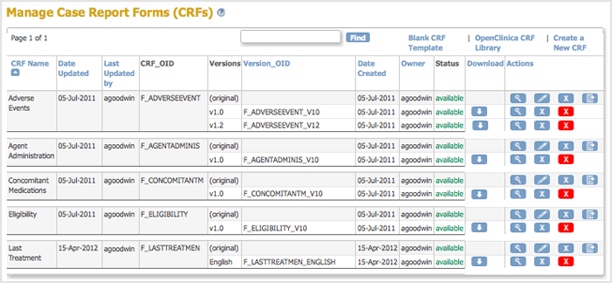
The Manage CRFs page opens. The version of the CRF you added is listed in the table.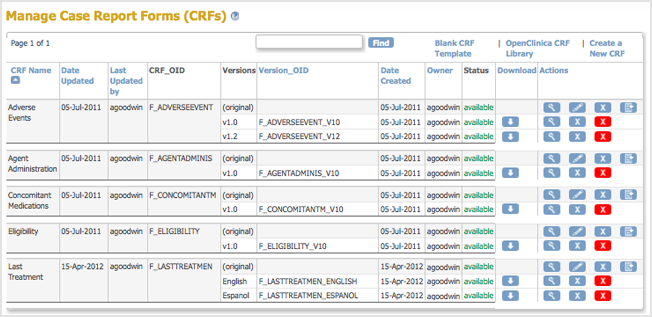
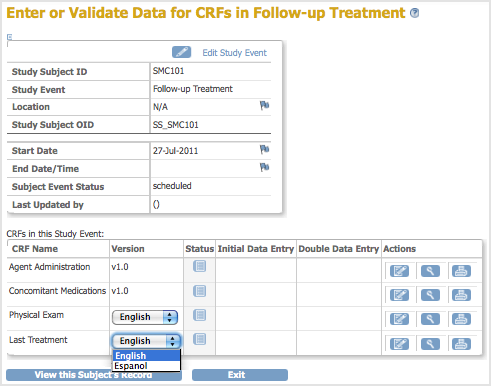
Now, when a user enters Event Data for a Subject, they can choose which version of the defined CRF to use. For the example, Last Treatment, the user can choose the English or Espanol version.
5.4.11 Remove, Restore, and Delete Defined CRFs
If your User Type has appropriate permission, you can perform the following actions on defined CRFs or versions you no longer want to use:
- Delete a version of a CRF if it has not been used for data entry for any Subjects and you no longer want the CRF in your OpenClinica system for potential use in any Studies. You cannot recover the CRF after its been deleted.
- Remove a version of the CRF if it has been used for data entry for Subjects, to prevent its use going forward. Data captured using this version of the CRF is not included in data extracts whose definition specifies that CRF. You can restore a version of the CRF that’s been removed.
- Restore a version of the CRF that has previously been removed, which allows it to again be used for data entry for Subjects.
- Remove the “original” (parent) CRF to prevent any versions of that CRF to be used going forward, and to prevent the CRF from being assigned to any more Event Definitions. You can restore the parent CRF, and all versions, after it has been removed. Data captured using any versions of the CRF is not included in data extracts whose definition specifies that CRF.
- Restore an “original” CRF that has previously been removed, which allows any versions of that CRF to be used going forward, and allows the CRF to be assigned to Event Definitions.
- Archive a version of the CRF to prevent it from being added to any more Event Definitions. Data previously captured using that version of the CRF is included in data extracts whose definition specifies that CRF. Instructions to archive a CRF are in Administer CRFs.
Delete a CRF Version
Delete a version of a defined CRF if it has not been used for data entry for any Subjects. A deleted version of a CRF cannot be restored. To delete a version of a CRF:
- Access the Table of CRFs.
- For the version of the CRF you want to delete, click the Delete icon
 . For the example, the Espanol version of the Last Treatment CRF is being deleted.
The Confirm Deletion of CRF Version page opens.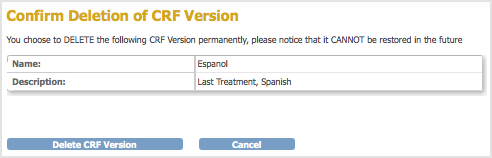
- Click Delete CRF Version, then click OK in the confirmation dialog box.
The Manage CRFs page opens. The version of the CRF you deleted no longer appears in the table.
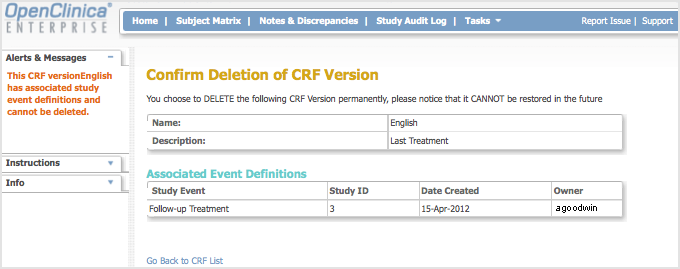
If you try to delete a version of a CRF that has already been used to enter Subject data, OpenClinica prevents you and displays the following:
Remove a CRF Version
If a version of a defined CRF has been used for data entry for Subjects, you can prevent its use going forward by removing it. A version of a CRF that has been removed can be restored. To remove a version of the CRF:
- Access the Table of CRFs.
- For the version of the CRF you want to remove, click the Remove icon
 . For the example shown here, the Last Treatment CRF, English version, is being removed.
The Confirm Removal of CRF Version page opens. It lists the Event CRFs and Subjects who have had data entered using that version of the CRF.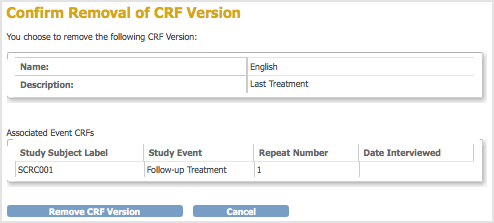
- Click Remove CRF Version, and then click OK in the confirmation dialog box.
The Manage CRFs page opens. The version of the CRF you removed is listed, but with a Restore icon instead of a Remove icon in the Actions column and a Status of “removed”.
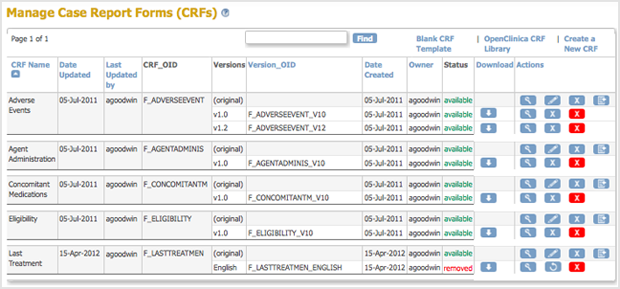
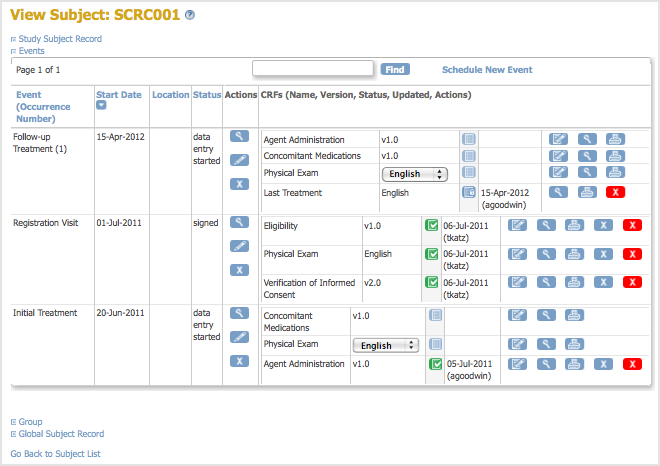
After removing the version of the CRF, you can still view the CRF and can still view Subject data for that version of the CRF, as shown below, however you cannot change any of the data. The status of the CRF for the Subject is “locked”:
After removing a version of the CRF, it is no longer available for you to choose from when you enter data for any other Subjects for that CRF.
Restore a CRF Version
After removing a version of a defined CRF, you can restore it to make it available for use for entering Subject data. To restore a version of the CRF:
- Access the Table of CRFs.
- For the version of the CRF you want to restore, click the Restore icon . For the example shown here, the Last Treatment CRF, English version, is being restored.
The Confirm Restore of CRF Version page opens. It lists the Event CRFs and Subjects who have had data entered using that version of the CRF.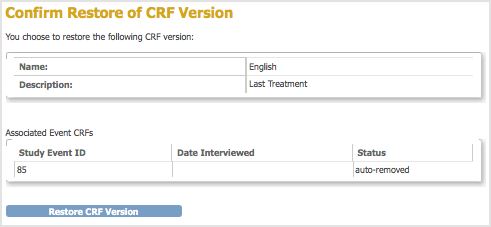
- Click Restore CRF Version, then click OK in the confirmation dialog box.
The Manage CRFs page opens. The CRF you restored is listed with a status of “available.”
Remove the Original Version of a CRF
You can remove the original (parent) version of a defined CRF, which automatically removes all versions of the CRF. To remove the original version of a CRF:
- Access the Table of CRFs.
- For the CRF you want to remove, click the Remove icon in the row for the version “original”. For the example shown, the Last Treatment CRF is being removed.
The Confirm Removal of CRF page opens. It lists all versions of that CRF and all Event Definitions to which the CRF has been assigned.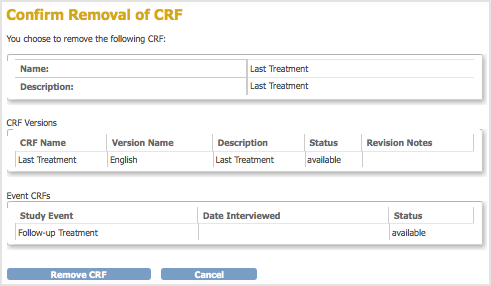
- Click Remove CRF, then click OK in the confirmation dialog box.
The Manage CRFs page opens. The CRF you removed is listed, but with a Restore icon instead of a Remove icon in the Actions column and a Status of “removed.” All versions of the CRF are listed, but with a status of “auto-removed.”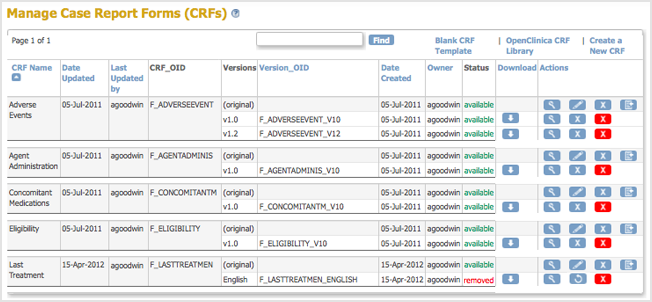
After removing the original version of a defined CRF, any Event Definitions to which the CRF was assigned list the CRF, but show the status as auto-removed. When you are adding CRFs to Event Definitions, the removed CRF is not listed for you to choose from.
Note: you cannot delete the original version of a defined CRF.
Restore the Original Version of a CRF
After removing the original version of a CRF, you can restore it. Restoring the original CRF restores all versions of it to all Event Definitions in all Studies to which the CRF was assigned. To restore the original version of a CRF:
- Access the Table of CRFs.
- For the CRF you want to restore, click the Restore icon in the row for the version “original.” For the example shown, the Last Treatment CRF is being restored.
The Confirm Restore of CRF page opens. It lists CRF versions for that CRF and all Event Definitions to which the CRF has been assigned.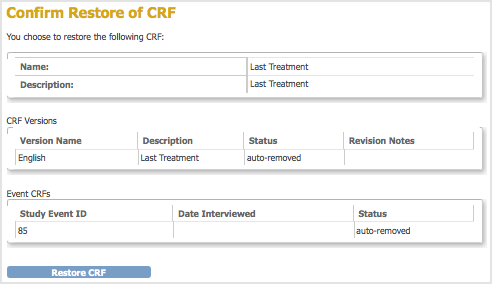
- Click Restore CRF, then click OK in the confirmation dialog box.
The Manage CRFs page opens. It lists the CRF you restored and all versions of it with a status of “available.”