When you create an Event Definition, you specify its parameters and select the CRFs for it. You do not have to specify CRFs for the Event Definition when you first create it, but can select the CRFs later. To create an Event Definition for the current Study:
- Access the Build Study page by selecting Tasks > Build Study.
- In the Actions column of the table, for the Create Event Definitions task, click the Add icon
 .
.
The Create Study Event Definition page opens.
- Complete the dialog box, referring to the field descriptions included in the dialog box. For example:
- Name (of Event Definition): Follow Up Visit
- Description: Each scheduled session to administer the treatment.
- Repeating: Yes (because a Subject will complete the Event multiple times in the Study; each time, the user completes a new set of forms for the Subject for that occurrence of the Event).
- Type: Scheduled (because the Event will be scheduled for specific dates and times). Note that an Event whose Type is Unscheduled might or might not occur (like an Adverse Event), while an Event whose Type is Common is expected to occur but at an unknown time.
- Category: Treatment.
- Click Continue.
The Define Study Event – Select CRF(s) page opens. It lists all CRFs created in your OpenClinica system.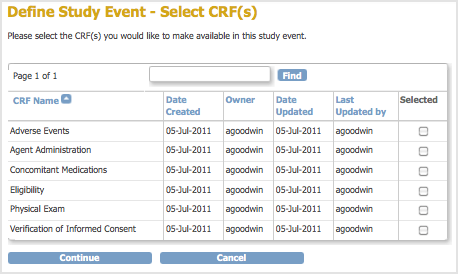
- In this step, you select the CRFs for the Event Definition. To help locate CRFs to include, click a column header to sort by that column, or use the Find field. You do not have to select CRFs at this point–you can complete the Event Definition without them, then add the CRFs later if you like. If you want to select the CRFs now, click the checkbox in the Selected column for each CRF you want to include in the Event Definition, then click Continue. For example, select the Physical Exam CRF, which will be completed for each Followup Visit Event in the Study.
The Define Study Event – Selected CRF(s) – Select Default Version page opens. It lists configuration options for each CRF you selected.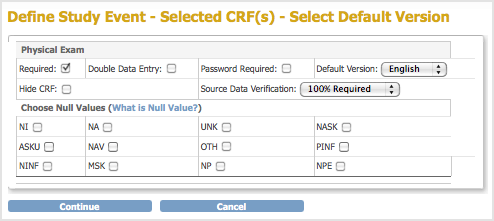
- Specify the configuration parameters for each CRF you selected, referring to the following information as needed. Note that you can specify different parameters for the CRFs at different sites; for more information, see Create and Modify Sites.
- Required: Select if the CRF must be completed for the Event, or do not select if the CRF is optional for the Event.
- Double Data Entry: Select if the data for the CRF must be entered twice. For more information on how this works, see Double Data Entry.
- Password Required: Select if a user must supply their OpenClinica password when marking a CRF complete at the end of data entry.
- Default Version: If more than one version of the CRF exists, such as for multiple languages, select the default version for the Event. You can limit the available versions for a Site when you create or modify the Site as part of building the Study.
- Hide CRF: Select to make the CRF viewable only at the Study level, meaning Sites cannot access the CRF. Typically, you hide a CRF when the data is not entered using the OpenClinica web interface but rather is imported from files.
- Source Data Verification: Select one of the values from the drop-down list. Select 100% Required, Partially Required, or Not Required to help you organize CRFs in the Source Data Verification table. When you specify Not Applicable, the CRFs are not included in Source Data Verification table. For more information, see Source Data Verification.
- Choose Null Values: Please Do Not Use This Feature. This functionality will be removed in future versions of OpenClinica. If you need to specify selections to define null values (for example “Not Done” or “Unknown,” add those selections to the Response Options Text and Response Values columns of the CRF template.
- Click Continue.
The Confirm Event Definition page opens. - Verify the Event Definition information, then click Confirm and Finish to complete this Event Definition.
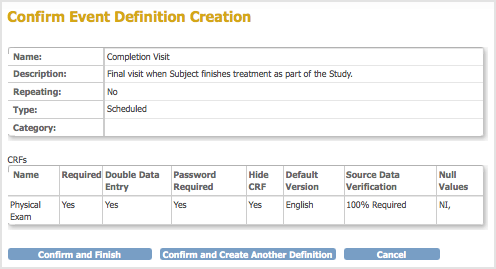
The Build Study page opens. The Alerts and Messages sidebar panel displays a message that the Event Definition was successfully added. In the Create Event Definitions row, the Count has increased by 1, reflecting the Event Definition you just completed.