Data can be reviewed using the Subject Matrix or the Queries page. Each of these review options is outlined below. Monitors also have the option of reviewing data using the Source Data Verification page.
Review and Manage Data from the Participant Matrix
Typically, Monitors and Data Managers are responsible for reviewing data, but anyone with access to the Participant Matrix can view/review data as needed. Data Managers can also remove a participant and/or reassign a participant to a different site. The actions column presents the appropriate actions available, based on your user role. The following displays the actions available to a Data Manager:

Remove a Participant
Data Managers have access to remove Participants. Removing a Participant does not delete the Participant, but instead removes access to that Participant’s data. The data for that subject can still be viewed, but cannot be edited and will not be included in data extracts. Once a Participant is removed from the study, the remove icon changes to a restore icon. To restore access to that Participant’s data, simply click the restore icon and the data is available again for editing and extracts.
Reassign a Participant
Data Managers also have access to reassign a Participant to another Site. This may be needed if a Participant moves to a different location but still wants to continue on the Study. Prior to reassigning, be sure that the original Site has an extract of that Participant’s data. Then, to Reassign a Participant, click the Reassign icon. Specify the new site and click Reassign Participant.

The new site has immediate access to that Participant’s forms and all data previously collected for the Participant. The original site no longer has access to that Participant’s ongoing data.
Review Participant Data
To review data, click the view icon for the participant whose data you’d like to review.
The participant detail page displays. All visit-based events are listed first, followed by all common events.

To review data on a specific form, click the view icon for that form.
Filter Participant Details
As you review data, you can enter search criteria for the Common Events – for example, to show only AEs that are ongoing. You can also change the number of rows listed for any of the Common Events, and you can sort Common Events by clicking the toggles next to any of the column headings. When you customize anything related to what is displayed for Common Events, the Custom View On button displays at the top of the Participant Detail page.

The Custom View is active for that participant throughout the time you are logged into OpenClinica. If you view a different participant’s detail page, the view may not be customized, or if it is, it may be a different customization. In the example above, throughout the current session, any time you view participant 001, that same custom view is in effect.
To clear a custom view, click anywhere on the Custom View On button and all view customizations are removed for that participant.
Form Migration
Overview: Data Managers can migrate Form data on a Participant-by-Participant basis or in a batch. |
Definition: Form migration is the ability to transfer data from one Form version to another. |
Example: A Data Manager might choose to migrate Form data in order to update the Form to a new version. |
If there are multiple versions of a Form available before data has been entered, any user can choose which version to use.
However, if data has already been entered and a new Form version becomes available afterward, you must have a User Role of Data Manager to migrate Form data. You can migrate data either on a Participant-by-Participant basis or in a batch.
Form migration causes the following:
Audit Log: Form migration appears in the Audit Log for the Participant(s) the data was migrated for.
E-Signature Status: If a Participant Casebook or Event was signed before the Form migration, that signature is removed, and it must be signed again.
SDV Status: If SDV was already performed, the status resets to needs source data verification
Extracts: If data existed in the original Form version that does not exist in the new Form version, that data does not appear on extracts.
Response Options: You can remove responses, but the values in the Name field for those that remain cannot be changed. For example, if the options were Mild, Moderate, and Severe (1, 2, and 3) you can remove Severe, but you cannot change Mild from 1 to any other value.
Note: Data will not be deleted from the database due to Form version migration, even if it no longer exists in the new Form version. (See Potential Migration Outcome Examples below for more information.)
Requirements:
Data Entry Status: Data Entry Started
Study Status: Available
User Role: Data Manager
Participant Status: Active
Event Status: Active (not removed, locked, or skipped)
Form Status: Active (not removed)
New Form Version: Active (not removed)
Previous Form Version (used for initial data entry): Active
Prerequisites:
The study must contain at least 2 versions of a Form.
The study must be published.
Participant-by-Participant Migration:
Click the View button across from the Participant on the Participant Matrix.
Click the Enter Data button, and enter data.
When finished entering data, click the Close button or the Complete button.
Click the Reassign CRF to a new version button.

5. Select the new Form version in the New CRF Version field.
6. Click the Continue button.
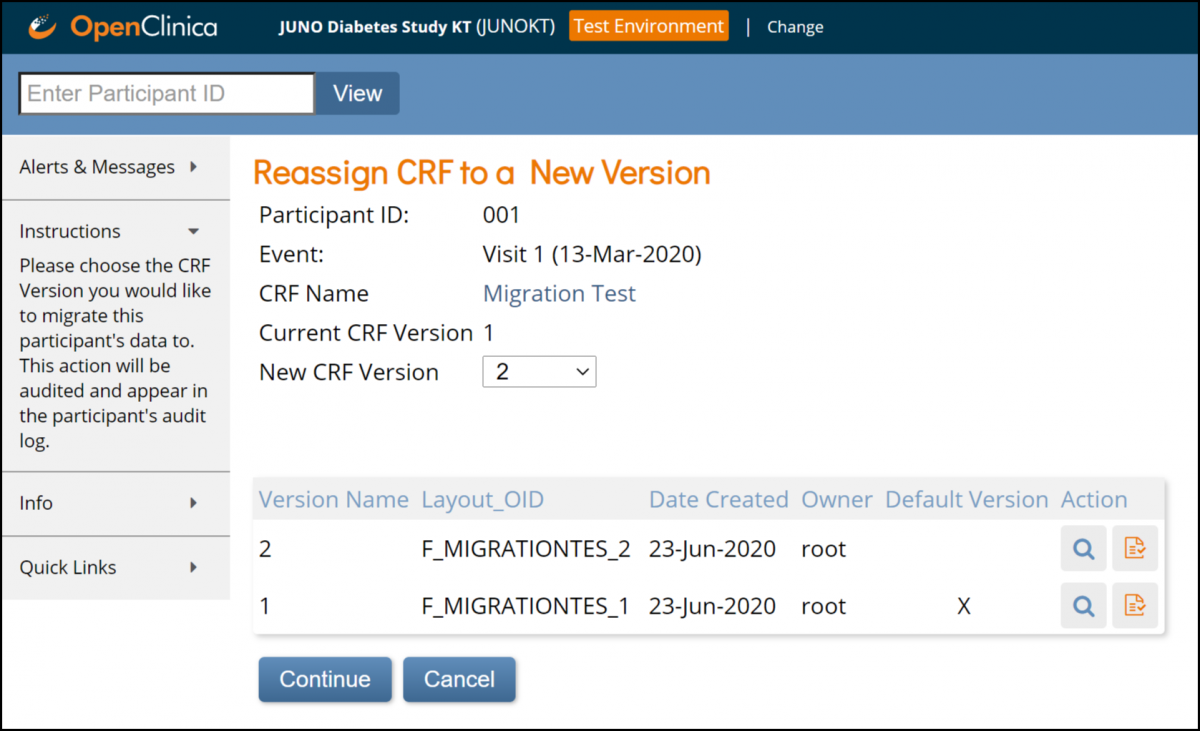
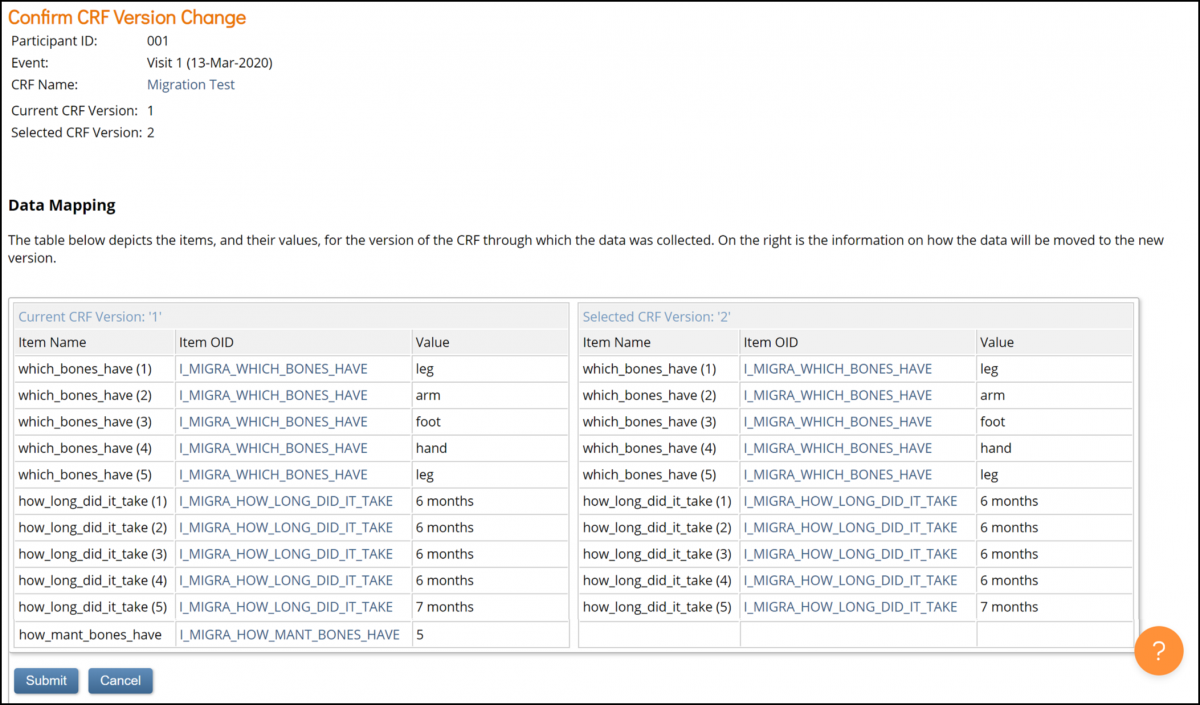
7. Verify the data mapping information on the Confirm CRF Version screen, and click the Submit button.
Batch Migration:
In the header bar of Runtime, select Tasks.
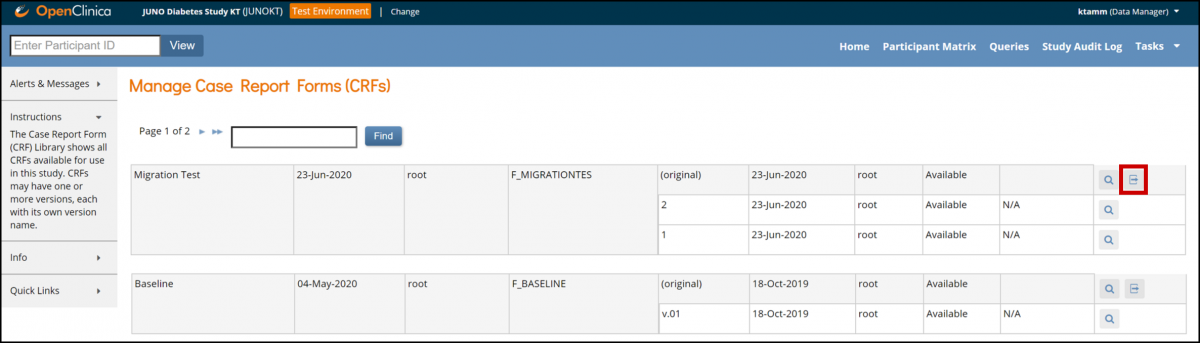
Select CRFs under Monitor and Manage Data.
Click the Batch CRF version migration button next to the CRF you want to update.
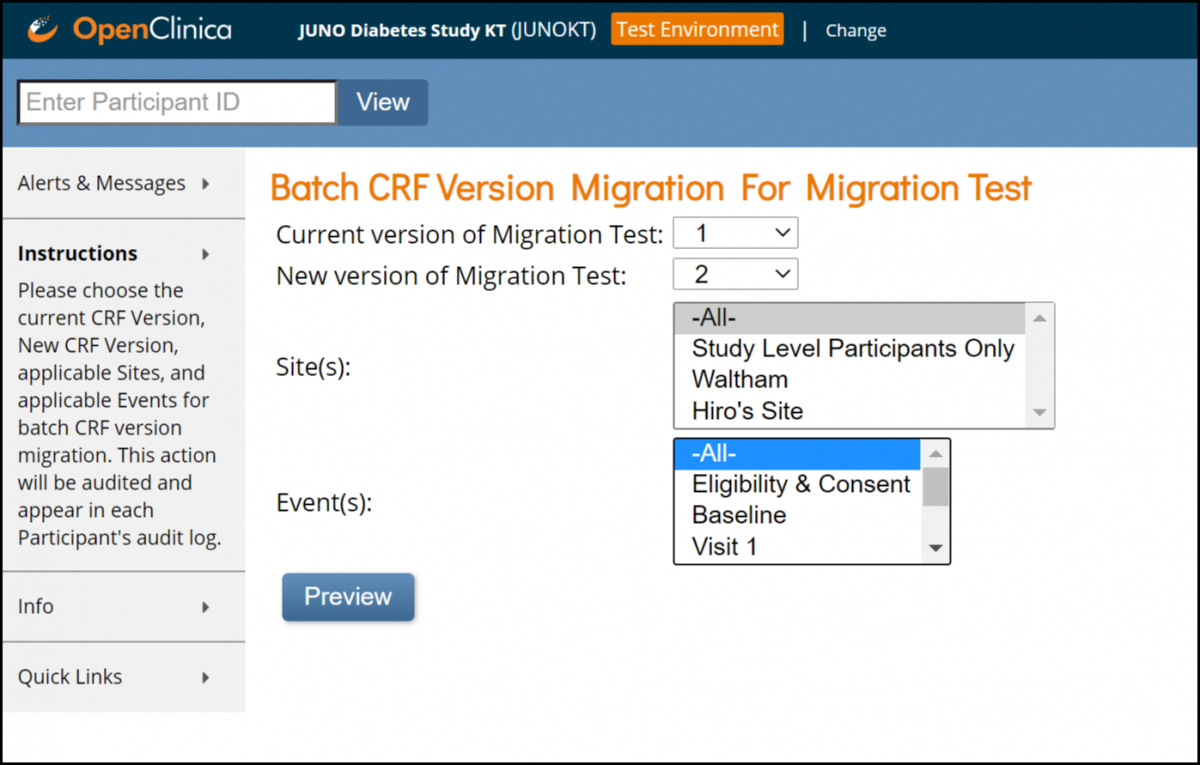
3. Select the current version of the Form in the Current Version of (Form Name) field.
4. Select the new version of the Form in the New Version of (Form Name) field.
5. (Optional) Select a site to update the version at. (The default is all sites.)
6. (Optional) If the Form is in multiple events, select an Event to update the version in. (The default is all Events.)
7. Click the Preview button.
8. Verify the Migration Summary information that appears below the Preview button.
9. Click the Migrate button.
When you return to the CRF screen, the following message appears under Alerts in the sidebar: Batch CRF version migration is running. You will receive an email once the process is complete
You will receive an email with a link to a report of the migration, which provides a list of all Participants and Forms that the data was migrated for.
Potential Migration Outcome Examples:
Example A: More Items in Original Form Version than New Form Version:
Before:
Version A has an item named meditem2.
Version B does not have an item named meditem2.
Both versions have an item named item1.
After:
Data for meditem2 is not migrated.
Data for item1 is migrated.
The user will not see meditem2 in the new Form version.
meditem 2 will not appear in extracts but remains in the database.
Example B: More Response Options Available in Original Form Version than New Form Version:
Before:
Both CRF versions have an item named item1.
Version A has the response options X, Y, and Z.
Version B only has the response options X and Y.
The user selected the response option Z in the original Form version.
After:
Data for item1 is migrated, but it will appear as though no response was selected since response option Z no longer exists in the new Form version.
For single-select types: New data will overwrite existing data.
For multi-select types: New response options will be added. (If the user selected the response option Z in the original Form version, and that option no longer exists in the new version of the Form, if they then select the response option Y, both the values of Z and Y will be stored in the database.)
Example C: The maximum number of repeats in the original Form version exceeds that in the new Form version:
Before:
Both Form versions have a repeating group named group1.
The maximum number of repeats in Form A is 5.
The maximum number of repeats in Form B is 3.
The user entered data for 5 repeats.
After:
All 5 rows of data appear on the Form despite the fact that in the new Form version only allows 3 rows of data.
No additional data can be entered.
Create Queries
As you review data, if you need more information from the site for a particular item, click the bubble icon next to that item to create a query.

To create the query:
- Type the query in the Comment box.
- The system automatically assigns the query to the person who entered the data, but you can select a different user from the drop-down list if you’d like.
Even if you assign a query to a specific user, anyone with access to that participant’s data can respond to the query. For example, if you assign it to a CRC at a site, that query would be on that CRC’s to-do list, but any other user at that site who has access to OpenClinica could respond to the query.
- To email the assigned user to make him/her aware of the query, check the Email box.
The email includes a link to log into OpenClinica; no study data is referenced in the email contents.
- To save and assign the query, click Submit.
Note that the item history is tracked in the lower portion of the query dialog box.
Continue to review and query data as needed.
The color of the query bubble represents the query status, as follows:
| Status | Bubble Appearance | Comments |
| No Query | | Click this bubble to create a query. |
| New | | A query has been added by either a site user (e.g., a comment/annotation), data manager, or monitor, or was auto-generated by OpenClinica based on built-in edit checks. |
| Updated | Either a site user, data manager, or monitor has added information to the query. | |
| Closed | | The query is considered resolved by the data manager or monitor. |
| Closed Modified | | Slightly paler than Closed, this means the data was changed after the query was closed |
Review and Manage Data from the Queries Page
To review and manage data from the Queries page, from the Tasks menu, select Queries.
The Queries page displays. There is a summary table followed by a detalied list of queries that is filtered to display Queries only. To see entries for Reason for Change, click the gray filter box under the Type column and select Reason for Change (see Marking a Form Complete). You can filter the Queries view to filter any column that includes a gray filter box.

Details about each query are listed in the detail section of the page. You have options above the table that allow you to show more columns (Show More), download the queries, or print.
To review data associated with a query, you have two options:
- View Query Only: This option displays a shaded background showing the item value in question, with the query and item history in the foreground. You can add a query comment, assign the query, and you have the option of emailing the assigned user. All users with access to queries can update the query; only Data Managers and Monitors have access to close a query.

- View Query Within Record: This option displays a shaded background of all the item values on the form for that query. You have access to update the query and update and/or review all the data on the form. This provides reviewers with more context when reviewing specific item data issues.

You can then update the query comment, use the x to close the query details, and review the entire form in question. Data Managers and Monitors have the additional option of closing the query.
If an item only displays based on the response to another question, there may be instances where an item was conditionally displayed, a query was added to that item, and then the response to the lead-in question was changed, so that item is no longer displayed. That query still exists, however, and needs to be addressed. Similarly, if there is a form that has repeating records and a query was added to a row, but that row has since been deleted, the query still exists, but is no longer displayed on the form. OpenClinica informs you of these hidden items and provides an option for resolving the associated queries.
For example, when the item in question is a response that has since been hidden, or is on a repeating record that has since been deleted, the following message displays:

To review the remaining data on that form, click OK and review the data. To review the data for the item in question, return to the Queries page and use the view icon for that query (as instructed in the message).
You can continue to use the Queries page to filter queries as needed, and to work through the detailed table to review query comments, the item and query histories, and the item and/or form values associated with each query.