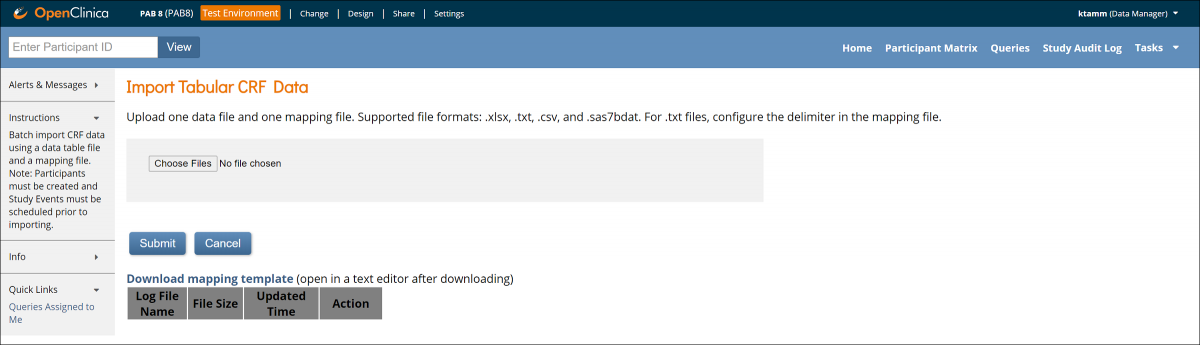
You can import data on the Import Tabular CRF Data screen. To do so, you need a Data Text file that contains your data and a Data Mapping file that maps your data to Form items.
When you import a flat file, each data row imports into the Form in a different Event occurrence for the specified Participant.
If you import into a Common Event, new event occurrences are created as needed. If you import into a Visit-Based Event, the data imports into existing scheduled Event occurrences.
To Import Data on the Import Tabular Data screen:
- Download the mapping template.
- Edit the template and save it.
- Create a data text file.
- Click the Browse button.
- Select your Data Mapping file and Data Text file together by pressing the Ctrl key (Windows) or Command key (Mac) and clicking on both files.
- Click the Open button.
- Click Submit.
Protip: You can use different delimiters, such as pipe, comma, tab, etc. The Data Mapping Template includes a line you can use to specify which delimiter you are using, for example, Delimiter=|. Excel automatically formats data, but if you use another program, you might need to put the data for each delimiter in quotes. For example, if the data is a | b | c | d,e,f | g | “d,e,f” would be in quotes.
You can click the Tasks button and select Bulk Actions Log to check the status of the job. You can view, download, or delete the import from there.
Data Text File
Use this file to specify Participant IDs for the Participants with data you want to import. You can also include other data items with OIDs.
Note: The following formats are supported: text (.txt), CSV (.csv), Excel (.xlsx), and SAS datasets (.sas7bdat). If you use a text (.txt) file, you can use a delimiter of your choice, for example a comma or tab. If no delimiter is specified, the import will use a pipe ( | ) by default. You can specify the delimiter by adding an additional line, for example: #Delimiter=t
To Make a Data Text File:
- Create a tabular file as a text (.txt) document or use another supported format (see the note above). Alternately, download the sample file to edit.
- Enter a heading for Participant OIDs. If not defined, the heading will be ParticipantID.
- Enter Participant OIDs.
- (Optional) Create columns for associated data for each Participant, separated by pipe characters or, if you have created a text (.txt) file, another delimiter of your choice. Any spaces before or after item values are removed upon import, so the data entered in the system will not include spaces that are in the beginning or end of the file. Column headers should match those in the Data Mapping file.
Note: Make sure to use the internal item name and response values. For example, in the image below, use what_stage for the item name and stage_i, stage_ii, stage_iii, and stage_iv for the responses.

Data Mapping File
Use this file to map each item to a column header from the Data Text file. For a single item, use the format itemgroup.item, replacing item group and item with Item Group and Item OIDs. For multiple items, use comma-separated values in the format of itemgroup.item, itemgroup.item.)
You can use Skip/Match Criteria in the Data Mapping file to skip importing specific data when the data in a Participants Form matches the specified criteria. (i.e. if data already exists in the Form, the system does not import new data.)
In order to use Skip/Match criteria, you must have created Participants and Visit-Based Events must be scheduled prior to importing.
Skip/Match Criteria works for all Event types (Repeating Common Events, Non-Repeating Common Events, Non-Repeating Visit-Based Events, and Repeating Visit-Based Events.)
However, for Repeating Visit-Based Events, the data is only imported into the first instance of the Event.
Regardless of Event type:
If there is a match, importing the data for that row is skipped.
If there is no match or Skip/Match criteria are not used, the data for that row is imported.
To Make a Data Mapping File:
You can download a sample Data Mapping file on the Upload CRF Data screen.
- Create a text file, or download the sample file to edit. Exclude spaces.
- (Optional) If you want to use Skip/Match Criteria, enter SkipMatchCriteria=itemgroup.item, replacing itemgroup and item with Item Group and Item OIDs. For example, to use First Name as criteria, enter SkipMatchCriteria=IG_PHYSI_GRP2.I_PHYSI_FNAME.
- Under the heading, # Study, Study Event and Form OIDs, enter the following in rows:
StudyOID=
StudyEventOID=
FormOID=
FormVersion=
Note: You can only include one Form version in a Data Mapping file. To include another version in the import, you must create a new Data Mapping file and Data Text file. Each pair of files must be imported separately.
- Next to the first three rows, enter the appropriate OID.
- Next to FormVersion, enter the version number of the Form.
- Under the heading, # Data file OIDs, enter a row for the name of each column header in your Data Text file, followed by the OIDs in the format of itemgroup.item, replacing itemgroup and item with Item Group and Item OIDs. For example, to import an item under the column header, Ethnicity, enter Ethnicity=IG_PHYSI_GRP3.I_PHYSI_PETHNIC).
- Save the file in the format of filename.properties. (Replace filename with the name of your file.)
Note: To make a .properties file, Click File, and select Save As. Then change Save as Type to All Files, and add .properties to the file name. If you previously saved it as a text file, you might need to rename it in order to change the file type.
The Log File:
- Is generated with the name datafilename_log.txt. (The system replace datafileneame with the name of your Data Text file.)
- If a data file with the same name is used again, the existing log file from a previous upload is appended to the new log file.
- Contains the following:
- Row number: The row number of the record in the Data Text file
- ParticipantID: The value of the Participant ID in the Data Text File
- Status: The outcome of the import, indicated by the values, Success or Failed
- Message:
- For a failed import, displays an error code.
- For a successful import, displays the values imported or Skip.
To Download the Log File:
Once the import is complete, click the Download button in the Actions column.
Common Errors:
- Spaces in the Data Text and/or Data Mapping File
- Invalid OID
- Items spelled differently in Data Test and Data Map File
- Mismatched number of columns in the Data Text File and the Data Mapping File
- Items not in the correct format of itemgroup.item
- Items listed by item name, not internal item name (variable).
Common Error Codes and Messages:
Error Code | Message |
errorCode.ValidationFailed | This is not the correct response set. |
errorCode.ValidationFailed | You have a date value which is not in ISO 8601 format at the (Form OID) Check it and try again |
errorCode.ValidationFailed | This field should be a number. |
errorCode.ValidationFailed | The Event CRF you are trying to update does not have the correct status. |
errorCode.ValidationFailed | Your CRF Version (Form OID) did not generate any results in the database. Check it and try again. |
errorCode.ValidationFailed | Your Participant OID (Participant OID) does not reference an existing Participant in the study. |
errorCode.ValidationFailed | You do not have a user role set up for (user role) in study (Study OID) |
errorCode.ValidationFailed | Your Study Event (Event OID) for Participant OID (Participant OID) does not reference an existing Study Event in the Study. |
errorCode.ValidationFailed | The Item Group (Item Group OID) did not generate any results in the database. Check it and try again. |
errorCode.ValidationFailed | Your Form Layout OID (Form Layout OID) for Form OID (Form OID) does not reference a proper Form Layout in the Form. |
errorCode.dataRowMissingPipe | Error-data file format not match header – less pipe than header |
errorCode.Exception | Error processing data import request. |