This page explains how you can create and manage datasets in OpenClinica. A dataset defines the specific events, forms, items, and attributes you want to extract from your study. Once created, you can run the extract on demand or through a scheduled job, and download the resulting files in multiple formats.
What Is an Extract?
A dataset defines the specific events, forms, items, and attributes you want to include in your output. In addition to form items, you can also add event attributes, participant attributes, and CRF attributes to your dataset. This gives you fine-grained control over which data are included when you generate an extract.
OpenClinica supports datasets that include:
Any clinical data collected in the study, including data from Participate forms
Items from multiple events and forms
Event-, participant-, and CRF-level attributes
Either all available items or only those you select
Why Use a Dataset?
Datasets allow you to:
Generate customized extracts for analysis or reporting
Combine data across events, forms, and sites
Produce consistent extracts over time using the same dataset definition
Download data in multiple output formats
Run extracts on demand or schedule them to run automatically
When you run a dataset, OpenClinica generates an extract containing data for all participants and sites you have permission to access.
Who Can Create and Run Extracts?
The following roles typically have access to create and run datasets:
Data Managers
Data Specialists
Investigators
Monitors
Access to specific extracts may vary depending on your study configuration and role permissions.
How Extracts Work
When you run a dataset:
OpenClinica compiles the selected data from all permitted participants and sites
You can download the extract in multiple format options
Extracts can be run manually or scheduled to run automatically
ℹ️ Note: Archived or removed forms are not included in extracts by default. Archived form versions are included. This behavior also applies to Participant Casebooks and API-based extracts unless overridden.
💡 Tip: To extract all data for a single participant, use a Participant Casebook. For details, refer to Generating Participant Casebooks.
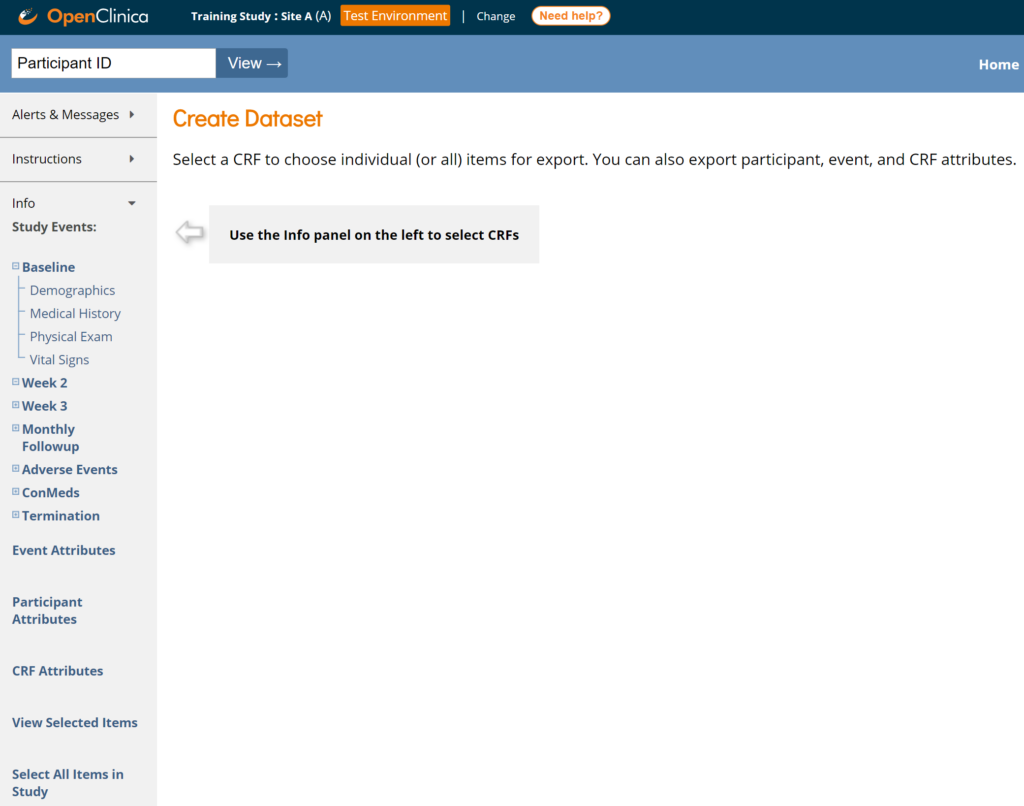
Create a Dataset
This section guides you through creating a dataset by selecting Events, Forms, and Items to include in your extract.
- Open the Create Dataset Page
- In Study Runner, click Tasks in the header bar.
- Select Create Dataset.
- Select Events, Forms, and Items
Use the left panel to choose the data you want to include.
Select an Event- Expand the Event that contains the Form data you want to extract.
- If the same Form appears in multiple Events, select one now—you can add additional Events later.
- Expand the Event that contains the Form data you want to extract.
Select a Form
- Click the Form containing the Items you want to extract.
Select Items
Choose specific Items, or select all Items in the Form:
- Check Select All Items to include every Item within the Form.
- Otherwise, select Items individually.
⚠️ Important:
Forms that contain only contact data Items do not appear during dataset creation. Similarly, contact data items are not available for inclusion into the extract.
All non–contact data items are available for selection when building a dataset, and Item metadata is always visible. Actual data access is enforced only when the extract is run or downloaded.
Add More Items (Optional)
- To select additional Items from other Events or Forms:
- Click Save and Add More Items.
- Repeat the selection steps above until all desired Items are included.
ℹ️ Note: You may also add data from Events, Participants, and CRFs using the Event/Participant/CRF Attributes screens.
To include the entire study, click Select All Items in the Study.
- Name and Describe the Dataset
- Click Save and Define Scope.
The Name and Description page appears. - Enter a Name and Description for the dataset.
- Click Save and Define Scope.
ℹ️ Note: Dataset names must use alphanumeric characters; underscores are allowed.
- Choose Item Status
From the Item Status field, select which CRF status you want to include:- CRFs marked Complete
- CRFs not marked Complete
- All CRFs
- Save the Dataset Definition
Ignore the message and optional fields shown in the lower portion of the screen, then click Confirm and Save.
Your dataset definition is now saved. As additional data are entered in the study, future extracts will include any new data that match your saved definition.
Run an Extract
On the Select Format screen, choose an output format for your dataset.
Click Run Now.
You will receive an email notification when the extract has finished processing.
OpenClinica displays a progress message while the extract is running. Large datasets may take several minutes to complete. While processing, the dataset status appears as IN PROGRESS.
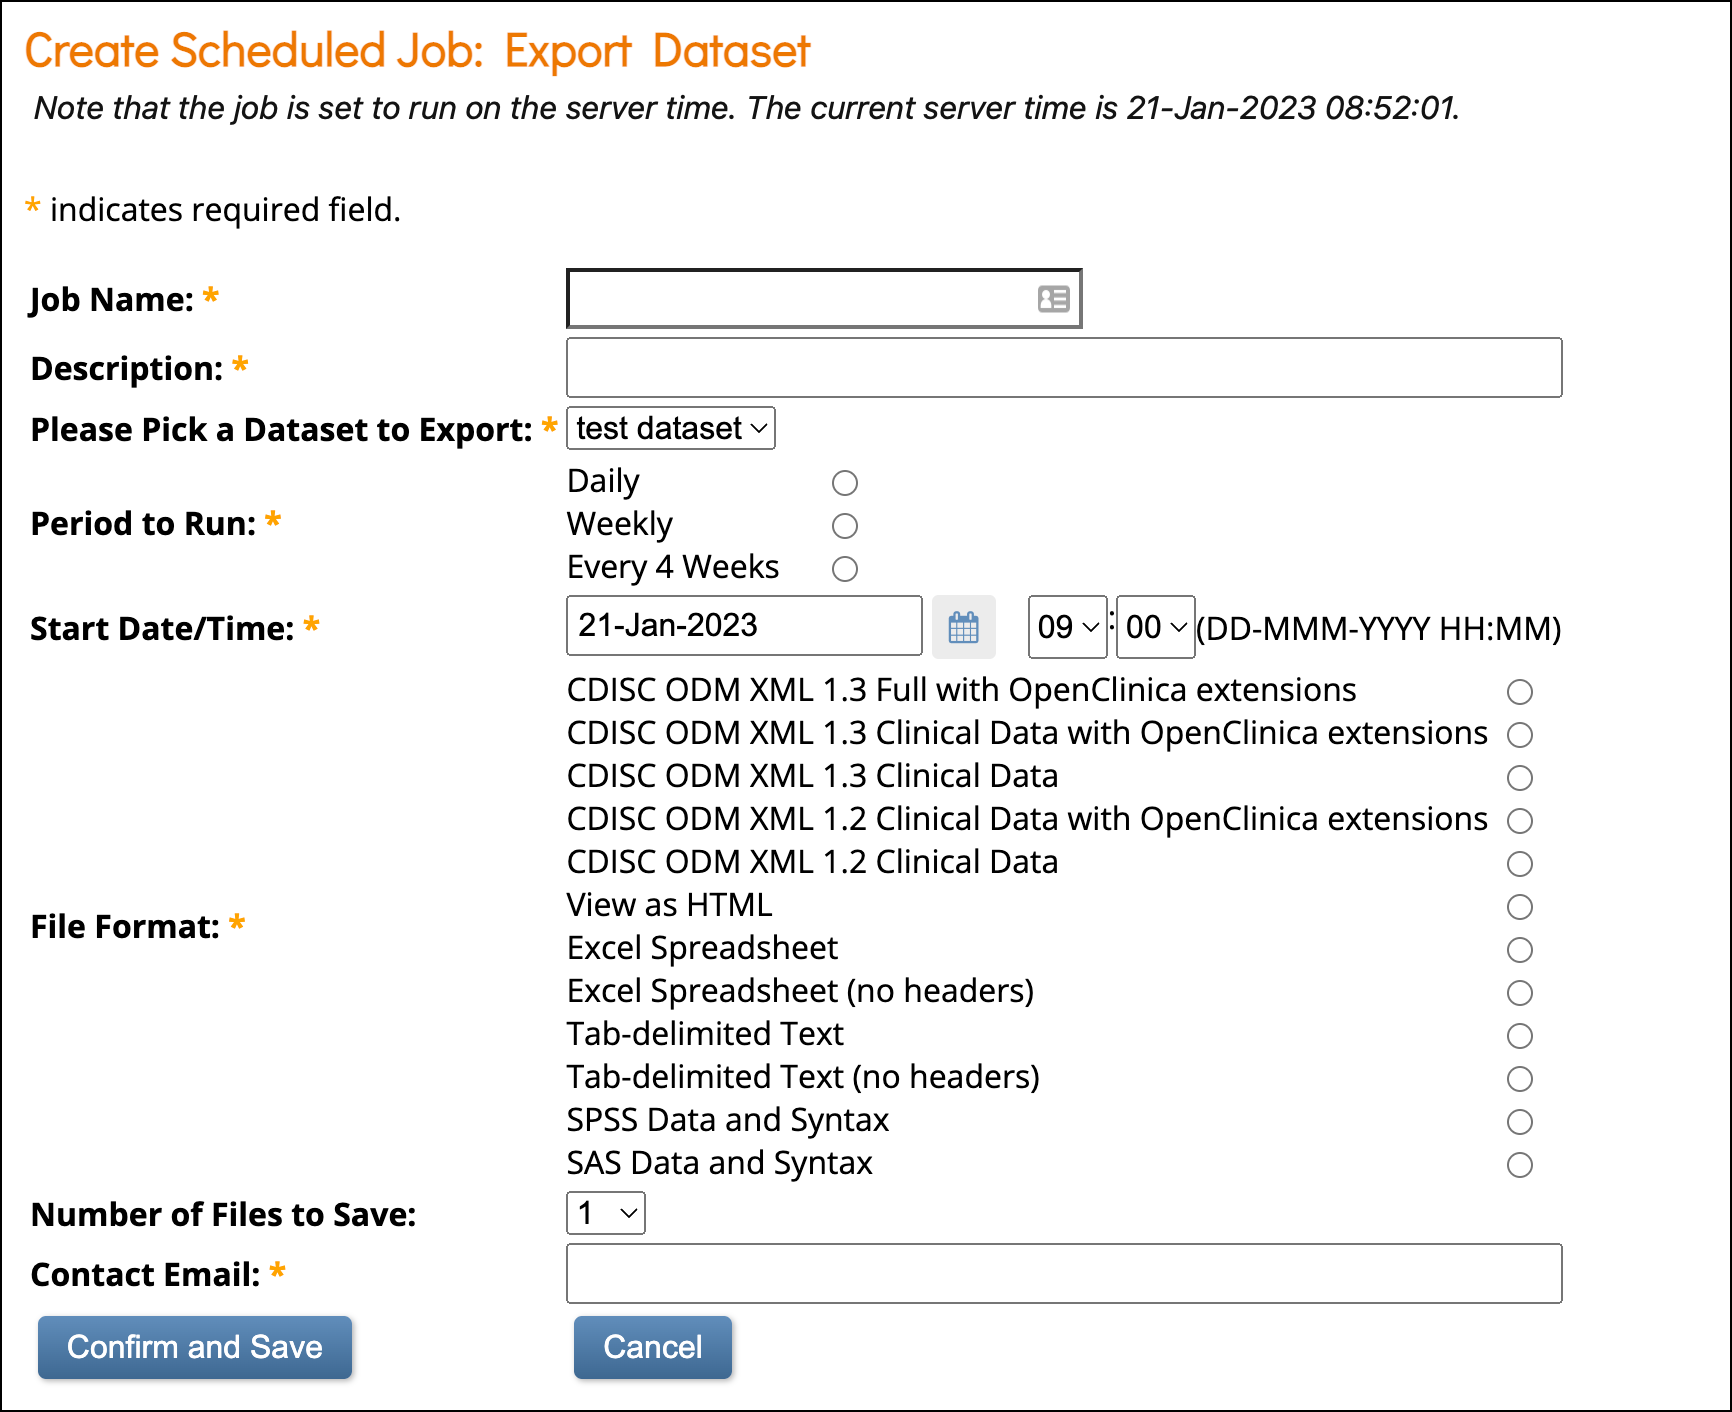
ℹ️ Note: The first format option—CDISC ODM XML 1.3 Full with OpenClinica extensions—is the most complete extract. It is the only format that includes:
• Audit log data
• All clinical data
• All metadata
Download an Extract
You can download an extract using either method below:
Click the link in the email you receive after the extract is complete, or
Download from the user interface:
Click Back to Dataset to return to the status screen.
Locate your dataset at the bottom of the page.
Click Download in the Actions column next to the extract file.
ℹ️ Note: Some extract files may display “Filtered” in the file name or may be unavailable for download. Refer to the following section for details on filtered extracts and access restrictions.
Extract Permissions and Access Rules
OpenClinica enforces form-level permissions when running and downloading the extract. These rules ensure you only access data from Forms you are authorized to view. Metadata (Item names and labels) are always visible.
- Permissions When Running an Extract
When you run an extract:- OpenClinica checks your access to all permission tags associated with selected Forms.
- If you lack access to any Form:
- Metadata remains visible; but the restricted Form data is omitted.
- The system generates a filtered extract with the prefix
filtered_.
- Permissions When Downloading an Extract
Before a dataset (full or filtered) is downloaded, OpenClinica performs a second permission check:- You must have access to every Form included in the dataset.
- If you lack access to one or more Forms:
- The download is blocked.
- An error message appears.
- You cannot view, open, or delete the dataset file.
- This behavior applies to extracts you created and extracts created by other users with different permission sets.
For more information about form permissions, refer to Managing Form Access and Permissions.
Deleting a Dataset
To delete a dataset, click the Delete button in the Actions column. Deleting a dataset removes only the dataset definition—it does not remove any data from the OpenClinica database.
ℹ️ Notes:
- The dataset file reflects the data that existed at the time the extract was generated. The file name includes the date and time of generation.
- If you do not have access to one or more Forms in the extracted dataset file, you cannot delete the dataset or filtered dataset.
File Overwrite Behavior
OpenClinica retains one dataset file per format for each dataset definition. If you run the same extract again in a format that already exists:
- The new file overwrites the previous file of that format.
- If you run the extract in a new format, both files remain available.
For example, if an extract was originally generated as Excel and you run it again as Excel, the Excel file is replaced. If you then run the same extract as HTML, both the Excel and HTML files will be available.
Scheduled Export Jobs
Scheduled export jobs allow you to automate dataset extracts so they run at predefined intervals without manual intervention.
View Scheduled Jobs
To view scheduled export jobs:
- In Study Runner, click Tasks in the header bar.
- Under Extract Data, select Jobs.
The Scheduled Export Data Jobs screen appears.
View Job Details
- Go to Tasks > Jobs under Extract Data.
- Click View in the Actions column.
Create a Scheduled Job
Only users with the Admin User Type can create scheduled jobs.
- Click Tasks > Jobs under Extract Data.
- Select Create New Scheduled Extract.
- Complete all required fields.
- Click Confirm and Save to create the job, or Cancel to discard it.
- You will receive an email when the job completes.
Retention Setting
The Number of files to save field allows you to retain up to 10 past extract files.
- The most recent file is always emailed to recipients.
- Older files can be accessed through the API.
ℹ️ Note: The default date/time is the current server time. Any date/time after the server time is valid.
Edit a Scheduled Job
- Navigate to Tasks > Jobs.
- Click Edit in the Actions column.
- Update one or more fields.
- Click Confirm and Save, or Cancel.
Remove a Scheduled Job
- Open Tasks > Jobs.
- Click Remove in the Actions column.
- Removing a job stops it from running but allows it to be restored later.
- Confirm removal.
Restore a Scheduled Job
- Go to Tasks > Jobs.
- Click Restore in the Actions column.
Delete a Scheduled Job
- Go to Tasks > Jobs.
- Click Delete in the Actions column.
- Confirm the deletion.
⚠️ Warning: Deleting a job permanently removes it. Unlike the Remove action, deleted jobs cannot be restored.
Role-Based Access to Scheduled Job APIs
Some users may also access scheduled job files through the Scheduled Jobs API on the Web Services Information screen.
| User Type | Roles | Allowed Actions | Access Limitations |
| Study-level roles | Data Managers Data Specialists Data Monitors |
| Access is not limited by site, but is controlled by study permissions and permission tags |
| Site-level roles | Site Monitors Investigators |
| Cannot access job files for other sites or study-level jobs |
| No API access | Clinical Research Coordinators (CRCs) Data Entry Persons Site Viewers Study Viewers | None | Cannot execute jobs or retrieve files via API |
Permission Enforcement
Retrieving a job file via API follows the same form-level permission rules as manual downloads:
If you lack access to any Form included in the dataset, API retrieval fails.
Relevant API Endpoints
Get job execution UUIDs:
GET /auth/api/extractJobs/{jobUuid}/jobExecutions- Retrieve a dataset file for a job execution:
GET /auth/api/extractJobs/jobExecutions/{jobExecutionUuid}/dataset
Dataset Formats
OpenClinica allows you to download datasets in several formats based on how you want to view the data. Tabular formats (Tab Delimited Text, HTML, and Excel) are the easiest to read.
Available Dataset Formats
Tabular Formats
These formats are the easiest to read and are commonly used for review and reporting.
| Format | File Type(s) | Applications | Description |
| Tab-Delimited Text | tsv | Text Editor | Easy to read; Includes a table with information on the dataset and a table that contains the data; can be parsed by other programs |
| HTML | html | Internet Browser | Easy to read; Includes a table with information on the dataset and a table that contains the data |
| Excel | xls | Excel | Easy to read; Includes a table with information on the dataset and a table that contains the data |
| SPSS | dat sps | IBM SPSS | File contains information about data set; .dat file contains data; uses different syntax; useful for analysis |
| CDISC ODM XML (1.2 or 1.3, With extensions, or Full) | xml | XML Editor or Internet Browser | The most complete extract; Contains information about the dataset, data, and metadata; limitations |
| SAS Data and Syntax | xml sas | SAS Data and Syntax | Requires the most set-up; uses different syntax; useful for analysis |
For more information, refer to OC Data Extracts and Reporting Types.
Below Are Some Images of Extract Formats:
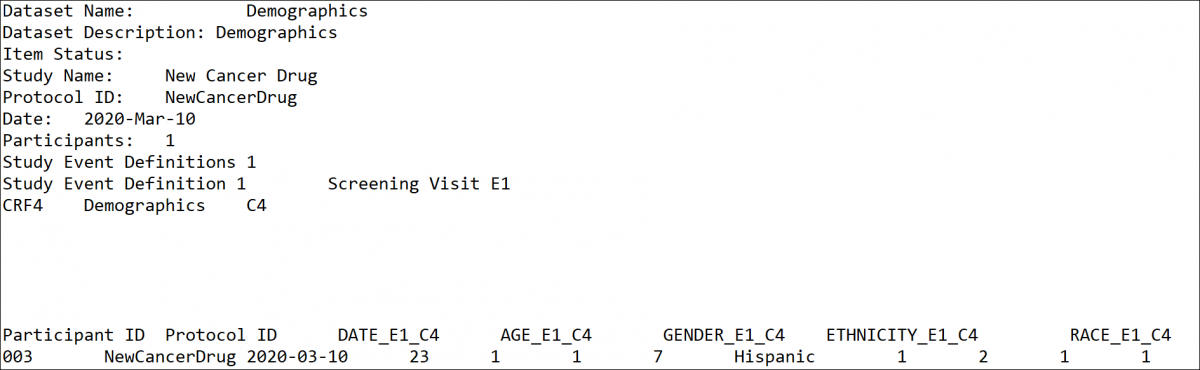
Tab-Delimited
HTML Format
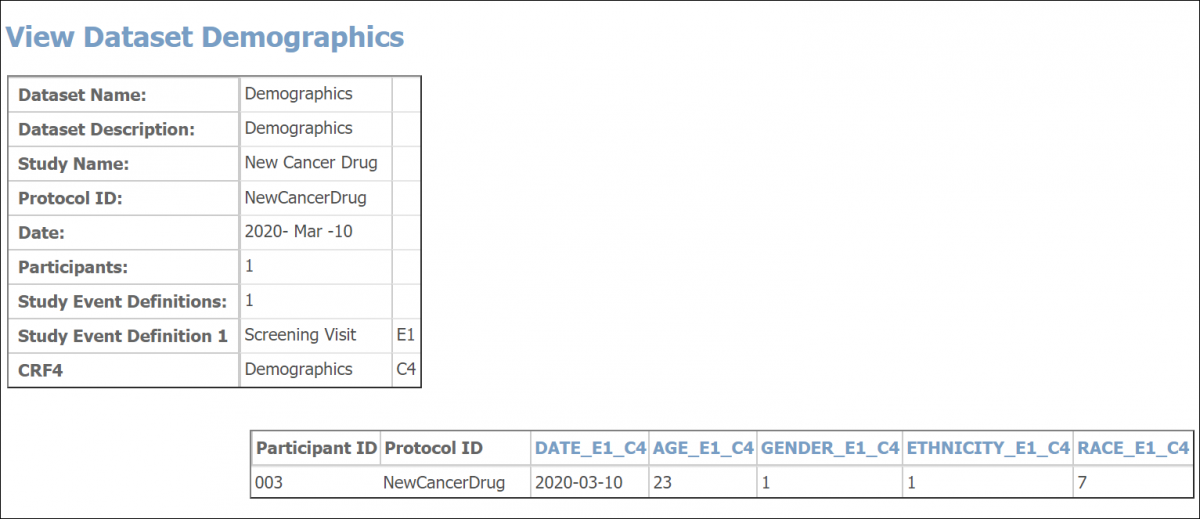
💡 Tip: When viewing an HTML file, you can click an Item’s column header to view its metadata.
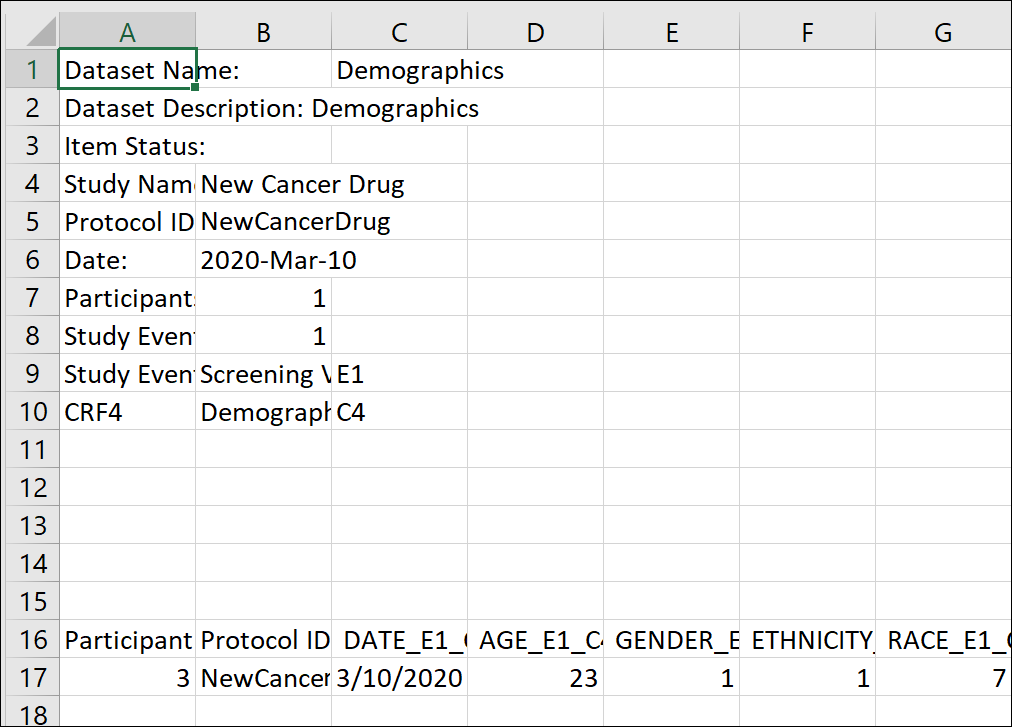
Excel Format
CDISC ODM XML Format
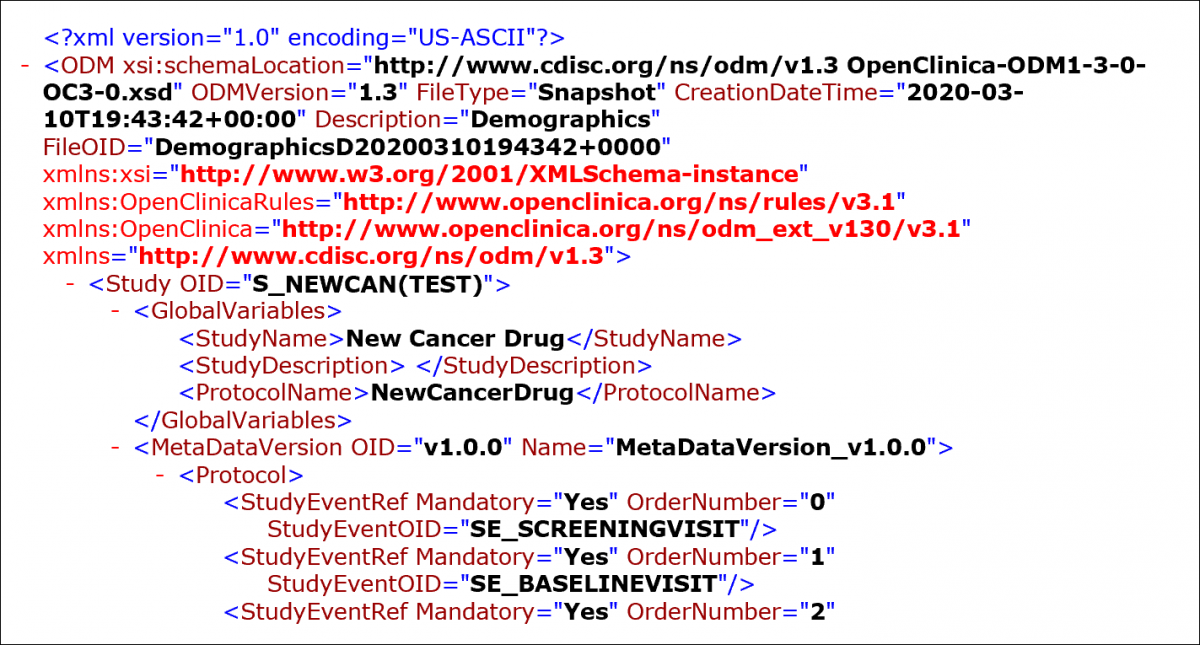
CDISC
CDISC ODM is a vendor-neutral, platform-independent format used for the interchange and archiving of data collected in clinical trials. It represents study metadata, clinical data, and administrative data, and is designed to comply with guidance and regulations published by the FDA for computer systems used in clinical research.
ODM Data Model Structure
The ODM model organizes clinical study data into structured entities, including:
- Subjects
- Study Events
- Forms
- Item Groups
- Items
- Annotations
Metadata and Clinical Data
- Metadata defines the types of Study Events, Forms, Item Groups, and Items permitted in the study.
- Clinical Data consists of the actual collected entities that correspond to those metadata definitions.
ODM File Composition
An ODM file is an XML document structured as a hierarchical tree of elements. Each element represents an entity and contains required and optional attributes.
File Components
An ODM file consists of two main sections:
- Metadata
Includes Study unit OIDs, Event information, CRF details, Item Groups, Items, validation rules, and user account information. - Subject Data
Includes Subject details, Event data, CRF data, and collected Item values.
ODM File Types
An ODM file must be one of the following:
- Snapshot
Represents the current state of the included data. - Transactional
Represents the latest state and, optionally, prior states of the included entities.
Granularity Attribute
Each ODM file includes a Granularity attribute that defines the scope and coverage of the data contained within the file.
CDISC ODM Format Options
When you select a CDISC ODM format for a dataset, OpenClinica exports the data as an .xml file that complies with the Clinical Data Interchange Standards Consortium (CDISC) Operational Data Model (ODM).
Available ODM Variants
You can choose from the following options:
- 1.2 or 1.3 – Specifies the version of the ODM standard used for the export.
- With Extensions – Includes OpenClinica-specific entities that are not part of the ODM specification, such as OpenClinica:SdvStatus.
- Full – Includes Discrepancy Notes (Queries) and the Audit Log.
ℹ️ Note: In the Full ODM XML format, contact data is always masked in the audit log, regardless of user permissions.
SPSS Format
When you select the SPSS format, the extracted data is provided as a .DAT file that you can open in a text editor. The SPSS output displays data in a table layout similar to Excel for easier review and analysis.
Variable Naming and Identifier Conventions
To prevent duplication and ensure accurate identification of data collected across multiple Events and CRFs, OpenClinica appends identifiers and ordinal numbers to each variable name.
These variable names can be used in multiple CRFs across multiple Events. These appended numbers will help identify the event, CRF and item the value was collected in.
Where Identifiers Are Defined
- For Tab-Delimited, HTML, and Excel formats, identifiers are defined in the header table.
- For SPSS, identifiers are defined in the separate syntax file (.sps).
The following conventions apply to Tab-Delimited, HTML, and Excel formats:
- E1
- E represents the Event identifier.
- 1 indicates which Event the variable originated from, as defined in the header table.
- For repeating Events, this appears as E1_1, E1_2, E1_3, and so on.
- C1
- C represents the CRF identifier.
- 1 indicates which CRF the variable originated from, as defined in the header table.
- For repeating Events or repeating Item Groups, an ordinal value _X is appended to specify the occurrence.
For example:
- An item named DEMO in the 3rd occurrence of a repeating event and the 5th repeat of a group would appear as: DEMO_E1_3_C1_5
- An item in a repeating event but not part of a repeating group would appear as: DEMO_E1_3_C1
The [EVENT HANDLE] and [CRF HANDLE] represent system-generated identifiers appended to each Item name to prevent duplication across repeating data points.
Structure of Tabular Extracts
Tabular formats (Tab-Delimited Text, HTML, and Excel) contain two distinct sections:
Header Table
The header table includes the following information:
- Dataset name
- Dataset description
- Study name
- Protocol ID
- Date
- Subjects
- Study Event Definitions
- CRFs
For each included Study Event Definition, the event name and associated identifier appear for reference in the data table.
For each included CRF, the CRF name and associated identifier appear for reference in the data table.
Data Table
The data table includes the data you selected for the dataset.
SAS
This section explains how to work with datasets exported in SAS format, including how to prepare files and configure SAS Studio to generate usable output tables.
SAS Output Files
When you select the SAS format, OpenClinica generates the following files:
- SAS_DATA.xml – The extracted data.
- SAS_MAP.xml – A mapping file that maps the data to the appropriate structures
- SAS_Format.sas – For items defined as select_one or select_multiple, OpenClinica creates the library and maps response values to the appropriate response text
ℹ️ Note: Select_multiple and checkbox Items appear as comma-separated values in OpenClinica (for example, 1,2,7), these cannot be mapped to individual response text options.
Prepare SAS Studio
If using SAS Studio, please follow the directions below. Other versions of SAS will retain the basic instructions related to what needs to be uploaded and the code that needs to be run.
After Creating a Dataset in OpenClinica and Downloading it in SAS Format:
- Create a SAS Studio account by going to SAAS Studio | SAAS
- Sign in and select SAS® Studio (Launch)
- In SAS Studio, right-click Files.
- Select New > Folder, enter a folder name, and click Save.
- To upload the data file (xml) and the map file (xml), click Upload Files at the top of the sidebar or right-click the folder and select Upload Files.
- Click Choose Files after confirming the folder.
- Select the SAS_MAP and SAS_DATA xml files to upload and click Open.
- Verify the information and click Upload.
- Click New at the top of the sidebar or right-click on your folder and select New > SAS Program (F4) to open a new Program window.
- Open the SAS_FORMAT file in an external text editor.
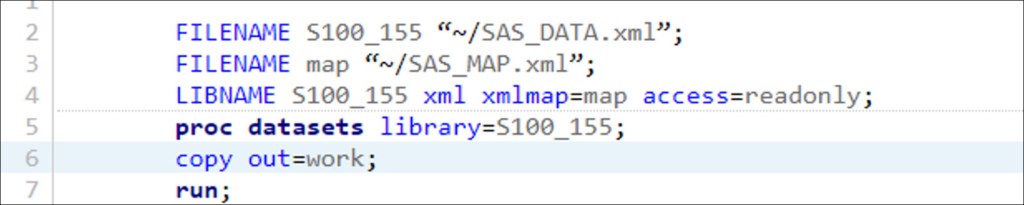
- Before running this code, edit the first three lines of the code by replacing the ~ with the path of the files.
- Find the paths by right-clicking the folder that contains these files and selecting Properties.
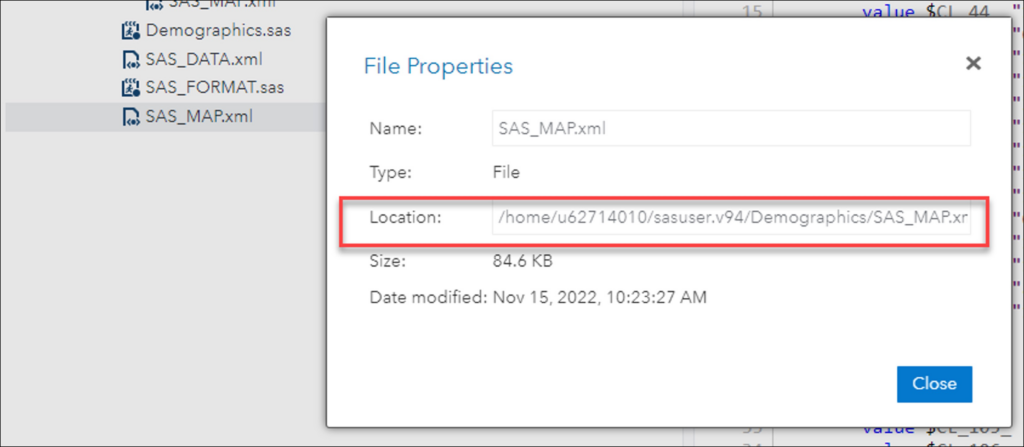
Example
- BEFORE – The First 3 Lines of Your Format File:
FILENAME S100_155 “~/SAS_DATA.xml”;
FILENAME map “~/SAS_MAP.xml”;
LIBNAME S100_155 xml xmlmap=map access=readonly;
- AFTER – The First 3 Lines of Your Format File:
FILENAME S100_155 “/home/u62714010/sasuser.v94/Demographics/SAS_DATA.xml/”;
FILENAME map “/home/u62714010/sasuser.v94/Demographics/SAS_MAP.xml”;
LIBNAME S100_155 xml xmlmap=map access=readonly;

Run the Program
- Paste the updated syntax into the SAS Program window.
- Click Run.
- View results in the Output Data tab.
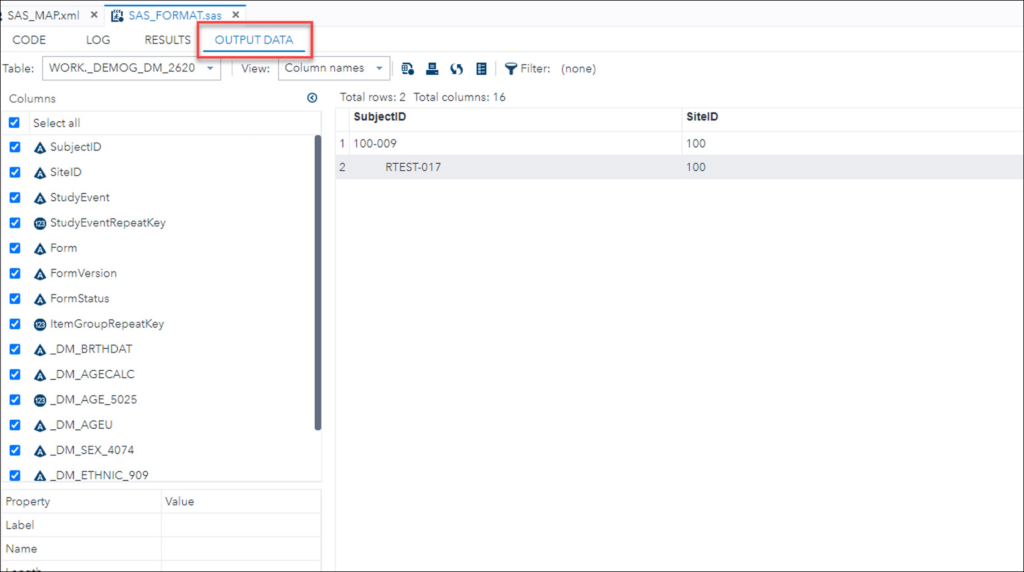
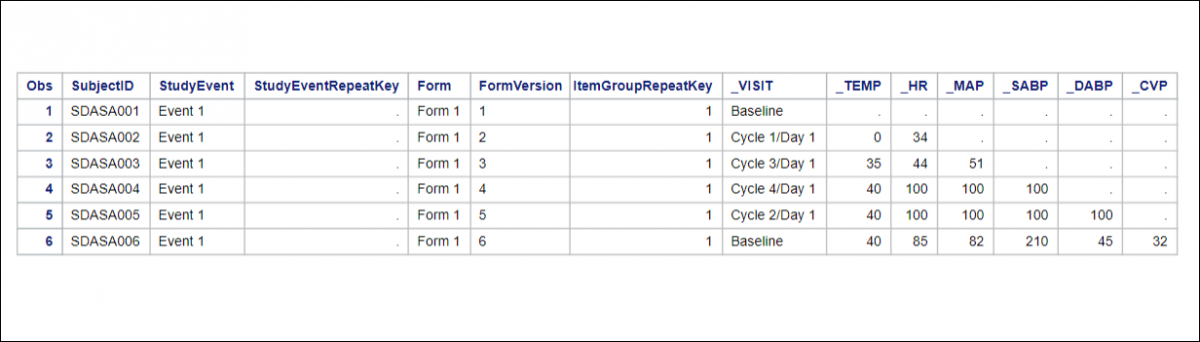
Generated Output
Table Generation
SAS generates data tables based on OpenClinica Item Groups. Each Item Group produces a corresponding SAS table.
- Tables are generated from OpenClinica metadata.
- All Item Groups included in the extract produce a table.
- If no data exists for a specific Item Group, the corresponding SAS table is still created but remains empty.
Column Naming
- OpenClinica Items are used as SAS column names.
- Tables include the complete master set of Items defined by the Item Group, even if Items span multiple CRF Versions.
- The SAS output does not indicate which CRF Version the Item originated from.
Data Type Classification
SAS output supports two data types:
- Numeric
Includes all OpenClinica Items defined as Integer or Real. - Char
Includes all other OpenClinica Item data types.
Constraints and System Rules
OpenClinica supports a maximum of 3,999 single-byte characters in a text field. When extracted to SAS, the full value is preserved in the SAS_DATA.xml file.
SAS Dataset Naming Rules
SAS dataset names must:
- Not exceed 32 characters
- Begin with a letter (A–Z) or underscore (_)
To comply with these rules, OpenClinica generates dataset names using a modified Item Group OID, based on the following logic:
- If the Item Group is Ungrouped, the CRF Name is used as the dataset name.
- Otherwise:
- The prefixed IG is removed to reduce character length.
- The resulting format is:
_[First 5 characters of CRF Name]_GROUPLABEL - If the resulting name exceeds 35 characters, OpenClinica appends a three- or four-digit number derived from the original IG_OID to ensure uniqueness.
SAS Column Naming Rules
SAS column names must:
- Not exceed 32 characters
- Begin with a letter (A–Z) or underscore (_)
To meet these requirements, OpenClinica modifies the Item OID when generating column names as follows:
- Truncates the
I_5CHARprefix from the left. - Retains the portion beginning with
_ITEMNAMEto prevent numeric-leading names. - Any appended three- or four-digit numbers are retained to preserve uniqueness.
SPSS File Structure and Access
When you select the SPSS format, the extracted .zip file contains the following files:
- .DAT file – A tab-delimited data file containing the dataset values
- .SPS file – An SPSS syntax file that defines the dataset structure and formatting
Load Data into SPSS
To access the dataset:
- Save both the .dat and .sps files to the same folder.
- Open IBM SPSS.
- Open the .sps file in SPSS.
- If the files are not in the same location, update the file path in the .sps file to point to the physical location of the .dat file.
- Select Run > All to load the data into SPSS.
You can preview the raw data by opening the .dat file in a text editor.
SPSS File Specifications
When you select the SPSS format, OpenClinica generates a package of files for use in IBM SPSS. These files have been tested with SPSS for Windows, version 20.
Although SPSS can read almost any ASCII file and deduce parameters for some of these variable attributes, any other attributes must be typed in by hand, which is tedious for large datasets.
Instead of using a generic ASCII dataset file, select the SPSS Syntax format (.sps). When used in conjunction with the associated .dat file, this format automatically loads the dataset into SPSS with the correct variable definitions and attributes applied.
SPSS Data Definitions Cover Ten Main Properties for Any Variable:
- Name
- Type
- Width
- Decimals
- Label
- Values
- Missing
- Columns
- Align
- Measure.
OpenClinica Currently Supports Automated Definition of:
- Name
- Type
- Width
- Decimals
- Label
- Values
SPSS Conceptual Mapping
This table presents the conceptual mapping of SPSS Data Definitions to OpenClinica data element metadata:
| SPSS Data Definition Metadata | OpenClinica CRF Metadata |
| Name | Item Name |
| Type | Mapped to Item Types |
| Width | Calculated from the Widest Value in the Field |
| Decimals | If the Item Type is Decimal, it is Calculated from the Most Precise Value in the Field |
| Label | Item Label |
| Values | Generated from Choice Labels and Choice Names |
| Missing | N/A |
| Columns | N/A |
| Align | N/A |
| Measure | N/A |
Mapping between SPSS types and OpenClinica CRF Item Types
The table below describes the mapping of OpenClinica CRF ITEM data types to SPSS types.
| CRF Data Type | CRF Width (Decimal) | CDISC ODM XML Data Type | SPSS Variable Type | SPSS Syntax for Type Format |
|---|---|---|---|---|
| text, select_one, select_multiple | n | text | String | An |
| integer | n | integer | Numeric | Fn.0 |
| decimal | n(d) | float | Numeric | Fn.d |
| file, image, audio, video | n | text | String | An |
| date | N/A | date | Date | ADATE10 |
ℹ️ Note:
- Multi-Select Item Behavior
Items with a data type of ST, INT, or REAL are treated as multi-select Items when associated with a CRF response type of multi-select or checkbox.
In this case:
- The Item is defined as a string (A) in SPSS.
- Selected values appear as a comma-separated list in the field, even if the original CRF Item data type is INT or REAL.
- Numeric Precision Limitation
SPSS supports a maximum of 17 significant figures. Values exceeding this limit lose precision during export. This is a limitation of SPSS and not of OpenClinica.
Examples
| Significant Figures | Entered Value | Value Stored in SPSS |
| 20 | 12345678901234567890 | 12345678901234567000 |
| 19 | 0.1234567890123456789 | 0.123456789012345 |
Mapping Between SPSS Values and OpenClinica Choice Labels
In SPSS, the VALUE LABELS section of the syntax file maps OpenClinica choice labels to the corresponding discrete values used in SPSS.
Only Items with a response type of select_one or select_multiple appear in the VALUE LABELS section.
VALUE LABELS Syntax Structure
Value labels are defined for each variable using the following format:
Syntax Pattern – Example
- Variable 1
VARNAME1
Choice Name[0] “Choice Label[0]”
Choice Name [1] “Choice Label[1]”
Choice Name [2] “Choice Label[2]” - Variable 2
VARNAME2
Choice Name[0] “Choice Label[0]”Choice Name [1] “Choice Label[1]”
Choice Name [2] “Choice Label[2]”
SPSS Data Definitions for Built-in System Fields
Subject Attribute: Subject Status
| SPSS Data Definition Property | Value | Encoding |
| Name | SubjectStatus | SubjectStatus |
| Type | String | A |
| Width | [maximum length of subject status string across all the subjects] | [maximum length of subject status string across all the subjects] |
| Decimal | N/A | |
| Label | Subject Status | Subject Status |
| Values | None | |
| Missing | None | |
| Columns | [maximum length of subject status string across all the subjects] | [maximum length of subject status string across all the subjects] |
| Align | Left | |
| Measure | Unknown |
Event Attribute: Start Date
| SPSS Data Definition Property | Value | Encoding |
| Name | STARTDATE_[EVENT HANDLE] | STARTDATE_[EVENT HANDLE] |
| Type | Date | ADATE10 |
| Width | N/A | |
| Decimals | N/A | |
| Label | Start Date for [EVENT NAME] (EVENT HANDLE) | Start Date for [EVENT NAME] (EVENT HANDLE) |
| Values | None | |
| Missing | None | |
| Columns | 10 | |
| Align | Right | |
| Measure | Unknown |
Event Attribute: Status
| SPSS Data Definition Property | Value | Encoding |
| Name | EventStatus_ [EVENT HANDLE] | EndDate_[EVENT HANDLE] |
| Type | String | |
| Width | [maximum length of event status string across all the subjects] | [maximum length of event status string across all the subjects] |
| Decimals | N/A | |
| Labels | Event Status For [EVENT NAME] (EVENT HANDLE) | End Date for [EVENT NAME] (EVENT HANDLE) |
| Values | None | |
| Missing | None | |
| Columns | [maximum length of event status string across all the subjects] | [maximum length of event status string across all the subjects] |
| Align | Right | |
| Measure | Unknown |
CRF Attribute: CRF Version Status
| SPSS Data Definition Property | Value | Encoding |
| Name | CRFVersionStatus_[EVENT HANDLE]_[CRF HANDLE] | CRFVersionStatus_[EVENT HANDLE]_[CRF HANDLE] |
| Type | String | A |
| Width | [maximum length of CRF version status string across all the event CRFs] | [maximum length of CRF version status string across all the event CRFs] |
| Decimals | N/A | |
| Labels | Event Status For [EVENT NAME] (EVENT HANDLE) | CRF Version Status For [EVENT NAME] |
| Values | None | |
| Missing | None | |
| Columns | [maximum length of CRF version status string across all the event CRFs] | [maximum length of CRF version status string across all the event CRFs] |
| Align | Left | |
| Measure | Unknown |
CRF Attribute: CRF Version Name
| SPSS Data Definition Property | Value | Encoding |
| Name | VersionName_ [EVENT HANDLE]_[CRF HANDLE] | VersionName_ [EVENT HANDLE]_[CRF HANDLE] |
| Type | String | A |
| Width | [maximum length of CRF version name string across all the event CRFs] | [maximum length of CRF version name string across all the event CRFs] |
| Decimals | N/A | |
| Labels | Version Name For [EVENT NAME] | Version Name For [EVENT NAME] |
| Values | None | |
| Missing | None | |
| Columns | [maximum length of CRF version name string across all the event CRFs] | [maximum length of CRF version name string across all the event CRFs] |
| Align | Left | |
| Measure | Unknown |
The Following Rules Apply to Variable Names in SPSS:
General Requirements
- Must begin with a letter.
- Remaining characters can include:
- Letters
- Digits
- Period ( . )
- Symbols: @, #, _, $
- Must be unique.
- Must not exceed 64 bytes:
- Typically 64 characters in single-byte languages (for example, English, French, German, Spanish, Italian, Hebrew, Russian, Greek, Arabic, Thai).
- Typically 32 characters in double-byte languages (e.g., Japanese, Chinese, Korean).
Character Restrictions
- Cannot contain spaces or special characters such as:
- !, ?, ‘, *
- Avoid ending with:
- A period ( . ), as it may be interpreted as a command terminator.
- An underscore ( _ ), to prevent conflict with system-generated variables.
- The $ symbol:
- Indicates a system variable when used as the first character.
- Is not permitted as the first character of a user-defined variable.
Reserved Keywords
Variable names cannot use the following reserved keywords:
- ALL, AND, BY, EQ, GE, GT, LE, LT, NE, NOT, OR, TO, or WITH
Case Sensitivity
- Variable names may include any mixture of uppercase and lowercase letters.
- Case is preserved for display purposes only.
Line Wrapping Behavior
When long variable names wrap across multiple lines in SPSS output, line breaks occur at:
- Underscores
- Periods
- Transitions from lowercase to uppercase characters
OpenClinica Variable Name Conversion Rules
When an invalid variable name is encountered, OpenClinica automatically converts it to a valid SPSS variable name using the following logic:
- If the first character is not a letter, V is prefixed to the name.
- Invalid characters are replaced with #.
- If the final character is a period or underscore, it is replaced with #.
- Names longer than 64 characters are truncated to 64 characters.
- If truncation results in non-unique names:
- Sequential numbers are appended to ensure uniqueness.
- The default size of the sequential number is 3 digits.
- If a reserved keyword is used:
- Sequential numbers are appended to create a valid variable name.