Welcome!
The OpenClinica 4 (OC4) User Guide provides detailed information on how to build studies and forms, operate your study, manage your data, and support your study team and sites.
It also includes details about our add-on modules: Participate (for patient engagement and electronic patient reported outcomes, or ePRO), Insight (reporting, visualization, and data warehousing), and Randomize (for clinical trial randomization and supply management) to enhance your experience.
OpenClinica is trusted in thousands of studies around the world to capture and organize critical research data, and to enhance the productivity of your research.
We hope youll find your OpenClinica experience to be friendly, intuitive, and of the highest quality. The team here at OpenClinica is committed to your success.
Frequently Used Terms
The following table displays terms that are frequently used within OpenClinica.
| Question | Answer |
|---|---|
| What is a study? | A study is a collection of Forms and Events that contain participant data. |
| What is a participant? | A participant (or a subject) is a person who provides data for the study. If the Participate Module is activated, participants can enter data. If the Randomize Module is activated, participants can randomly assign groups, such as placebo and non-placebo without the bias of demographics, sex, gender, age, etc. |
| What is an Event? | Every Event has at least one Form. An Event can be visit-based, a scheduled occurence, or common, an unscheduled occurence. Events can common events can also be repeating or non-repeating. Examples: Visit-Based: One Month Followup Common Repeating: Adverse Event Common Non-Repeating: Termination |
| What is a Form? | A Form (or CRF) is an electronic record of participant data. Each Event has at least one Form. You can enter data into a Form, depending on your access. Forms can have conditional fields that only appear as a result of selecting specific responses or include calculations. Data Managers create Forms in Study Designer. If the Participate module is activated, they can make the Form a Participate Form, which allows participants to enter data from their device. |
| What is Study Designer? | Study Designer is where Data Managers create Events and Forms. |
| What is Study Runner? | Study Runner is the application for using the study, either in Test or Production. Depending on acces, you can view/enter data, create queries, verify, import data, extract data, etc. |
Frequently Used Screens
The screens you most frequently use depend on your User Role. Below are descriptions of the five main screens in OpenClinica.
| Screen | Description | Screenshot (Click the image to see a larger view) |
|---|---|---|
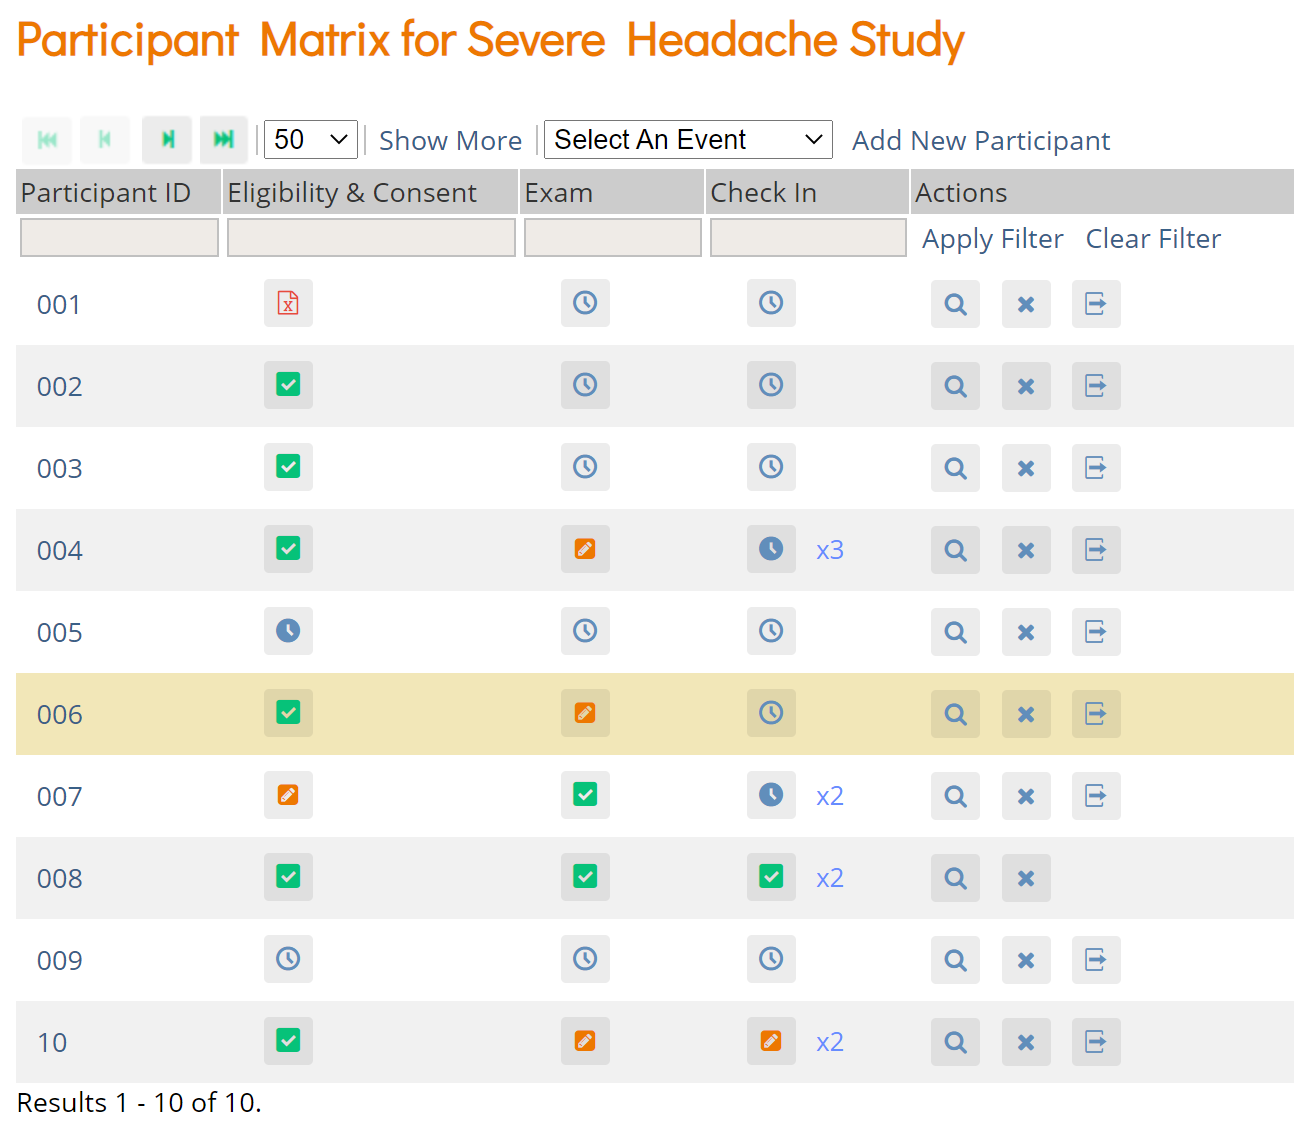
| Participant Matrix | This screen displays a list of participant IDs, events, and event statuses. From this screen, you can view participant details, schedule events, remove/restore participants, and reassign participants to another site, depending on access.
|  |
| Participant Details | This screen displays the participant's general information, events, and forms. From here you can view Forms, enter data into forms, edit form data, lock events, remove/restore events, clear forms, and reassign a Form to another version, depending on access. The Participant Details screen is divided into the following sections:
|  |
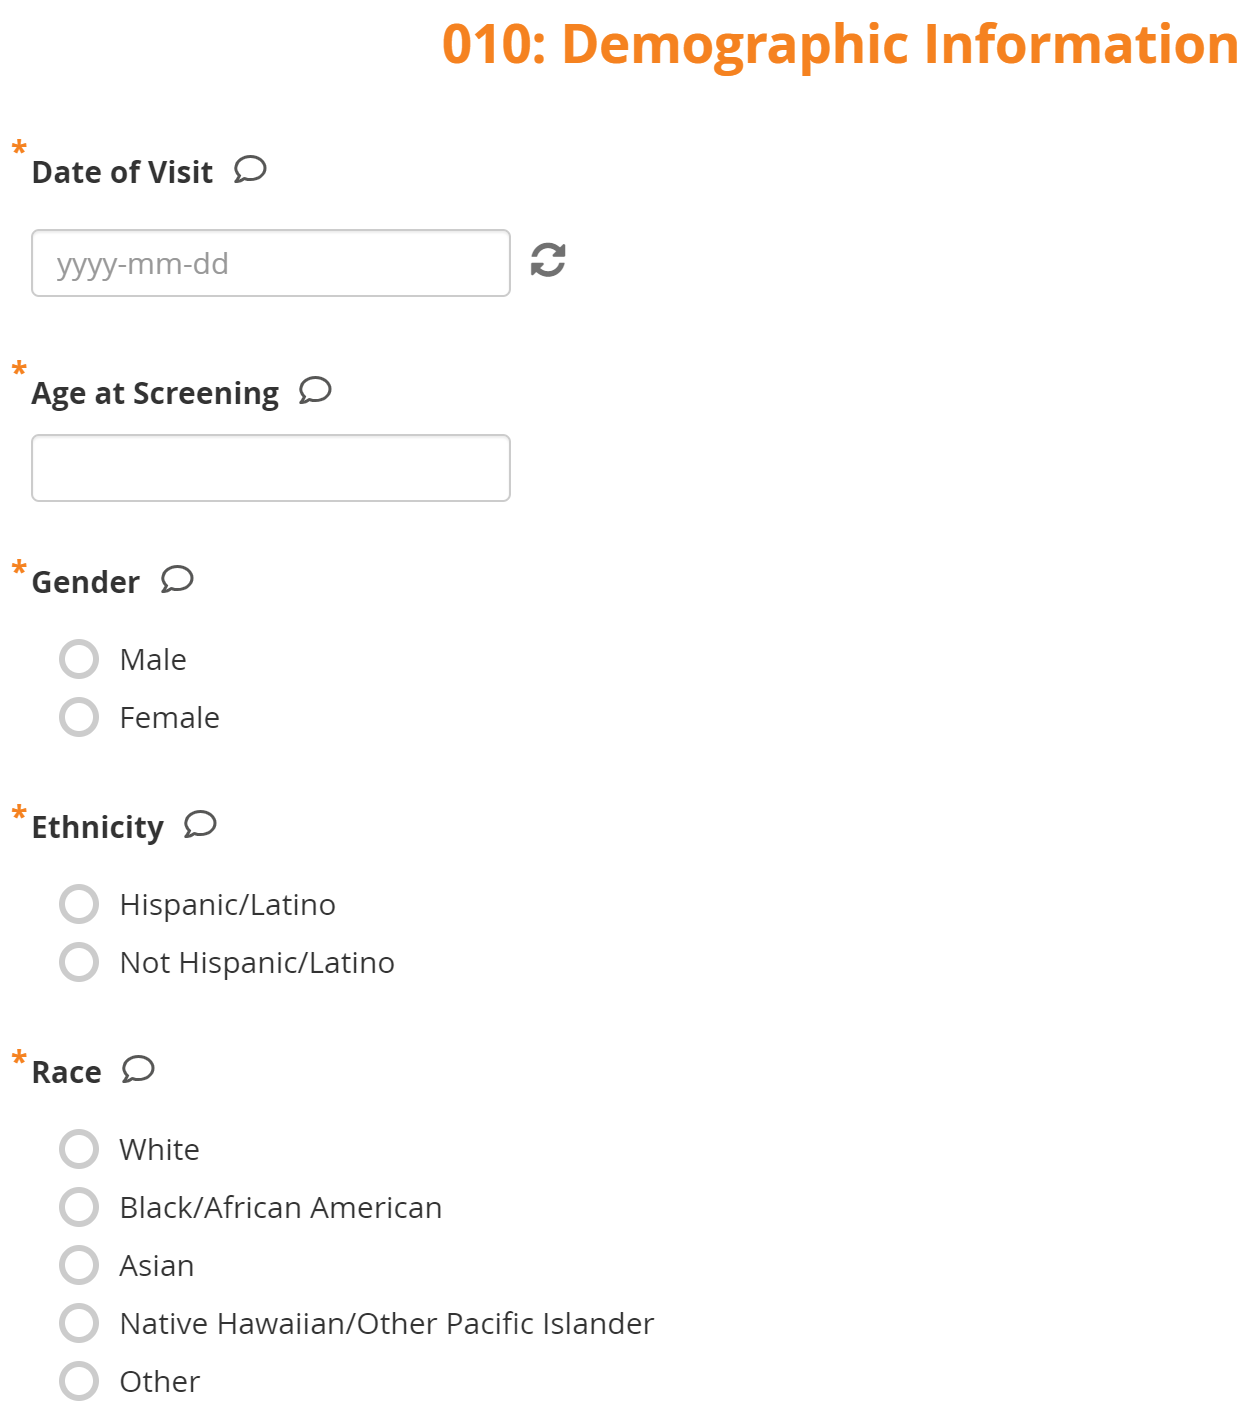
| Form Data Entry | When you open a form, you can view, enter data, edit data, add queries or annotations, close, and complete forms. If a user makes a change to the data after the form has been completed, they must enter a Reason for Change. Some features include:
|  |
| Queries | This screen displays all queries in the study environment. On this screen, you can view, add, update, and close queries, depending on access. Queries are usually added while reviewing forms from the Participant Details screen, but you can also add them when reviewing forms here. | 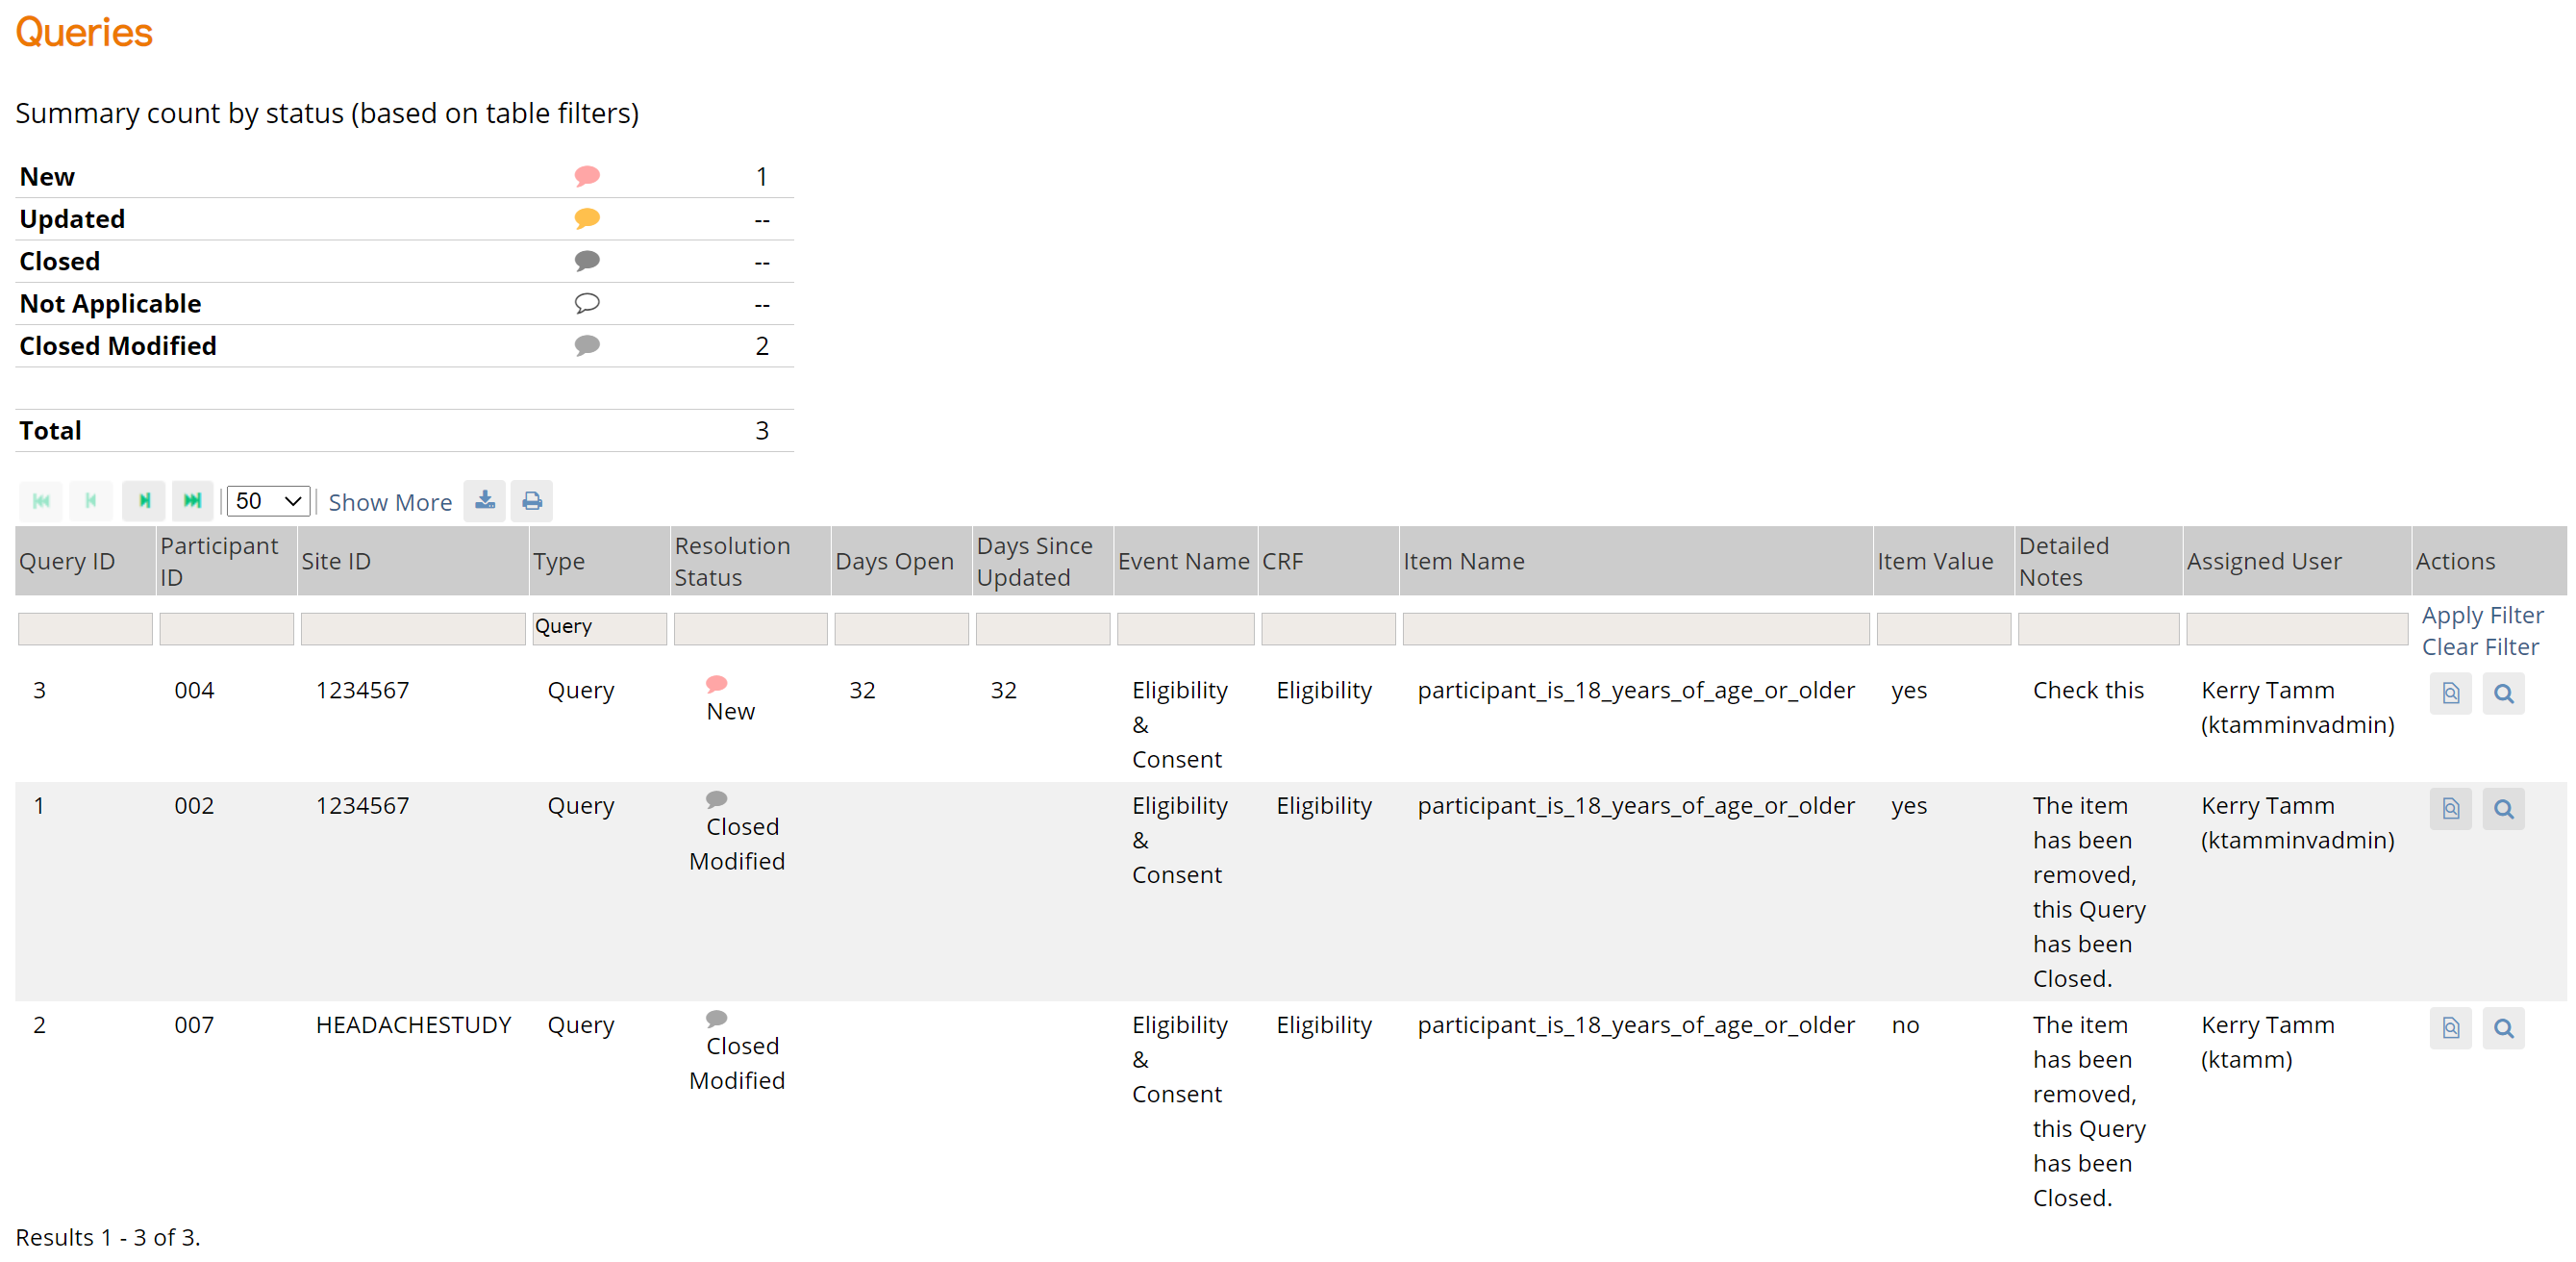 |
| Source Data Verification | On this screen, you can view forms, view item data, and verify/unverify forms. | 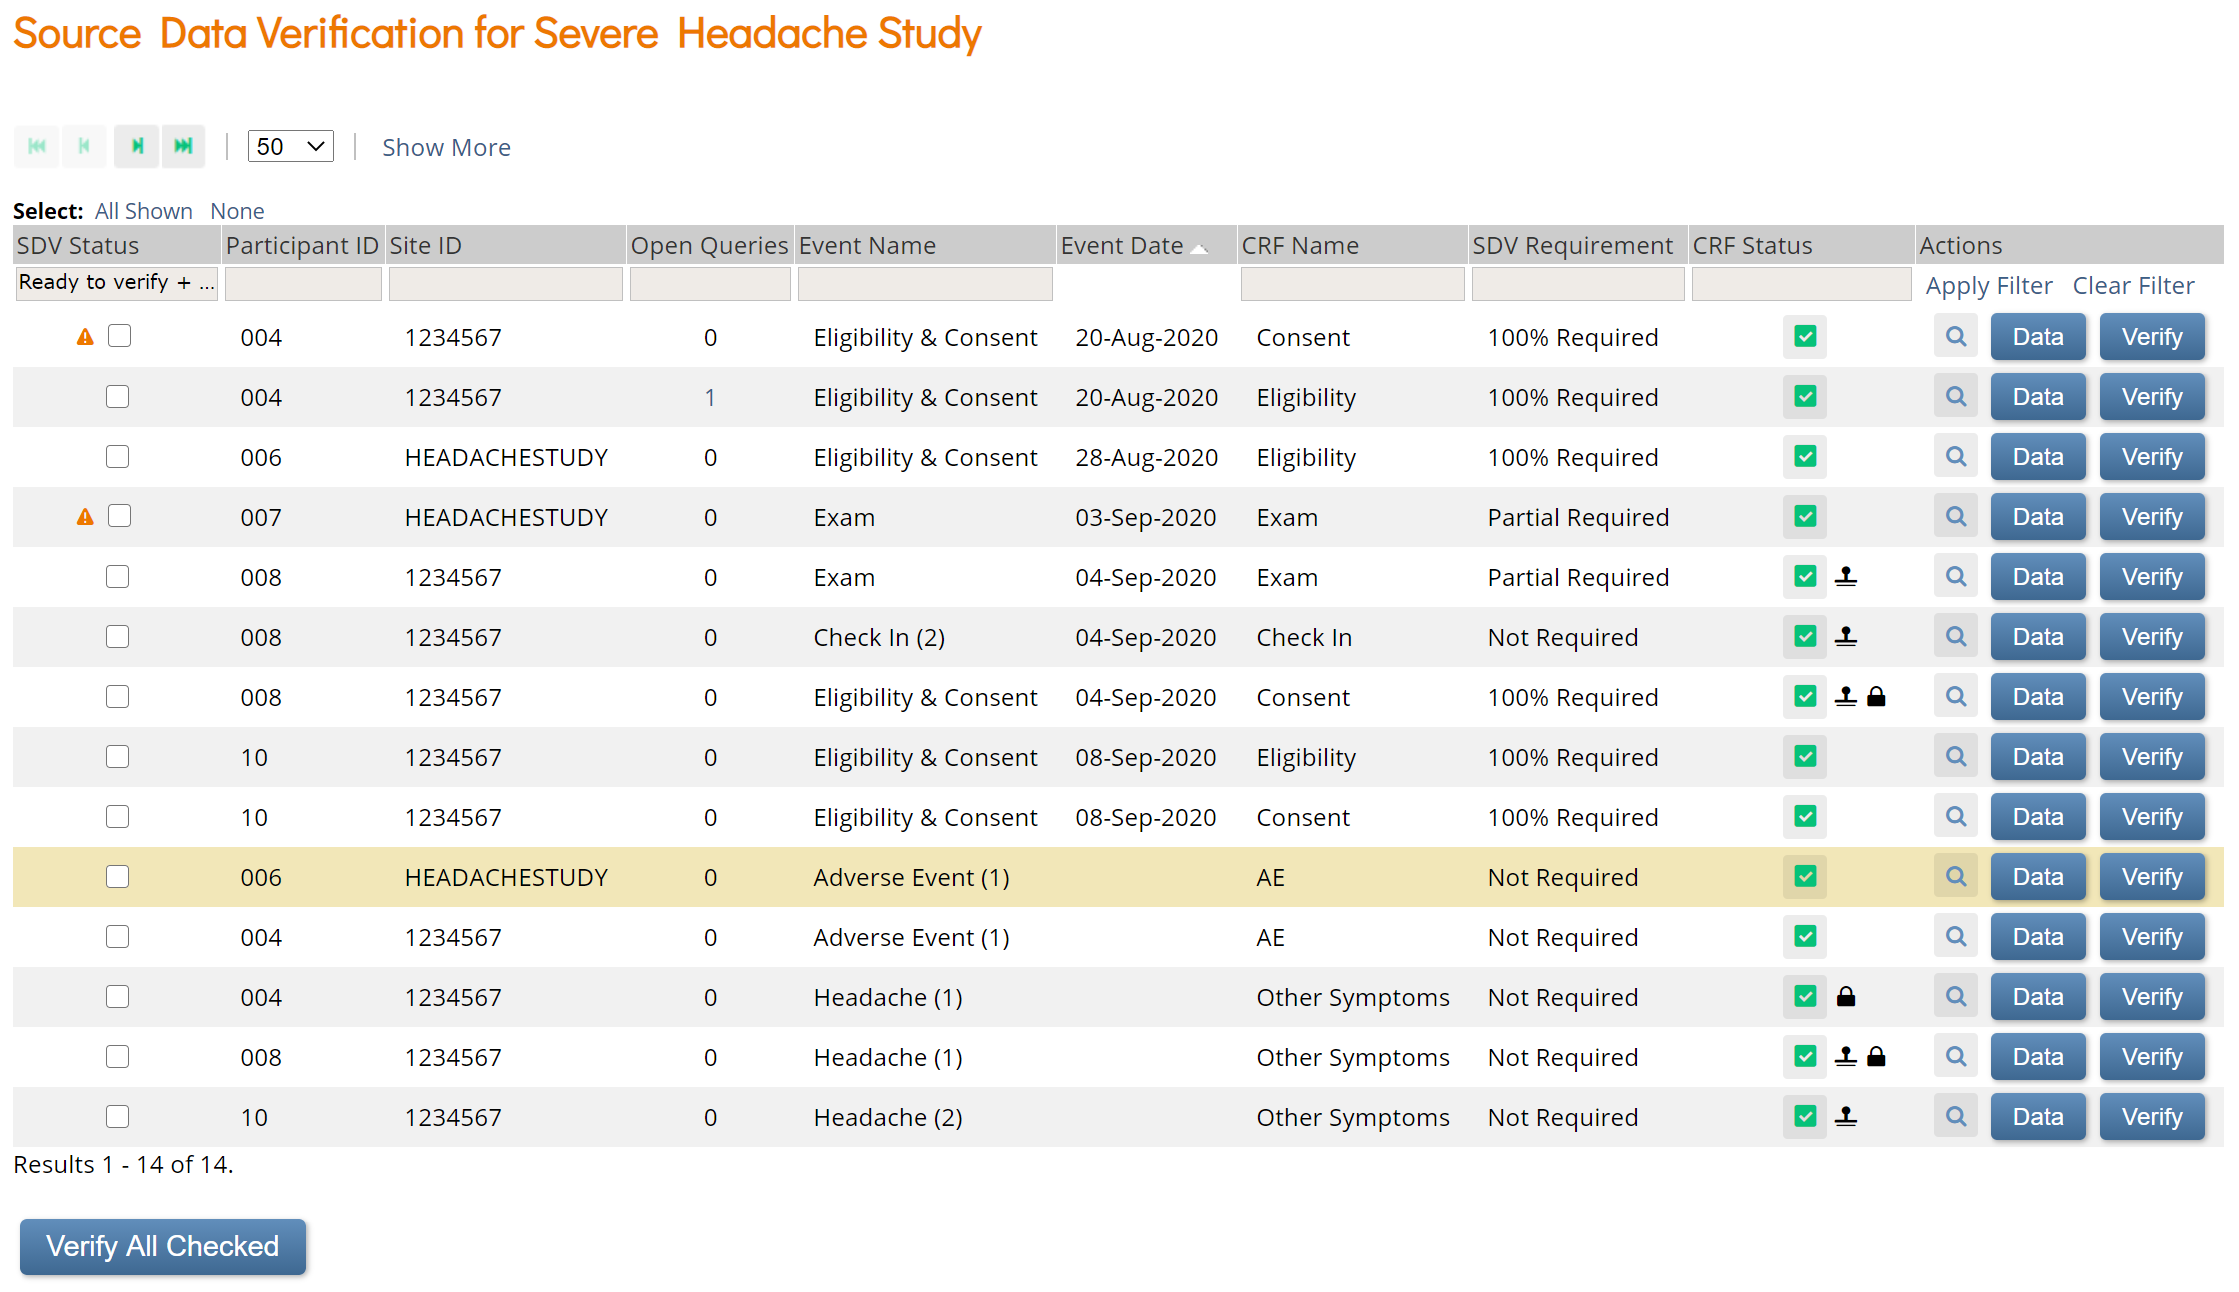 |
Openclinica Navigation
There are two main areas in Openclinica: Study Build System and Study Runner.
Only Data Managers and Administrators can access the Study Build System. This includes:
- The My Studies screen
- Study Designer
- User Roles screen
- Settings screen
- Modules screen
- Share screen
All users can access Study Runner, but the Home screen depends on User Role, as does access to certain features.
Study Runner includes:
- The Home screen, which can be the Welcome screen, Participant Matrix, or Source Data Verification screen
- The Participant Details screen
- The Queries screen
- The Study Audit Log
- The Tasks menu and associated tasks
- The User Menu

The header bar displays:
- The study name
- The study ID
- The environment the study is in
- The Change, Share, and Settings buttons. (Only users who are Data Managers and Administrators see the Design button.)
- Participant ID Search
- Links to areas in Study Runner
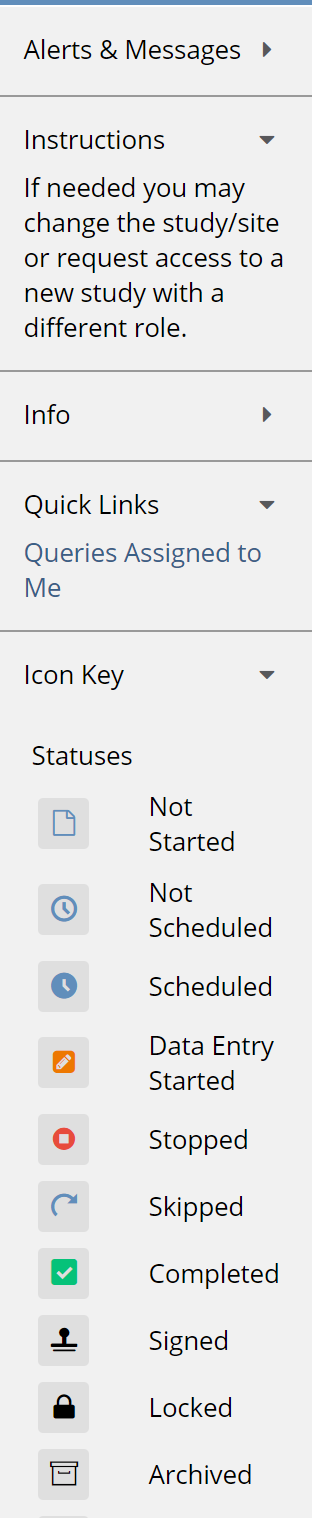
The panel on the left displays:
- Alerts & Messages
- Instructions
- Info
- Quick Links
- Icon Key
Getting Invited
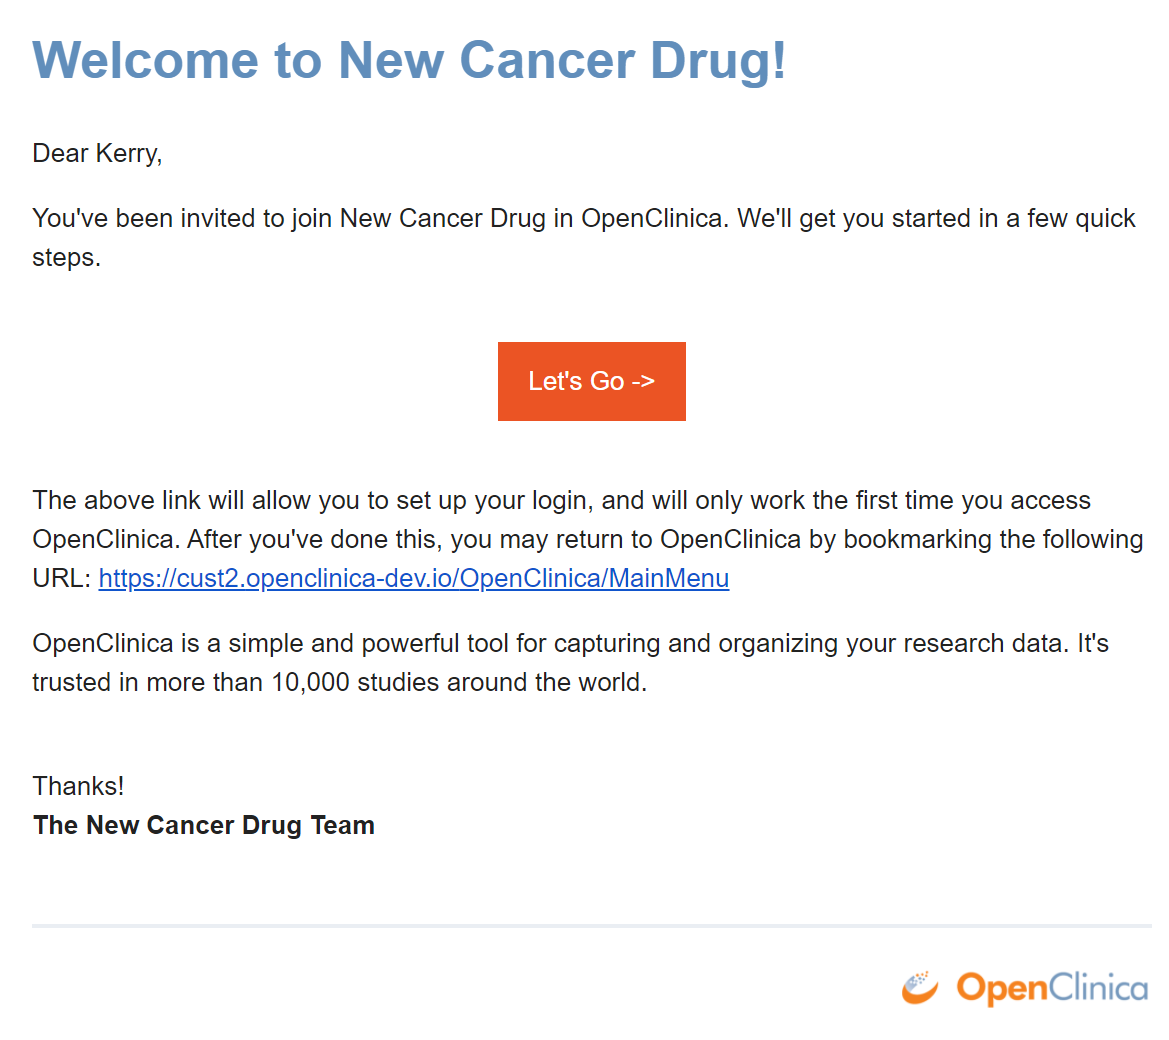
You will receive an email inviting you to participate in a study.
To accept an invitation:
- Open the email.
- Click Let’s Go.
Your First Log In
After clicking Let’s Go, you will be redirected to a page asking you to reset your password.
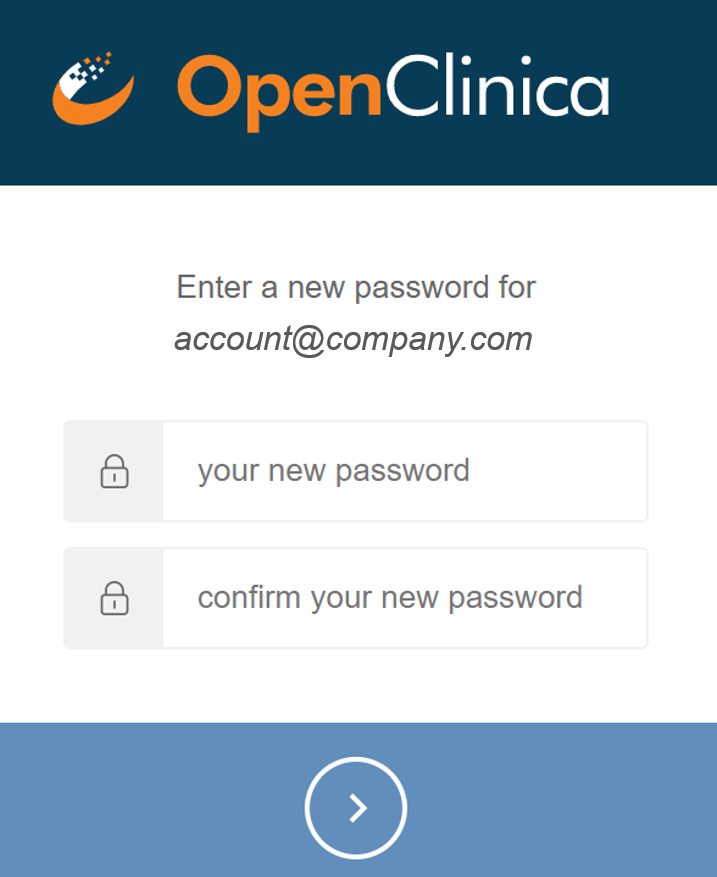
Your password must:
- Be at least 8 characters in length
- Contain at least one of each of the following types of characters:
- Lower case letters (a-z)
- Upper case letters (A-Z)
- Numbers (0-9)
- Special characters (!@#$%^&*)
In addition:
- Passwords expire every 180 days, and users are automatically prompted to create a new password.
- User accounts are locked after ten failed login attempts from the same IP address.
- The lockout resets after 15 minutes. The login failure count resets every 24 hours.
- When a user tries to login after their account has been locked, it is included in the User Audit Log as a failed login attempt.
- If a user resets a password, it cannot be the same as the previous password.
- The password reset link is available for 24 hours, after which, if a user has not reset the password, they must request a password reset again.
- All reset requests are logged in the User Audit Log.
- Users are automatically logged out of OpenClinica after one hour of inactivity.
- Invitations to studies expire in 14 days if they have not been accessed.
Once you have entered a password that meets the requirements, you will be prompted to log into OpenClinica.
Note:
The username or email address is not case-sensitive, but the password is case-sensitive.
If you want to create an OpenClinica bookmark, make sure to bookmark the Home screen after you log instead of bookmarking the Login page.
Subsequent Log Ins
To log into OpenClinica after your first log in:
- Enter the URL into the URL bar at the top of the browser, or click on a bookmark to the Home screen.
- Enter your username.
- Enter your password.

Note:
If you forget your password, click “Don’t Remember Your Password?”
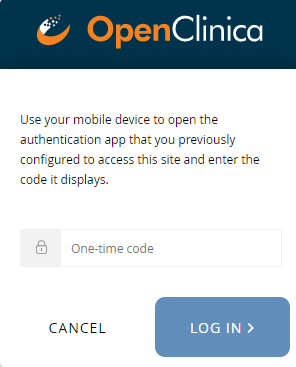
Multi-Factor Authentication
Your site can set up multi-factor authentication. This requires users to log in with their username and password as well as an access code provided by either the FreeOTP app or Google Authenticator app on their smartphone.
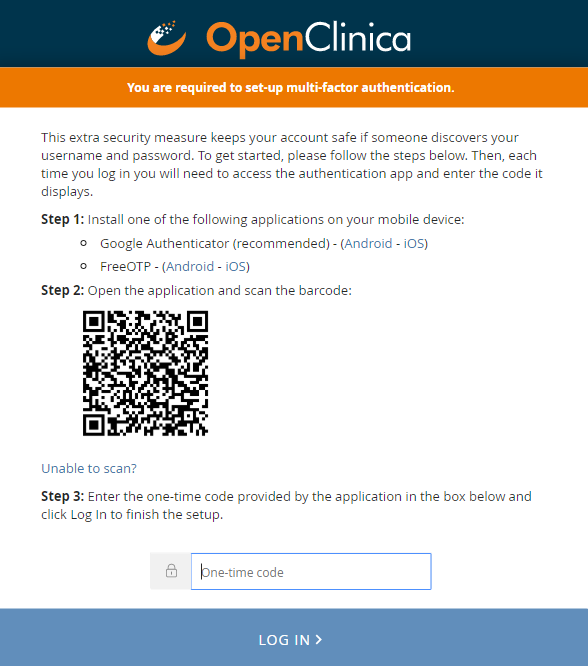
You can enable multi-factor authentication for your site with an API or contact the OpenClinica Customer Service team.
To set up multi-factor authentication for your site:
- Download either the FreeOTP app or the Google Authenticator app to your smartphone.
- Open the application, and scan the barcode on the Log In screen.
- Enter an access code provided by the application.
Note:
After you log in for the first time with multi-factor authentication, you will not need to scan the barcode for subsequent log ins.
Users with a User Type of Administrator can reset multi-factor authentication for a user from the Reset Multi-Factor Access button on the People table on the Administration screen.
Home Screens
Your Home screen depends on your User Role, as shown in the table below:
| User Role | Home Screen | Displays |
|---|---|---|
| Data Manager/Admin | Welcome | Graphs of Study Progress |
| Investigator | Participant Matrix | Participants and Events |
| Clinical Research Coordinator | Participant Matrix | Participants and Events |
| Data Specialist | Participant Matrix | Participants and Events |
| Data Entry Person | Participant Matrix | Participants and Events |
| Study or Site Monitor | Source Data Verification | Forms to Review and Verify |
| Study or Site Viewer | Participant Matrix | Participants and Events |
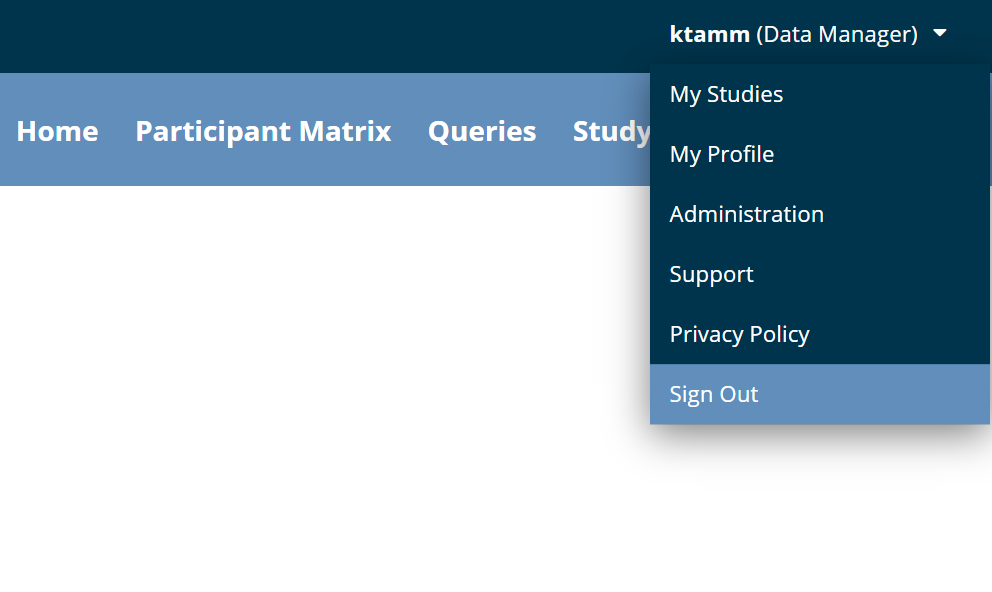
How to Log Out
To log out of Openclinica:
- Click the User Menu.
- Click Sign Out.