2.4.7.1 Basic Calendaring
Basic Calendaring provides a simple user interface to automatically schedule events, close them when overdue, and send notifications to participants or study team members.
⚠️ Important Notes:
- Supports visit-based, non-repeating events only.
- Applies to site-level participants only.
- Each event can have one scheduling rule and one auto-close rule.
- If events are reordered, review the calendar to confirm the intended schedule.
Schedule the First Event
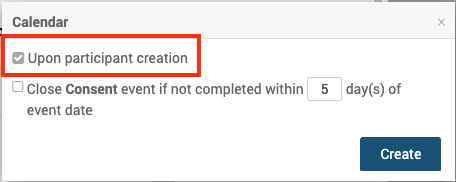
The first event in a study can be scheduled automatically when a participant record is created.
To schedule the first event:
- Click on the Event name.
- Expand Calendar by clicking

- Select Upon participant creation.
- Click Create.
Schedule Subsequent Events
Subsequent events are scheduled relative to a prior event.
The events can be scheduled in two ways: On-demand or based on a specific date. Each event can only have one scheduling rule.
To configure scheduling:
- Click on the Event name
- Expand Calendar by clicking
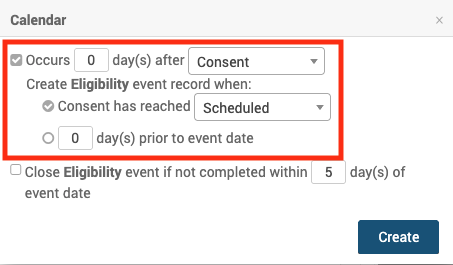
- Select the event you want to base the schedule on from the dropdown (triggering event).
- Choose one of the following scheduling options:
- Define scheduling by status (On-demand) – Schedule the new event when the triggering event reaches a specific status (Scheduled, Data Entry Started, or Completed).
- Example: An Eligibility event will be created as soon as the Consent event reaches the status of “Scheduled.”
- Define scheduling by date – Schedule the new event a specific number of days before or after the triggering event’s date. This rule runs nightly at 12:00 a.m. in the site’s time zone.
- Example (after): Baseline Visit event record should be available for data entry 7 days after Screening Visit.
- Example (before): Baseline Visit event record should be available for data entry 3 days before Baseline Visit.
- Define scheduling by status (On-demand) – Schedule the new event when the triggering event reaches a specific status (Scheduled, Data Entry Started, or Completed).
- Click Create
ℹ️ Note: Each event can have only one scheduling rule.
Automatically Close Events
You can configure events to close automatically if not completed on time. The scheduling rule runs at 11:00 p.m. in the site’s time zone.
To auto-close an event:
- Click on the Event name
- Expand Calendar by clicking
- Select Close if not completed within X days.
- Click Create
If an event has existed for [x] number of days, its status is updated automatically:
- Complete – The event moves to Complete if all required forms have a status of Complete and no forms have a status of Data Entry Started.
- Stopped – The event moves to Stopped if any required form has a non-complete status or if any form has a status of Data Entry Started.
- Skipped – If the event is still in Scheduled status, it moves to Skipped
ℹ️ Note: These statuses can be manually changed back if needed.
Notifications Based on Events
You can configure automated notifications by email or SMS for participants and study team members. Each event can include multiple notification rules.
- Notifications can be triggered upon Event creation, at specific time intervals, or upon completion.
- You can configure multiple notification rules for a single event (e.g., at different times or to different recipients)
⚠️ Limitation: Calendaring notifications cannot be used alongside legacy OC4 rules in the same study.
To configure notifications:
- Click on the Event name
- Expand Notifications by clicking
- Select the trigger you want to base the notification on.
- Upon event creation
- X days before the event date – Send the notification a set number of days before the event. You can define the time of day the notification is sent. Delivery is based on the participant site’s time zone.
- X days after the event date – Send the notification a set number of days after the event. You can define the time of day the notification is sent. Delivery is based on the participant site’s time zone.
- When the event is completed
- Enter Recipients
- One or more email addresses
- ${participant} (if the Participate module is enabled)
- Participants with both email and phone receive the notification through both channels.
- Enter Subject – Used for email notifications only. You can customize the subject line with variables.
- Enter Message – Used for the body of email or text notifications. You can customize the content with variables.
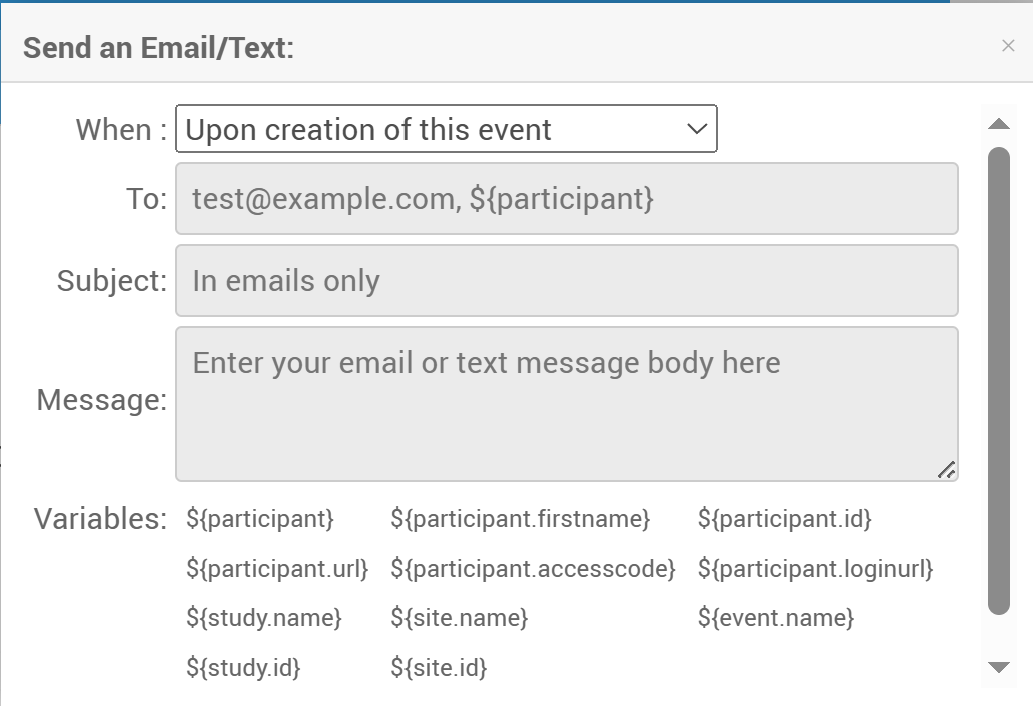
Supported Variables
The following Variables refer to specific study data and can be inserted into Subject and Message to customize the message.
| Parameter | Description | To | Message | Subject |
| ${participant.firstname} | Participant First Name | X | ||
| ${participant.loginurl} | Participant URL with Automatic Login | X | ||
| ${participant.url} | Participant URL without Automatic Login | X | ||
| ${study.name} | Name of the Study, as Defined in OpenClinica | X | X | |
| ${participant.accesscode} | Single-Use Code the Participant must use to access OpenClinica Participate | X | ||
| ${event.name} | Name of the Event, as specified in OpenClinica | X | X | |
| ${participant} | Participant Contact Information, as provided when the Participant was connected to the Study. (This could be a mobile number for SMS notification, an email address, or both); OpenClinica automatically sends the notification. | X | ||
| ${participant.id} | Participant ID | X | X | |
| ${site.id} | Site ID | X | X | |
| ${site.name} | Site Name | X | X | |
| ${study.id} | Study ID | X | X |
Reordering Events
If you reorder Events:
- Extended options applied to later Events are preserved.
- Moving an Event to the first position displays only limited options.
- If moved back, the saved extended options are restored.
⚠️ Always review Calendar after reordering Events to ensure it reflects your intended schedule.
2.4.7.2 Rules
Definition: A rule is a logical expression used to automate a task. |
Examples:
|
There are two main types of rules that Data Managers can create:
- EventAction rules automatically schedule events
- NotificationAction rules automatically send notifications by email or SMS
You can download the Rules Template and edit it to create a rule to perform either an EventAction or a NotificationAction.
Note: You can only write rules based on the statuses in the table below. You cannot be written based on an event being Removed or Archived.
| Event Status | Text for Rule (case sensitive) |
| Not Scheduled | not_scheduled |
| Scheduled | scheduled |
| Data Entry Started | data_entry_started |
| Completed | completed |
| Skipped | skipped |
| Stopped | stopped |
| Signed | signed |
| Locked | locked |
Despite the use of the new data model, with Statuses and Independent Status Attributes, rules that use the old data model will still work correctly.
Quick Start Guide
To Create a Rule:
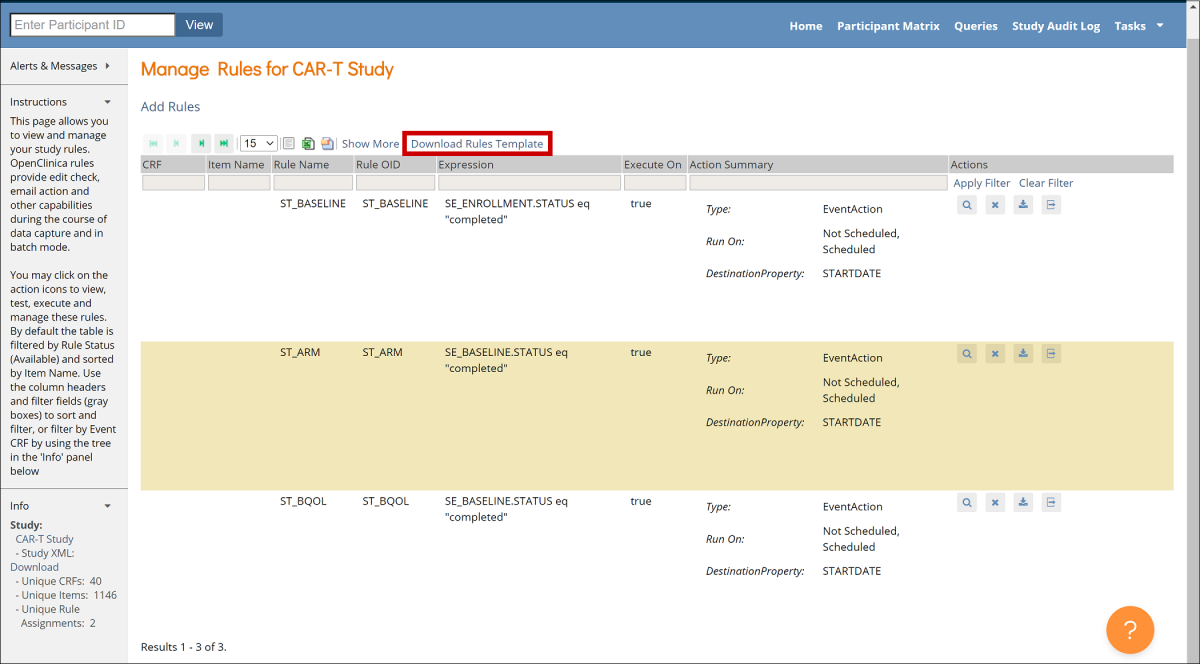
Step 1: Access the Manage Rules screen.
- Click Tasks in the header bar of Study Runner.
- Select Rules.
- The Rules option does not display when logged in at the Site level. Change to Study level to see the Rules option.
Step 2: Download the Rules Template.
Click the Download Rules Template link at the top of the table.
Step 3: Open the Rules Template in an XML editor, such as Notepad ++ for Windows or BBEdit for Mac.
Note: The Rules Template file contains instructions that are bracketed by “<!– ” and “–>“. These instructions can be left in in the file, as they will not affect the functionality of the rule. However, they can also be removed in order to make the file easier to read.
Step 4: Find and record OIDs to reference Events and Forms.
- Click Tasks in the header bar of Study Runner, and select View Study.
- Click the Download the Study Metadata link at top of the screen and record OIDs, or scroll down on the screen and record OIDs from there.
See Locate Object Identifiers in a Study for more information on finding OIDs.
Step 5: In the Rules Template, delete any actions you do not want the rule to perform.
- If you are making an EventAction rule, delete the lines starting from <NotificationAction > to </NotificationAction> tags.

- If you are making a NotificationAction rule, delete the lines starting from <EventAction> to </EventAction> tags.

Step 6: Define the Target.
The target is the trigger condition – any time a value changes, the rule evaluates the target. The two supported trigger conditions are as follows.
- Event Status: [SE_EVENTOID].STATUS
- Event Start Date: [SE_EVENTOID].STARTDATE
First, remove the text “Context=”OC_RULES_V1“.

Between the > and <, enter the trigger condition, including the actual Event OID for the event whose status or start date updates should trigger the rule:
- [SE_EVENTOID].STATUS if you want the rule to trigger when the [SE_EVENTOID] status changes
- [SE_EVENTOID].STARTDATE if you want the rule to trigger when the [SE_EVENTOID] start date changes.

(Optional): If you want the rule to run at a certain time, use the RunOnSchedule tag. Specify the time in 24-hour format UTC and remove the “<!– ” and “–>” text.

Step 7: Define an OID for the rule.
It must be entered in all capital letters within double quotes. You can include numbers and underscores. It must be unique within the study and can only be 40 characters long.

Step 8: Enter the expression.
Expressions are the conditions that cause the rule to run. There are two types of actions: Event Action and Notification Action.
- Event Action
- IfExpressionEvaluates: Define as “true” or “false”, meaning that if the rule action will only occur when the expression you define matches (“true”) or does not match (“false”).
- OID: Replace “Target_Event_OID” with the Study Event OID for the event that will be scheduled by this rule.
- RunOnStatus: If you want the rule to run only when the target event is at specific status, specify all of the statuses as true or false. For a repeating event, specify the ordinal in square brackets. For ex. SE_DAILYDIARY[1].
- For example, if it is a scheduling rule, you would likely only want the rule to run when the event has a status of “not_scheduled”.
- EventDestination: STARTDATE. Legacy rules can only schedule events, and not advance them through the workflow.
- ValueExpression: Remove Context=”OC_RULES_V1″ and enter the expression whose result should be entered into the EventDestination property of the event. For example, in the example below (SE_ENROLLMENT.STARTDATE +7. ), the EventDestination property that will be set to the start date of the Enrollment event plus 7 days.

- Note: See syntax below, in the tables
- NotificationAction:
- IfExpressionEvaluates: Define as “true” or “false”, meaning that if the notification will be sent only when the expression you define matches (“true”) or does not match (“false”).
- To: Specify the recipient(s) by replacing user1@openclinica.com with:
- A comma separated list of email recipients, if the notification always needs to be sent to the same individuals / group of individuals.
- ${participant}, if the notification needs to be sent to the email address and phone number that have been entered into OpenClinica for the Participant. Can only be used if OpenclinicaParticipate is active.
- Subject: Enter the subject line for the notification.
- Message: Define the message that will be sent to recipients.

- Note: For details of the parameters that can be used within the Subject and Message tags, see the table Notification Action Parameters table below.
Step 9: Enter the information about the rule itself.
- RuleDef: Enter the same Rule OID as you entered in the RuleRef tag above, and add a name for the rule as well.
- Description: Describe the rule in simple terms so that it is easy to understand what the rule is doing.
- Expression: Enter the condition that will trigger the rule to run.

- Note: See syntax below, in the tables.
Step 10: Make sure all tags are closed and save the file as an XML file.
Step 11: Click the Add Rules link at the top of the Manage Rules screen.
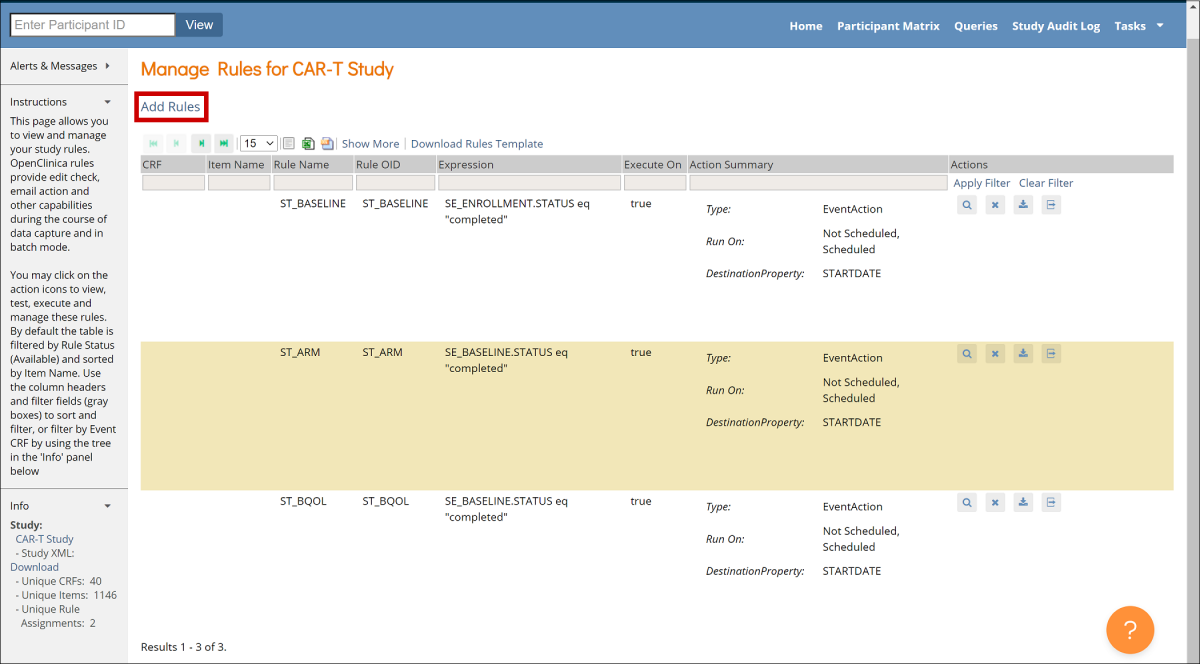
Step 12: Click Choose file, and select a file to upload. Then click the Continue button. If any errors are identified within the rule XML, address them and upload the file again.
To View a Rule:
Click the View button next to the rule you want to view.

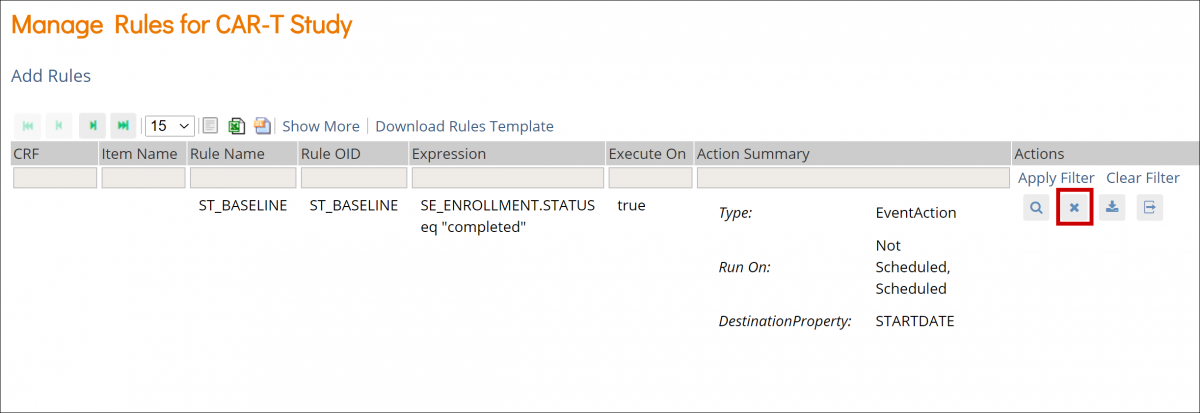
To Remove a Rule:
Click the Remove button next to the rule you want to remove.
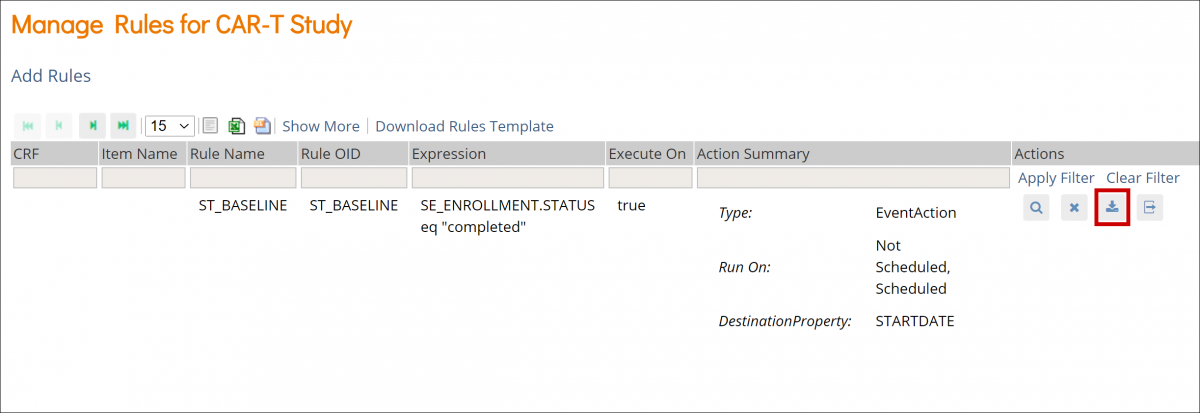
To Download a Rule:
Click the Download button next to the rule you want to download.
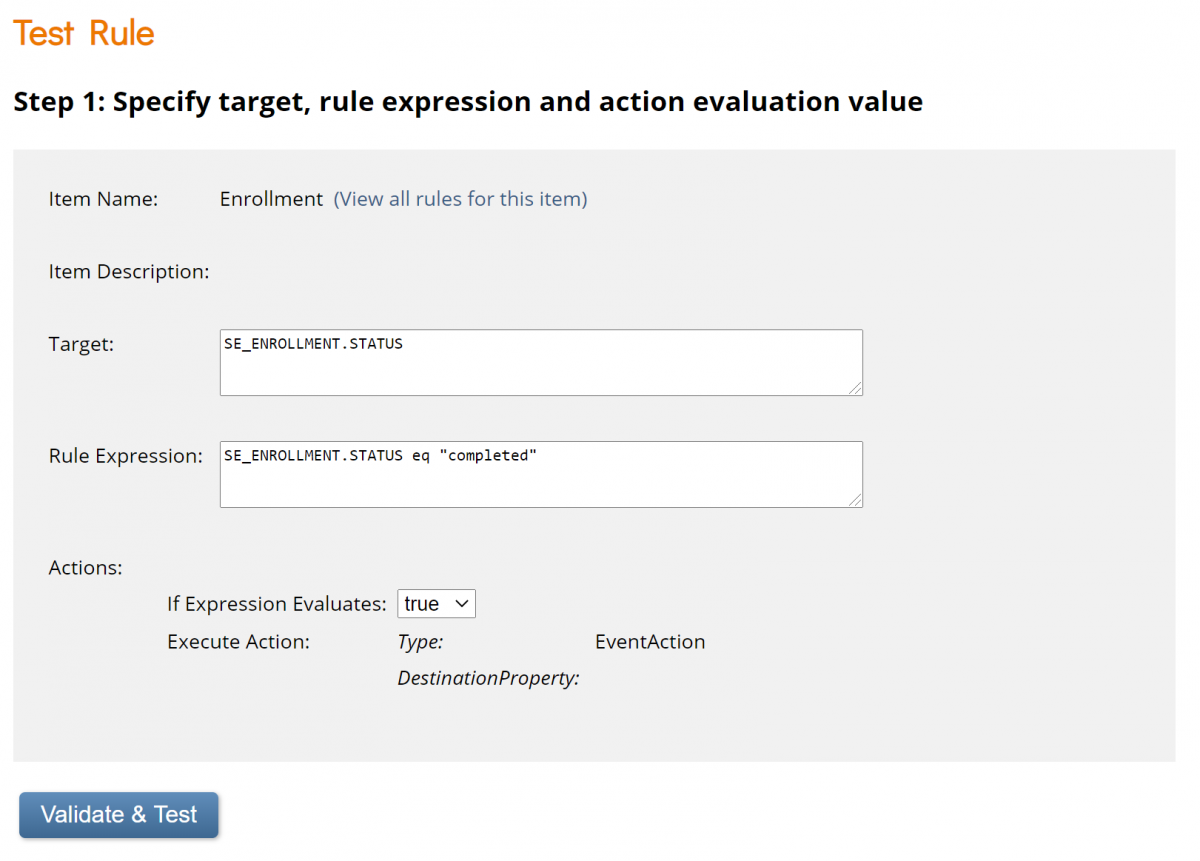
To Test a Rule:
- Click the Test button next to the rule you want to test.
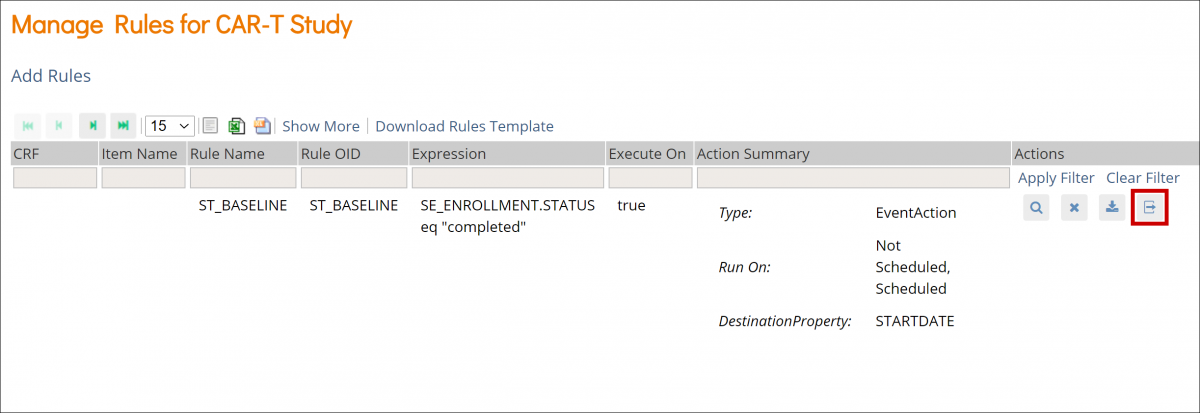
- Check that the Target, Rule Expression, and Actions are displayed correctly on the screen.
- Click the Validate & Test button.
- Specify test values for variables in your rule expression.
- Click the Validate & Test button again.
- Review the results of the test. On the left-hand sidebar under Alerts & Messages, you will see a statement about whether the test was valid or invalid. Scroll down to Verify results for more details.
Actions
Icon | Action | Description |
 | View | View the rule information, such as Target OID, Study Event Definition, CRF Name, etc. |
 | Remove | Remove the rule |
 | Download | Download the rule |
 | Test | Test to ensure that the rule works |
Rule Components
Rule Component | Description |
| RuleDef | The rule definition, which includes the rule OID, name, description, and expression. This defines the rule, which is then assigned (referenced) in the RuleRef. |
| RuleRef | The rule definition/expression being used by the assignment is referred to in the RuleRef. This is an OID for the particular RuleDef. Each RuleRef may have multiple actions and ActionTypes. |
| RunOnStatus | For EventAction, the parameter that defines when the EventAction will execute. The current status values include not_scheduled, scheduled, data_entry_started, completed, skipped, and stopped. |
| Target | The target is the event that when changed, causes the rule to be evaluated. The legacy rule can be triggered on EVENT.STARTDATE or EVENT.STATUS. |
| RunOnSchedule | This will be evaluated and triggered the first time it becomes true based on a change of event status or other component of the expression. The rule will also be evaluated daily at the set hour in the UTC time zone and may trigger then if the expression is true. Notes:
|
| EventAction | Defines:
|
| EventDestination | Must be set to STARTDATE. |
| ValueExpression | A calculation or other expression that defines what will be populated in the EventDestination. |
| Expression | The expression that will trigger the rule to run. |
Expressions
Expression | Definition | Variable Type |
| eq | Equal to | Any |
| ne | Not Equal to | Any |
| ct | Contains | Any |
| gt | Greater Than | Number |
| gte | Greater Than or Equal to | Number |
| lt | Less Than | Number |
| lte | Less Than or Equal to | Number |
Example:
SE_ENROLLMENT.STATUS eq “completed”
Conditional Operators
Operator | Function | Description |
| and | And | Variables used with this operator should be of a boolean type |
| or | Or | Variables used with this operator should be of a boolean type |
Example:
SE_SCREENING.STARTDATE lte _CURRENT_DATE and SE_SCREENING.STATUS ne “completed”
Arithmetic Operators
Operator | Function | Description |
| + | Addition | Variables used with this operator should be of a number type |
| – | Subtraction | Variables used with this operator should be of a number type |
| * | Multiplication | Variables used with this operator should be of a number type |
| / | Division | Variables used with this operator should be of a number type |
Example:
SE_ENROLLMENT.STARTDATE + 7
Dates within Rules: Equality and Relational Operators
| Expression | Definition | Full Expression |
| eq | Equal to | SE_EVENTOID eq 2025-01-15 |
| ne | Not Equal to | SE_EVENTOID ne 2025-01-15 |
| gt | Greater Than | SE_EVENTOID gt 2025-01-15 |
| gte | Greater Than or Equal to | SE_EVENTOID gte 2025-01-15 |
| lt | Less Than | SE_EVENTOID lt 2025-01-15 |
| lte | Less Than or Equal to | SE_EVENTOID lte 2025-01-15 |
The format of the date included in an expression should be yyyy-MM-dd.
Example:
January 15, 2025 should be written as: 2025-01-15
You can also use _CURRENT_DATE to compare values against the current server date. This is treated as an exact time of day and will not match any date using the eq comparison operator. It should be used with gt/gte and/or lt/lte operators.
For example, to notify Participants of a Form that must be completed on the next day, you could use a NotificationAction with an expression such as:
<Expression>(SE_EVENTOID.STARTDATE lte (_CURRENT_DATE + 1) and SE_EVENTOID.STARTDATE gt _CURRENT_DATE and SE_EVENTOID.STATUS ne “complete”</Expression>
This would send a notification one day in advance of the expected event completion date as long as the event were not already completed by the Participant. It uses a pair of clauses using the lte and gt operators and _CURRENT_DATE to ensue that it is triggered as expected only when _CURRENT_DATE is within one day before the Event Start Date.
Notification Action Parameters
Parameter | Description | To | Message | Subject |
| ${participant.firstname} | The Participant First Name | X | ||
| ${participant.loginurl} | The Participant URL with Automatic Login Note: If the access code has not been previously created, triggering a notification with the ${participant.loginurl} variable will generate the access code for the participant. | X | ||
| ${participant.url} | The Participant URL without Automatic Login | X | ||
| ${study.name} | The Name of the Study, as Defined in OpenClinica | X | X | |
| ${participant.accessCode} | The Code the Participant Must Use to Access OpenClinica Participate. Note: If the access code has not been previously created, triggering a notification with the ${participant.accessCode} variable will generate the access code for the participant. | X | ||
| ${event.name} | The Name of the Event, as Specified in OpenClinica | X | X | |
| ${participant} | The Participant Contact Information, as Provided When the Participant was Connected to the Study. (This Could be a Mobile Number for SMS Notification, an Email Address, or Both); OpenClinica Automatically Sends the Notification | X | ||
| ${participant.id} | Participant ID | X | X | |
| ${site.id} | Site ID | X | X | |
| ${site.name} | Site Name | X | X | |
| ${study.id} | Study ID | X | X | |
| \n | Use at the End of a Line for a Line Break | X |
For example, the following rule will send a notification to any Participant who has an Event scheduled for the following day:

Rule Examples
Schedule Day 7 Questions event for 7 days after the Baseline Questions event is marked as complete.

Notify participant that the Baseline Questions event is available when the current date is equal to or past the event start date. The notification will be sent every day at 09:00 UTC until the event is marked as complete, skipped or stopped.

Notify participant that Day 7 Questions event is available when the current date is before or equal to STARTDATE and the event has been scheduled.

When the Baseline visit has been completed, schedule both Visit1 and Visit 2, as well as notify a user that Baseline has been completed.
