Basic Calendaring provides a simple user interface to automatically schedule events, close them when overdue, and send notifications to participants or study team members.
⚠️ Important Notes:
- Supports visit-based, non-repeating events only.
- Applies to site-level participants only.
- Each event can have one scheduling rule and one auto-close rule.
- If events are reordered, review the calendar to confirm the intended schedule.
Schedule the First Event
The first event in a study can be scheduled automatically when a participant record is created.
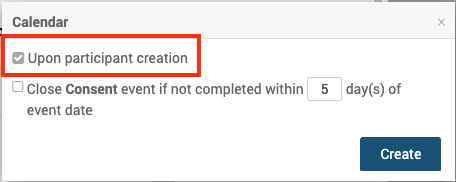
To schedule the first event:
- Click on the Event name.
- Expand Calendar by clicking

- Select Upon participant creation.
- Click Create.
Schedule Subsequent Events
Subsequent events are scheduled relative to a prior event.
The events can be scheduled in two ways: On-demand or based on a specific date. Each event can only have one scheduling rule.
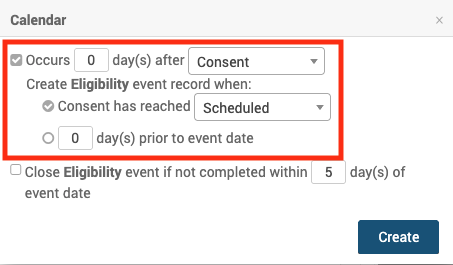
To configure scheduling:
- Click on the Event name
- Expand Calendar by clicking
- Select the event you want to base the schedule on from the dropdown (triggering event).
- Choose one of the following scheduling options:
- Define scheduling by status (On-demand) – Schedule the new event when the triggering event reaches a specific status (Scheduled, Data Entry Started, or Completed).
- Example: An Eligibility event will be created as soon as the Consent event reaches the status of “Scheduled.”
- Define scheduling by date – Schedule the new event a specific number of days before or after the triggering event’s date. This rule runs nightly at 12:00 a.m. in the site’s time zone.
- Example (after): Baseline Visit event record should be available for data entry 7 days after Screening Visit.
- Example (before): Baseline Visit event record should be available for data entry 3 days before Baseline Visit.
- Define scheduling by status (On-demand) – Schedule the new event when the triggering event reaches a specific status (Scheduled, Data Entry Started, or Completed).
- Click Create
ℹ️ Note: Each event can have only one scheduling rule.
Automatically Close Events
You can configure events to close automatically if not completed on time. The scheduling rule runs at 11:00 p.m. in the site’s time zone.
To auto-close an event:
- Click on the Event name
- Expand Calendar by clicking
- Select Close if not completed within X days.
- Click Create
If an event has existed for [x] number of days, its status is updated automatically:
- Complete – The event moves to Complete if all required forms have a status of Complete and no forms have a status of Data Entry Started.
- Stopped – The event moves to Stopped if any required form has a non-complete status or if any form has a status of Data Entry Started.
- Skipped – If the event is still in Scheduled status, it moves to Skipped
ℹ️ Note: These statuses can be manually changed back if needed.
Notifications Based on Events
You can configure automated notifications by email or SMS for participants and study team members. Each event can include multiple notification rules.
- Notifications can be triggered upon Event creation, at specific time intervals, or upon completion.
- You can configure multiple notification rules for a single event (e.g., at different times or to different recipients)
⚠️ Limitation: Calendaring notifications cannot be used alongside legacy OC4 rules in the same study.
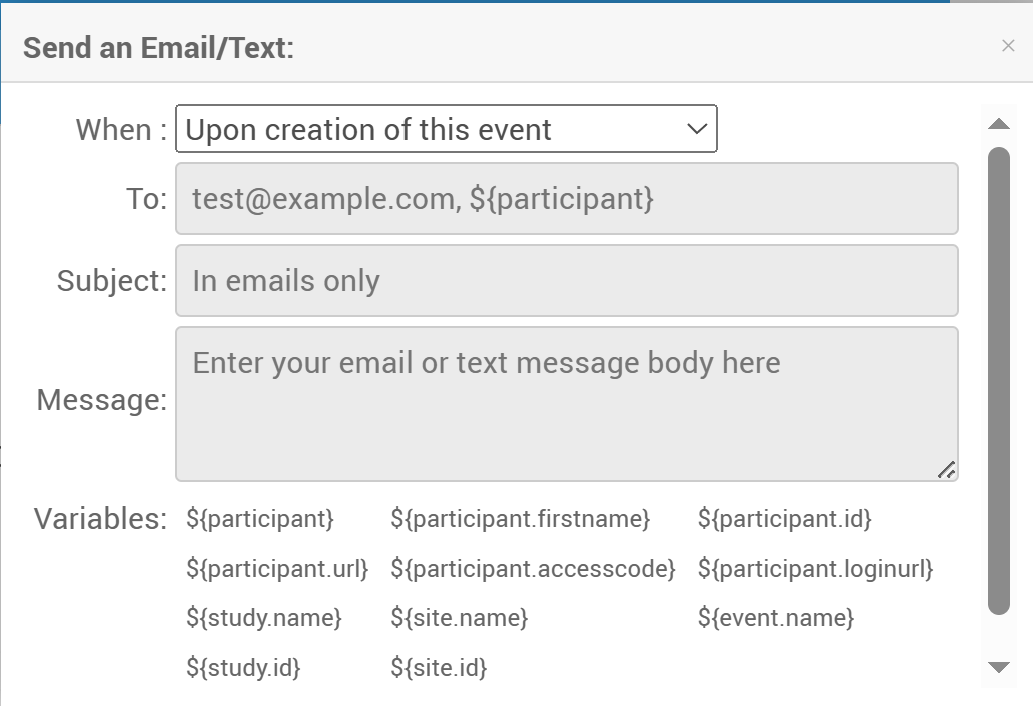
To configure notifications:
- Click on the Event name
- Expand Notifications by clicking
- Select the trigger you want to base the notification on.
- Upon event creation
- X days before the event date – Send the notification a set number of days before the event. You can define the time of day the notification is sent. Delivery is based on the participant site’s time zone.
- X days after the event date – Send the notification a set number of days after the event. You can define the time of day the notification is sent. Delivery is based on the participant site’s time zone.
- When the event is completed
- Enter Recipients
- One or more email addresses
- ${participant} (if the Participate module is enabled)
- Participants with both email and phone receive the notification through both channels.
- Enter Subject – Used for email notifications only. You can customize the subject line with variables.
- Enter Message – Used for the body of email or text notifications. You can customize the content with variables.
Supported Variables
The following Variables refer to specific study data and can be inserted into Subject and Message to customize the message.
| Parameter | Description | To | Message | Subject |
| ${participant.firstname} | Participant First Name | X | ||
| ${participant.loginurl} | Participant URL with Automatic Login | X | ||
| ${participant.url} | Participant URL without Automatic Login | X | ||
| ${study.name} | Name of the Study, as Defined in OpenClinica | X | X | |
| ${participant.accesscode} | Single-Use Code the Participant must use to access OpenClinica Participate | X | ||
| ${event.name} | Name of the Event, as specified in OpenClinica | X | X | |
| ${participant} | Participant Contact Information, as provided when the Participant was connected to the Study. (This could be a mobile number for SMS notification, an email address, or both); OpenClinica automatically sends the notification. | X | ||
| ${participant.id} | Participant ID | X | X | |
| ${site.id} | Site ID | X | X | |
| ${site.name} | Site Name | X | X | |
| ${study.id} | Study ID | X | X |
Reordering Events
If you reorder Events:
- Extended options applied to later Events are preserved.
- Moving an Event to the first position displays only limited options.
- If moved back, the saved extended options are restored.
⚠️ Always review Calendar after reordering Events to ensure it reflects your intended schedule.