Overview:
You must add Participants to be able to enter data.
Definition:
A Participant is a person who participates in your Study and provides data. This could be a patient receiving treatment or a test subject in a clinical trial.
Example:
For example, a Participant might have a specific demographic or medical condition that is required to participate in the Study.
You must add Participants to a Study before you can enter data for those Participants. There are different ways to add Participants:
Your study must have a Status of Available to add Participants. To set the Status to Available:
1. From the User menu, select My Studies.
2. Select Share and the environment in which you want to share the study.
3. Click the Change Status link at the top of the screen.
4. Select a Status of Available.
Depending on the study settings, studies can be configured to allow you to do one of the following:
- Manually enter the Participant ID.
- Automatically generate a Participant ID based on a predefined format template.
- Add Participants in batch using Web Services (for Administrators with Data Manager access).
For more information on Study Settings, see Edit Settings. For more information on Web Services, see OpenClinica 4 Technical Documentation.
Note: If you do not see the Add New Participant link above the Participant Matrix, either your User Role does not have access to add Participants, or the Data Manager has set a limit for the number of Participants allowed in the study, and your study has reached the maximum number of Participants. In addition, you cannot add Participants if a study has a status of In Design, Frozen, or Locked. If you are a Data Manager and want to change the maximum number of Participants allowed for a study, see the Study Settings information in Create a Study.
You can add Participants:
- Manually.
- Automatically.
- In a batch.
The Method of Creation field is set to Manual Entry by default. To change this setting to allow automatic entry:
1. From the My Studies screen, click the Settings (gear) icon under the study name, and select Settings.
2. Click the Edit link next to the Participant ID Settings header.
3. Click the radio button next to System-generated.
Note: If Method of Creation is set to System-generated, only Data Managers can edit the Participant ID.
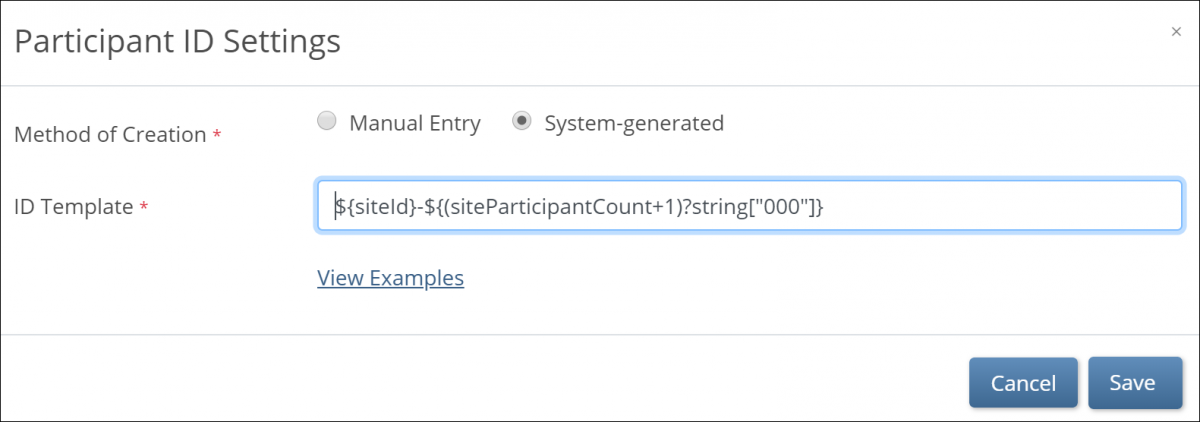
If you choose System-generated, you must specify the template for the system-generated ID.
You can generate Participant IDs by the following methods:
- The Participant Count Method: Generate Participant IDs sequentially.
- The Random number Method: Generate Participant IDs using random numbers.
You can build your ID Template using one or more of the following components:
1. ${siteId} – The unique identifier for the site the Participant is being added to.
2. ${siteParticipantCount} – The current number of Participants at the site. This is generally used like ${(siteParticipantCount+1)} to have the ID increment the Participant count for each new Participant added.
3. ${helper.random(n)} – Generates a random number with up to n digits each time a Participant ID is generated.
4. ?string[000] – Added to the resulting values to pad them with leading zeros to equal the number of digits specified, for example, ${(siteParticipantCount+1)?string[000]} or ${(helper.random(5))?string[00000]}.
5. Prefixes, suffixes, separators – Include other text (such as “-” or a Study-specific prefix) to include standard content in each ID.
Note: Each ID Template must include #2 or #3.
Examples:
The Participant Count Method template, ${siteId}-${(siteParticipantCount+1)?string[000]}, for site University Hospital (Site ID = UH) would produce the IDs, UH-001, UH-002, UH-003, etc.
The Random number Method template, P-${(helper.random(5))?string[00000]}, would produce IDs with a fixed prefix of P- followed by a 5-digit random number (including leading zeros), for example P-00362, P-82394, P-35070.
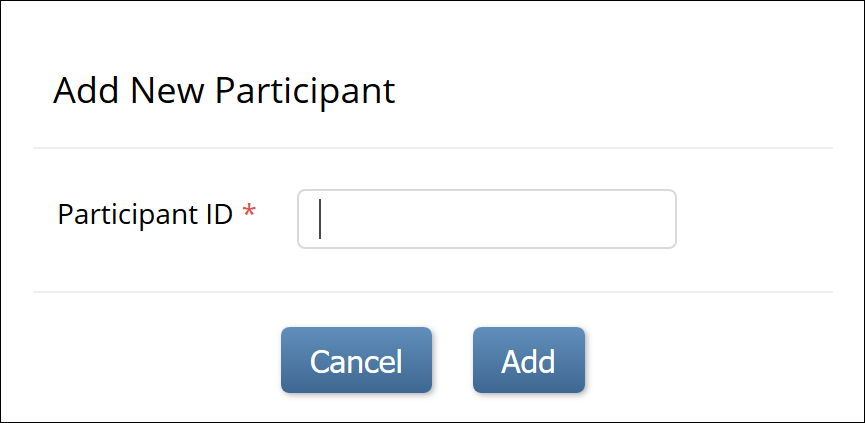
To manually add a Participant:
1. From the Tasks menu, select Add Participant, or on the Participant Matrix screen, click Add New Participant above the matrix.
2. Enter a Participant ID in the Add New Participant screen. (This should be a unique identifier, e.g. 001).
3. Click the Add button.
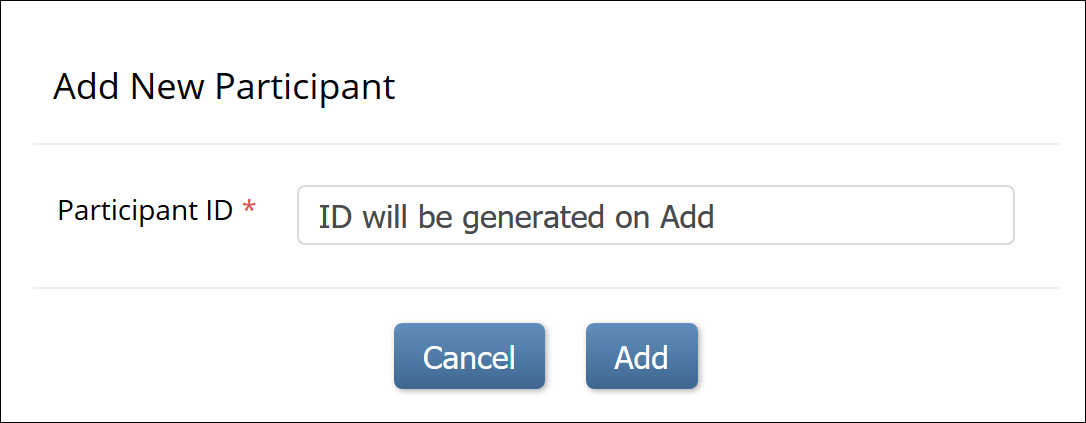
To make the system automatically generate a Participant:
1. Set the Method of Creation field to System-generated (see above).
2. From the Tasks menu, select Add Participant, or on the Participant Matrix screen, click Add New Participant above the matrix.
3. Click the Add button in the Add New Participant screen to generate a Participant ID.
To add Participants in a batch:
1. From the User menu, select Administration.
2. Click the Web Services Information button.
3. Execute the API to create a batch of Participant IDs.
Once you have added a Participant to your study, you can enter data.
The Participant Matrix
The Participant Matrix shows each Participant ID, and the Participants status for each Visit-Based Event.

For information on removing, reassigning, and restoring Participants, see Review and Manage Data.
The Participant Details screen
To access the Participant Details screen, click on the Participant ID or the View button that corresponds to that Participant.
The Participant Details screen is divided into sections. Under General Information, there are sections for Visit-Based Events, Common Repeating Events, Common Non-Repeating Events.

Event Actions and Statuses:
The table below describes Event statuses:
Icon | Status | Description |
| not scheduled | The Event has not been scheduled. Common Events, such as Adverse Events remain in this status throughout the study. |
| scheduled | The Event has been scheduled, but no data has been entered. |
| data entry started | A user has started to enter data, but not all of the Forms in the Event have a status of completed. |
| completed | A user has completed data entry for at least one Form in the Event. If further changes are needed in that Form, you are required to provide a reason for change. |


The table below describes Event actions:
Icon | Action | Description |
| View | View the Event details. |
| Edit | Edit the scheduled date/time. |
| Lock | Prevent other users from editing or removing Forms. Users can still view and sign Forms. |
| Unlock | Allow other users to edit or remove Forms that were previously locked. |
| Remove | Remove the Event from the study. This is not permanent. |
| Restore | Restore an Event that was removed from the study. All data is restored. |
| Sign | Approve the data for each Form in the Event. All Forms in the Event must either be completed or not scheduled. |


Form Actions and Statuses
The table below describes Form statuses:
Icon | Status | Description |
| Not started | The Event has been scheduled, but no data has been entered on the Form. |
| Not scheduled | The Event has not been scheduled. |
| Scheduled | The Event has been scheduled |
| Data entry started | The user has opened the Form and/or started to enter data, but the Form has not been completed. |
| Stopped | The Participant has temporarily stopped participating in the study. |
| Skipped | The user has decided not to complete the Form. Any data that has been entered can still be viewed and/or exported. |
| Completed | The user has completed data entry on this Form. |
| Signed | This Form has been signed. |
| Locked | This Form has been locked. Users cannot edit or remove the Form. Users can still sign and view the Form. |
| Invalid | This Form is invalid because the Event has been removed. Users can still view the Form. |


Note: You cannot change a status from Stopped to Skipped or vice versa.
The table below describes Form actions:
Icon | Action | Description |
| Enter/Edit | Enter or edit data in the Form. |
| View | View data in the Form. |
| Remove | Remove the Form from the Event. This is not permanent. |
| Restore | Restore a Form that was previously removed. All data is restored. |
| Clear Form | Delete all data in the Form. |
| Reassign a CRF to a new Version | Change the version of the Form if data has already been entered. |


Scheduling an Event
To enter data for a Participant, you must first do the following:
-Add a Participant.
-Schedule an Event.
Once a Participant has been added, you can schedule events and start to enter data.
To schedule an Event from the Participant Matrix:
- Click on the Schedule button for the Participant and the Event that you want to schedule.
- Select Schedule.
- Enter information in the Schedule Study Event window
- Select a Study Event Definition from the drop-down list.
- (Optional) The current date is the default Start Date, but you can edit as needed.
- (Optional) To schedule additional Events, click Schedule Another Event, and enter information for that Event. Repeat as needed.
- To return to the Participant Details screen to enter data, click the Proceed to Enter Data button.
To schedule an Event from the Participant Details screen:
- Click the Participant ID or View button next to a Participant.
- Under the Visits header on the Participant Details screen, click Add New.
- Enter information in the Schedule Study Event window.
- Select a Study Event Definition from the drop-down list.
- (Optional) The current date is the default Start Date, but you can edit as needed.
- (Optional) To schedule additional Events, click Schedule Another Event, and enter information for that Event. Repeat as needed.
- To return to the Participant Details screen to enter data, click the Proceed to Enter Data button.
Adding Common Events
For Non-Visit Based Events (Common Events, such as Adverse Events and Concomitant Medications) a visit date is not required, and the Add New button opens the form directly.