Extract Data
Datasets allow the user to select specific Events, Forms, and/or items (or all data) to be included in a set.
You can create a dataset with any data that has been entered into OpenClinica. You can also combine data from different Events and Forms as needed when creating a dataset.
Once you define the data that you want to extract, you can choose from a number of different formats in which to view and work with that data. Once the extract is run, datasets include data from all sites and all participants within those sites.
You can also download Participant Casebooks to extract all data on a single participant.
Archived and removed Forms are not included by default (although archived Form Versions are included.) This setting can be changed for Participant Casebooks or when using the API.
Create a Dataset
To create a dataset:
1. Click Tasks in the header bar, and select Create Dataset.

2. In the left panel, expand the Event that contains the Form data that you want to extract. If the Form is in multiple Events, select one Event now, and add more Events and Forms later.
3. Select the Form that contains the data you want to extract.
4. Select individual items, or to select all items in that Form, check the Select All Items checkbox above the item list.
5. (Optional) To select additional items, either from the same Form in other Events, or from a different Form, click Save and Add More Items. Then repeat steps 2 through 4 until you have selected all of the items you want to include in the dataset.
Note: In addition to selecting data from Forms, you can also select data from Events, Participants, and CRFs from the Event/Participant/CRF Attributes screens . You can also click Select All Items in the Study to include all items in the study.
6. Once you have selected all of the items you want to include in the dataset, click Save and Define Scope. The Name and Description screen appears.

7. Enter a name and description for the dataset.
Note: Names must be alphanumeric characters, but underscores are permitted. ![]()
8. In the Item Status field, select the completion status of the data you want to include in the extract. You can choose to include data from: CRFs marked Complete, CRFs not marked Complete, and all CRFs.
9. Ignore the message and fields on the lower portion of the screen, and click Confirm and Save.
10. On the Select Format screen, select the output format for the extracted dataset, and click Run Now to extract the data.
Note: The first option is the most complete extract format, and it is the only option that includes the audit log data as well as all of the clinical data and metadata. If using Participate forms with data entered by the participant, it is included in study data. It can also be included in extracts if those forms are added.

OpenClinica displays a screen that indicates your extract is running. Click Back to Dataset to view the status of extracted data. The Select Format screen appears again, and your dataset is listed at the bottom of the screen. For large datasets it might take a while to extract data. If not complete, you will see that the dataset is still IN PROGRESS.
12. To download the dataset, in the Action column, click the Download button. To delete the dataset (this only deletes the data extract; it does NOT delete data from the database), click the Delete button.
Notes: The data in the dataset reflects the OpenClinica database at the time the dataset file was generated, not at the time when you downloaded the file. The dataset file name includes the date and time that the file was generated.
You can run the same extract in a number of different formats. OpenClinica retains one dataset file for each format for the dataset definition. If you generate a dataset and the dataset format already exists, the file you create overwrites the existing file.
For example, if the same extract was run and you selected Excel, that extract would overwrite the original Excel file. However, if you selected HTML for the second extract of this dataset, both the Excel file and the HTML file would be available.
If there is a permission tag on the Form that prevents you from accessing the Form data, you also cannot extract the data.
If you do not have access to any of the selected Forms, an error message appears to inform you that you do not have permission to access that data. If you do not have access to one or more Forms in the extracted dataset file, you cannot access, download, or delete the dataset.
Formats for DataSet Files
You can download datasets in several formats based on how you want to view the data. Tabular formats (Tab Delimited Text, HTML, and Excel) are the easiest to read.
The table below summarizes the different formats:
Format | File Type(s) | Applications | Summary |
Tab Delimited Text | .tsv | spreadsheets application | Easy to read; Includes a table with information on the dataset and a table that contains the data; can be parsed by other programs. |
HTML | .html | Internet Browser | Easy to read; Includes a table with information on the dataset and a table that contains the data |
Excel | .xls | Excel | Easy to read; Includes a table with information on the dataset and a table that contains the data |
SPSS | .dat and .sps | IBM SPSS | .sps file contains information about data set; .dat file contains data; uses different syntax; useful for analysis |
CDISC ODM XML (1.2 or 1.3, With extensions, or Full) | .xml | XML Editor or Internet Browser | The most complete extract; Contains information about the dataset, data, and metadata; limitations |
SAS Data and Syntax | .xml and .sas | SAS Studio | Requires the most set-up; uses different syntax; useful for analysis |
Below are some images of extract formats:
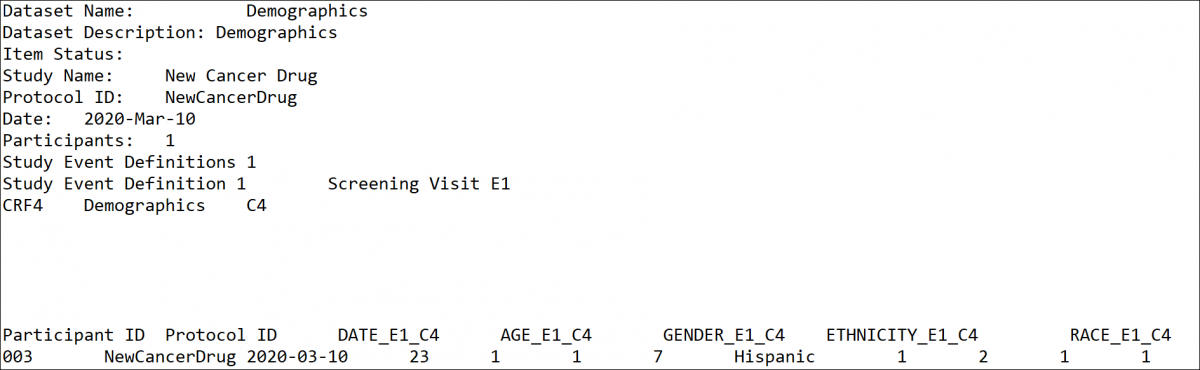
Tab-Delimited:
HTML Format:
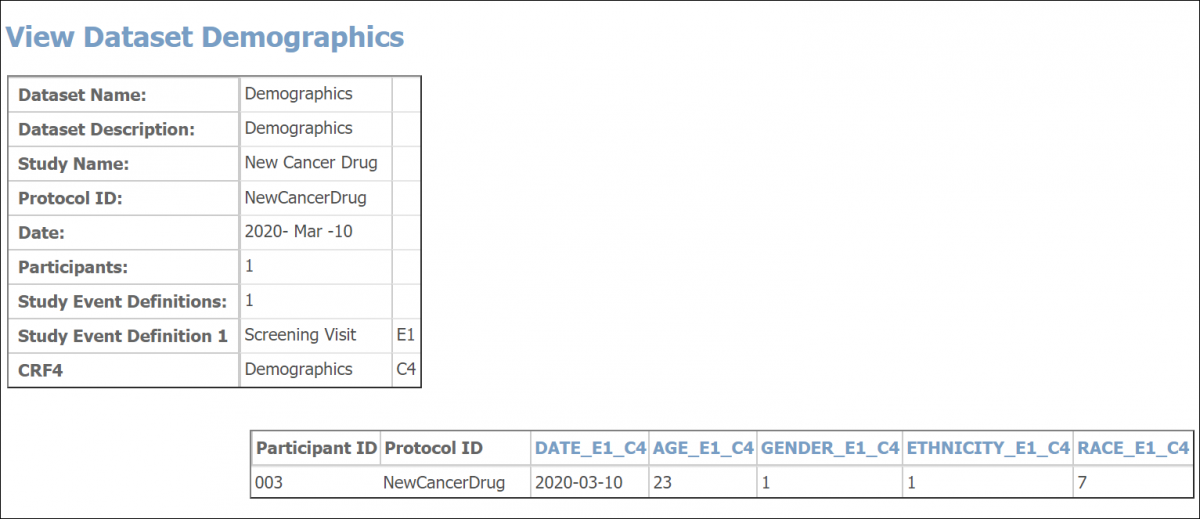
When viewing the HTML file, you can view the metadata for an Item by clicking its column header.
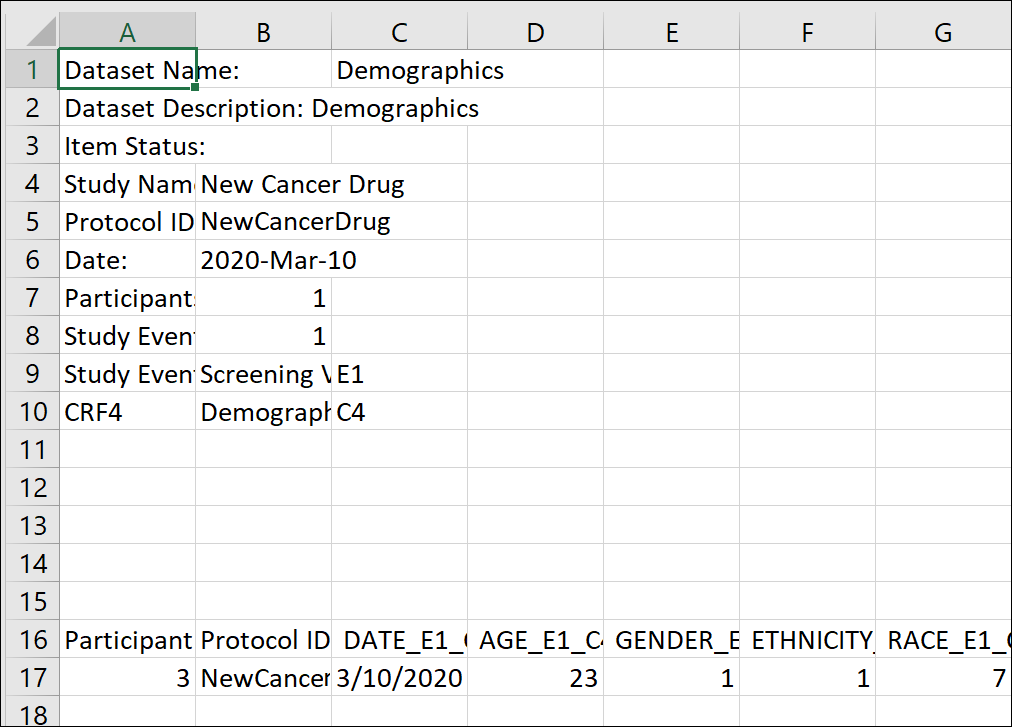
Excel Format:
CDISC ODM XML Format:
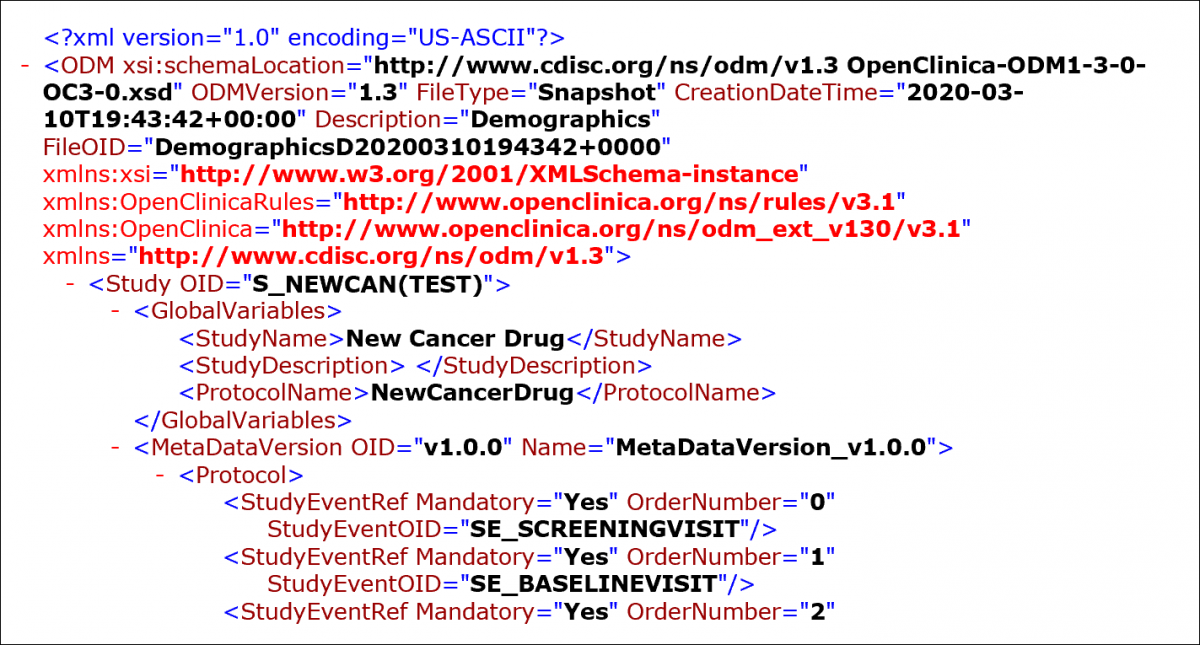
When you select one of the CDISC ODM formats for the dataset, OpenClinica exports the dataset to an .xml file that complies with the Operational Data Model (ODM) of the Clinical Data Interchange Standards Consortium (CDISC) standard. These are the different parameters for the available ODM formats:
1.3 or 1.2: refers to the version of the ODM specification.
With extensions: Includes OpenClinica entities that are not part of the ODM specification, such as the Subject Group Class and its attributes.
Full: Includes Discrepancy Notes and the Audit Log.
SAS Format:
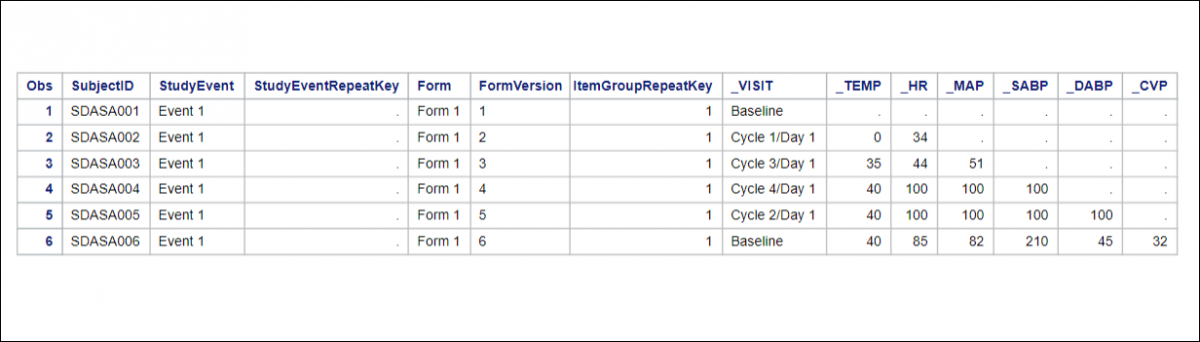
SPSS Format:
You can open the .DAT file in a Text Editor.
The SPSS Format appears in a table similar to Excel.
Downloading Participant Casebooks
You can access a Participant Casebook from the Participant Details screen.
A Participant Casebook includes Participant data, excluding data that you do not have permission to view.
1. Click the Participant Matrix header button in Runtime.
2. Click the View button next to the participant you want to download data for.
Note: You can also skip steps 1 and 2 and go directly to the Participant Details screen by entering the Participant ID in the Search box in the upper-righthand corner of any screen within the Runtime.
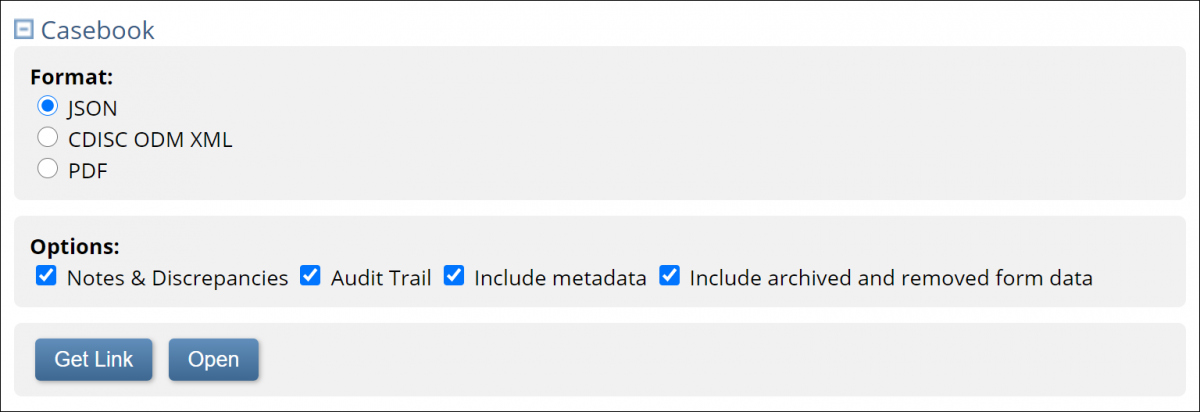
3. Scroll to the bottom of the Participant Details screen, and select Casebook.
4. Under Format, click the radio button next to JSON or CDISC ODM XML or PDF to choose the format in which you want the data downloaded.
5. Uncheck the checkboxes if you do not want to include certain options in the data. You can choose to include or exclude: Notes & Discrepancies (Queries, Annotations, and Reason for Change), Audit Trail, Metadata, and/or Archived Form data.
Note: Casebooks always include Clinical Data.
6. Choose how to view the data (if applicable):
For XML or JSON files:
- To get a link, select the Get Link button. Highlight and copy the link into the URL bar in your browser to view the data.
- To open the webpage directly, select the Open button.
For PDFs, click Get PDF.
Note: Data from archived or removed Forms is excluded from extracts by default. Check the Include
archived and removed form data check box to include it.
You can click Tasks in the header bar of Runtime and select Bulk Actions Log to check the status of the job. You can view, download, or delete the import from there.
You will also receive a notification email with a link to download the extract.
Additional Format Information
Tab-Delimited, HTML, and Excel:
To avoid duplication and confusion about the data collected in a study, certain identifiers and ordinal numbers must be appended to each variable name.
These variable names can be used in multiple CRFs across multiple Events. These appended numbers will help identify the event, CRF and item the value was collected in.
The identifiers are defined in the header table for Tab Delimited, HTML, and Excel formats. The identifiers are defined in a separate syntax (.sps) file for SPSS.
The following conventions apply to Tab Delimited, HTML, and Excel formats:
- E1 = E specifies that the appendage represents the event. 1 specifies which event the variable is from, as defined in the header table. If the event is repeating, it would be represented as E1_1, E1_2, E1_3 etc.
- C1 = C specifies that the appendage represents a CRF. 1 specifies which CRF the variable is from, as defined in the header table. For repeating events and repeating groups, additional information must be provided to specify which occurrence of the event and/or which repeat of the group the item value comes from. This is done by appending _X where X is the ordinal or repeat number.
For example:
An item called DEMO appearing in the 3rd occurrence of a repeating event, and the 5th repeat of the group called Example would be identified as: DEMO_E1_3_C1_5
For an item in a repeating event, but not part of a repeating group, the variable would be identified as: DEMO_E1_3_C1
The [EVENT HANDLE] and [CRF HANDLE] refer to identifiers appended to each item name to avoid duplication and confusion amongst the repeating data points collected in a study.
CDISC:
CDISC ODM is a vendor neutral, platform independent format for interchange and archive of data collected in clinical trials. The model represents study metadata, data, and administrative data associated with a clinical trial. The ODM has been designed to be compliant with guidance and regulations published by the FDA for computer systems used in clinical trials.
The ODM model categorizes a clinical study’s data into several kinds of entities including subjects, study events, forms, item groups, items, and annotations. The metadata of a study describes the types of study events, forms, item groups, and items that are allowed in the study. The clinical data of a study will typically have many actual entities corresponding to their definitions described in the metadata.
Like any XML file, an ODM file consists of a tree of elements that correspond to entities. Each element consists of required attributes and optional attributes. An ODM file type must be either Snapshot or Transactional.
A Snapshot file shows the current state of the included data.
A Transactional file shows both the latest state and (optionally) some prior states of an included entity.
An ODM file has a Granularity attribute which describes the coverage information of the ODM file.
The ODM file consists of two parts: metadata followed by Subject data. The metadata provides OIDs for the Study units (as defined when the CRFs were created), Event information, CRF information including Item Groups and Items with information about validations, and user account information. The Subject data provides Subject information, Event information, CRF information, and then the values.
SAS:
The output from OpenClinica includes three files:
- SAS_DATA.xml – The extracted data.
- SAS_Format.sas – For items defined as select_one or select_multiple, OpenClinica creates the library and maps response values to the appropriate response text
Note: Because select multiple and checkbox items include multiple values in a string format in OpenClinica (e.g., 1,2,7), these cannot be mapped to individual response text options. - SAS_MAP.xml – A mapping file that maps the data to the appropriate structures
If youre using SAS Studio, please follow the directions below. Other versions of SAS will retain the basic instructions related to what needs to be uploaded and the code that needs to be run.
After creating a dataset in OpenClinica and downloading it in SAS Format:
- Create an account for SAS Studio.
- Go to https://odamid.oda.sas.com/SASODAControlCenter/
- Right-click Files.
- Select New.
- Select Folder.
- Enter a name for the folder.
- Click Save.
- To upload the data file (xml) and the map file (xml). Click the Upload button at the top of the sidebar or right click the folder and select Upload Files to upload the SAS_MAP and SAS_DATA xml files.
- Select your files and confirm that you want to upload them.
- Click the New button at the top of the sidebar or right-click on your folder and select New. Then select SAS Program (F4) to open a new Program window.
- Open the SAS_FORMAT file in an external text editor.
- Before running this code, edit the first three lines of the code by replacing the ~ with the path of the files. You can find the paths by right-clicking the folder that contains these files and selecting Properties.
The first 3 lines of your format file (before):
FILENAME SBFBD201 “~/SAS_DATA.xml”;
FILENAME map “~/SAS_MAP.xml”;
LIBNAME SBFBD201 xml xmlmap=map access=readonly;
The first 3 lines of your format file (after):
FILENAME SBFBD201 “/home/u45064292/siemenstest1/SAS_DATA.xml”;
FILENAME map “/home/u45064292/siemenstest1/SAS_MAP.xml”;
LIBNAME SBFBD201 xml xmlmap=map access=readonly;
- Click Run at the top of the screen.
- A new tab called Output Data appears. Click on that tab to see the results of your export.
Output:
This generates all the data tables based on Item Groups.
OpenClinica Items become SAS Column Names.
Tables include the master set of items (i.e., Item Groups span CRF Versions, though the SAS file does not indicate which version of the CRF was the source for the item.)
There are two resulting data types: Numeric or Char. All OpenClinica items that are Integer or Real are classified as Numeric. All other OpenClinica data types are classified as Char.
The SAS datasets/tables are generated from the OpenClinica metadata. Tables are created for all Item Groups in the extract. If no data was entered for a specific item group, the SAS table is still created, but is empty.
Troubleshooting:
OpenClinica allows 3,999 single-byte characters in a text field. When this size string is extracted to SAS, the full string is in the SAS_DATA.xml file.
SAS data set names must not exceed 32 characters and must start with either a letter (A-Z) or underscore. As a result, Openclinica uses a modified Item Group OID for the data set name as follows:
- If group is Ungrouped use the CRF Name, otherwise:
- To reduce the number of characters the remove the prepended IG (This means Group labels start with “_” + 5CHAR (of CRF Name) + _GROUPLABEL)
- If the resulting value exceeds 35 characters, OpenClinica appends the dataset name with the three- or four-digit number appended to the IG_OID
- SAS column names must not exceed 32 characters and must start with a letter (A-Z) or underscore. As a result, OpenClinica uses a modified Item OID for the column names as follows:
- Truncate from the left to remove the I_5CHAR prefix to each Item Name.
- Retain the portion of the OID starting with _ (underscore) followed by ITEMNAME (this ensures no Column Names start with a number.)
- Retain appended three- or four-digit numbers to ensure item/column name uniqueness.
SPSS:
When you select the SPSS format, the extracted .zip file contains two different files: a .dat file, which is a tab-delimited data file, and an .sps file, which is an SPSS data definition script.
To access the data, save the .dat and .sps files to the same location, then open the .sps file in the IBM SPSS program. If the .sps and .dat files are not in the same location, change the file location in the .sps file to point to the physical location of the .dat file. Then from SPSS, select Run > All to load the data into the application.
You can preview the .dat file by opening it in a text editor.
SPSS File Specifications
If you select the SPSS format, OpenClinica produces a package of files for use by the SPSS program. The files have been tested with the SPSS Windows software, version 20.
Although SPSS can read almost any ASCII file and deduce parameters for some of these variable attributes, any other attributes must be typed in by hand, which is tedious for large datasets.
Instead of generating an ASCII format dataset file from OpenClinica for use with SPSS, select the OpenClinica SPSS Syntax file format (.sps) which, in association with the data file (.dat), automatically loads the data with the correct variable definitions and attributes into SPSS.
SPSS Data Definitions cover ten main properties for any variable: Name, Type, Width, Decimals, Label, Values, Missing, Columns, Align, and Measure. OpenClinica currently supports automated definition of Name, Type, Width, Decimals, Label, and Values using the SPSS Syntax file format (.sps).
The following topics describe the structure and syntax of the OpenClinica .sps dataset file and corresponding .dat file.
SPSS Conceptual Mapping
This table presents the conceptual mapping of SPSS Data Definitions to OpenClinica data element metadata:
SPSS Data Definition Metadata | OpenClinica CRF Metadata |
Name | Item name |
Type | Mapped to Item types |
Width | Calculated from widest value in field |
Decimals | If Item type = decimal, then calculated from most precise value in field. Else 0. |
Label | Item label |
Values | Generated from Choice labels and Choice names |
Missing | N/A |
Columns | N/A |
Align | N/A |
Measure | N/A |
Mapping between SPSS types and OpenClinica CRF Item Types
The table below describes the mapping of OpenClinica CRF ITEM data types to SPSS types.
CRF Data Type | CRF Width (decimal) | CDISC ODM XML Data Type | SPSS Variable Type | SPSS Syntax for Type Format |
text, select_one, select_multiple | n | text | String | An |
integer | n | integer | Numeric | Fn.0 |
decimal | n(d) | float | Numeric | Fn.d |
file, image, audio, video | n | text | String | An |
date | N/A | date | Date | ADATE10 |
Notes:
- Items of type ST, INT, and REAL are considered multi-select items when they are associated with a CRF response type of multi-select or checkbox. In this case, the item will be defined as a string (A) in SPSS and the selected values shown as a comma separated list in the field, even if the CRF data type is INT or REAL.
- SPSS can only handle up to 17 significant figures. If you use more than 17 significant figures you will lose accuracy in exporting to SPSS, but that is a limitation of SPSS not the OpenClinica export.
Examples:
- if you enter 12345678901234567890 (20 digits) into a numeric field the value 12345678901234567000 will be stored.
- if you enter 0.1234567890123456789 into a numeric field the value 0.123456789012345 will be stored.
Mapping Between SPSS Values and OpenClinica Choice Label
VALUE LABELS in the SPSS Syntax file map OpenClinica choice labels to discrete value sets in SPSS. Only variables that are of the type select_one or select_multiple are listed in the VALUE LABELS section.
Syntax for VALUE LABELS
Value labels appear for each variable as follows:
VALUE LABELS
VARNAME1
Choice Name[0] “Choice Label[0]”
Choice Name [1] “Choice Label[1]”
Choice Name [2] “Choice Label[2]”
VARNAME2
Choice Name[0] “Choice Label[0]”
Choice Name [1] “Choice Label[1]”
Choice Name [2] “Choice Label[2]”
SPSS Data Definitions for Built-in System Fields
Subject Attribute: Subject Status
SPSS Data Definition Property | Value | Encoding |
Name | SubjectStatus | SubjectStatus |
Type | String | A |
Width | [maximum length of subject status string across all the subjects] | [maximum length of subject status string across all the subjects] |
Decimals | N/A |
|
Label | Subject Status | Subject Status |
Values | None |
|
Missing | None |
|
Columns | [maximum length of subject status string across all the subjects] | [maximum length of subject status string across all the subjects] |
Align | Left |
|
Measure | Unknown |
|
Event Attribute: Start Date
SPSS Data Definition Property | Value | Encoding |
Name | STARTDATE_[EVENT HANDLE] | STARTDATE_[EVENT HANDLE] |
Type | Date | ADATE10 |
Width | N/A |
|
Decimals | N/A |
|
Label | Start Date for [EVENT NAME] (EVENT HANDLE) | Start Date for [EVENT NAME] (EVENT HANDLE) |
Values | None |
|
Missing | None |
|
Columns | 10 |
|
Align | Right |
|
Measure | Unknown |
|
Event Attribute: End Date
SPSS Data Definition Property | Value | Encoding |
Name | EndDate_[EVENT HANDLE] | EndDate_[EVENT HANDLE] |
Type | Date | ADATE10 |
Width | N/A |
|
Decimals | N/A |
|
Label | End Date for [EVENT NAME] (EVENT HANDLE) | End Date for [EVENT NAME] (EVENT HANDLE) |
Values | None |
|
Missing | None |
|
Columns | 10 |
|
Align | Right |
|
Measure | Unknown |
|
Event Attribute: Status
SPSS Data Definition Property | Value | Encoding |
Name | EventStatus_ [EVENT HANDLE] | EndDate_[EVENT HANDLE] |
Type | String | A |
Width | [maximum length of event status string across all the subjects] | [maximum length of event status string across all the subjects] |
Decimals | N/A |
|
Label | Event Status For [EVENT NAME] (EVENT HANDLE) | End Date for [EVENT NAME] (EVENT HANDLE) |
Values | None |
|
Missing | None |
|
Columns | [maximum length of event status string across all the subjects] | [maximum length of event status string across all the subjects] |
Align | Right |
|
Measure | Unknown |
|
CRF Attribute: CRF Version Status
SPSS Data Definition Property | Value | Encoding |
Name | CRFVersionStatus_[EVENT HANDLE]_[CRF HANDLE] | CRFVersionStatus_[EVENT HANDLE]_[CRF HANDLE] |
Type | String | A |
Width | [maximum length of CRF version status string across all the event CRFs] | [maximum length of CRF version status string across all the event CRFs] |
Decimals | N/A |
|
Label | CRF Version Status For [EVENT NAME] | CRF Version Status For [EVENT NAME] |
Values | None |
|
Missing | None |
|
Columns | [maximum length of CRF version status string across all the event CRFs] | [maximum length of CRF version status string across all the event CRFs] |
Align | Left |
|
Measure | Unknown |
|
CRF Attribute: CRF Version Name
SPSS Data Definition Property | Value | Encoding |
Name | VersionName_ [EVENT HANDLE]_[CRF HANDLE] | VersionName_ [EVENT HANDLE]_[CRF HANDLE] |
Type | String | A |
Width | [maximum length of CRF version name string across all the event CRFs] | [maximum length of CRF version name string across all the event CRFs] |
Decimals | N/A |
|
Label | Version Name For [EVENT NAME] | Version Name For [EVENT NAME] |
Values | None |
|
Missing | None |
|
Columns | [maximum length of CRF version name string across all the event CRFs] | [maximum length of CRF version name string across all the event CRFs] |
Align | Left |
|
Measure | Unknown |
|
The following rules apply to variable names in SPSS:Must begin with a letter. Remaining characters can be any letter, any digit, a period, or the symbols @, #, _, or $.
A $ sign in the first position indicates that the variable is a system variable. The $ sign is not allowed as the initial character of a user-defined variable.
Avoid ending with a period, since the period may be interpreted as a command terminator.
Avoid ending with an underscore to prevent conflict with variables automatically created by some procedures.
Length of name cannot exceed 64 bytes. 64 bytes typically means 64 characters in single-byte languages (for example, English, French, German, Spanish, Italian, Hebrew, Russian, Greek, Arabic, Thai) and 32 characters in double-byte languages (for example, Japanese, Chinese, Korean).
Cannot include spaces and special characters (for example, !, ?, ‘, and *).
Must be unique.
Cannot use reserved keywords: ALL, AND, BY, EQ, GE, GT, LE,LT,NE, NOT, OR, TO, WITH.
Can use any mixture of uppercase and lowercase characters; case is preserved for display purposes.
When long variable names need to wrap onto multiple lines in output, SPSS attempts to break the lines at underscores, periods, and changes from lower case to upper case.
OpenClinica follows certain rules for automatically converting an invalid dataset variable name to a valid SPSS variable name:
If the first character is not a letter, V is used as the first letter
Any invalid characters are replaced with the symbol #
If the last character is a period or an underscore, it is replaced by #.
If a name is longer than 64 characters, it is truncated to 64 characters.
If long variable names result in non-unique names in a data file, sequential numbers are used to replace its letters at the end. By default, the size of sequential numbers is 3.
If a reserved keyword has been used as a variable name, sequential numbers are appended to it.