8.5.1.1 Create an Import Job
Before you can create an import Job, the file(s) to be imported must exist at a location specified in your OpenClinica system configuration. For information about creating an import file, see Data File for Import. For more about the location of the import files, see filePath in the datainfo.properties file in Configuring the OpenClinica Application.
To create an import Job:
- Select Tasks > Jobs.
The Administer All Jobs page opens. - Click View All Import Data Jobs.
The View Scheduled Import Data Jobs page opens. - Click Create a New Import Data Job.
The Create Scheduled Job: Import Data page opens.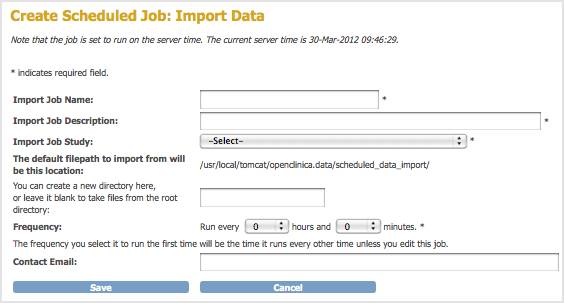
- Complete at least the required fields. Refer to the following information as needed:
- Import Job Name: The name must be unique among all Job names on your OpenClincia system.
- Import Job Study: The Study or Site where the data will be imported to.
- The default filepath to import from: The value reported here is the filePath specified in the datainfo.properties file; see Configuring the OpenClinica Application for details. If your files are being imported from multiple locations, put all of the files into the filePath location.
- You can create a new directory here …: If you want to put the files to be imported for this Job in a subdirectory of the location specified in filePath, enter the name of the subdirectory here. The subdirectory must exist.
- Frequency: When you complete creating the Job, it runs for the first time. After that, it runs regularly at the interval you specify here. For example, if the current time when you save this page is 08:10, and you specify a frequency of 12 hours, the Job will run at 08:10 today, and again today at 20:10, then again at 08:10 and 20:10 tomorrow and each day after that.
- Contact Email: Each time the Job completes running, the OpenClinica system sends an email notification to the addresses you specify here, stating that the imported data Job has completed. Separate multiple email addresses with a comma, for example: dmanagone@institution.org, sdirk@institution.org.
- Click Save.
The import Job runs and an email including a link to OpenClinica is sent to all email addresses provided. OpenClinica moves the files from the filePath location to another folder so that the same files are not imported the next time the Job runs. The View Scheduled Import Data Jobs page opens. It now includes the scheduled import Job you just created, showing that the Previous Fire Time is the current time and the Next Fire Time is based on the interval you specified for Frequency.
8.5.1.2 View Scheduled Import Jobs
To view all scheduled import data Jobs:
- Select Tasks > Jobs.
The Administer All Jobs page opens. - Click View All Import Data Jobs.
The View Scheduled Import Data Jobs page opens, listing all scheduled import Jobs and information about them such as the Previous Fire Time (last date and time the Job executed), and Next Fire Time (the next date and time the Job is scheduled to execute). The time used is server time, which is reported on the page.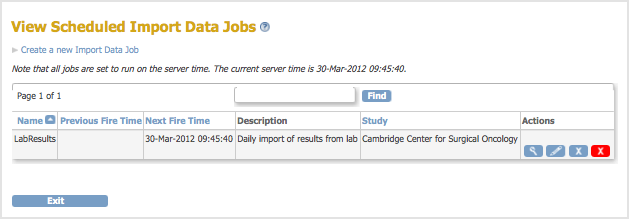
- View summary information about the Jobs in the table. You can click any of the column header links to sort the Jobs by that column. Use the Find field to find all Jobs whose Name, Description, Study, or Times includes the text you specify.
- To see details about a Job, click the View icon for it.
The View Job page opens for that Job.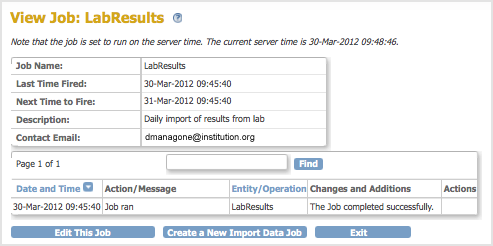
8.5.1.3 Modify Scheduled Import Jobs
You can edit the parameters of an import Job, remove or restore an import Job, or delete an import Job.
Edit an Import Job
- Select Tasks > Jobs.
The Administer All Jobs page opens. - Click View All Import Data Jobs.
The View Scheduled Import Data Jobs page opens, listing all scheduled import Jobs. - For the Job you want to edit, click the Edit icon.
The Update Scheduled Job: Import Data page opens.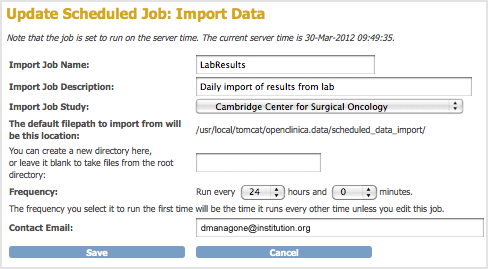
- Make changes to the values, then click Save.
The Scheduled Import Data Jobs page opens, reflecting the changes you made to the Job.
Remove an Import Job
Remove a scheduled import Job to stop it from running at the specified frequency. You can later restore the Job. To remove an import Job:
- Select Tasks > Jobs.
The Administer All Jobs page opens. - Click View All Import Data Jobs.
The View Scheduled Import Data Jobs page opens, listing all scheduled import Jobs. - For the Job you want to remove, click the Remove icon
 .
. - Click OK in the confirmation dialog box.
The View Scheduled Import Data Jobs page opens. The Job you removed is still listed, but with no value for Next Fire Time.
Restore an Import Job
When you want to resume running a Job according to the specified frequency after it has been removed, restore the Job as follows:
- Select Tasks > Jobs.
The Administer All Jobs page opens. - Click View All Import Data Jobs.
The View Scheduled Import Data Jobs page opens, listing all scheduled import Jobs. - For the Job you want to restore, click the Restore icon
 .
. - Click OK in the confirmation dialog box.
The View Scheduled Import Data Jobs page opens. The Job you restored is listed, and the Next Fire Time now shows when the Job will next run.
Delete an Import Job
Delete an import Job when you no longer want the Job to run. You cannot restore a deleted Job. To delete a scheduled import Job:
- Select Tasks > Jobs.
The Administer All Jobs page opens. - Click View All Import Data Jobs.
The View Scheduled Import Data Jobs page opens, listing all scheduled import Jobs. - For the Job you no longer want, click the Delete icon
 .
. - Click OK in the confirmation dialog box.
The View Scheduled Import Data Jobs page opens. The Job you deleted is no longer listed. If you need the Job again, you can re-create it.