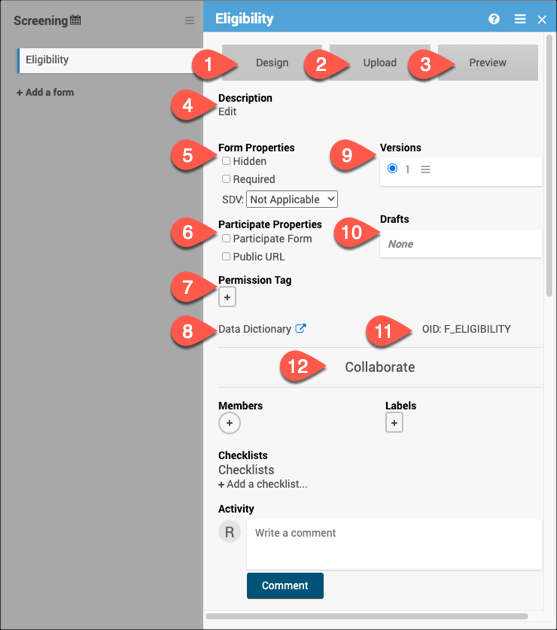
*This page is currently in draft form and subject to change.

18.3.1 Events

Once users have created a study event, they can configure the event by accessing the Event Card. On the Event Card, users are able to update event name, description and properties, as well as set up automatic event scheduling and notifications.

Description / Properties

Clicking on the Event name will make the field editable. The user can update the Event name as needed, and Save. Updating the Event name will change the name of the event that appears within Study Runner.

This does not change the Event OID that was assigned at the time of Event creation.

Clicking on Edit under Description will allow the user to add or update the Event description as needed. This is optionally displayed on the Participant Dashboard for Participate and eConsent events.

There are two main types of events:

  • Visit-Based: An event that is scheduled to occur within the study and is associated with a visit date. These visits are associated with a schedule that is outlined in the study protocol, and each visit has a specific set of forms that are collected.
  • Common: An event that isn’t necessarily associated with a visit but may occur any time throughout the study, such as an Adverse Event. They can additionally be defined as:
    • Repeating: Used when the event needs to have multiple instances of the event, such as with an Adverse Event.
    • Non-Repeating: Used when the event will only occur once, such as Early Termination.

Calendar Configurations

Calendaring allows the user to define automated Event scheduling based on the status of other study Events.

Users can choose when to create and also when to close events:

  • Occurs [x] day(s) after [Triggering Event]: Schedules this Event for a specific number of days after another study Event, which are shown in the dropdown menu.
    • Create [this Event] event record when:  Only one of the following can be selected:
      • [Triggering Event] has reached [status]: Schedules this Event when the Triggering Event has reached a specific status. The options are Scheduled, Data Entry Started, or Completed.
      • [x] day(s) prior to event date: Schedules this Event a specific number of days before the Event date.
  • Close [this Event] event if not completed within [x] day(s) of event date: Once an Event is scheduled, whether automatically or manually, the user can elect to close it automatically if it has not been completed within [x] days.


Calendar Notifications

The user can also configure notifications to be sent upon Event status change. Notifications can be scheduled to send to one or more static email addresses or to the Participant.

Important Note: Using Calendaring notifications alongside the legacy OC4 rules within the same study is not supported.

  • When: The timing for the notification to be sent
    • Upon creation of this event: Notification will be sent as soon as the event has been created.
    • Before this event: Notification will be sent [x] days prior to the event date at the time designated (based on the Participant’s Site’s time zone).
    • After this event: Notification will be sent [x] days after the event date at the time designated (based on the Participant’s Site’s time zone).  
    • This event is complete: Notification will be sent as soon as the event has been completed.
  • To: Notification can be sent to one contact, or a comma-separated list of multiple contacts. The following types of contact information can be entered:
    • Email address
    • ${participant}: When the study has the Participate module activated, will send the notification to the contact information entered into OpenClinica for a Participant. This will send an email and a text message if the Participant has both an email address and a phone number.
  • Subject: The subject is used as the subject for email notifications only, and can be customized using Variables.
  • Message: The message can be customized using Variables.

Variables refer to specific study data and can be inserted into Subject and Message to customize the message.


Collaborate

Members

Shows the users involved in designing the study who can be associated with specific Events.

Labels

A Label is a color or color with text that can be used to represent groups of Events. Labels can be used to help facilitate building a study but have no functional implications. For example, a label can be added for events that require review.

Activity

The Activity Log displays design-related actions that have been taken on the Event. It also displays the user who performed the action and when the action was performed. A Comment is text that allows users in Study Designer to communicate with collaborators. This text remains in the Activity Log for the event.

18.3.2 Form Card


1. Design

Click Design to use Form Designer to create or make changes to your form instead of or in addition to using the Form Template.

Using Form Designer

2. Upload

Click Upload to use the Form Template to create or make changes to your form instead of or in addition to using Form Designer.

Using the Form Template

3. Preview

Use Preview to preview the default version of the form for data entry. The button will change to Preview (as a Participant) if it is marked as a Participate form.

OpenClinica Participate

4. Description

Add, edit, or remove a brief description for the form.

5. Form Properties

Use the Form Properties section to mark a form as Hidden or Required. Here you can also set the SDV status for the form.

Form Properties

Source Data Verification (Monitor)

Source Data Verification (Data Manager)

6. Participate Properties

*This section will only appear if the Participate module is activated for your study. Here, you can specify if the form is a Participate form (where participants will fill out the form), if it will have a Public URL, and if the form will be offline capable.

Design Participate Forms

7. Permission Tag

Use Permission Tags to determine which User Roles can access data from specific Forms in Study Runner.

Permission Tags

User Access & Sharing

8. Data Dictionary

The Data Dictionary gives you form-specific information including form metadata, form properties, and item metadata (such as Item OID, Item Group Name, Item Group OID, Item Type, and Insight Table). The Data Dictionary is available via a link on each form card in Study Designer and can be downloaded as a CSV file to view outside of Study Designer.

Locating Object Identifiers in a Study

9. Versions

This section displays all available versions of the form and indicates the default version. Click on the menu next to the version name to display all available actions for the version.

Publishing Your Study

Publish History

Form Migration

10. Drafts

Drafts will display the pending version of the form. Click the menu to view all actions for the draft including saving the draft as a version.

11. OID

Quickly view the form OID to reference for different form functions.

Locating Object Identifiers in a Study

12. Collaborate

The Collaborate section includes multiple features to facilitate collaboration with colleagues while building your study.

Members

Labels

Checklists

Activity

Comments


Additional Resources for Form Cards

Designing Forms

Use this section to get started designing forms within your study, learn about events, and understand the basics with form templates.

Design a Study

Events & Forms


Logic and Functions

Use this section to go beyond the basics with your forms by using functions and logic.

Form Logic

Functions


Example Forms

Use this section to view sample CDISC CDASH-compliant eCRF templates that can be customized or imported as-is to the OpenClinica EDC platform.

Form Library (CDASH)