The features of OC4 data entry include the following:
- Participant Matrix: Easily see the data entry status of participants.
- Auto-save: Automatically save during data entry.
- Conditional field display: Only see relevant fields during data entry.
- Automatic calculations and data checks: Automatically use calculations and checks.
- Queries: Easily create or view queries.
Before You Enter Data
To enter data into OpenClinica, you must do the following:
- Add a Participant
- Schedule an Event
See Adding Participants for more information on adding Participants.
Scheduling an Event
Once a Participant has been added, you can schedule events and start to enter data.
You can schedule events from the Participant Matrix, Participant Details screen, or the Tasks menu.
To Schedule a Visit-Based Event from the Participant Matrix:
- Click the Schedule button for the Participant and the Event that you want to schedule.
- Select Schedule.
- Select a Study Event Definition from the drop-down list.
- (Optional) Select a Start Date/Time. The current date is the start date by default, but you can change it.
- (Optional) Select an End Date/Time.
- (Optional) To schedule additional Events, click Schedule Another Event, and enter information for that Event. Repeat as needed.
- To go to the Participant Details screen to enter data, click the Proceed to Enter Data button.
To Schedule a Visit-Based Event from the Participant Details screen:
- Click the Participant ID or View button next to a Participant on the Participant Matrix.
- Under the Visits header on the Participant Details screen, click Add New.
- Select a Visit Name from the drop-down list.
- The current date is the start date by default, but you can change it.
- (Optional) Click Show advanced options to change the Start Time or End Date/Time.
- (Optional) To schedule additional Visits, click + Add another visit, and enter the new visit information. Repeat as needed.
- When you are ready, click Add visits.
Note: Once a non-repeating event has been scheduled, it will no longer be available in the Add Visits window for that participant.
To Schedule a Visit-Based Event from the Tasks Menu:
- Click the Tasks button in the header bar of Study Runner.
- Select Schedule Event.
- Enter a Participant ID in the Participant ID field.
- Select a Study Event Definition from the drop-down list.
- (Optional) Select a Start Date/Time. The current date is the start date by default, but you can change it.
- (Optional) Select an End Date/Time.
- (Optional) To schedule additional Events, click Schedule Another Event, and enter information for that Event. Repeat as needed.
- To go to the Participant Details screen to enter data, click the Proceed to Enter Data button.
To Add a Common Event from the Participant Details screen:
- Click the Participant ID or View button next to a Participant.
- Under a header for a common event on the Participant Details screen, click Add New.
Note: For Common Events, such as Adverse Events and Concomitant Medications, a visit date is not required, and the Add New button opens the form directly.
Entering Data
To Enter Data Directly into Forms:
- Click the Add New button to add a form associated with the Event. This will open the form directly for you to document.
- Click the Edit button in the three dots menu to open the form.
- Enter information into each field.
To Continue to the Next Page of the Form:
Click the Next button.
To Mark Data Entry Complete:
Click the Complete button.
To Close the Form and Continue Data Entry Later:
Click the Close button.
Note: If you cannot access a Form, the access to that Form might be restricted in your Study.
To Download Data for Files, Audio Recordings, Videos, Images, Annotations, Drawings, or Signatures
Click the Download button that appears in the field. This button is available in Edit, Review-Only, and Read-Only modes.
Event/Form Independent Attributes
Event/Form Independent Attributes are separate from the Event/Form Statuses. Each Event or Form has a single status, but can have multiple attributes. For example, an Event might be Completed, Signed, and Locked.
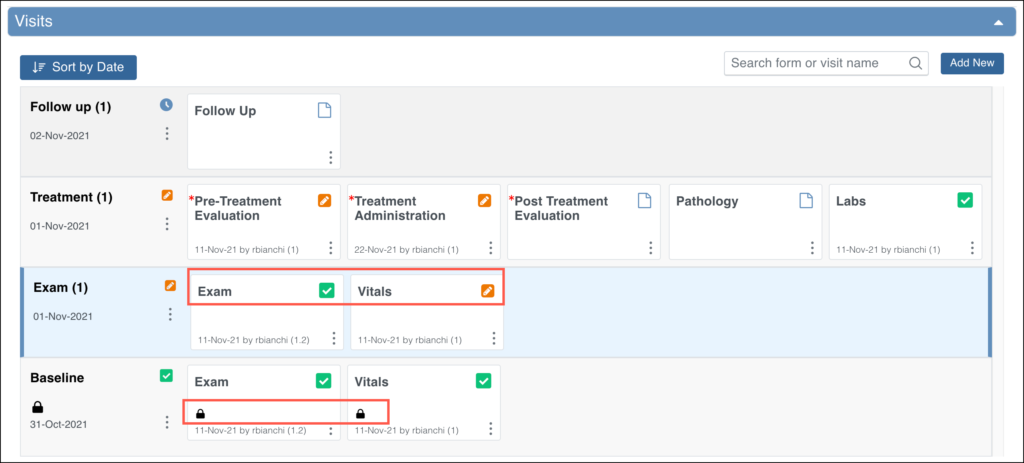
The Participant Matrix
Once you have entered data for Participants, use the Participant Matrix to view and navigate Participant records.
The Participant Matrix lists visit-based events across the top and participant IDs down the side. Each icon represents the status of the participant/event combination.
A legend of the icons is listed on the left side of the screen.
Hover over the icons in the Participant Matrix to see more details about the participant event. Click an icon for options to view and/or edit data, depending on your access.
You can filter Events by status, including the independent statuses of Locked and Signed. You can also filter Events with Not Locked and Not Signed.
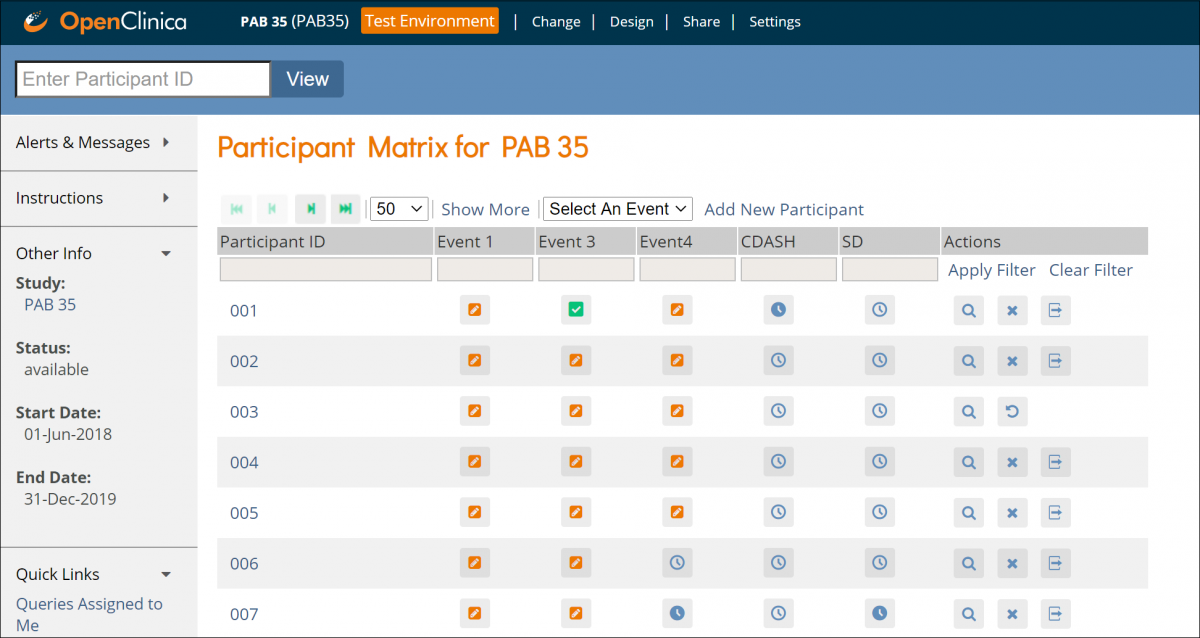
Note: If you filter Events with a status of Not Started, the Participant Matrix only includes Events that were previously started and then deleted, i.e. Events that have never been started are excluded.
If you have a repeating Event for a Participant, the Participant Matrix shows the least complete status. For example, if the first event is data entry started and the second event is completed, only the status of data entry started will display.
For information on removing, reassigning, and restoring Participants, see Reviewing and Managing Data.
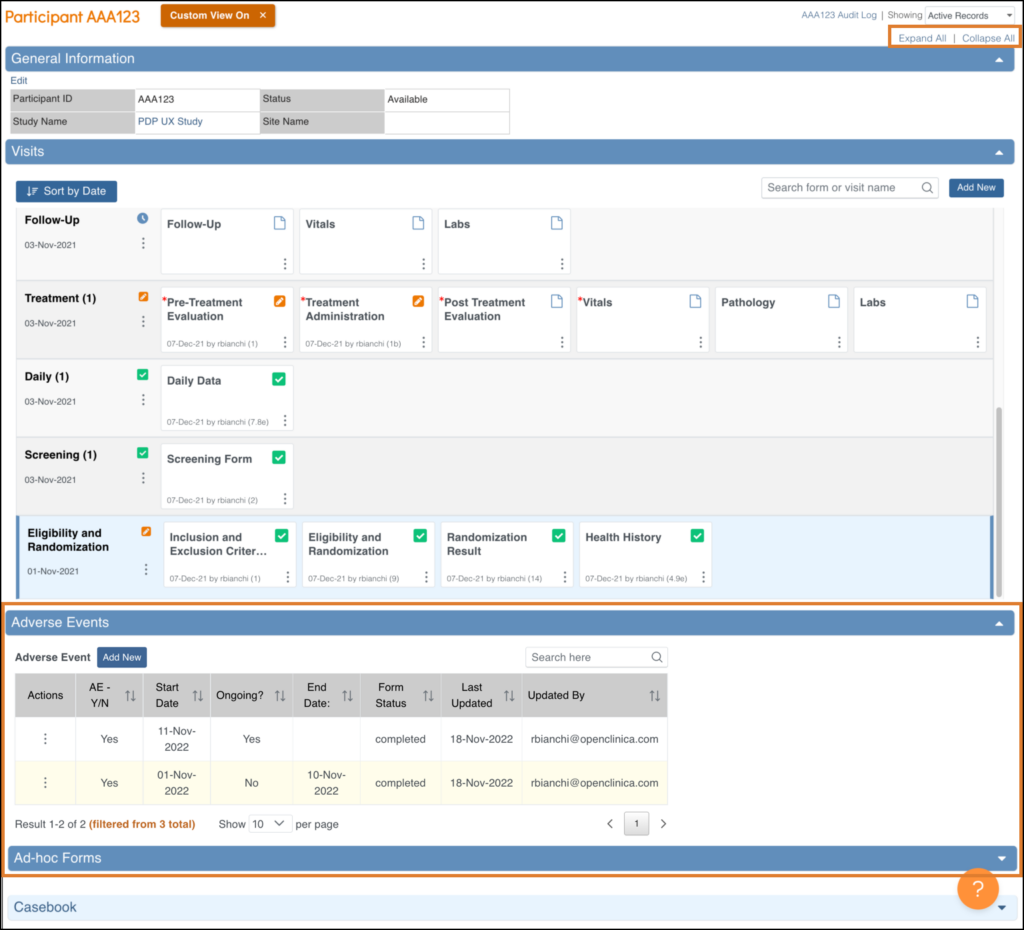
The Participant Details Page
To access the Participant Details Page, click on the Participant ID or the View button that corresponds to that Participant.
The Participant Details Page is divided into sections. Below the General Information section, there are sections for Visits and repeating or non-repeating Common Repeating.
The General Information section displays information about the Participant, the study, the site, and the Participant status.
Common Events collect data that is not necessarily related to a specific visit, but may occur between visits (e.g., adverse events, concomitant medications, or early termination). When you view the Participant Details screen, all Visit-Based Events are listed first, followed by the Common Events.
The Participant Details Page includes Visit-based Events and related forms followed by any common events and related forms.
The page initially opens with the Visit-Based Events displayed and all Common Events collapsed.
To Expand the Common Events Section:
Click the Expand All link to expand all sections including Common Events or click an individual common event section to expand only that section.
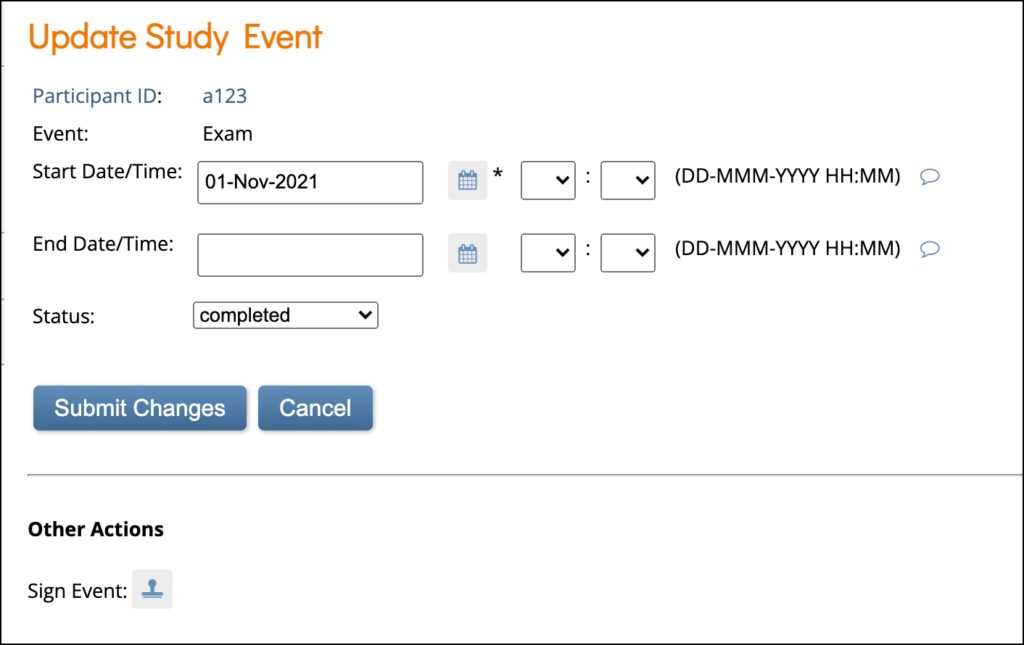
The Update Event Screen
To update an Event status from the Participant Details screen, click the three-dot menu on the event and select Edit.
Available statuses are Data Entry Started, Completed, Stopped, and Skipped.
If you are a Data Manager or Administrator, you can click the Lock Event button at the bottom of the screen to lock the Event.
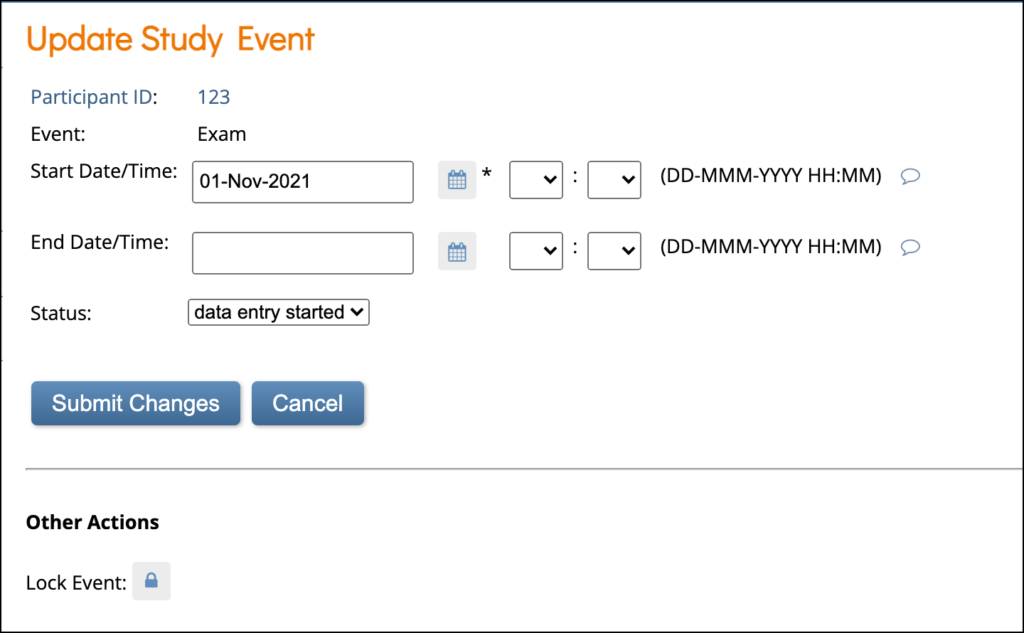
If you are an Investigator or Data Specialist, you can click the Sign Event button to sign. You cannot remove an Event from this screen.
Event and Form Statuses/Actions
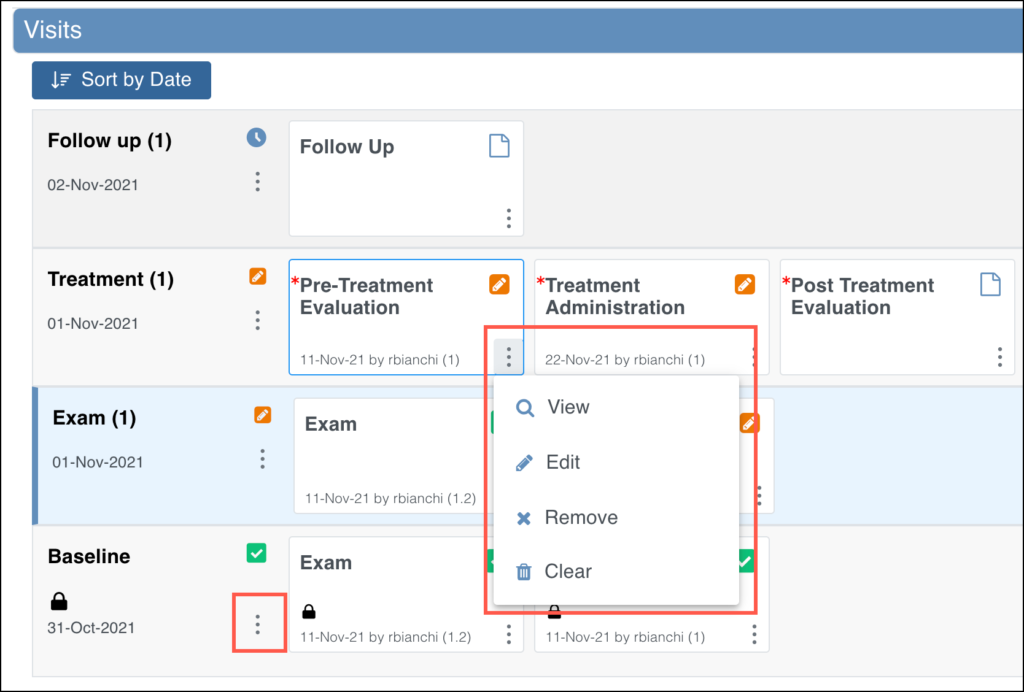
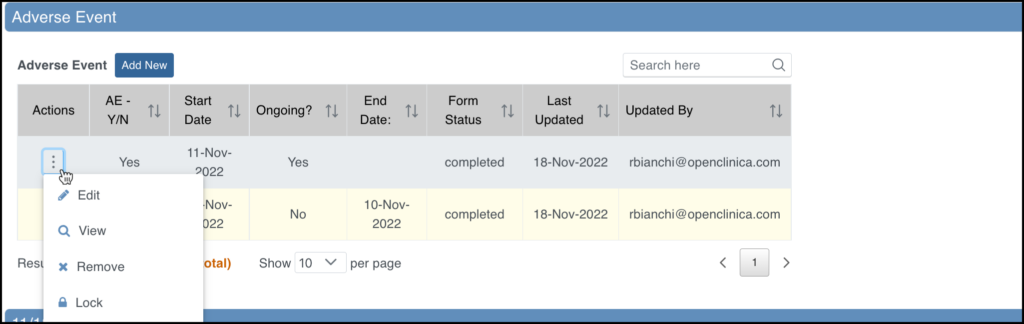
Events appear on the Participant Matrix, Participant Details screen, and many other screens throughout Study Runner. If you click on the Event on the Participant Matrix, you can choose from some of the actions.
Note: If you filter Events with a status of Not Started, the Participant Matrix only includes Events that were previously started and then deleted, i.e. Events that have never been started are excluded.

Form Statuses and Attributes do not appear on the Participant Matrix, but do appear on the Participant Details screen, and many other screens throughout Study Runner.
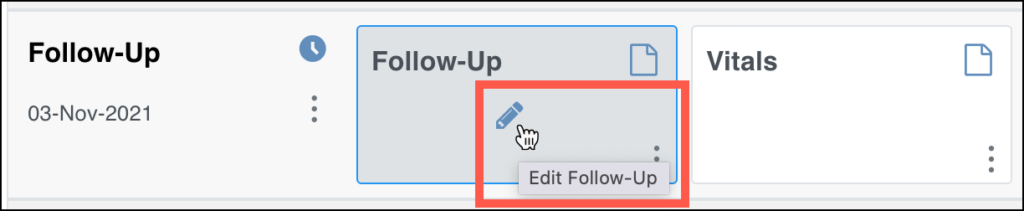
Use the three-dot Actions menu to view all available actions for the Events and Forms.
Alternatively, hover over the form card to view the default action for the form and click the form card to take the default action. The default action is based off of your role and the status of the form.
For Common Events on the Participant Details screen, the Independent Attributes appear in the Form Status column. Actions are available within the menu in the first column in the table.
The form that was opened most recently is indicated by the yellow background.
Below are tables that display the statuses and actions you can take on Events and Forms. Below the tables are instructions on how to perform each action.
Event Statuses
| Icon | Status | Description |
|---|---|---|
 | Not Scheduled | The Event has not been scheduled. Common Events, such as Adverse Events remain in this status throughout the study. |
 | Scheduled | The Event has been scheduled, but no data has been entered. |
 | Data Entry Started | A user has started to enter data, but not all of the Forms in the Event have a status of completed. |
 | Completed | A user has completed data entry for at least one Form in the Event. If further changes are needed in that Form, you are required to provide a reason for change. |
 | Skipped | The user has decided not to complete the Event. Any data that has been entered can still be viewed and/or exported. You can select this setting from the dropdown menu on the Update Event screen when the current status is scheduled. |
 | Stopped | The Participant has temporarily stopped participating in the study. You can select this status from the dropdown menu on the Update Event screen when the current status is data entry started. |
 | Removed | The Event has been removed. Users can still view Forms. This will supersede any of the other statuses. |
Event Attributes
| Icon | Status | Description |
|---|---|---|
 | Signed | The Event has been signed. This icon appears in addition to the status. Note: If an Event is signed, changes to an item in a Form in that Event removes the signature. This also occurs if an Event status is changed from completed, stopped, skipped or not scheduled after being signed. In addition, this changes the Participant Status from signed to available and the Event Status to completed. Archiving/unarchiving or removing a Form will unsign the Event. The exception is that when archiving/unarchiving, a Form with a status of Not Started will not be unsigned. Multiple users can sign an Event, so even if an Event has already been signed, the sign action will still be available. If there are multiple signatures, the most recent one appears on the Form, and the others appear in the Audit Log. |
 | Archived | The Event was archived in Study Designer. This icon appears in addition to the status. |
 | Locked | A Data Manager locked the Event. No data can be added, and the Event cannot be removed. This icon appears in addition to the status. |
Event Actions
| Icon | Action | Description |
|---|---|---|
 | Enter/Edit | Enter or edit data in the Form. |
 | View | View data in the Form. |
 | Remove | Remove the Form from the Event. This is not permanent. |
 | Restore | Restore a Form that was previously removed. All data is restored. |
| Clear Form | Clear all data in the Form. This resets the Form to Not Started and closes all associated queries, but audit history is retained. | |
 | Reassign CRF Version | Change the version of the Form if data has already been entered. |
Form Statuses
| Icon | Status | Description |
|---|---|---|
 | Not Started | The Event has been scheduled, but no data has been entered on the Form. |
 | Initial Data Entry | The user has opened the Form and/or started to enter data, but the Form has not been completed. |
 | Completed | The user has completed data entry on this Form. |
 | Removed | This Form has been removed or the Event it is in has been removed. Users can still view the Form. This will supersede any of the other statuses. |
Form Attributes
| Icon | Attribute | Description |
|---|---|---|
 | Signed | The Form has been signed. This icon appears in addition to the status. Note: If a Form is signed, changes to an item in a Form in that Form removes the signature. Archiving/unarchiving or removing a Form will unsign the Event. The exception is that when archiving/unarchiving, a Form with a status of Not Started will not be unsigned. Multiple users can sign an Form, so even if an Event has already been signed, the Sign Action will still be available. If there are multiple signatures, the most recent one appears on the Form, and the others appear in the Audit Log. |
 | Archived | The Form was archived in Study Designer. This icon appears in addition to the status. |
 | Locked | A Data Manager locked the Form. No data can be added, and the Form cannot be removed. This icon appears in addition to the status. |
A red asterisk (*) on a form card indicates that the form is required.
Form Actions
| Icon | Action | Description |
|---|---|---|
 | Enter/Edit | Enter or edit data in the Form. |
 | View | View data in the Form. |
 | Remove | Remove the Form from the Event. This is not permanent. |
 | Restore | Restore a Form that was previously removed. All data is restored. |
| Clear Form | Clear all data in the Form. This resets the Form to Not Started and closes all associated queries, but audit history is retained. | |
 | Reassign a CRF to a new Version | Change the version of the Form if data has already been entered. |
Events
To View an Event:
Click the View button in the three dots menu on the Participant Details screen.
Edit an Event:
Click the View button in the three dots menu on the Participant Details screen.
To Lock an Event:
If you are a Data Manager you can lock an Event so that no Form data can be entered or edited and Forms cannot be removed, restored, or cleared.
Click the Lock button in the three dots menu on the Participant Details screen.
or
Click the Edit button in the three dots menu on the Participant Details screen. On the Update Study Event screen, click the Lock button under Other Actions.
To Sign an Event:
If you are an Investigator or Data Specialist, you can sign an Event to indicate that all Forms have been reviewed and approved.
Events must have a status of completed, stopped, or skipped before they can be signed. The Event cannot have been archived or removed. To sign a participant event, first review the data captured in the event, then change the status to signed.
Click the Sign button in the three dots menu on the Participant Details screen.
or
Click the Edit button in the three dots menu on the Participant Details screen. On the Update Study Event screen, click the Sign button under Other Actions.
Note: If an Event is signed, changes to an item in a Form in that Event removes the signature. This also occurs if an Event status is changed from completed, stopped, skipped or Not Scheduled after being signed. In addition, this changes the Participant Status from signed to available and the Event Status to completed.
Archiving/unarchiving or removing a form will unsign the Event. The exception is that when archiving/unarchiving, a form with a status of Not Started will not be unsigned.
Multiple users can sign an Event, so even if an Event has already been signed, the Sign action will still be available. If there are multiple signatures, the most recent one appears on the Form, and the others appear in the Audit Log.
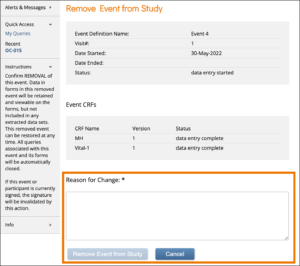
To Remove an Event:
Click the Remove button in the three dots menu on the Participant Details screen. Enter a Reason for Change and click Remove Event from Study.
Note: If an Event is removed after being signed, the signature is invalidated, and if restored, the form must be signed again.
To Restore an Event:
If you have removed an Event you want to restore, click the Restore button in the three dot Event Actions menu on the Participant Details screen. Enter a Reason for Change and click Restore Event to Study.
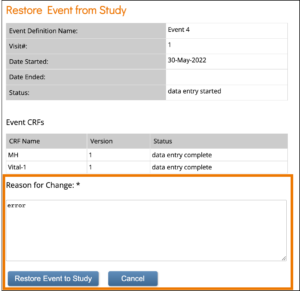
Note: If an Event is removed after being signed, the signature is invalidated, and if restored, the Form must be signed again. When data was entered on the Form prior to the Event being removed, The event this form is in has been removed appears at the top of the Form.
Forms
To View a Form:
Click the View button in the three dots menu on the Participant Details screen.
To Enter/Edit Form Data:
Click Edit in the three dots menu on the Participant Details screen. If you have permission to access the Form, you can start entering or editing data.
If you edit a form that has already been completed, you must enter a reason for change.
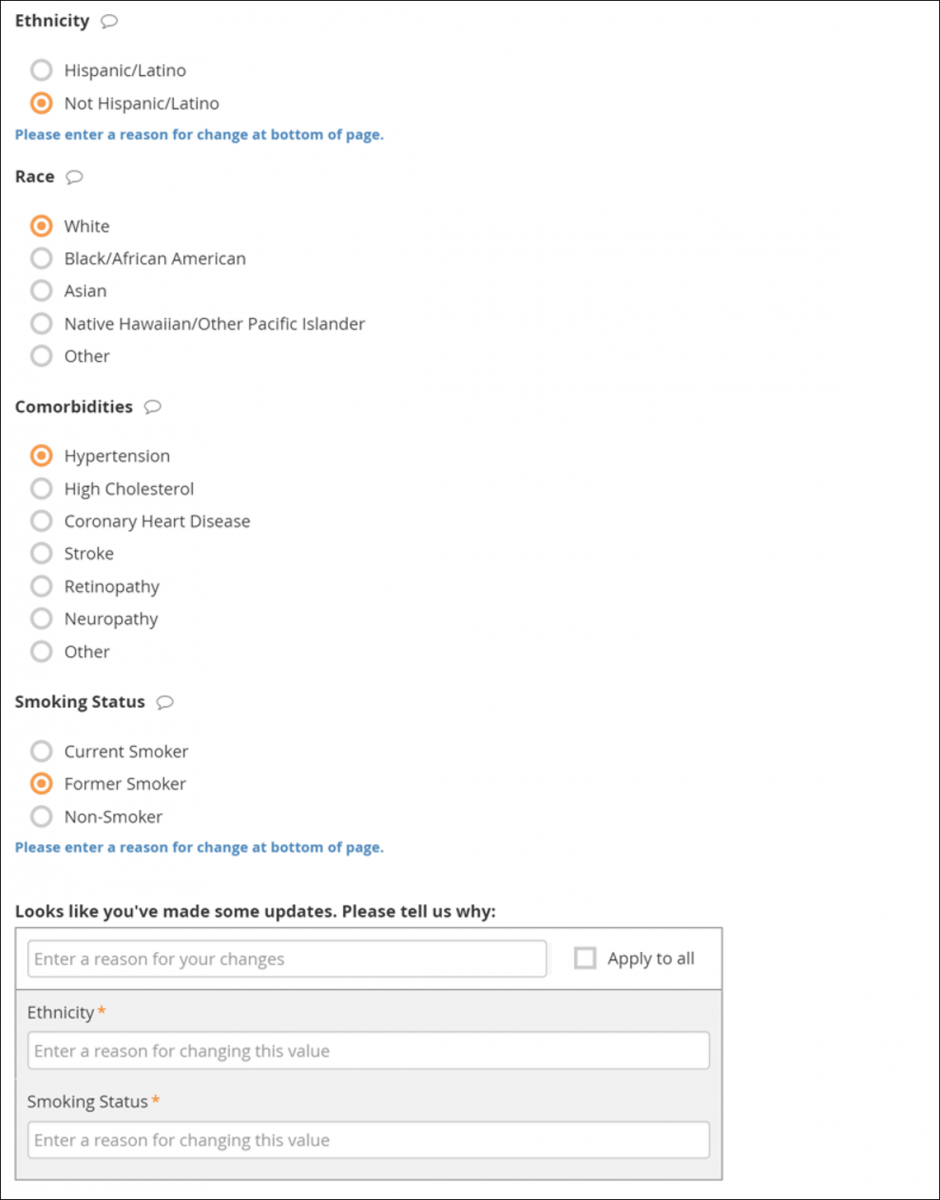
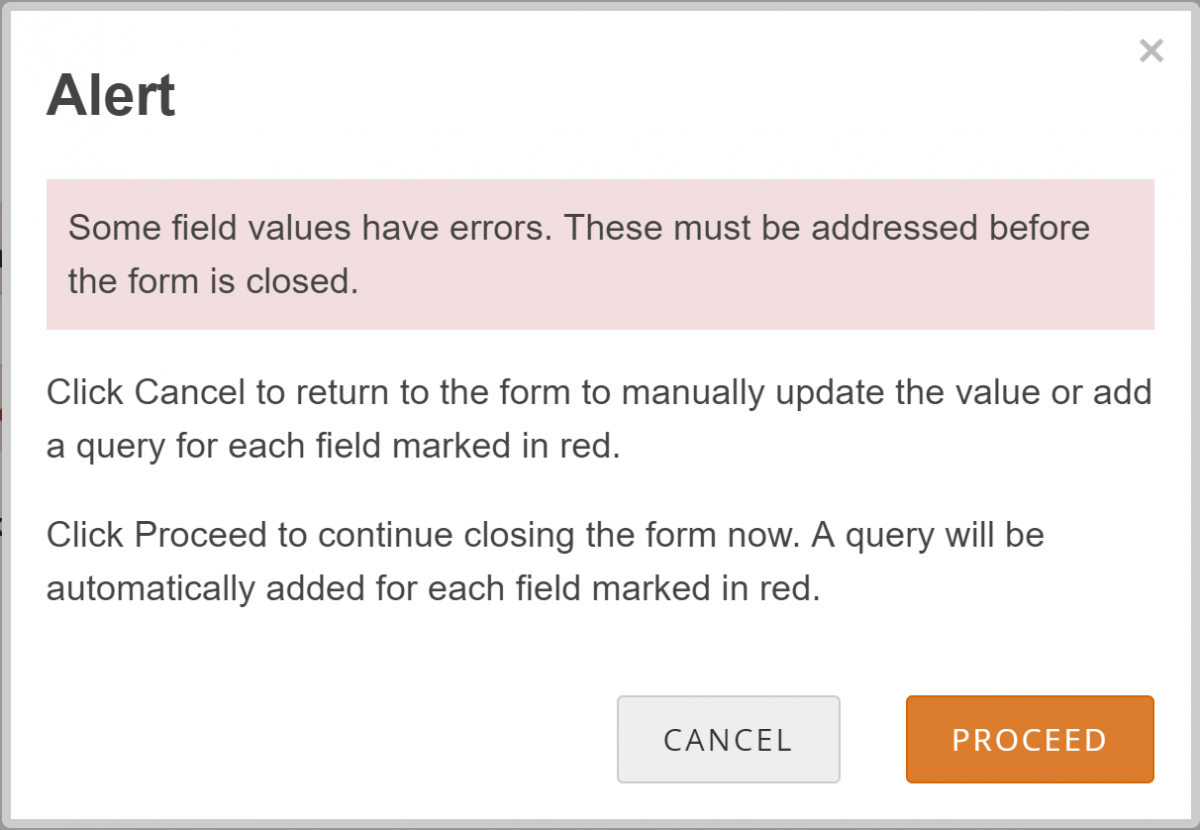
If your changes do not meet form requirements, such as constraints, you will see a message alerting you that specific values have errors and must be changed.
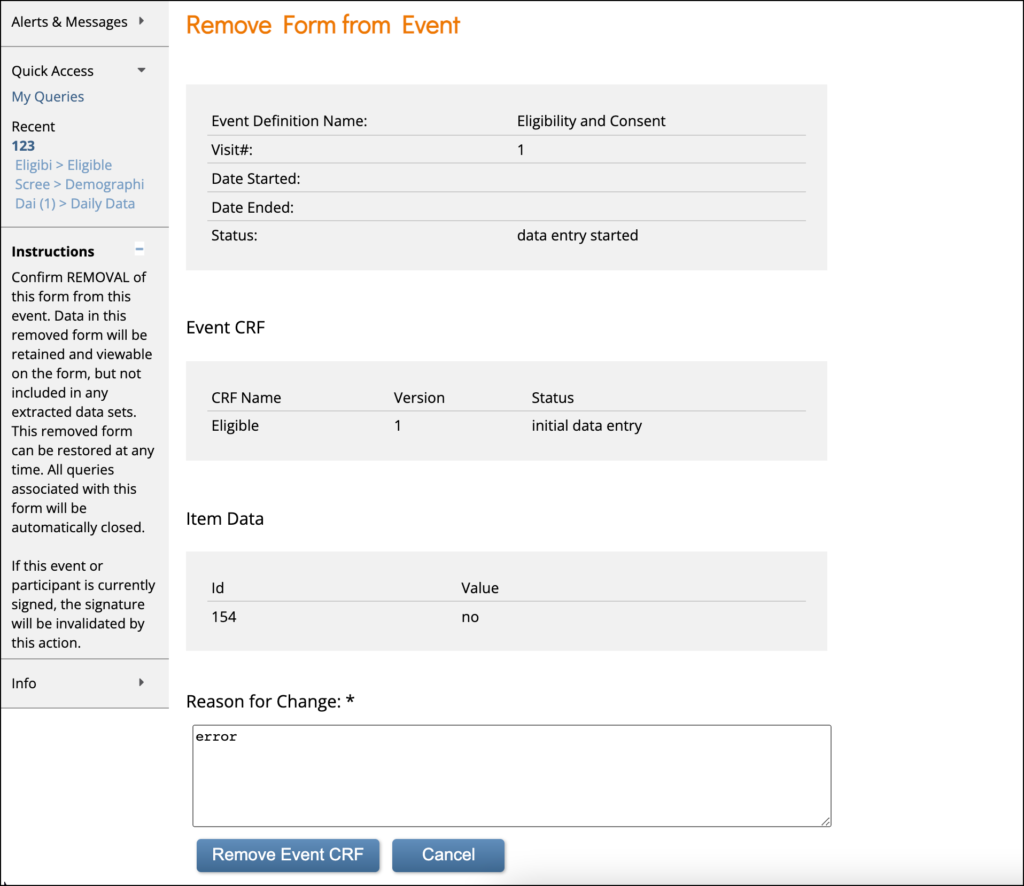
To Remove a Form:
Click the Remove button in the three dots menu on the Participant Details screen. Enter a Reason for Change and click Remove Event CRF.
Note: If a Form is removed after being signed, the signature is invalidated, and if restored, the form must be signed again.
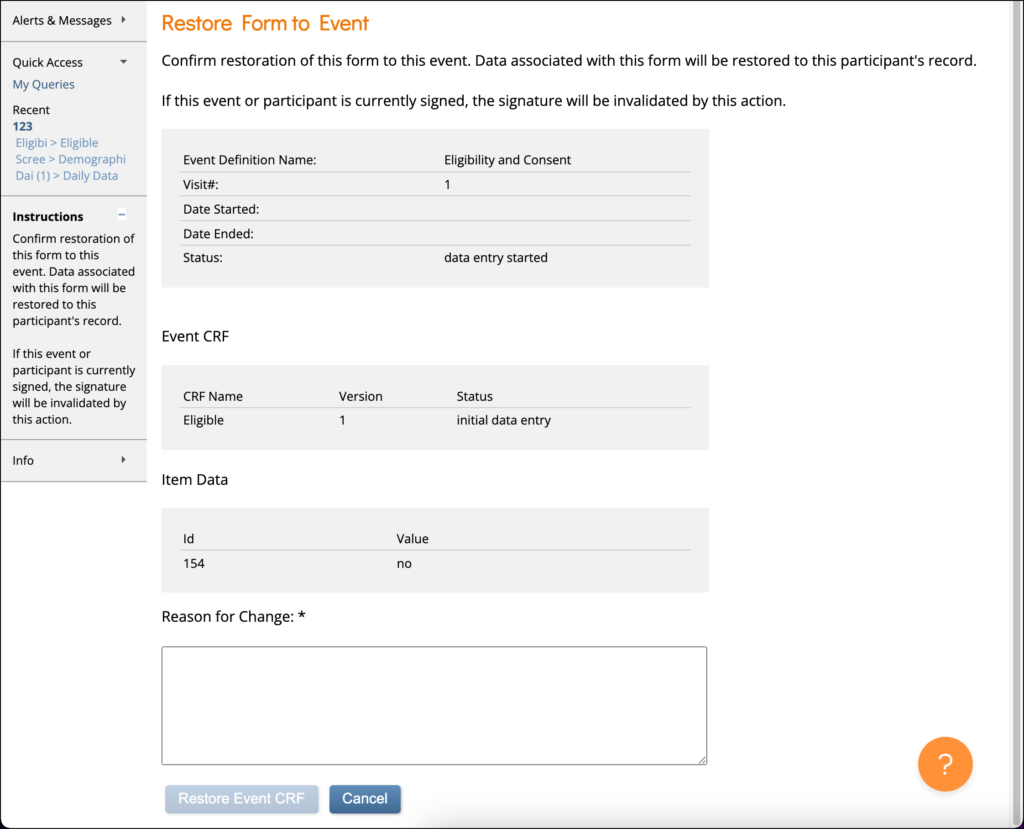
To Restore a Form:
Click the Restore button in the three dots menu on the Participant Details screen. Enter a Reason for Change and click Restore Event CRF.
Note: If a Form is removed after being signed, the signature is invalidated, and if restored, the Form must be signed again.
To Clear a Form:
To clear form data, click the Clear Form button in the three dots menu on the Participant Details screen. The system does the following:
- Clears all data from the Form
- Closes all queries associated with the Form
- Removes a signature, if present
- Sets the Status of the Form to Not Started
- Records this action in the Participants Audit Log.
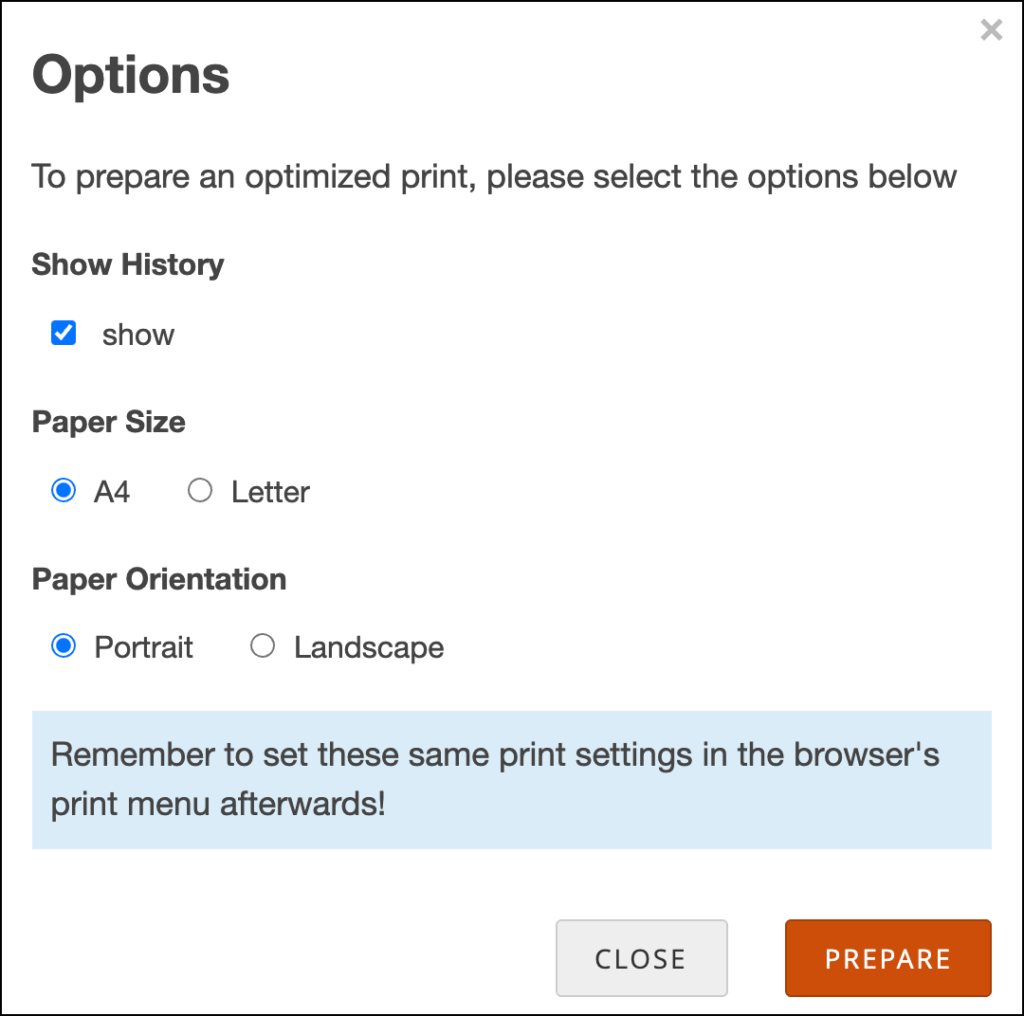
To Print a Form:
- Click the Print button that appears at the top of the screen for each Form.
- Enter information on the Options screen
- (Optional) Check the checkbox next to Show to include Query and Edit History on the printed Form.
- Select a Paper Size.
- Select a Paper Orientation.
Note: The Paper Size and Paper Orientation fields appear only for Forms with the Style of theme-grid and printing options must be set correctly in your browser for these settings to take effect.
- Click the Prepare button to show a preview.
- Click the Print button.
Queries
Review the Data and/or Add a Manual Query:
- Click the Cancel button.
- Review the value to make sure you entered it correctly.
- If the value is correct, create the query that includes an appropriate message for that value. Otherwise, change the value.
Allow the System to Automatically Create a Query for the Value in Question:
- Click the Proceed button.
- The system auto-generates a query based on the default message text defined in the Form.