- From either of the following websites, download the Windows Service Installer Version, apache-tomcat-6.0.32.exe, and save it to c:ocinstall:
- Run
c:ocinstallapache-tomcat-6.0.32.exe
The Apache Tomcat Setup Installation Wizard opens. - When the Open File – Security Warning message displays, click Run.
- On the Welcome screen of the Apache Tomcat Setup Installation Wizard, click Next.
The License Agreement screen displays. - Click I Agree to accept the agreement.
The Choose Components screen displays. - Click Next to accept the default values.
The Configuration screen displays. - Click Next to accept the default values.
The Java Virtual Machine screen displays. - Click …, then select the path you installed the JDK into:
c:ocjdk1.6.0_24
The screen now should look like this: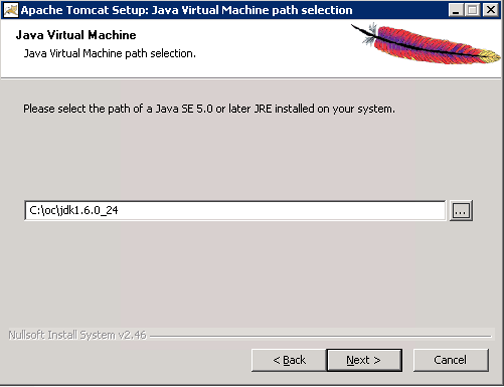
- Click Next.
The Choose Install Location screen displays. - Edit the Destination Folder to be c:octomcat. The screen should look like this:
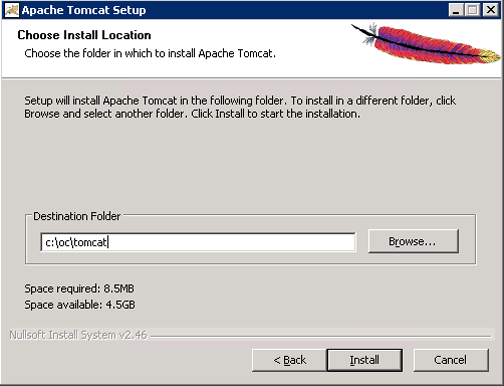
- Click Install to start the installation.
When the installation is finished, the Completing the Apache Tomact Setup Wizard screen displays. - Complete the screen as follows:
- Clear the Run Apache Tomcat checkbox.
- Clear the Show Readme checkbox.
The screen should now look like this:

- Click Finish.
- Create the directory c:octomcatoldwebapps.
- Move the web apps provided with Tomcat that OpenClinica does not need by moving the contents of c:octomcatwebapps to c:octomcatoldwebapps.
- OpenClinica 4 User Documentation
- 1 Administration
- 2 Building Forms and Studies
- 3 Getting Started
- 3.1 How to Get Help
- 3.2 For OC3 Users
- 3.3 Logging In
- 3.4 OpenClinica Basics
- 3.4.1 OpenClinica Navigation
- 3.4.2 The Participant Matrix
- 3.4.3 Adding a Participant
- 3.4.4 The Participant Details Screen
- 3.4.5 Events
- 3.4.6 Viewing and Entering Data on Forms
- 3.4.7 Your Home Screen
- 3.4.8 Managing Your Account
- 3.4.9 Frequently Used Screens
- 3.4.10 Frequently Used Terms
- 3.4.11 How to Log Out
- 4 Getting Data for Your Study: Reports and Extracts
- 5 Launching and Managing Studies
- 6 Using OpenClinica as a CRC
- 7 Using OpenClinica as an Investigator
- 8 Using OpenClinica as a Monitor
- 9 Using OpenClinica as a Data Manager
- 10 Importing Data
- 11 Completing Your Study
- 12 OpenClinica eConsent
- 13 OpenClinica Insight
- 14 OpenClinica Participate
- 15 OpenClinica Randomize
- 16 How and When to Use APIs
- 16.1 CDISC ODM XML
- 16.2 Clinicaldata (Import and Retrieve Clinical Data)
- 16.3 Participants (Add or Update a Participant)
- 16.4 Participants/Bulk (Add and Update Bulk List of Participants)
- 16.5 Retrieve Participant Contact Information
- 16.6 Events (Create and Update Single Study Event)
- 16.7 Bulk Create and Update Study Events
- 16.8 Bulk Actions Log
- 16.9 Participants (Get Participants at Study Level or Site Level)
- 17 Knowledge Articles
- 18 Help Index
- OpenClinica 3 User Documentation
- 1 Monitor and Manage Data
- 2 Extract Data
- 2.1 Create Dataset
- 2.2 View and Manage Datasets
- 2.3 Edit Dataset
- 2.4 Download Datasets
- 2.5 Formats for Dataset Files
- 2.6 SPSS File Specifications
- 2.6.1 SPSS Conceptual Mapping
- 2.6.2 Creation of SPSS Data Definitions from OpenClinica CRF Item Properties
- 2.6.3 Use of [EVENT HANDLE] and [CRF HANDLE] Appended to Variable Names
- 2.6.4 Mapping between SPSS types and OpenClinica CRF ITEM Data Types
- 2.6.5 Handling of OpenClinica Null values
- 2.6.6 Mapping Between SPSS Values and OpenClinica RESPONSE_OPTIONS
- 2.7 Data Mart (OpenClinica Enterprise Edition)
- 2.8 Importing OpenClinica Data Into R
- 2.9 Importing OpenClinica Data into STATA
- 3 Study Setup
- 3.1 View Study
- 3.2 Build and Modify Study
- 3.3 Create Study Edit Details
- 3.4 Create and Modify Case Report Forms (CRFs)
- 3.4.1 About CRFs in OpenClinica
- 3.4.2 OpenClinica eCRF Specifications
- 3.4.3 Overview of Creating and Modifying CRFs
- 3.4.4 Designing CRFs
- 3.4.5 Create a CRF
- 3.4.6 Providing Content for a Defined CRF
- 3.4.7 Upload a Defined CRF
- 3.4.8 Table of CRFs
- 3.4.9 Edit the Defined CRF Name and Description
- 3.4.10 Create a New Version of a Defined CRF
- 3.4.11 Remove, Restore, and Delete Defined CRFs
- 3.5 Create and Modify Event Definitions
- 3.6 Create and Modify Subject Group Classes
- 3.7 Create Rules
- 3.8 Create and Modify Sites
- 3.9 Users and Roles at Current Study or Site
- 4 Rules
- 5 Users and Roles
- 5.1 About User Roles and Types
- 5.2 Permissions for User Roles and Types
- 5.2.1 Summary of Features Available to User Roles
- 5.2.2 Submit Data Module - Permissions
- 5.2.3 Monitor and Manage Data Module - Permissions
- 5.2.4 Extract Data Module - Permissions
- 5.2.5 Study Setup Module - Permissions
- 5.2.6 Administration Module - Permissions
- 5.2.7 Module for Other Features - Permissions
- 5.3 View, Assign, and Modify Users and Roles
- 5.4 User Matrix
- 5.5 Light Weight Directory Access Protocol(LDAP) Users
- 6 Administration
- 7 Printing CRFs
- 8 OpenClinica Participate
- 9 OpenClinica Randomize
- 10 OpenClinica Installation and Upgrade Guides
- 10.1 System Requirements
- 10.2 Install OpenClinica
- 10.3 Install OpenClinica 3.4
- 10.4 Install OpenClinica 3.3 on Linux
- 10.5 Install OpenClinica 3.3 on Windows
- 10.6 Upgrade to OpenClinica 3.3 on Linux
- 10.7 Upgrade to OpenClinica 3.3 on Windows
- 10.8 Install OpenClinica 3.2 on Linux
- 10.9 Install OpenClinica 3.2 on Windows
- 10.10 Upgrade to OpenClinica 3.2 on Linux
- 10.11 Upgrade to OpenClinica 3.2 on Windows
- 10.12 Install OpenClinica 3.1.x on Linux
- 10.12.1 Overview of Installation on Linux Systems
- 10.12.2 Operating System Requirements
- 10.12.3 Download Installation Files
- 10.12.4 Install Java
- 10.12.5 Install Tomcat
- 10.12.6 Install PostgreSQL Database
- 10.12.7 Set Up the PostgreSQL Database
- 10.12.8 Deploying OpenClinica within Tomcat
- 10.12.9 Deploying OpenClinica Web Services within Tomcat
- 10.12.10 Set Tomcat to Start
- 10.12.11 Configure OpenClinica for Optimum Performance
- 10.12.12 Configure the OpenClinica Application
- 10.12.13 Configure the OpenClinica Web Services
- 10.12.14 Description of datainfo.properties File
- 10.12.15 Description of datainfo.properties File for Web Services
- 10.12.16 Verify Access to OpenClinica
- 10.12.17 Verify Access to OpenClinica Web Services
- 10.12.18 Configure Tomcat to Use HTTPS
- 10.12.19 Verify the Installation
- 10.13 Install OpenClinica 3.1.x on Windows
- 10.13.1 Overview of Installation on Windows Systems
- 10.13.2 Software Dependencies and Operating System Requirements
- 10.13.3 Install Java
- 10.13.4 Install PostgreSQL Database
- 10.13.5 Install Tomcat
- 10.13.6 Install OpenClinica Package
- 10.13.7 Install OpenClinica Web Services Package
- 10.13.8 Set Up the PostgreSQL Database
- 10.13.9 Configure Tomcat
- 10.13.10 Configure OpenClinica for better Performance
- 10.13.11 Configure the OpenClinica Application
- 10.13.12 Configure the OpenClinica Web Services
- 10.13.13 Start Tomcat
- 10.13.14 Verify the Installation
- 10.13.15 Verify the Installation of OpenClinica Web Services
- 10.14 Upgrade to OpenClinica 3.1.x on Linux
- 10.14.1 Overview of the Upgrade Process on Linux Systems
- 10.14.2 Overview of the Upgrade Process for Web Services on Linux Systems
- 10.14.3 Back Up OpenClinica
- 10.14.4 Upgrade OpenClinica
- 10.14.5 Upgrade OpenClinica Web Services
- 10.14.6 Manual Database Updates
- 10.14.7 Verify the Upgrade
- 10.14.8 Verify the Upgrade for OpenClinica Web Services
- 10.15 Upgrade to OpenClinica 3.1.x on Windows
- 10.15.1 Overview of the Upgrade Process on Windows Systems
- 10.15.2 Software Dependencies and System Requirements
- 10.15.3 Back Up OpenClinica
- 10.15.4 Manual Database Updates
- 10.15.5 Verify the Upgrade
- 10.15.6 Upgrade OpenClinica
- 10.15.7 Back Up OpenClinica Web Services
- 10.15.8 Verify the Upgrade for OpenClinica Web Services
- 10.15.9 Upgrade OpenClinica Web Services
- 10.16 OpenClinica VM Image
- 10.17 Configuring an Oracle Database for OpenClinica (Deprecated)
- 10.18 Operating System Installation
- 11 Glossary
- 12 Knowledge Articles
- 13 OpenClinica Community Tools and Tips
- 14 OpenClinica Conference Presentations
- 15 Submit Data
- 15.1 Add Subject
- 15.2 Schedule an Event
- 15.3 View and Update Events
- 15.4 Entering Data for an Event Into CRFs
- 15.5 Import Data
- 15.6 Notes and Discrepancies
- 15.7 Remove, Restore, and Delete Study Events and CRFs for a Subject
- 15.8 Subject Matrix
- 15.8.1 Overview of Subject Matrix
- 15.8.2 View and Enter Event Data in Subject Matrix
- 15.8.3 Show More Information About Subjects in Subject Matrix
- 15.8.4 Find and Organize Data in Subject Matrix
- 15.8.5 Actions for a Subject in Subject Matrix
- 15.8.6 View Event Details in Subject Matrix
- 15.8.7 View and Edit Details for a Subject in Subject Matrix
- 16 Overview of OpenClinica
- OpenClinica 3 Technical Documentation
- 1 REST Web Services
- 2 SOAP Web Services
- 3 CRF Template Elements
- 4 Database Schema
- 5 Date Format Specifications
- 6 Item Data Specifications
- 7 Internationalization and Localization
- 8 System Administration
- 9 Build a Data Extract or Reporting plug-in
- 10 CDISC ODM Representation in OpenClinica
- 10.1 CDISC ODM - General Issues
- 10.2 Limitations on Support for Generated and Received ODM Files
- 10.3 Entities and Elements
- 10.4 OIDs and Clinical Data Keys
- 10.5 File Properties, Transactions and Element Ordering
- 10.6 Study Metadata Versions and Sites
- 10.7 Data Representations in ODM XML (Extract)
- 10.8 Data Representations in ODM XML (Import)
- 10.9 Item Data Types
- 10.10 Mapping of OpenClinica Elements to ODM
- 10.11 CDISC ODM XML Schema
- 10.12 Global Case Report Form in ODM repesentation
- 11 Developing for OpenClinica
- LMS FAQ's
- Release Notes (OC4)
- 1 OpenClinica 4 – Release Notes 2024
- 2 OpenClinica 4 – Release Notes 2023
- 3 OpenClinica 4 - Release Notes 2022
- 4 OpenClinica 4 - Release Notes 2021
- 5 OpenClinica 4 - Release Notes 2020
- 6 OpenClinica 4 - Release Notes 2019
- 7 Release Notes - OpenClinica Insight - 2019
- 8 OpenClinica 4 - Release Notes 2018
- 9 Release Notes - OpenClinica Insight - 2018
- 10 OpenClinica 4 - Release Notes 2017
- Release Notes (OC3)
- 1 Release Notes – OpenClinica 3.17
- 2 Release Notes - OpenClinica 3.16
- 3 Release Notes - OpenClinica 3.15
- 4 Release Notes - OpenClinica 3.14
- 5 Release Notes - OpenClinica 3.13
- 6 Release Notes - OpenClinica 3.12
- 7 Release Notes - OpenClinica 3.11
- 8 Release Notes - OpenClinica 3.10
- 9 Release Notes - OpenClinica 3.9
- 10 Release Notes - OpenClinica 3.8
- 11 Release Notes - OpenClinica 3.7
- 12 Release Notes - OpenClinica 3.6
- 13 Release Notes - OpenClinica 3.5
- 14 Release Notes - OpenClinica 3.4.1
- 15 Release Notes - OpenClinica 3.4
- 16 Release Notes - OpenClinica 3.3
- 17 Release Notes - OpenClinica 3.2
- 18 Release Notes - OpenClinica 3.1.4.1
- 19 Release Notes - OpenClinica 3.1.4
- 20 Release Notes - OpenClinica 3.1.3.1
- 21 Release Notes - OpenClinica 3.1.3
- 22 Release Notes - Older Releases
- Data Mart Guide