6.2.1 Create a New User
Create a new user when someone needs to work with your OpenClinica system and they have not worked with it before. To create a new user:
- From the Tasks menu, in the Administration module, select Users.
The Administer Users page opens. - Click the Create New User link (near the top of the page).
The Create a User Account page opens.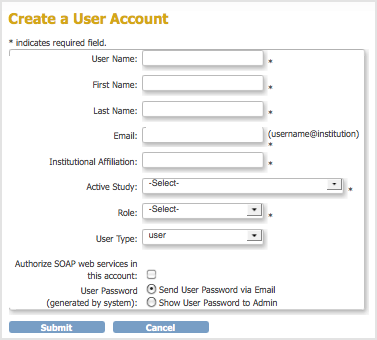
- Complete the fields. For information about the fields, see About User Information in the Administration Module.
- Click Submit.
The View User Account page opens, presenting the information for the user you just created. The Alerts and Messages sidebar panel reports that you successfully added the user, and if you selected the option “Show User Password to Admin”, reports the system-generated, temporary password; record the password to provide to the user.
6.2.2 About User Information in the Administration Module
The following information is helpful when working with user accounts in the Administration module:
- User Name: At least five alphanumeric characters. Can include underscores (_). Is case-sensitive. Cannot be the same as any other user name in the system.
- Email: Address for the user. Required for messages that the OpenClinica system sends, such as notification when a job completes, or a temporary password if the user requests a new password.
- Status: The status is “available” if the user can be assigned to Studies and Sites, or “removed” if the user has been removed from the OpenClinica system and cannot be assigned to Studies and Sites.
- Active Study: When you create a user, you assign them to a Study or Site, called the Active Study. After that, you can assign the user to more Studies or Sites, or remove the user from any Study or Site.
- User Type or Business Administrator/Technical Administrator: When you create a user, you assign them a User Type of “user,” “business administrator,” or “technical administrator.” After creating the user, you can change the User Type. For more information, see About User Roles and Types.
- Roles: All Roles the user has in all Studies and Sites in the OpenClinica system. When you first create a user, you assign them a role to the Active Study. After that, you can assign the user to different Roles at other Studies and to Sites within the Studies, and you can change or remove the Role for each Study or Site the user is assigned to. For more information, see About User Roles and Types.
- Owner: The OpenClinica user who created the user whose information you are viewing.
- Authorize SOAP web services in this account: Select this option to allow the user to work on SOAP requests.
- User Password: The system generates an initial, temporary password for a new user. When you select the Send User Password via Email option, the system sends the password to the user’s email address, which you specified as part of creating the user’s account. When you select the Show User Password to Admin option, the system displays the password to you after you complete creating the user or resetting the user password.
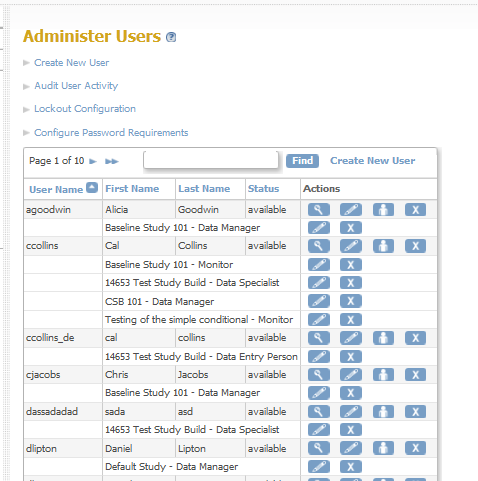
6.2.3 View and Modify User Information
Access the Administer Users page to view information about all users in your OpenClinica system. To access the page, from the Tasks menu, in the Administration module, select Users.
The Administer Users page includes a table that reports the Studies each user is assigned to and their Role in each Study. the table shows users for all Studies in your OpenClinica system, regardless of the current Study or Site. For more about the terms and values, see About User Information in the Administration Module.
For each user, there are at least two rows:
- The first row is for the user in the OpenClinica system.
- There are one or more rows for the user and their role at each Study or Site they are assigned to.
6.2.3.1 View User Information
If you want to view complete information about a user in your OpenClinica system:
- From the Tasks menu, in the Administration module, select Users.
The Administer Users page opens. - For the user whose information you want to view, click the View icon in the Actions column.
The View User Account page opens; for more about the terms and values, see About User Information in the Administration Module.
6.2.3.2 Edit User Information
You can edit the following information about a user from the Administration module:
- First and Last Name
- Email address
- Institutional Affiliation
- User Type
- SOAP web services authorization
- User password (reset it to a new, temporary password)
For more about the terms and values, see About User Information in the Administration Module.
To edit the information:
- From the Tasks menu, in the Administration module, select Users.
The Administer Users page opens. - For the user whose information you want to edit, click the Edit icon in the main (first) row of the Actions column (not the Edit icon in any of the following rows for that user).
The Edit a User Account page opens.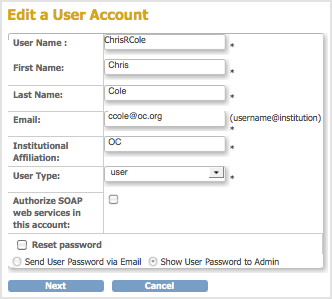
- Change the available values and options (User Name cannot be edited). For details, see About User Information.
- Click Next.
The Edit a User Account – Confirmation Screen opens. - Verify that the information is correct, then click Confirm.
The Administer Users page opens, and the Alerts and Messages sidebar panel reports the status of the user information update as successful or not.
6.2.3.3 Change User Role
To change the user Role for a Study or Site that the user is already assigned to, follow these steps.
- From the Tasks menu, in the Administration module, select Users.
The Administer Users page opens. - For the user whose Role you want to change, click the Edit icon in the Actions column of the row for that Study or Site (not the first row in the table for that user).
The Modify Role page for the user and Study or Site opens.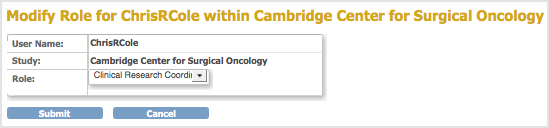
- From the Role drop-down list, select the Role you want to assign to the user. If the user is currently assigned at the Site level, only Roles appropriate to the Site level display. Similarly, if the user is currently assigned to the Study level, only Roles appropriate to the Study level display.
- Click Submit.
The Administer Users page opens, and the Alerts and Messages sidebar panel reports the status of the user role change as successful or not.
Note: You cannot use the above steps to change the user Role from a Site-level Role to a Study-level Role, or from a Study-level Role to a Site-level Role. Instead, add the new Role by following the steps in Assign User to Study or Site and to Role. The user can then have a Role at both the Study and Site levels, or you can remove the original Role by following the steps in Remove or Restore User.
6.2.3.4 Assign User to Study or Site and to Role
From the Administration module, you can assign a user to a Role at any Study or Site that they are not already assigned to. This includes:
- Assigning a user to a Study where they are not currently assigned to the Study or any Sites within it.
- Assigning a user to a Site when they are not currently assigned to the parent Study and are not assigned to any other Sites within the Study.
- Assigning a user to a Site within a Study if they are already assigned at the Study level or to another Site in the Study.
- Assigning a user to the Study level if they are already assigned to one or more Sites within the Study.
To assign a user to a Study or Site:
- From the Tasks menu, in the Administration module, select Users.
The Administer Users page opens. - For the user you want to assign, click the Set Role icon in the Actions column.
The Set User Role page opens for that user.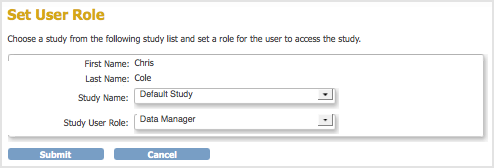
- From the Study Name drop-down list, select the Study or Site to which you want to assign the user. The list does not include entries for Studies and Sites where the user is already assigned.
- From the Study User Role drop-down list, select the user Role at the selected Study or Site. The list only includes Roles appropriate for the level (Study or Site) that you selected.
- Click Submit.
The Administer User page opens. The table includes an entry for the assignment you just completed.
6.2.3.5 Remove or Restore User
Remove User from Study or Site
You can remove a user from a Study or Site so they can no longer access it:
- From the Tasks menu, in the Administration module, select Users.
The Administer Users page opens. - For the user you want to remove, click the Remove icon in the Actions column in that row for the user (not in the main row for the user).
- Click OK in the confirmation window.
The user is removed, but is still listed in the Administer Users table for that Study or Site with only a Restore icon in the Actions column.
You can also remove a user from the current Study or Site using the Study Setup module.
Remove User from System
Using the Administration module, you can remove a user from your OpenClinica system so that they cannot log in and cannot be assigned to any Studies or Sites.
- From the Tasks menu, in the Administration module, select Users.
The Administer Users page opens. - For the user you want to remove, click the Remove icon in the main (first) row of the Actions column (not in any of the following rows) for that user.
- Click OK in the confirmation window.
The user is removed, but is still listed in the Administer Users table with only a Restore icon in the Actions column.
Restore User
After removing a user, you can restore the account so the user can regain access to the Site, Study, or the OpenClinica system. To restore a user:
- From the Tasks menu, in the Administration module, select Users.
The Administer Users page opens. - If the user you want to restore had been removed from all Studies and Sites:
- Click the Restore icon in the main (first) row of the Actions column (not in any of the following rows) for that user.
- Click OK in the confirmation window.
The user is restored to the OpenClinica system. - If the User Type is Business Administrator or Technical Administrator, reset the user’s password or they will not be able to log in: for instructions, see Edit User Information. For User Type of User, the user can log in using the same password they used before being removed and restored.
- Restore the user to the specific Study or Site to which you want them to regain access by clicking the Restore icon in the Actions column in that row for the user.
- Click OK in the confirmation window.
The user is restored to that Study or Site.
6.2.4 Monitor User Access
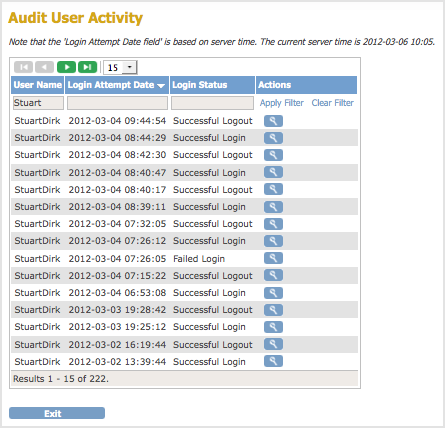
You can view all attempts users make to access OpenClinica, and for each attempt, whether they are successful or not, the user name, and the date and time. To audit user activity:
- From the Tasks menu, in the Administration module, select Users.
The Administer Users page opens. - Click the Audit User Activity link.
The Audit User Activity page opens, presenting a table of all attempts to access OpenClinica.
You can sort the table by any of the columns by clicking the column header; click again to reverse the sort order in that column.
You can filter the list of attempts. Type a string in the filter field for one or more columns (the fields are directly beneath the column headers) and press Enter. The table shows only those attempts whose values match the strings you typed. After filtering, to show all entries again, click Clear Filter.
At the bottom of the page is the total number of pages that match your criteria. To view other pages, use the arrows at the top of the table. To change the number of attempts shown per page, select the value from the drop-down list that is located just above the table.
6.2.5 Configure Access to OpenClinica
To enhance system security, you can configure OpenClinica so that authorized users are only allowed a specified number of failed login attempts, and after that, they are locked out. By default, the feature is disabled. After a user has been locked out, you unlock them so they can successfully log in again.
6.2.5.1 Set Lockout Feature
To set the lockout feature:
- From the Tasks menu, in the Administration module, select Users.
The Administer Users page opens. - Click the Lockout Configuration link.
The Lockout Configuration page opens: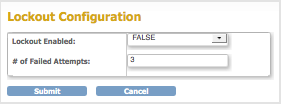
- To activate the lockout feature, set the Lockout Enabled value to TRUE.
- For the # of Failed Attempts, enter a value between 1 and 25.
- Click Submit.
The system displays a confirmation message.
OpenClinica tracks the number of consecutive failed login attempts. After that number equals the value specified for the # of Failed Attempts, the user cannot log in to OpenClinica. For the user to regain access to OpenClinica, an administrator must unlock the user’s account in the Administer Users interface.
6.2.5.2 Unlock a Locked-Out User
If a user fails to log in successfully more than the allowed number of times as specified via the lockout feature, you must unlock the user account using the Administration module. To unlock a user account:
- From the Tasks menu, in the Administration module, select Users.
The Administer Users page opens. - Click the Unlock icon
 in the Actions column for the user whose account you want to unlock.
The user account is unlocked. The unlock icon no longer appears in the Administer Users table. - The user can log in to OpenClinica again using the new, temporary password sent to the user’s email account.
6.2.5.3 Additional Password Configuration Options
You can also specify these configuration options for managing user passwords in the datainfo.properties file:
- The default method for how a user receives their password, either via email or from the business administrator.
- If a user must change their password on the first log in.
- If a user’s password should expire, and if so, the length of time until it expires.
For details, see Configuring the OpenClinica Application.
6.2.5.4 Configure Password Requirements
Starting with OpenClinica 3.1.3, in the Administration module, the Configure Password Requirements page allows an administrator to configure the password policy for your OpenClinica system. A password policy that forces users to use strong passwords makes your system less vulnerable to bruteforce attacks that try to guess a user’s password.
To access the Configure Password Requirements page, from the Tasks menu, in the Administration module, select Users, then Configure Password Requirements.

In the Configure Password Requirements, you can define the values for the following options:
- Minimum length: minimum number of characters a password may contain. If this value is set to zero or any negative number, OpenClinica will not check the minimum length of the user’s password. However, disabling the minimum password length does not allow an user account to have no password – in this case valid password consists of at least one character.
- Maximum length: maximum number of characters a password may contain. If this value is set to zero or any negative number, OpenClinica will not check the maximum length of the user’s password.
- Passwords must contain: Specifiy types of characters that must be present in a password. The character types groups are Lower Case Characters, Upper Case Characters, Digits and Special Characters. The following characters are considered special characters: ! @ # $ % & * ( )
- User is required to change password (after first login): Should the user be forced to change his password upon first login to OpenClinica. When OpenClinica creates a user account, a password is generated and sent via email to the email address configured in the user’s account or shown to the administrative user who created the account. This setting is used to ensure the user won’t be able to use the system-generated password after the first login. A change in this configuration will be effective only after restarting the OpenClinica application server.
- Password expiration time (in days): Number of days after a password is set to be considered expired. Once a user authenticates to OpenClinica and their password is expired, the system will prompt the user to change their password. If this value is set to zero or any negative number, OpenClinica never consider a user’s password expired. A change in this configuration will be effective only after restarting the OpenClinica application server.